

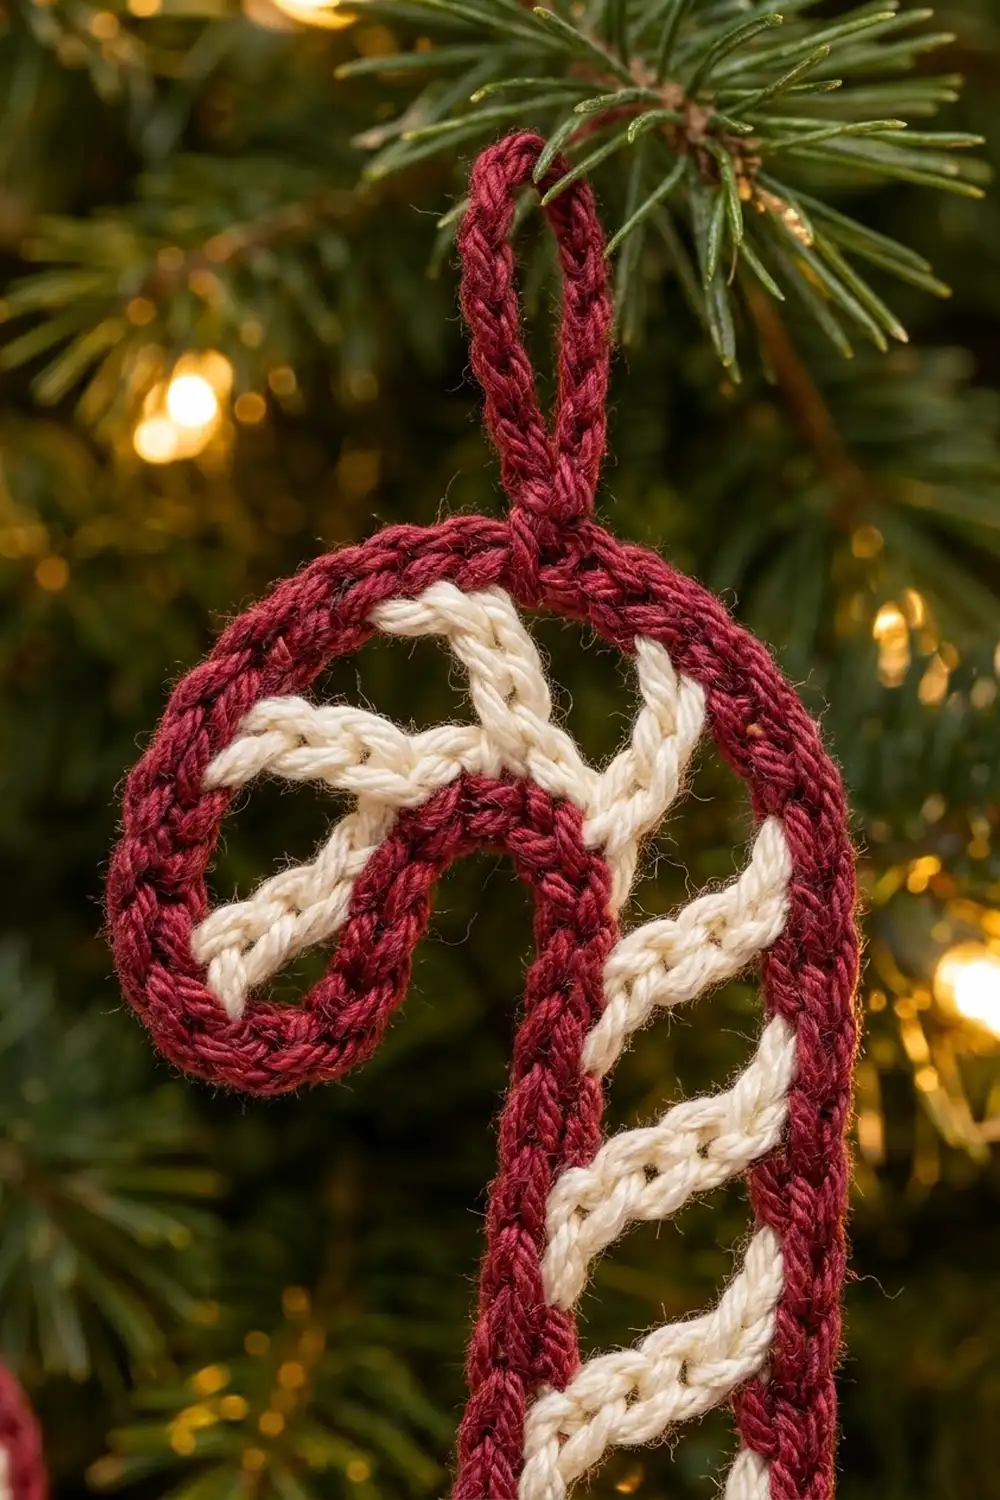
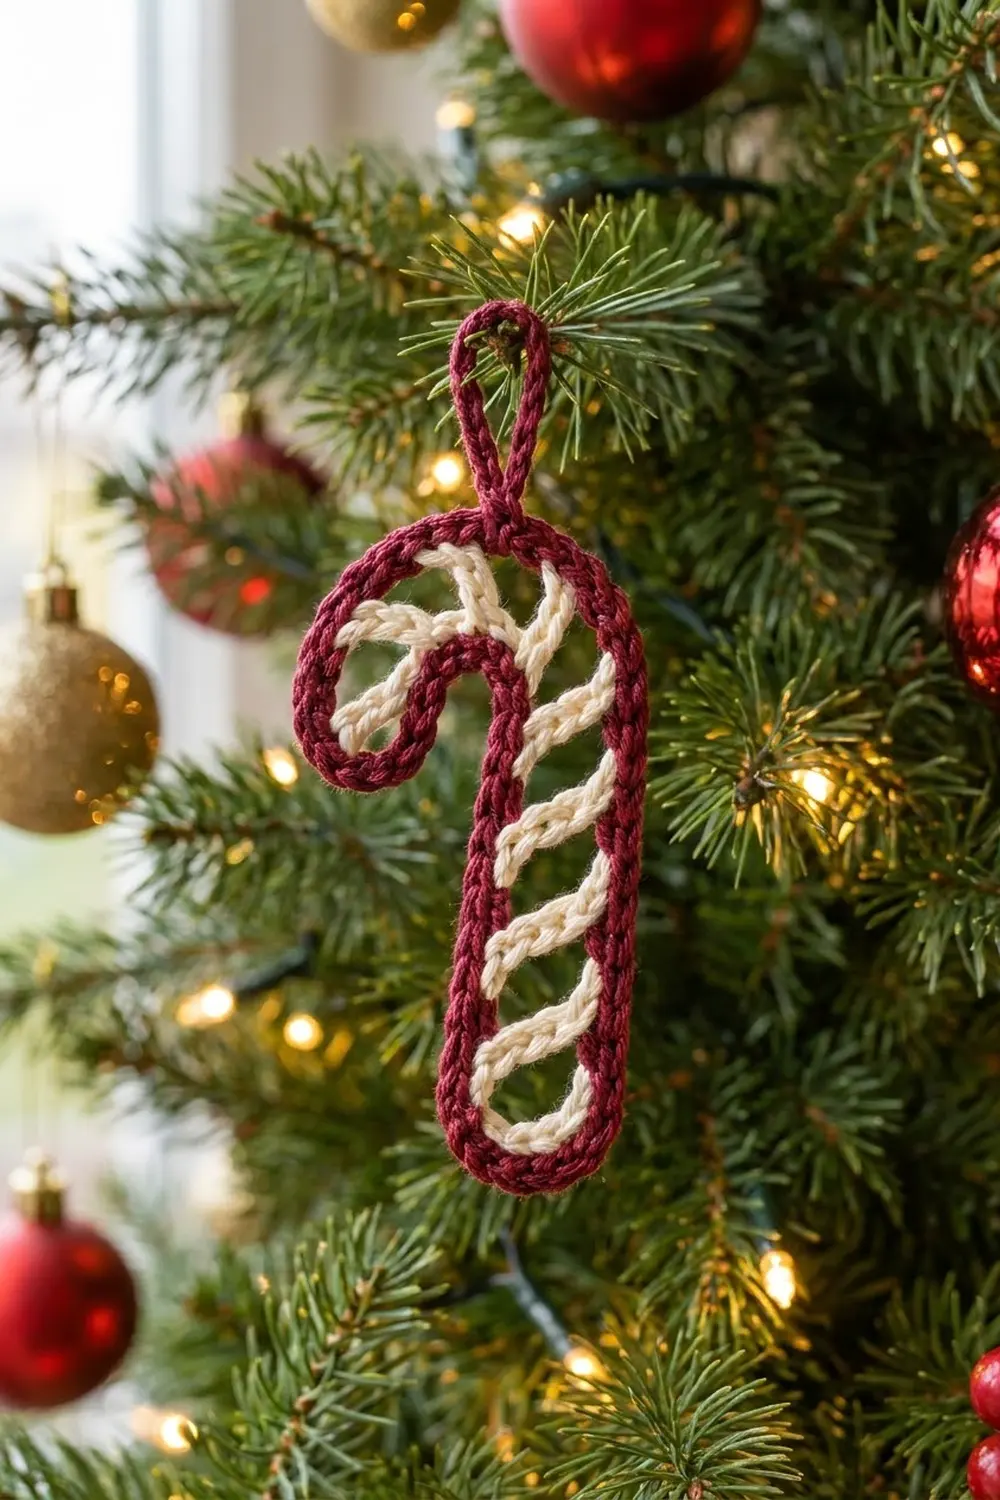
This little candy cane is mostly outline and open space. A thick burgundy cord traces the whole cane shape: the rounded foot, the long shaft, the arch and the curled hook tip. Inside that outline, short cream bars run diagonally from one edge to the other. They make the classic peppermint stripe, with open space between each bar.
The colors are deep burgundy and soft cream, so the ornament looks warm and a little vintage rather than bright red and white. Because the stripes are open, it looks light on the tree, and you can see branches and lights through it. A burgundy hanging loop sits at the top of the arch.
The pattern uses US crochet terms. The finished ornament is about 5 in (12.7 cm) tall without the loop, about 6 in (15.2 cm) tall with the loop, and about 2.5 in (6.4 cm) wide across the hook.
The construction is simple. You crochet one closed ring of single crochet into a chain and pin it into a cane shape. Then you hold that shape in place with 8 cream stripes. A burgundy slip stitch border round finishes the outline and hides the stripe joins. Last, you add the hanging loop and block.
Finished Size and Construction
- Finished size: 5 in (12.7 cm) tall x 2.5 in (6.4 cm) wide; 6 in (15.2 cm) tall with the loop
- Skill level: Easy to intermediate (simple stitches, careful placement)
- Terminology: US crochet terms
- Yarn weight: Worsted weight (#4), cotton or cotton blend
- Hook: 4.0 mm (US G-6)
- Number of pieces: 1 (a single ornament, no joining)
- Layout: One closed outline shaped as a candy cane, with the hook on the left and the shaft on the right
- Piece size: The outline cord is 64 stitches, 16 in (40.6 cm) around
- Size before border: Same as finished, 5 in (12.7 cm) x 2.5 in (6.4 cm)
- Border depth: 1 slip stitch round worked on top of the cord. It adds no length and no width.
Materials
Choose a smooth cotton in worsted weight, either mercerized or matte. Cotton holds curves well after blocking and shows the twisted look of the cord clearly. Acrylic also works, but it is springier and needs a stronger stiffener.
- Color A, burgundy: 6 g (about 10 m)
- Color B, cream: 3 g (about 6 m)
These quantities include a margin for tails and one practice gauge cord.
Tools:
- 4.0 mm (US G-6) crochet hook
- Tapestry needle
- Scissors
- 4 locking stitch markers, plus 1 extra to hold the live loop
- Foam blocking board and rustproof pins
- Optional: fabric stiffener, or a 1:1 mix of white craft glue and water
- Ruler or tape measure
Abbreviations (US Terms)
- ch – chain
- sc – single crochet
- sl st – slip stitch
- st(s) – stitch(es)
- rnd – round
- BB – back bump of the chain (the horizontal bar on the back of each chain)
Special stitch – Stripe Bar: With B on the hook, ch 3 and sl st into the target stitch on the opposite edge. Turn, sl st in the BB of each of the 3 ch, then sl st into the starting stitch. Each bar is 3 ch plus 3 sl st, which is thick enough to read as a stripe.
Gauge and Checkpoints
Gauge: 16 sc = 4 in (10.2 cm) when worked into the BB of a chain with A.
Always make a gauge cord first. Ch 17, then sc in the BB of the 2nd ch from the hook and in each BB across: 16 sc. Lay it flat without stretching. It should measure 4 in (10.2 cm).
- Too long: go down to a 3.75 mm hook.
- Too short: go up to a 4.5 mm hook.
Do not change the stitch counts to fix the size. All of the stripe positions depend on the 64-stitch count.
Checkpoints:
- After Rnd 1, the ring measures 16 in (40.6 cm) around, or 8 in (20.3 cm) when folded flat.
- After shaping and pinning, the cane is 5 in (12.7 cm) tall and 2.5 in (6.4 cm) wide.
- After the stripes, the cord does not pucker or bow between the bars.
- After the border, the size is still 5 in (12.7 cm) x 2.5 in (6.4 cm).
The Outline Cord
With A, ch 64. Join with a sl st to the first ch to form a ring. Make sure the chain is not twisted.
Rnd 1: Ch 1, sc in the BB of each ch around, then join with a sl st to the first sc. (64 sc)
Do not fasten off. Put the live loop on a stitch marker and set the ball aside.
Numbering the Stitches
Call the first sc st 1 and count from there. The sections below follow the outline in order.
| Section | Stitches | Count | Length |
|---|---|---|---|
| A – bottom curve | 1–5 | 5 | 1.25 in (3.2 cm) |
| B – outer shaft (right side, going up) | 6–19 | 14 | 3.5 in (8.9 cm) |
| C – outer arch | 20–34 | 15 | 3.75 in (9.5 cm) |
| D – outer hook leg (going down) | 35–37 | 3 | 0.75 in (1.9 cm) |
| E – hook tip curve | 38–42 | 5 | 1.25 in (3.2 cm) |
| F – inner hook leg (going up) | 43–45 | 3 | 0.75 in (1.9 cm) |
| G – inner arch | 46–50 | 5 | 1.25 in (3.2 cm) |
| H – inner shaft (left side, going down) | 51–64 | 14 | 3.5 in (8.9 cm) |
Total: 5 + 14 + 15 + 3 + 5 + 3 + 5 + 14 = 64 stitches.
Place markers in st 6, st 20, st 35 and st 51 to mark the starts of sections B, C, D and H.
Shaping
Pin the ring onto the blocking board, right side up. Keep the shaft straight and vertical: sections B and H should be parallel, with a gap of about 0.5 in (1.3 cm) between them on the inside. Curve section A into a round foot at the bottom.
Bend section C into a half-circle over the top. Bring sections D and F down on the left to form the short hook leg, and curve section E into a round tip. Section G forms the small inner curve under the arch.
Check that the cane is 5 in (12.7 cm) tall and 2.5 in (6.4 cm) wide. Both shaft sides are 14 stitches, so they should end at the same height.
The Cream Stripes
Work all of the stripes while the ornament is still pinned. Each stripe starts on the inner edge and ends one stitch higher on the outer edge, so every bar slants up toward the right.
To join B, insert the hook into the start stitch under both loops of the sc. Pull up a loop of B and ch 1 to secure it; this ch 1 does not count. Work one Stripe Bar to the target stitch. Fasten off and leave a 4 in (10.2 cm) tail at each end.
Shaft stripes:
| Stripe | Start (inner) | Target (outer) |
|---|---|---|
| 1 | st 64 | st 7 |
| 2 | st 61 | st 10 |
| 3 | st 58 | st 13 |
| 4 | st 55 | st 16 |
| 5 | st 52 | st 19 |
The start stitches climb the inner shaft every 3 stitches (64, 61, 58, 55, 52). The target stitches climb the outer shaft every 3 stitches (7, 10, 13, 16, 19). Each stripe rises by the same 1 stitch, so all 5 are parallel and evenly spaced, about 0.75 in (1.9 cm) apart.
Arch stripes:
| Stripe | Start (inner) | Target (outer) |
|---|---|---|
| 6 | st 50 | st 23 |
| 7 | st 47 | st 30 |
The inner arch is short (5 sts) and the outer arch is long (15 sts). These 2 bars fan out like spokes, which keeps the stripe pattern flowing around the curve.
Hook stripe:
| Stripe | Start (inner) | Target (outer) |
|---|---|---|
| 8 | st 44 | st 36 |
St 44 and st 36 are the middle stitches of the two hook legs. This bar crosses the hook with a slight slant.
Count check: 8 stripes x (3 ch + 3 sl st) = 48 cream stitches in total. The cord count stays at 64 sc.
Weave each cream tail into its own cream bar, not into the burgundy cord, so no cream shows on the outline.
Border
Border gauge: 16 sl st = 4 in (10.2 cm), the same as the cord.
Take the live A loop off its marker and put it back on the hook.
Rnd 2 (trim round): Sl st in each sc around, inserting the hook under both loops of every sc, including the stitches that hold stripe joins. Join with a sl st to the first sl st. (64 sl st = 64 worked 1-per-existing-stitch + 0 extra)
Counts per section:
- A – bottom curve: 5 sl st
- B – outer shaft: 14 sl st
- C – outer arch: 15 sl st
- D – outer hook leg: 3 sl st
- E – hook tip: 5 sl st
- F – inner hook leg: 3 sl st
- G – inner arch: 5 sl st
- H – inner shaft: 14 sl st
Total: 64 sl st.
Keep the slip stitches relaxed. They sit on top of the cord as a raised chain, which gives the outline its twisted, braided look and covers the points where the cream joins.
Why the math works: The border has exactly 1 stitch for each cord stitch, at the same gauge of 4 sts per inch. Each section keeps its length, so the 64 stitches still measure 16 in (40.6 cm) around. No stitches are added at the curves. The curves come from shaping and blocking, not from increases, so the outline will not ruffle.
Hanging Loop
Fasten off A after Rnd 2. Rejoin A with a sl st in st 27, the center top of the outer arch.
Ch 12, then sl st into st 27 again. Turn, sl st in the BB of each of the 12 ch, then sl st into st 27. (12 ch + 12 sl st)
The loop is about 2 in (5.1 cm) around and stands about 1 in (2.5 cm) above the cane. Fasten off and weave the tail into the cord.
Final Blocking
- Mix the stiffener, or the glue-and-water mix, in a small bowl.
- Dip the ornament and squeeze it gently. Blot it with a towel so no liquid is left in the open spaces.
- Pin it on the board in the cane shape, 5 in (12.7 cm) tall and 2.5 in (6.4 cm) wide.
- Pin the shaft sides parallel, and pin the foot and hook tip round.
- Straighten each cream bar so its slant matches its neighbors.
- Pin the loop straight up.
- Let it dry completely, usually 12 to 24 hours.
- Unpin it and check the measurements once more.
If you prefer not to stiffen it, spray it with water, pin it and let it dry. The shape will be softer.
Final Quality-Control Checklist
- Outline is 64 sc with 64 sl st on top.
- Cane is 5 in (12.7 cm) tall and 2.5 in (6.4 cm) wide.
- Both shaft sides are straight and the same height.
- There are 8 cream stripes, all slanting the same way.
- Shaft stripes are about 0.75 in (1.9 cm) apart.
- No cream yarn shows on the burgundy outline.
- Hanging loop is at the center top (st 27).
- All tails are woven in and trimmed.
- Ornament lies flat after drying.
Troubleshooting
The ring twisted when I joined it. Undo the join, lay the chain flat with all the back bumps facing up, and join again.
The outline is too big or too small. Check your gauge. A hook change of 0.25 mm is usually enough. Keep the stitch count the same, or the stripe positions will not line up.
The stripes sag. The chains are too loose. Tighten your tension on the ch 3, and pull the turning sl st snug.
The stripes pull the shaft inward. The chains are too tight. Relax your tension, or use a hook 0.5 mm larger for the cream only.
The border makes the cord wavy. The slip stitches are too tight. Work them looser, or use a hook 0.5 mm larger for Rnd 2.
The hook curl will not hold its shape. Use more stiffener and add extra pins around the tip while it dries.
The cream bars look thin. Make sure you work the return sl sts into the back bumps of the chain, not under the top loops.
Care
Spot clean with a damp cloth and let it air dry flat. Store it flat in tissue paper so the curve does not get crushed.
Final Notes
The measurement chain is short and easy to follow:
- The 16-stitch gauge cord measures 4 in (10.2 cm).
- The 64-stitch ring measures 16 in (40.6 cm) around.
- Shaped and pinned, the ring becomes a cane 5 in (12.7 cm) tall and 2.5 in (6.4 cm) wide.
- The 8 cream stripes hold that shape.
- The 64-stitch border keeps the same size.
- The 12-chain loop adds about 1 in (2.5 cm) on top.
If your gauge matches at the first step, every later step will match too. Once you know the stitch numbers, the next ornament goes quickly.
Happy crocheting!