

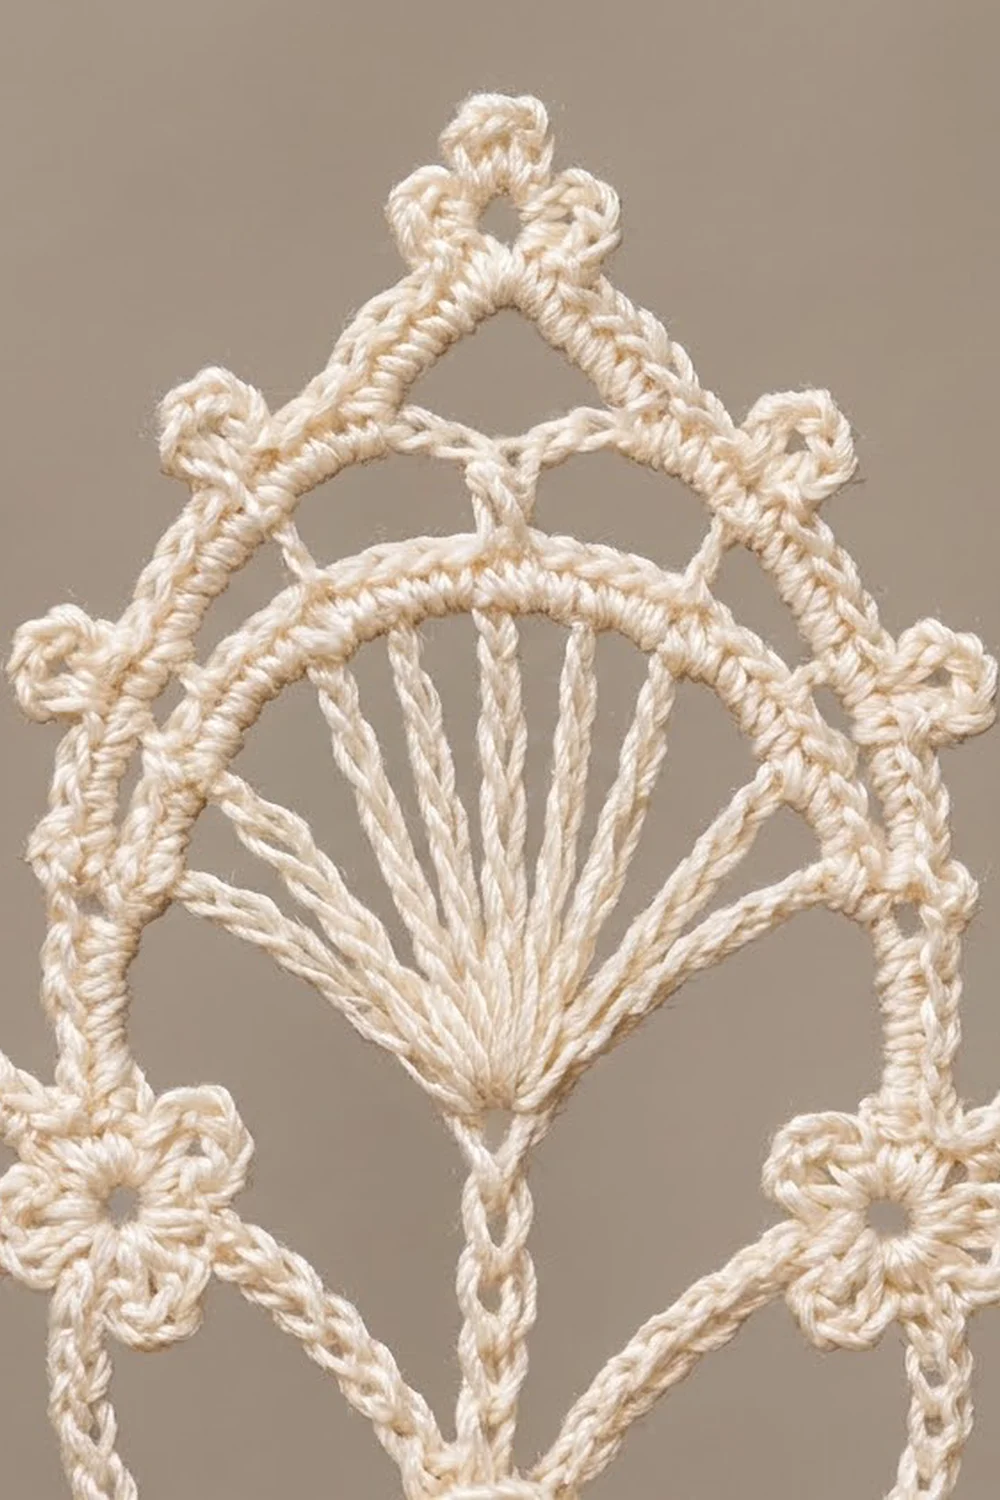
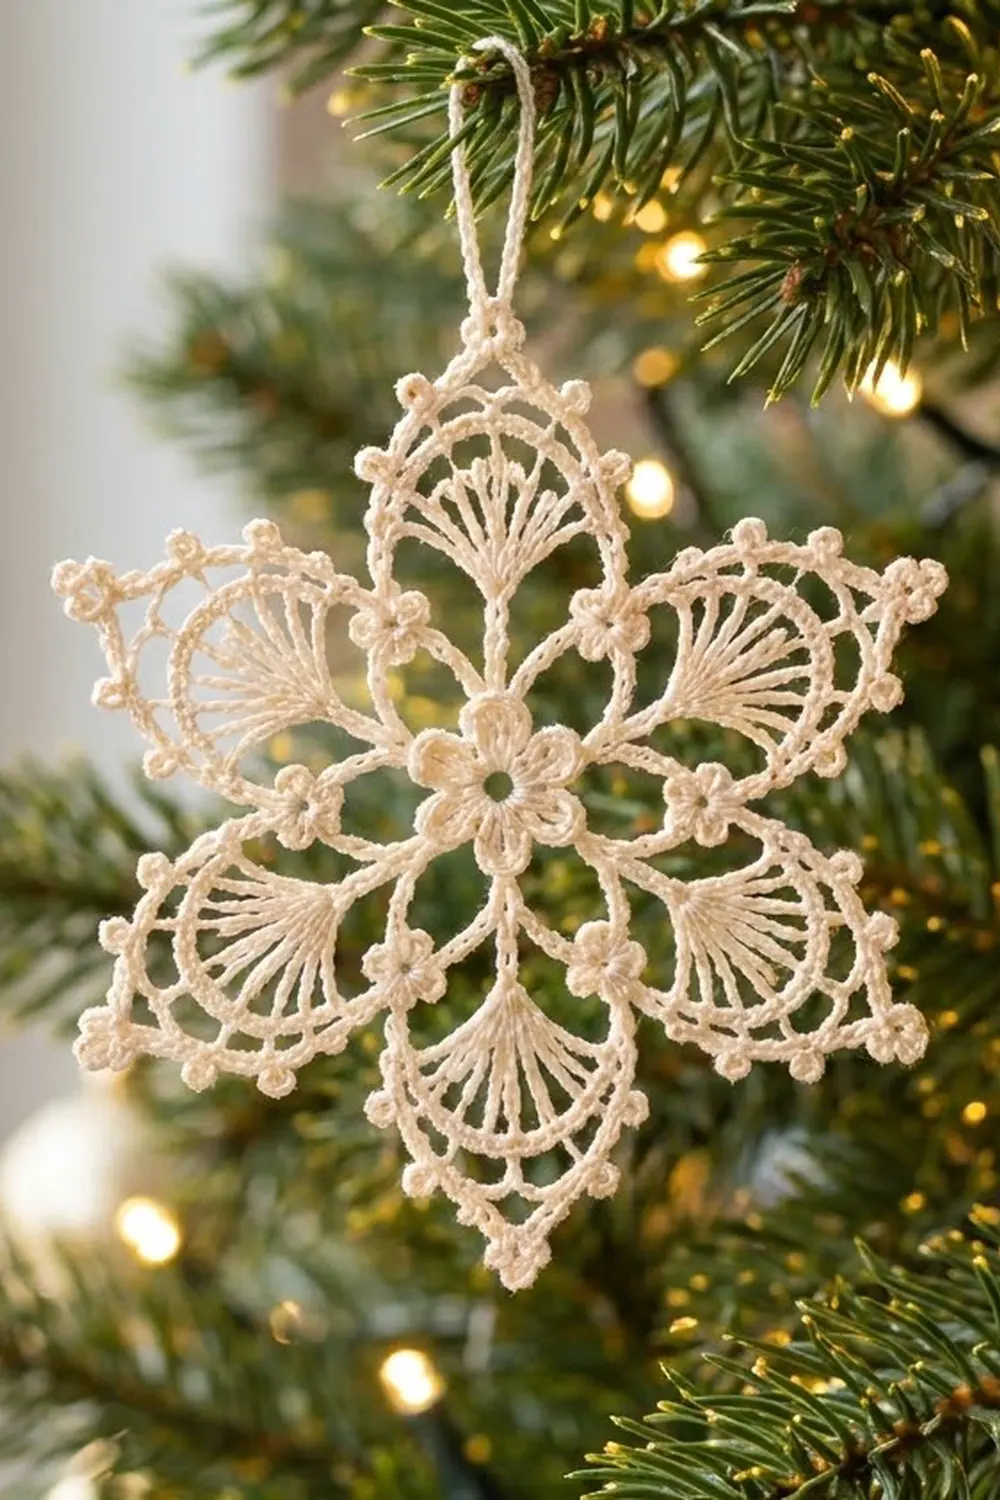
This six-pointed lace snowflake is made in ivory cotton thread. It is light enough to hang from the thinnest branch. Each point holds a fine fan of trebles inside a pointed chain frame, and tiny clover picots edge the whole outline like frost.
The style is classic thread lace with a modern, clean shape. One color keeps the stitch texture front and center. Ivory or cream reads warm under tree lights, and pure white looks crisp against greenery.
The pattern uses US crochet terms. The finished snowflake measures 4 in (10.2 cm) from point to point after blocking. The hanging loop adds about 1.25 in (3.2 cm), for a total hanging height of 5.25 in (13.3 cm).
The snowflake is worked in the round as one piece. You start with a small flower center, add a ring of chain arches, build six treble fans, frame them with pointed chain arches and finish with a single crochet and picot border. Then you add a hanging loop, starch and block.
Finished Size and Construction
- Finished size: 4 in (10.2 cm) point to point, blocked
- Hanging height with loop: 5.25 in (13.3 cm)
- Skill level: Intermediate (fine thread, counting into chain spaces)
- Terminology: US crochet terms
- Thread weight: Size 10 cotton crochet thread (lace weight, category 0)
- Hook: 1.5 mm steel hook (US steel 7 or 8, depending on brand)
- Number of pieces: 1
- Layout: Single motif, six points, worked in rounds
- Piece size: 4 in (10.2 cm) point to point
- Size before border: 3.6 in (9.1 cm) point to point
- Border depth: 0.2 in (0.5 cm) on each side
Materials
Thread: Use mercerized cotton crochet thread in size 10. Mercerized cotton holds starch well, keeps sharp points and has a soft sheen that suits ornaments. Avoid fuzzy or acrylic threads, which blur the fans and won’t block firmly.
- Ivory / cream: 10 g, about 56 m (61 yd)
One snowflake uses about 7–8 g, so this quantity includes a comfortable margin for a gauge swatch and the hanging loop.
Tools:
- 1.5 mm steel crochet hook
- Fine tapestry needle
- Small sharp scissors
- Fabric stiffener or starch (spray or liquid)
- Blocking board or foam mat covered with plastic wrap
- Rustproof pins (about 30)
- Printed circle or ruler for checking that the points are symmetrical
Abbreviations (US Terms)
- ch – chain
- sl st – slip stitch
- sc – single crochet
- hdc – half double crochet
- dc – double crochet
- tr – treble crochet (yarn over twice)
- sk – skip
- sp – space
- st(s) – stitch(es)
Special stitch – Picot trio (pt): Ch 3, sl st in 3rd ch from hook (first loop). Ch 4, sl st in the same base chain (second loop). Ch 3, sl st in the same base chain (third loop). This gives three small loops sharing one base, which looks like a tiny clover. Each pt counts as 1 unit and is not counted as a stitch.
Spoke sc: The single sc that sits in each valley between two points. You will work into it on every round from Round 5 onward, so it keeps all six sections lined up.
Gauge and Checkpoints
Make Rounds 1–4 as a test before committing to the full snowflake. Thread lace is very sensitive to tension, and four rounds take only a few minutes.
Measure flat and unblocked, pressing gently with your fingertips:
- After Round 1: 0.5 in (1.3 cm) across
- After Round 3 (flower): 1 in (2.5 cm) across
- After Round 4 (arch ring): 1.5 in (3.8 cm) across
- After Round 6 (fans): 2.4 in (6.1 cm) across, fan tip to fan tip
- After Round 8 (frames): 3.6 in (9.1 cm) point to point
- After Round 9 (border), blocked: 4 in (10.2 cm) point to point
If your piece is too big: Go down to a 1.25 mm hook, or tighten your chains. Loose chains are the most common reason for an oversized snowflake.
If your piece is too small: Go up to a 1.65 mm or 1.75 mm hook. If the fans cup or the arches pull tight, the problem is your chains. Make them a little looser rather than adding chains, because extra chains change the shape.
A difference of 0.25 in (0.6 cm) or less at Round 4 is fine. Blocking will even it out.
Pattern
Round 1 – Center Ring
Make a magic ring. Ch 3 (counts as dc), work 17 dc in ring. Pull the ring tight, but leave a small open center about 0.125 in (0.3 cm) across. Sl st to top of beginning ch-3.
Stitch count: 18 dc.
Round 2 – Petal Base
Ch 1, sc in same st. Ch 3, sk 2 dc, sc in next dc. Repeat from * 4 more times. Ch 3, sk 2 dc, sl st to first sc.
Stitch count: 6 sc and 6 ch-3 sps (24 sts).
Round 3 – Flower Petals
Sl st into first ch-3 sp. In each ch-3 sp around, work (sc, hdc, 3 dc, hdc, sc). Sl st to first sc.
Stitch count: 6 petals of 7 sts = 42 sts.
The center dc of each petal is the 4th st of that petal. You will work into it next.
Checkpoint: 1 in (2.5 cm) across.
Round 4 – Arch Ring
Sl st across the first 3 sts of the first petal so the hook sits in its center dc. Ch 1, sc in the same center dc. Ch 7, sc in the center dc of the next petal. Repeat from * 4 more times. Ch 7, sl st to first sc.
Stitch count: 6 sc and 6 ch-7 sps (48 sts).
These 6 sc are your spoke sc. Each ch-7 arch becomes the base of one point.
Checkpoint: 1.5 in (3.8 cm) across.
Round 5 – Solid Ring
Ch 1. Sc in spoke sc, 9 sc in next ch-7 sp. Repeat from * around. Sl st to first sc.
Stitch count: 6 sections of 10 sc = 60 sc.
In each section, position 1 is the spoke sc and positions 2–10 are the arch sc. The center of each arch is position 6.
Checkpoint: 1.6 in (4.1 cm) across.
Round 6 – Treble Fans
Ch 1, sc in same st (spoke sc). Ch 5, sk 4 sc, work (tr, [ch 1, tr] 8 times) in next sc (position 6), ch 5, sk 4 sc, sc in next spoke sc. Repeat from * around, ending the last repeat with sl st to first sc instead of the final sc.
Stitch count per section: 1 sc + 5 ch + 9 tr + 8 ch + 5 ch = 28 sts.
Round total: 6 × 28 = 168 sts.
All 9 trebles come out of one sc, so they fan open into the thin radiating spokes you see in each point. Keep every tr the same height. An uneven fan is very visible once it is starched.
Checkpoint: 2.4 in (6.1 cm) fan tip to fan tip.
Round 7 – Fan Spread
Ch 1, sc in same spoke sc. Ch 3, sk ch-5 sp, dc in first tr, (ch 2, dc in next tr) 8 times, ch 3, sk ch-5 sp, sc in next spoke sc. Repeat from * around, ending with sl st to first sc instead of the final sc.
Stitch count per section: 1 sc + 3 ch + 9 dc + 16 ch + 3 ch = 32 sts.
Round total: 6 × 32 = 192 sts.
Each fan now has 9 dc and 8 ch-2 sps, numbered 1–8 from right to left. The 5th dc is the center of the fan, and the point’s tip will grow from it.
Checkpoint: 2.8 in (7.1 cm) across.
Round 8 – Pointed Frames
Ch 1. Sc in spoke sc, ch 7, sc in ch-2 sp 2, ch 7, (sc, ch 5, sc) in 5th dc, ch 7, sc in ch-2 sp 7, ch 7. Repeat from * around. Sl st to first sc.
Stitch count per section: 5 sc + 33 ch (four ch-7 arches + one ch-5 tip) = 38 sts.
Round total: 6 × 38 = 228 sts.
Chain-2 sps 2 and 7 sit exactly 3 sps either side of the center dc, so each frame is symmetrical. The ch-5 tip sits directly above the middle of the fan. Together these make the pointed outline.
Checkpoint (size before border): 3.6 in (9.1 cm) point to point.
Border
Border Gauge
The border is a single round of sc packed into the chain arches, with picot trios spaced along every edge. It adds 0.2 in (0.5 cm) on each side, so 3.6 in + 0.2 in + 0.2 in = 4 in (10.2 cm) point to point.
Round 9 – Picot Border
This is a conversion round: you work 1 sc into each existing sc, plus sc and picot trios into the chain spaces.
Ch 1. Sc in spoke sc. (4 sc, pt, 4 sc) in next ch-7 sp. Sc in next sc. (4 sc, pt, 4 sc) in next ch-7 sp. Sc in next sc. (3 sc, pt, 3 sc) in ch-5 tip sp. Sc in next sc. (4 sc, pt, 4 sc) in next ch-7 sp. Sc in next sc. (4 sc, pt, 4 sc) in next ch-7 sp. Repeat from * around. Sl st to first sc. Do not fasten off yet if you plan to add the loop with the same thread; otherwise fasten off.
Stitch count per section (one point):
– 5 sc worked 1-per-existing-sc
– + 32 sc in the four ch-7 arches (8 sc each)
– + 6 sc in the ch-5 tip
– = 43 sc and 5 pt
Round total: 6 × 43 = 258 sc and 30 pt.
Per side of one point: Each point has two edges. Each edge runs from a spoke sc to the tip sp and holds 2 arches: 16 arch sc + 2 frame sc + 2 pt. The tip adds 6 sc + 1 pt, and the spoke sc is shared with the next point.
Why the Math Works
Every ch-7 arch from Round 8 gets 8 sc. That is one more sc than chains, which is enough to cover the arch without ruffling, and the pt in the middle sits at the top of the curve. The ch-5 tip gets 6 sc plus a pt, so it stays sharp. Because you work 1 sc into every existing sc, the spokes and frame joins stay exactly where Round 8 put them. All six points stay identical, so the snowflake blocks evenly.
Hanging Loop
Pick one point for the top. Join thread with sl st in the middle loop of the tip pt. Ch 30, sl st in the same loop. Ch 1, work 36 sc over the chain loop, sl st in the same tip loop. Fasten off.
The loop rises about 1.25 in (3.2 cm) above the tip.
Final Blocking
- Weave in all ends along the back of sc stitches. Thread ends slip out of chains, so avoid weaving into them.
- Soak the snowflake in fabric stiffener, or dip it in liquid starch mixed according to the label.
- Press out the extra liquid in a towel. The piece should be damp, not dripping.
- Lay it on a covered blocking board. Draw or print a 4 in (10.2 cm) circle with six evenly spaced lines (60° apart) as a guide.
- Pin the center ring flat first, then pin each of the six tips onto a guide line at the circle edge.
- Pin each spoke sc (valley) in toward the center so the points look sharp.
- Open each fan evenly with a pin, spreading the trebles into a smooth semicircle.
- Pin the center loop of every pt outward so each little clover lies open.
- Straighten the hanging loop and pin it flat above the top tip.
- Let it dry completely, usually 6–12 hours. Unpin only when the snowflake is stiff and dry.
Final Quality-Control Checklist
- Measures 4 in (10.2 cm) point to point, with all six points the same length
- Center flower has 6 even petals and a small open ring
- Each fan has 9 trebles, evenly spread
- Each point has 4 arches and 1 pointed tip
- 30 picot trios total, 5 per point, all open
- Spoke sc valleys sit evenly between points
- Hanging loop is centered on one tip and lies flat
- All ends are woven in and invisible from the front
- Piece is fully dry and stiff, with no sticky starch residue
Troubleshooting
Fans curl or cup: The tr are too short or the ch-1 sps too tight. Re-block with more pins, or rework Round 6 with slightly taller trebles.
Points lean sideways: The ch-2 sps were miscounted in Round 8. Check that the tip sits on the 5th dc and the frame sc land in sps 2 and 7.
Border ruffles: Your sc are too loose for 8 per arch. Try a smaller hook for Round 9 only.
Border pulls the arches flat: Your chains in Round 8 are too tight. Rework them with looser chains.
Picots collapse: Make sure each loop is closed into the same base chain, then pin them open during blocking.
Center hole too big: Pull the magic ring tighter before joining Round 1 and weave the tail around the ring.
Snowflake goes soft over time: Re-dip it in starch and block again. Humidity slowly softens starch.
Care
Store flat in tissue paper away from humidity. If the snowflake gets dirty, hand-wash it gently in cool water, then re-starch and re-block it.
Final Notes
The measurement chain keeps this snowflake on track:
- 1 in (2.5 cm) flower
- 1.5 in (3.8 cm) arch ring
- 2.4 in (6.1 cm) fans
- 3.6 in (9.1 cm) frames
- 0.2 in (0.5 cm) border on each side
- 4 in (10.2 cm) finished snowflake
Check each stage as you go, and the final blocking will only need to refine the shape, not fix it. Make one in ivory for a vintage look, or a few in white to scatter across the tree.
Happy crocheting!