

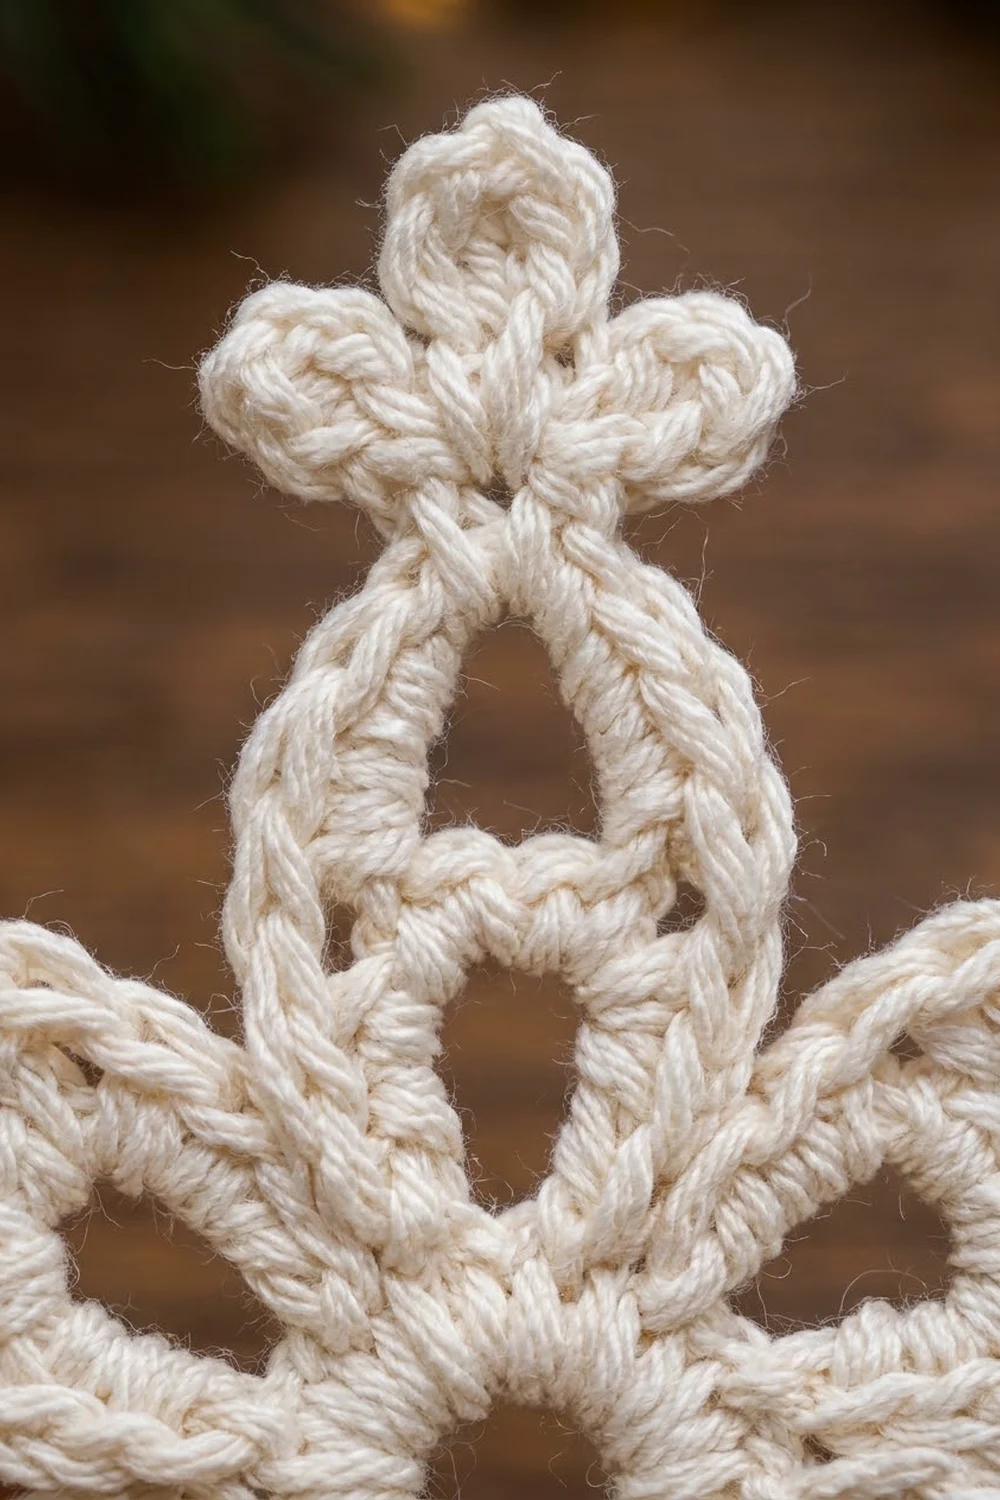
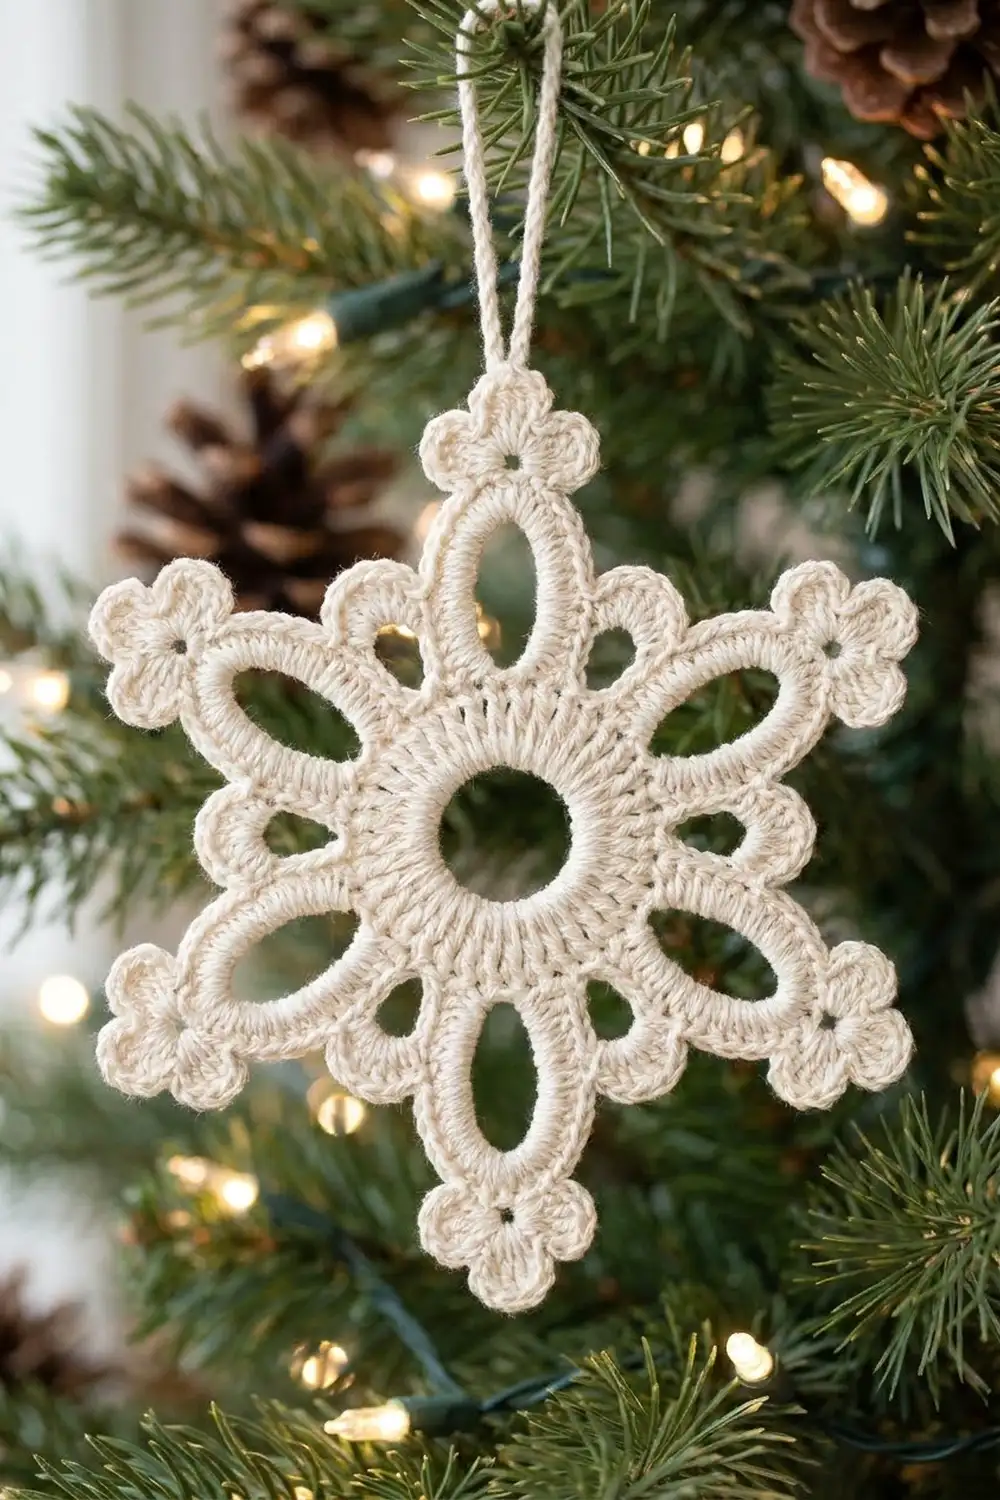
The Frostclover Snowflake is a lacy six-pointed ornament with a calm, classic look. Six teardrop arms spread out from a small open center. Each arm ends in a plump three-lobed clover tip, and gentle arches link the arms so the whole star stays firm once it’s starched.
It’s worked in a single cream or ivory cotton thread, which gives it a soft, snowy, vintage feel against green branches and warm lights. White, silver, or pale gold would work just as well.
This pattern uses US crochet terms. The finished snowflake measures 4 in (10.2 cm) from tip to tip after blocking.
The construction is simple. You work a ring of single crochet, add six long chain loops, cover them densely with single crochet to make the arms, add bridging arches between the arms, and finish with a clover-tip edging round. It’s one piece in one color, with only two ends to weave in.
Finished Size and Construction
- Finished size: 4 in (10.2 cm) tip to tip
- Skill level: Intermediate (lace motifs, working over chain loops)
- Terminology: US crochet terms
- Yarn weight: Size 3 cotton crochet thread (light fingering, #0 Lace to #1 Super Fine range)
- Hook: 2.0 mm steel hook
- Number of pieces: 1
- Layout: Single six-pointed motif, worked in the round
- Piece size: 4 in (10.2 cm) tip to tip
- Size before border: 3.5 in (8.9 cm) tip to tip after Round 4
- Border depth: 0.25 in (0.6 cm) added at each tip, for 0.5 in (1.3 cm) total across
Materials
Yarn: Use a smooth mercerized cotton thread in size 3. Mercerized cotton holds starch well, shows stitch definition crisply, and won’t fuzz on the tree. Avoid acrylic, because it won’t hold a starched shape.
- Cream / ivory: 8 g, about 30 m (32.8 yd), for one snowflake plus the hanging loop
Tools:
- 2.0 mm steel crochet hook
- Fine tapestry needle
- Scissors
- Fabric stiffener or starch (liquid starch, or a 1:1 white glue and water mix)
- Foam blocking board and rustproof pins
- Ruler or tape measure
- Plastic wrap to protect the board
Quantities include a margin of about 25% for your swatch, tension differences, and the hanging loop.
Abbreviations (US Terms)
- ch – chain
- sl st – slip stitch
- sc – single crochet
- dc – double crochet
- sk – skip
- sp – space
- st(s) – stitch(es)
- rep – repeat
Special stitch – Lobe: Ch 3. Yarn over and insert hook in the 3rd ch from hook, pull up a loop, yarn over and pull through 2 loops. Repeat once more in the same ch (3 loops on hook). Yarn over and pull through all 3 loops (a 2-dc cluster). Then sl st in the same ch. This makes one small round bump. Three lobes worked in a row form the clover tip.
Gauge and Checkpoints
Gauge isn’t critical for an ornament, but it controls the final size and how well the arms hold their shape. Make one complete snowflake first and measure at each stage before making a set.
- After Round 1: the ring measures 0.5 in (1.3 cm) across, with a center hole about 0.125 in (0.3 cm) wide.
- After Round 3: the covered arms measure 3.25 in (8.3 cm) tip to tip, gently stretched flat.
- After Round 4: 3.5 in (8.9 cm) tip to tip.
- After Round 5, blocked: 4 in (10.2 cm) tip to tip.
If your snowflake is too big (over 4.25 in / 10.8 cm), go down to a 1.75 mm hook, or work Round 2 with ch 15 loops instead of ch 16. If you shorten the loops, work 9 sc on each side of the arm in Round 3 and adjust the later counts to match.
If your snowflake is too small (under 3.75 in / 9.5 cm), go up to a 2.25 mm hook. Don’t add chains to the loops unless you also add matching sc in Round 3. Otherwise the arms will ruffle.
If the arms twist or ripple, your sc are packed too tightly over the chain loops. Relax your tension in Round 3 rather than changing the stitch counts.
Pattern
Round 1 – Center Ring
Make a magic ring.
Ch 1, work 18 sc in the ring. Pull the tail snug, leaving a small open hole at the center. Join with sl st to the first sc. (18 sc)
Check the size: 0.5 in (1.3 cm) across.
Round 2 – Arm Loops
This round places six long chain loops. Each loop starts and ends at sc that are 3 sts apart. Neighboring loops share their anchor points, so the arms meet narrowly at the center.
Ch 1, sc in the same st as the join. Ch 16, sk next 2 sc, sc in next sc. Rep from * 4 more times. Ch 16, sk the last 2 sc, join with sl st to the first sc.
(6 sc, 6 ch-16 loops)
Lay the work flat. You should see six long chain loops radiating from the ring like petals. Make sure none of them is twisted before moving on.
Round 3 – Covering the Arms
Here each chain loop becomes a thick, solid teardrop outline. Work all sc over the chain loop (into the loop space), not into the individual chains. That’s what gives the smooth, corded bars.
Sl st into the first ch-16 loop. Ch 1.
In the same ch-16 loop work: 10 sc, ch 3, 10 sc. Rep from * in each of the remaining 5 loops. Join with sl st to the first sc.
Per arm: 20 sc + 1 ch-3 tip space
Round total: 120 sc and 6 ch-3 tip spaces
To keep the instructions clear, count each arm’s stitches like this:
- Side A: the first 10 sc, numbered 1 to 10 from the center out to the tip.
- Side B: the last 10 sc, numbered 1 to 10 from the tip back to the center.
Push the sc together evenly so each side covers its half of the loop. The arm should form a pointed oval with a clear teardrop opening inside. Checkpoint: 3.25 in (8.3 cm) tip to tip.
Round 4 – Bridging Arches
This round links neighboring arms partway down their sides. Each arch, together with the inner sides of two arms, closes off a small lobe near the center.
Sl st in the next 9 sc (Side A, sts 2–10 of the first arm), then sl st into the ch-3 tip space.
Ch 1. (Sc, ch 3, sc) in the tip space. Sc in Side B sts 1–5. Ch 6. Sk Side B sts 6–10 of this arm and Side A sts 1–5 of the next arm. Sc in Side A sts 6–10 of the next arm. Work the next repeat in that arm’s tip space.
Rep from * 5 more times. On the final repeat, the last 5 sc go into Side A sts 6–10 of the first arm, working into the sc under your slip stitches. Join with sl st to the first sc.
Conversion count per arm: 10 sc worked 1-per-existing-stitch (5 on Side B + 5 on Side A) + 2 new sc in the tip = 12 sc, plus 1 ch-3 tip space and 1 ch-6 arch.
Round total: 72 sc, 6 ch-3 tip spaces, 6 ch-6 arches
The ch-6 arch should curve gently outward between two arms. If it pulls the arms together, your chains are too tight. Redo the arch more loosely.
Checkpoint: 3.5 in (8.9 cm) tip to tip. This is the size before the border.
Border
Border Gauge
The border is a single edging round. It covers each arch with 9 sc and adds the clover tips. At the recommended gauge, 9 sc covers about 1 in (2.5 cm) along an arch, and one clover cluster stands about 0.25 in (0.6 cm) beyond the old tip.
Round 5 – Clover-Tip Edging
Sl st into the first ch-3 tip space. Ch 1.
In the tip space work: sc, 3 Lobes, sc. Sc in the next 6 sc (the second tip sc + 5 sc down Side B). Work 9 sc over the ch-6 arch. Sc in the next 6 sc (5 sc up Side A of the next arm + that arm’s first tip sc). Rep from * 5 more times. Join with sl st to the first sc. Fasten off, leaving an 8 in (20.3 cm) tail.
Conversion count per arm (one repeat):
– 12 sc worked 1-per-existing-stitch (6 + 6)
– + 9 sc added over the ch-6 arch
– + 2 sc added in the tip space
– = 23 sc + 3 Lobes
Round total: 138 sc and 18 Lobes (6 clover tips)
Why the Math Works
Every round keeps the same sixfold repeat, so each arm is identical.
- Round 1 has 18 sc. Six anchors spaced every 3 sts in Round 2 use all 18 sts evenly (6 × 3 = 18).
- Round 3 puts 20 sc on each ch-16 loop: 10 per side, slightly more than one per chain. That’s normal when you work over a loop, and it keeps the bars from cupping.
- Round 4 deliberately skips the 10 sc nearest the center on each pair of neighboring sides. The ch-6 arch replaces that gap, which is what opens the inner lobes.
- Round 5 works 1 sc in every Round 4 sc and only adds stitches where new edge length exists (arches and tips). That’s why the edge lies flat without ruffling.
Size chain: 3.5 in (8.9 cm) before the border + 0.25 in (0.6 cm) at each tip = 4 in (10.2 cm).
Hanging Loop
Cut a 10 in (25.4 cm) length of thread. Thread it through the sc between the two outer lobes of one clover tip. Even out the ends, twist the strands gently, and tie an overhand knot about 1.75 in (4.4 cm) above the tip. Trim the ends to 0.25 in (0.6 cm).
Final Blocking
- Weave in ends before stiffening. Weave the center tail around the Round 1 ring and the final tail along one arm’s sc bar. Trim close.
- Soak the snowflake in your stiffener for 1–2 minutes until fully saturated.
- Squeeze, don’t wring. Press out the excess between your fingers, then blot on a towel. Clear any film from the center hole and the teardrop openings.
- Cover the board with plastic wrap. Draw or place a 4 in (10.2 cm) circle with six spokes 60 degrees apart.
- Pin the tips first. Put one pin through the center of each clover so the tip reaches the circle line.
- Pin the arches. Put one pin at the outer curve of each arch so it bows evenly outward, about 0.75 in (1.9 cm) from the center hole.
- Open the teardrops. Slide a pin into each arm’s opening to round it out, and pin each Lobe so it sits flat and rounded.
- Dry completely, 12–24 hours, before removing the pins.
Final Quality-Control Checklist
- Rounds 1 to 5 counted: 18 sc → 6 sc + 6 ch-16 loops → 120 sc → 72 sc → 138 sc + 18 Lobes.
- The center hole is open, small, and round.
- All six teardrop openings are the same length and come to a clean point.
- All six arches bow outward evenly. None are flat or pulled tight.
- Each tip has three distinct, rounded Lobes.
- It measures 4 in (10.2 cm) tip to tip across all three opposite pairs.
- Ends are woven in securely and invisible from both sides.
- The hanging loop is centered on one tip and the knot is tight.
- The piece is fully dry and holds its shape when hung.
Troubleshooting
Arms cup or curl upward: The Round 3 sc are too crowded or too tight. Loosen your tension, or check that you didn’t work extra sc past 10 per side.
Arms look floppy or the chain shows through: Your sc are too loose or too few. Work exactly 10 per side and slide them together snugly.
Arches pull the arms inward: The ch-6 is too tight. Rework it with looser chains, or use ch 7 and 10 sc in Round 5 (the per-arm total becomes 24 sc).
Lobes look flat or stringy: Make sure both dc of the cluster go into the same ch, and finish each Lobe with a sl st into that same ch.
One arm is longer than the others: A Round 2 loop probably has 15 or 17 chains. Count and redo that loop before Round 3.
Snowflake won’t stay stiff: Use a stronger stiffener mix and let it dry fully before handling.
Care
Store the snowflakes flat in a box between sheets of tissue. To refresh one, rinse gently in cool water, re-stiffen, and pin it out again as in the blocking steps.
Final Notes
The measurement chain is short and dependable:
- Round 1 ring: 0.5 in (1.3 cm)
- Covered arms after Round 3: 3.25 in (8.3 cm)
- Bridged star after Round 4: 3.5 in (8.9 cm)
- Clover-tip border: adds 0.25 in (0.6 cm) at each tip
- Finished blocked snowflake: 4 in (10.2 cm)
If your first snowflake hits these checkpoints, every one after it will match, so you can make as many as you like for gifts, gift toppers, or a whole tree. Happy crocheting!