

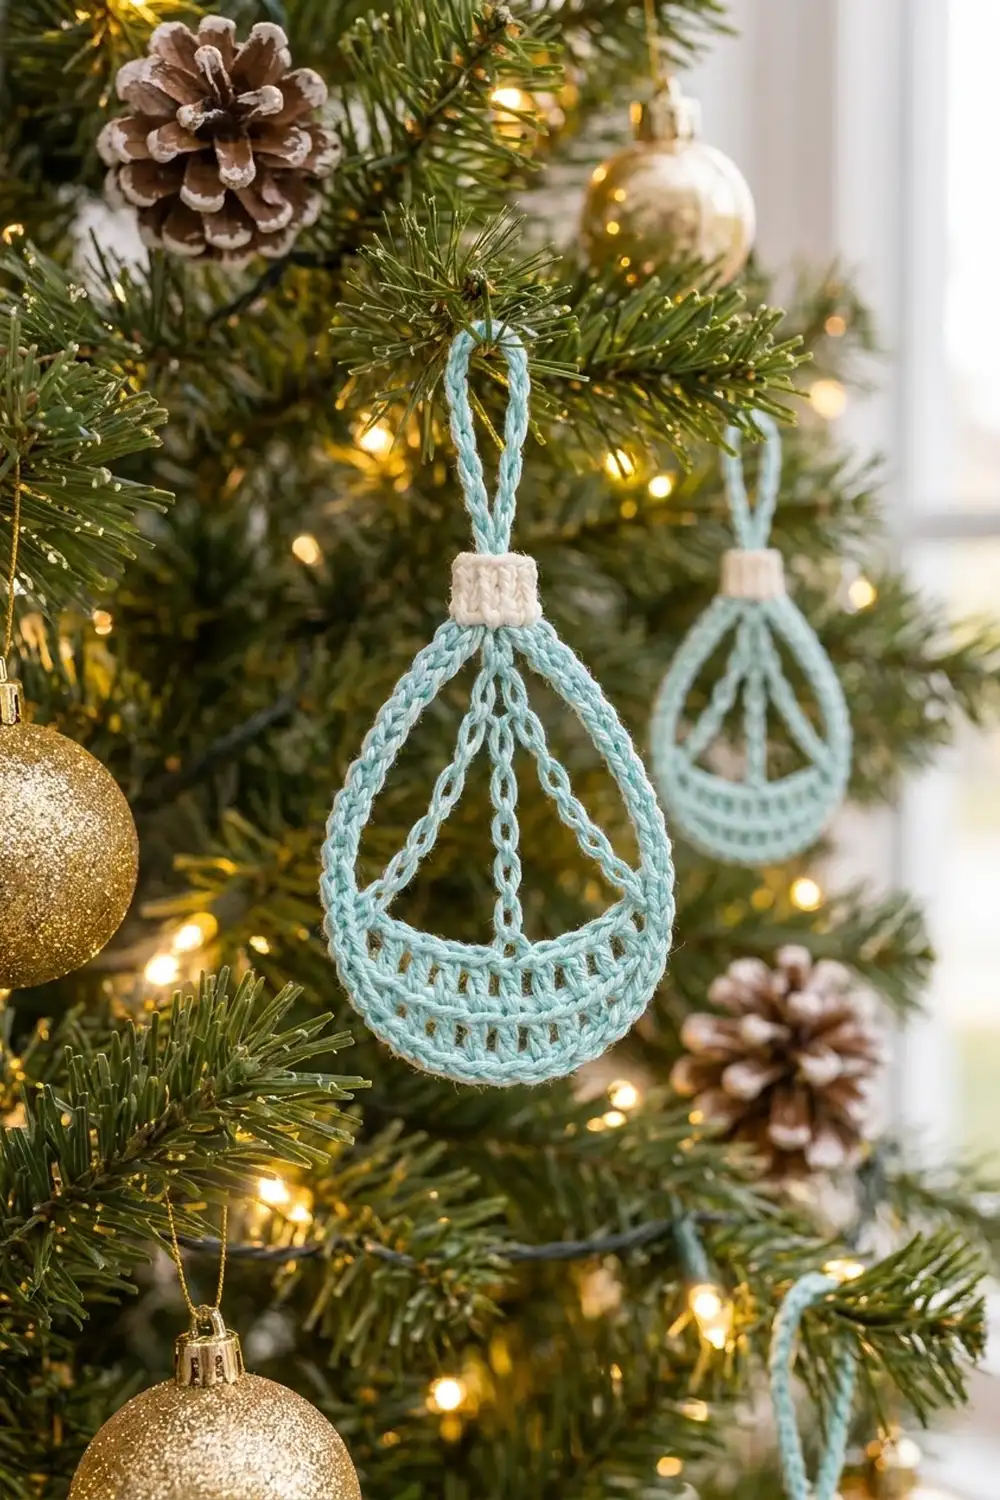
This little ornament is a sculptural teardrop outline. The open frame lets the tree lights show through, and inside it a small crescent “basket” of solid rows sits across the bottom. Three slim chain spokes run from the pinched top down to the basket. A cream ribbed collar covers the neck just below a chain hanging loop.
The palette is two soft colors: a frosty mint for the frame, spokes, basket and loop, and cream for the collar. It reads as modern and minimal. Hang it on a tree, use it as a gift-tag topper or tie it onto a wrapped box. It uses so little yarn that you can make a whole set from one small ball.
All terms in this pattern are US crochet terms. The finished teardrop body is 2.75 in (7.0 cm) wide and 3.5 in (8.9 cm) tall, measured from the neck to the bottom point. The hanging loop adds 1.25 in (3.2 cm), for a total height of 4.75 in (12.1 cm).
Here is how it’s built. You start with a chain ring and one round of single crochet, which becomes the frame. The basket is worked in short turned rows into the inner edge of the lower frame. You then add the spokes and the hanging loop, put a rope-style slip-stitch edge around the outside, and wrap a tiny cream collar around the gathered neck.
Finished Size and Construction
- Finished size: 2.75 in (7.0 cm) wide x 3.5 in (8.9 cm) tall body; 4.75 in (12.1 cm) including the loop
- Skill level: Easy-intermediate
- Terminology: US
- Yarn weight: Sport (#2), cotton or cotton blend
- Hook: 2.5 mm (US B/1 or C/2)
- Number of pieces: 1 ornament, made of one mint body worked in a single piece plus one small cream collar wrapped around the neck
- Layout: Single motif; it isn’t joined to anything else
- Piece size: 2.75 x 3.5 in (7.0 x 8.9 cm)
- Size before border: about 2.6 x 3.4 in (6.6 x 8.6 cm)
- Border depth: one slip-stitch round, which adds about 1/16 in (0.2 cm) per edge
Materials
Mercerized cotton is the best choice here. It gives crisp stitch definition, holds the teardrop shape after blocking and won’t shed onto your tree. A soft acrylic will also work, but the frame will be floppier.
Choose a pale, cool mint so the open spaces read clearly against green branches. Keep the collar color clearly lighter than the body so the neck stands out.
- Color A – Mint: 6 g / 25 m
- Color B – Cream: 1 g / 3 m
Tools:
- 2.5 mm crochet hook
- Tapestry needle
- 2 locking stitch markers
- Scissors
- Blocking mat and rustproof pins
- Spray bottle with water (spray starch is optional)
These quantities include a margin of about 30% for tails and gauge testing.
Abbreviations (US Terms)
- ch – chain
- sl st – slip stitch
- sc – single crochet
- dc – double crochet
- sc2tog – single crochet 2 together
- dc2tog – double crochet 2 together
- BLO – back loop only
- st(s) – stitch(es)
- RS – right side
Special technique – frame loops: In Rnd 1 you work each sc into the back bump of a chain. That leaves the top “V” of every foundation chain free along the inner edge of the ring. These free Vs are the frame loops, and the basket and spokes are worked into them. There are 60 frame loops, numbered 1 to 60 from the join in the direction you worked Rnd 1.
Gauge and Checkpoints
Gauge: 24 sc and 28 sc rows = 4 in (10.2 cm). Foundation chain: 7 ch = 1 in (2.5 cm).
The ornament is small, so make one complete ornament as your test piece and check it at each stage:
- After Rnd 1: Lay the ring flat as a circle. It should measure about 10 in (25.4 cm) around the outer edge, or 3.2 in (8.1 cm) across.
- After the basket: The top edge of Row 5 should measure about 2.5 in (6.4 cm) along its curve. At the center, the basket should be about 1.1 in (2.8 cm) deep, not counting the frame.
- After the border and blocking: The body should measure 2.75 x 3.5 in (7.0 x 8.9 cm).
If your piece is too big, go down 0.25 mm in hook size. If it’s too small, go up 0.25 mm. Either way, keep the stitch counts as written, because the basket decreases are matched to a 60-loop frame.
Part 1: Frame
With Color A, ch 60. Sl st to the first ch to form a ring, making sure the chain isn’t twisted.
Rnd 1 (RS): Ch 1. Working into the back bump of each ch, sc in each ch around. Join with sl st to the first sc. — 60 sc
Place a marker in frame loop 1, the free V of the first chain. This point becomes the top of the teardrop. Count around the inner edge to frame loop 17 and place the second marker there. Fasten off, leaving a 6 in (15.2 cm) tail.
The bottom center of the frame now falls between frame loops 30 and 31.
Keep the chain relaxed. A tight foundation shrinks the ring and makes the frame loops hard to find.
Part 2: Basket
You’ll work the basket back and forth into the frame loops. At the end of each row, slip stitch into the next frame loops to climb the side of the frame. This anchors the basket edge and makes each new row sit a little higher on the curve.
Row 1 (RS): With RS facing, join Color A with sl st in frame loop 17. Ch 1, then sc in frame loops 17 through 43. — 27 sc
Sl st in frame loops 44 and 45. Turn.
Row 2: Ch 2 (does not count as a st). Working into the Row 1 sts: dc in first 3 sc, dc2tog, dc in next 4 sc, dc2tog, dc in next 5 sc, dc2tog, dc in next 4 sc, dc2tog, dc in last 3 sc. — 23 dc (you work into all 27 sts, and the 4 decreases bring the count to 23)
Sl st in frame loops 16 and 15. Turn.
Row 3: Ch 1. Sc in first 2 dc, sc2tog, sc in next 3 dc, sc2tog, sc in next 5 dc, sc2tog, sc in next 3 dc, sc2tog, sc in last 2 dc. — 19 sc
Sl st in frame loops 46 and 47. Turn.
Row 4: Ch 2 (does not count). Dc in first 5 sc, dc2tog, dc in next 5 sc, dc2tog, dc in last 5 sc. — 17 dc
Sl st in frame loops 14 and 13. Turn.
Row 5: Ch 1. Sc in first 5 dc, sc2tog, sc in next 3 dc, sc2tog, sc in last 5 dc. — 15 sc
Sl st in frame loop 48. Fasten off and weave in the end.
The dc rows have an open, ladder-like texture and the sc rows lie flat between them, which gives the crescent its stripes. Each row is shorter than the one before, so the basket curves into a gentle smile without cupping. Stitch 8 of Row 5 is the center of the basket’s top edge.
If you crochet left-handed, the loops are numbered in the opposite direction, but every count stays the same.
Part 3: Spokes and Neck
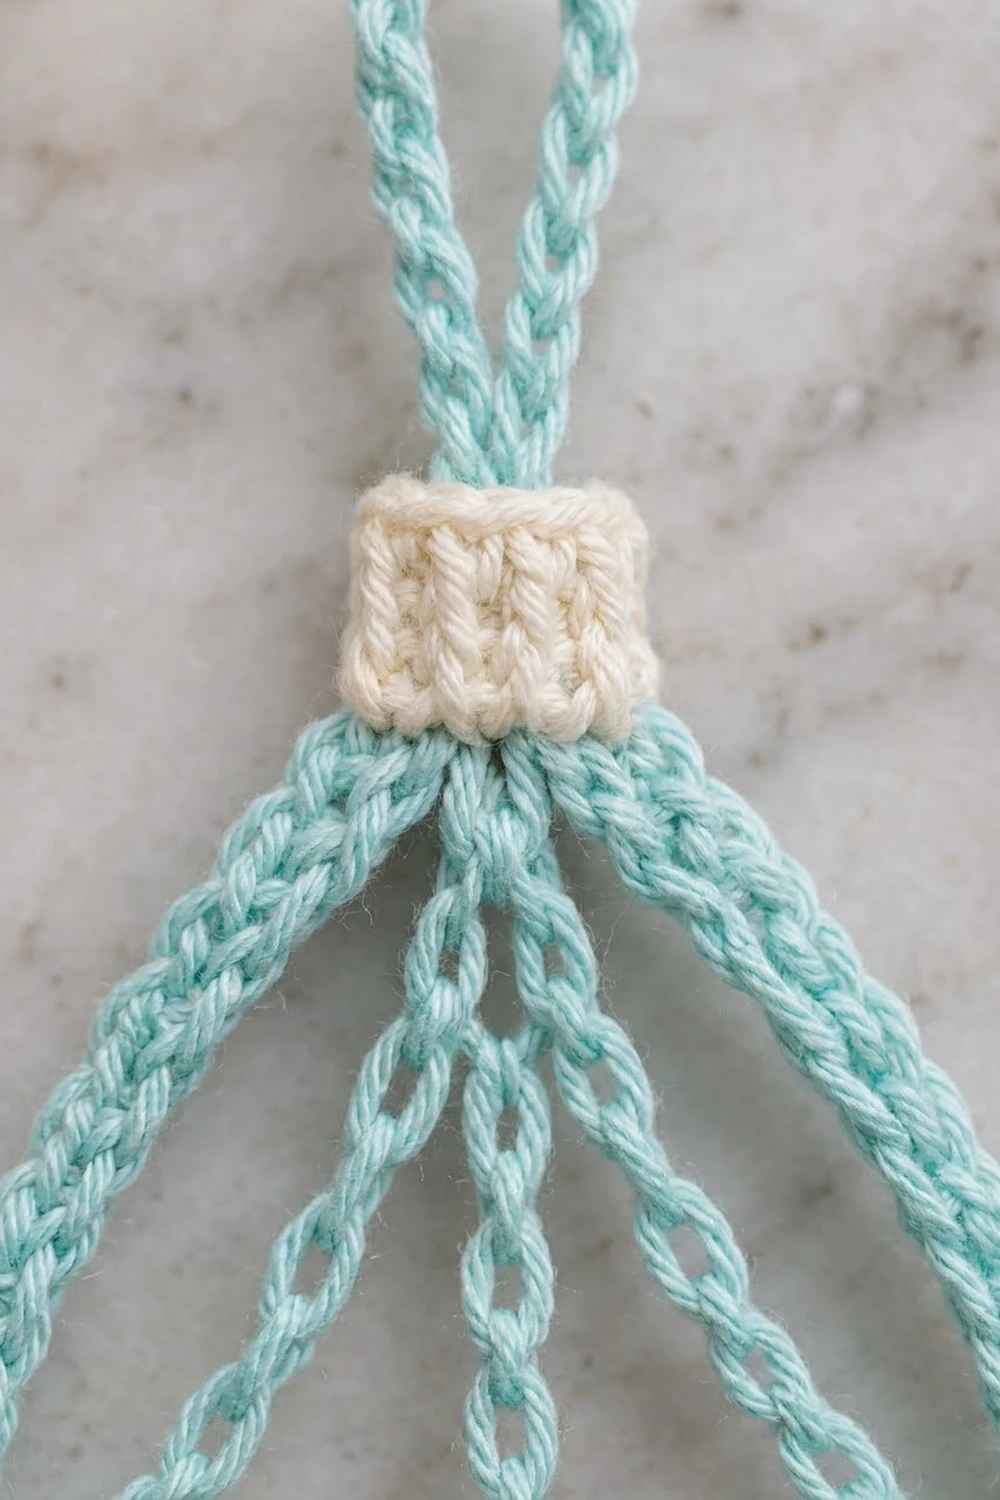
Center spoke: With RS facing, join Color A with sl st in frame loop 1 (the top). Ch 13, then sl st in st 8 of Row 5. Working back up the chain, sl st in the back bump of each ch. — 13 sl st
Sl st in frame loop 1. The center spoke is about 1.9 in (4.8 cm) long.
Left spoke: Ch 14, sl st in st 3 of Row 5. Sl st in the back bump of each ch back up to the top, then sl st in frame loop 1. — 14 sl st
Right spoke: Ch 14, sl st in st 13 of Row 5. Sl st in the back bump of each ch back up to the top, then sl st in frame loop 1. — 14 sl st
The side spokes are about 2 in (5.1 cm) long. They fan out at an angle while the center spoke drops straight down.
Chain the spokes at the same tension as the foundation. A slightly loose spoke will straighten during blocking, but a tight one will pull the top of the basket into a peak.
Close the neck: Fold the top of the frame so frame loops 58, 59 and 60 lie against frame loops 2, 3 and 4. Sl st through both layers 3 times to pull the two sides together into the teardrop point. Don’t fasten off.
Part 4: Hanging Loop
From the neck, ch 20. Sl st in the last sl st you made to form a loop. Sl st in the back bump of each ch around the loop. — 20 sl st
Sl st at the base of the loop and fasten off, leaving an 8 in (20.3 cm) tail. You’ll use this tail to secure the collar later. The finished loop stands about 1.25 in (3.2 cm) tall.
Part 5: Collar
With Color B, ch 4.
Row 1: Sc in 2nd ch from hook and in each remaining ch. Turn. — 3 sc
Rows 2–8: Ch 1, sc in BLO of each st. Turn. — 3 sc per row
The BLO rows form vertical ribs once the collar is wrapped. The strip measures about 0.5 in (1.3 cm) wide and 1.1 in (2.8 cm) long. Fasten off, leaving a 6 in (15.2 cm) tail. Set it aside until the border is done.
Border: Rope Edge
The border gauge is one sl st into each sc of Rnd 1. Work loosely so each sl st is as wide as the sc below it.
Rnd 2: With RS facing, join Color A with sl st in the top loops of the first sc of Rnd 1, beside the neck. Sl st in each sc around. — 60 sl st
That gives 30 sl st down the left side, from the neck to the bottom center, and 30 sl st up the right side, from the bottom center back to the neck. A teardrop has no corners, so there are no corner stitches to add. Join and fasten off.
Why the math works: Rnd 1 has 60 sc, and Rnd 2 puts exactly one sl st into each of them, so the outer edge stays at 60 sts. Because the count doesn’t change, the edge can’t ruffle or draw in. The result is a raised, braided rope line that thickens the frame by about 1/16 in (0.2 cm) per edge, taking the body from 2.6 x 3.4 in (6.6 x 8.6 cm) to 2.75 x 3.5 in (7.0 x 8.9 cm).
Attach the collar: Wrap the collar around the neck so it covers the joining slip stitches and the base of the loop, with the ribs running vertically. Whipstitch the short ends together at the back. Use the 8 in (20.3 cm) mint tail to tack the collar to the frame through the inside so it can’t slide. Weave in all ends.
Final Blocking
- Lightly mist the ornament until it’s damp but not wet.
- Lay it RS up on a blocking mat.
- Pin the bottom point of the frame, then pin the neck 3.5 in (8.9 cm) directly above it.
- Pin the widest point of each side, about 1.4 in (3.6 cm) above the bottom, so the body measures 2.75 in (7.0 cm) across.
- Pull each spoke straight and pin it where it meets the basket.
- Ease the top edge of the basket into a smooth smile curve.
- Pin the hanging loop into a narrow oval.
- For a stiffer finish, mist with light spray starch.
- Let the ornament dry completely before you unpin it.
Final Quality-Control Checklist
- Rnd 1 and the border each have 60 sts.
- The basket rows count 27, 23, 19, 17 and 15 sts.
- The basket is anchored evenly on both sides of the frame.
- The center spoke lands on st 8 of Row 5, and the side spokes land on sts 3 and 13.
- The neck is closed with no gap under the collar.
- The collar ribs run vertically, and the seam is at the back.
- The body measures 2.75 x 3.5 in (7.0 x 8.9 cm) after blocking.
- All ends are woven in and can’t be seen from the front.
Troubleshooting
The basket cups or buckles. Your dc rows are probably too loose. Recount the decreases, or work the basket only with a hook 0.25 mm smaller.
The basket pulls the frame inward. Your anchoring slip stitches are too tight. Redo them loosely, and climb exactly the number of frame loops written for each row.
The spokes sag. Chain more firmly, or remove 1 ch from each spoke. Starch also helps.
The spokes are uneven. Count again from st 1 of Row 5. Stitches 3, 8 and 13 should be evenly spaced, with 4 sts between each pair of spokes.
The ring is twisted. Check the chain before you join it. Once Rnd 1 is worked, a twist can’t be fixed, so start over.
The border ruffles. You worked more than one sl st into some sc. Rip back and work exactly 60.
The neck looks bulky under the collar. Close the neck with 2 sl sts instead of 3, or trim the tails closer after weaving them in.
The collar slides. Tack it through the frame on both the front and the back.
Care
Spot clean with cool water and mild soap, then reshape and dry flat. Store the ornament flat or hanging so the teardrop shape doesn’t get crushed.
Final Notes
Here is the measurement chain. A 60-chain ring gives 60 sc, about 10 in (25.4 cm) around. Basket Rows 1 to 5 decrease from 27 to 15 sts and form a crescent 1.1 in (2.8 cm) deep. Spokes of 13 and 14 chains reach from the neck to the basket. The 60-st rope border keeps the count the same, and blocking sets the body at 2.75 x 3.5 in (7.0 x 8.9 cm).
If your first ornament matches these numbers, the rest will too. Write down your hook size and keep a finished ornament nearby as a reference while you make a set.
Happy crocheting!