

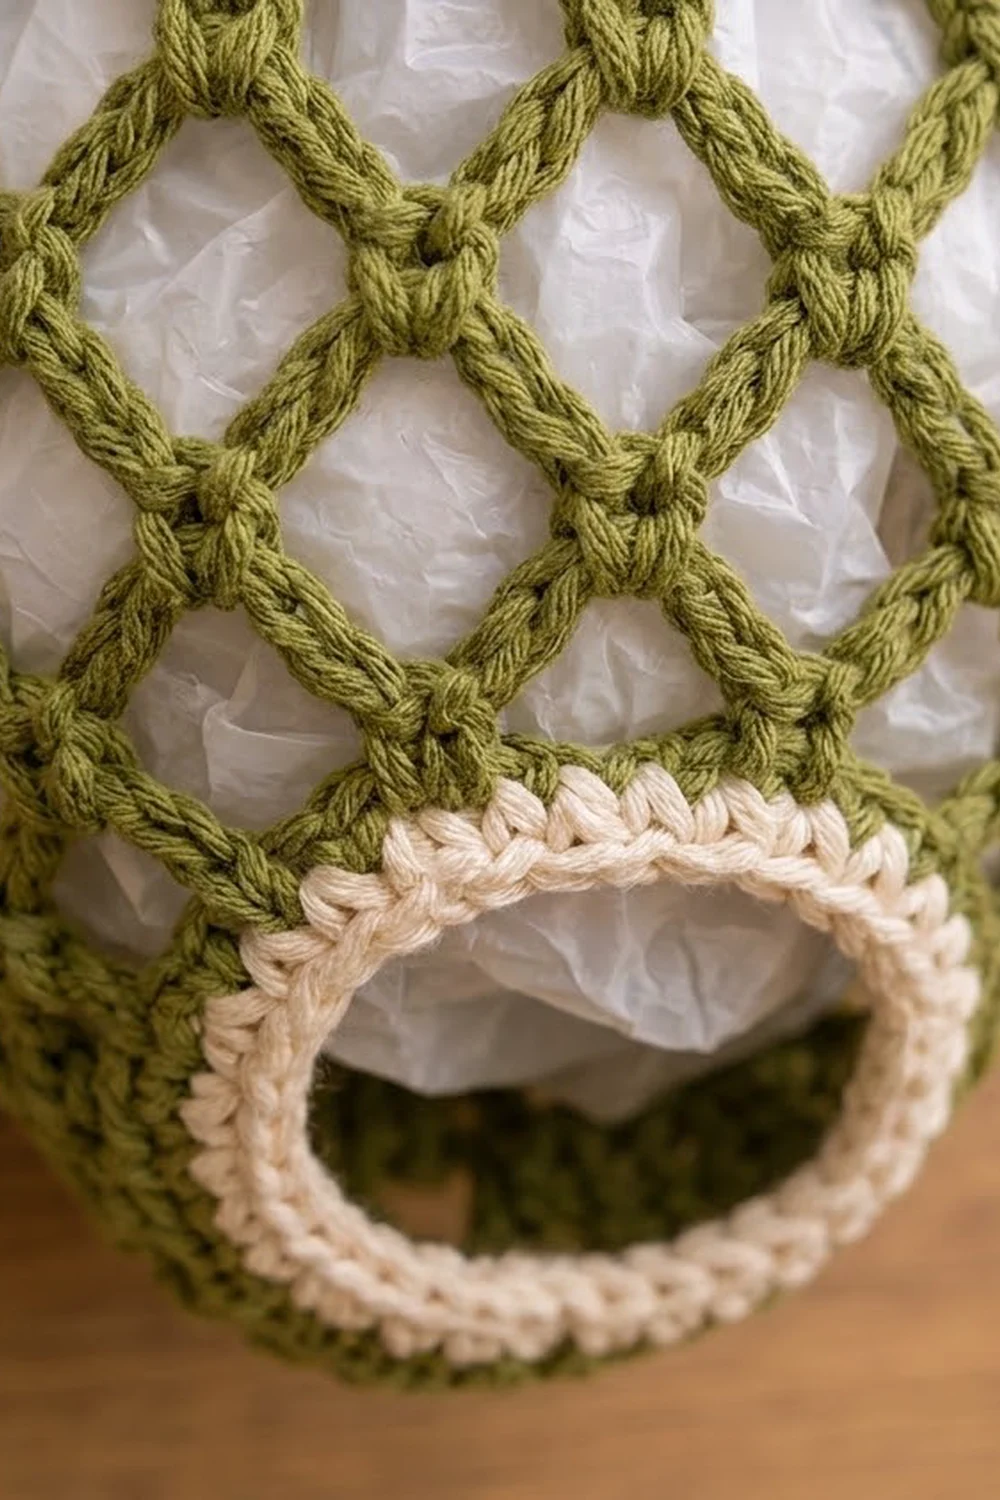
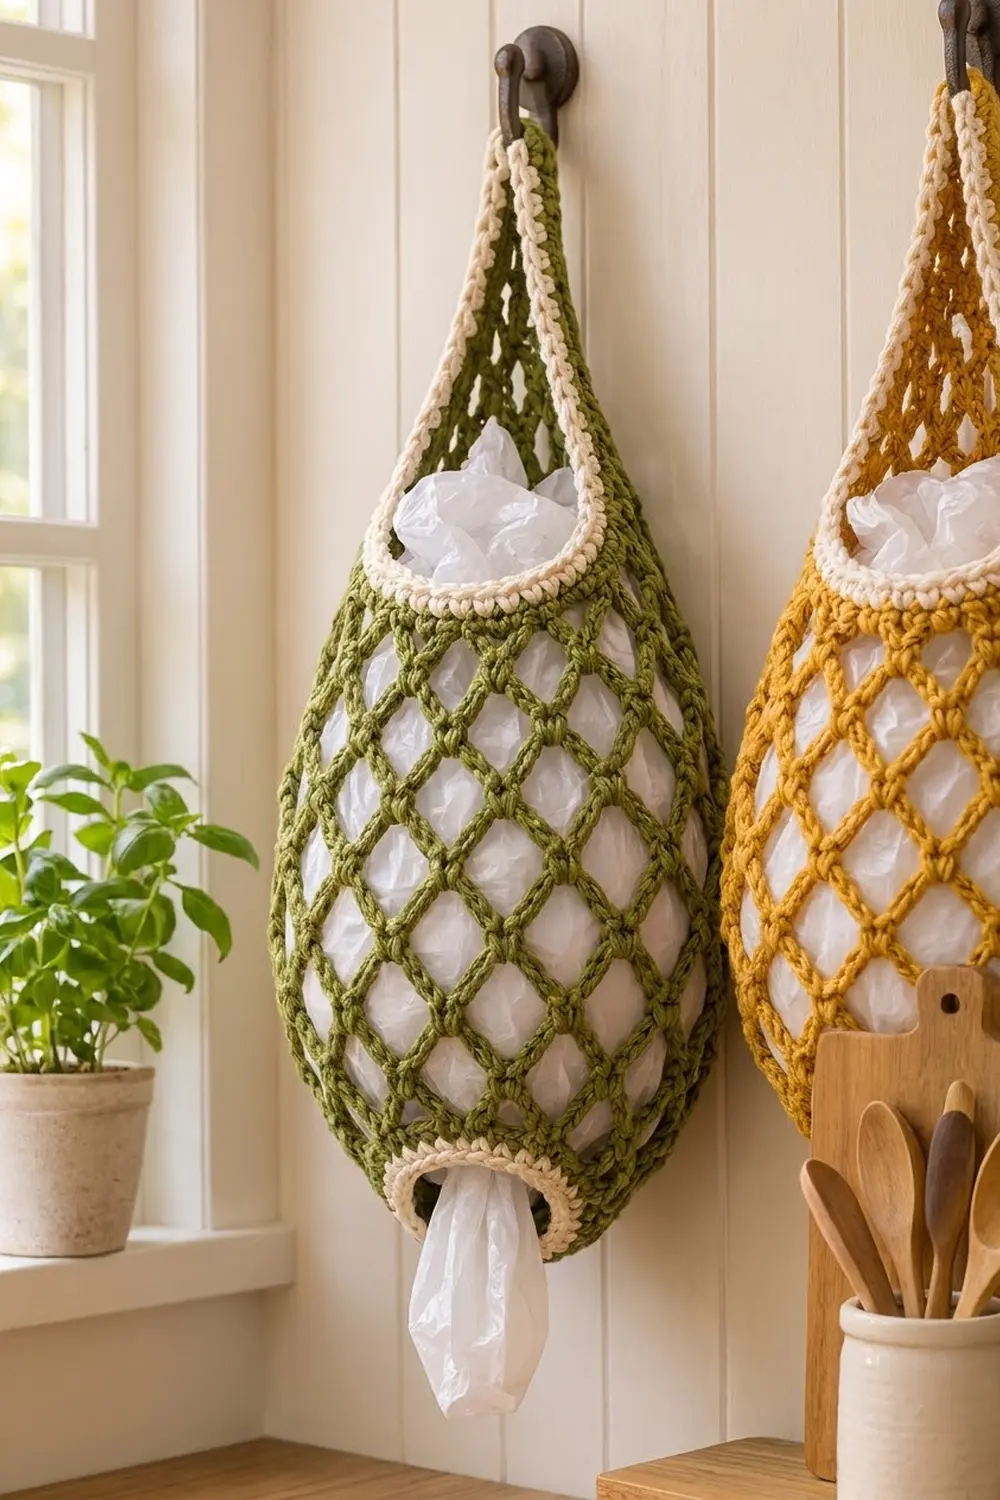
The Olive Grove Teardrop Bag Holder is a hanging net bag dispenser. You stuff used grocery bags in through the wide top opening and pull them out one at a time through the small ring at the bottom. The body is an open diamond mesh, so you can see the white bags inside, and the shape swells into a soft teardrop as you fill it.
The main color is olive green. Cream is used only for a twisted rim around the top opening, the bottom ring, and the hanging strap. The style is calm farmhouse-kitchen. The same pattern works in mustard, terracotta, or any other solid color.
This pattern uses US crochet terms. The finished holder measures about 14.4 in (36.6 cm) from the bottom ring to the top rim. With the strap and loop, the total hanging length is about 21.2 in (53.8 cm). When filled, it is about 9 in (22.9 cm) wide at the belly.
The holder is one piece worked from the bottom up. You start with a chain ring for the dispensing band and work chain-loop mesh rounds that increase, stay even, and then decrease. Next comes a solid top band, a short strap worked in rows, and a chain hanging loop. A two-round cream border finishes both ends.
Finished Size and Construction
- Finished size: body 14.4 in (36.6 cm) tall; total with hanger 21.2 in (53.8 cm); filled width about 9 in (22.9 cm)
- Skill level: Easy to Intermediate
- Terminology: US
- Yarn weight: Worsted (#4), cotton or cotton blend
- Hook: 5.0 mm (H-8)
- Number of pieces: 1
- Layout: worked in joined rounds from the bottom up, then the strap in rows
- Bottom ring: 9 in (22.9 cm) around, 4.5 in (11.4 cm) wide laid flat, about 2.9 in (7.4 cm) across
- Top opening: 12 in (30.5 cm) around, 6 in (15.2 cm) wide laid flat
- Size before border: 13.6 in (34.5 cm) tall
- Border depth: 0.4 in (1.0 cm) at each end
Materials
Use a smooth, firm cotton or cotton blend. Cotton holds the mesh open and does not stretch out of shape under the weight of the bags. Avoid fuzzy or very soft acrylic, which hides the diamond pattern.
- Olive green (Color A): 110 g, about 185 m (202 yd)
- Cream (Color B): 25 g, about 40 m (44 yd)
Tools:
– 5.0 mm (H-8) crochet hook
– 4 locking stitch markers
– Tapestry needle
– Scissors
– Measuring tape
– Spray bottle and a towel or balloon for blocking
These yarn amounts include a margin of about 15% for your gauge swatch and for differences in tension.
Abbreviations (US Terms)
- ch – chain
- sc – single crochet
- sl st – slip stitch
- st(s) – stitch(es)
- sc2tog – single crochet 2 together
- rev sc – reverse single crochet (crab stitch)
- RS – right side
- rep – repeat
Special stitch – loop-sc2tog: Insert the hook into the next ch-loop, yarn over, and pull up a loop. Insert the hook into the following ch-loop, yarn over, and pull up a loop. Yarn over and pull through all 3 loops on the hook. This joins two mesh loops into one knot.
Rev sc: Work single crochet from left to right (or right to left if you crochet left-handed). It makes a twisted, rope-like edge.
Gauge and Checkpoints
Gauge: 16 sc and 18 rounds = 4 in (10.2 cm) in solid sc. That works out to 4 sts and 4.5 rounds per inch.
The solid bands set every measurement in this pattern, so check the bottom band before you start the mesh. Treat it as your test piece. If it measures correctly after Round 4, the rest of the holder will follow.
Checkpoints:
– After Round 4: the band is 4.5 in (11.4 cm) wide laid flat and 0.9 in (2.3 cm) tall.
– After Round 9: the piece is about 4.2 in (10.7 cm) tall, measured hanging.
– After Round 15: the piece is about 9.6 in (24.4 cm) tall, measured hanging.
– After Round 20: the piece is about 12.9 in (32.8 cm) tall, measured hanging.
– After Round 23: the piece is 13.6 in (34.5 cm) tall, and the top band is 6 in (15.2 cm) wide laid flat.
If the band is too big: go down one hook size, to 4.5 mm (US 7). If it is too small: go up to 5.5 mm (I-9). Mesh height varies more than solid fabric. As a guide, a ch-5 round is about 0.6 in (1.5 cm) tall, a ch-6 round about 0.75 in (1.9 cm), and a ch-7 round about 0.9 in (2.3 cm). If your mesh runs short, add one ch-7 round.
Pattern
Bottom Dispensing Band
Work in joined rounds and do not turn. The ch 1 at the start of a round does not count as a stitch.
With Color A, ch 36. Join with a sl st to the first ch to form a ring, making sure the chain is not twisted.
Round 1: Ch 1, sc in each ch around, join with a sl st to the first sc. (36 sc)
Rounds 2–4: Ch 1, sc in each st around, join. (36 sc)
The band is now 9 in (22.9 cm) around and 0.9 in (2.3 cm) tall.
Mesh Body
“Sl st to center of next loop” means: sl st into each ch up to the middle chain of the loop. That is 3 sl sts for a ch-5 or ch-6 loop and 4 sl sts for a ch-7 loop.
Round 5 (set-up): Ch 1, sc in the first st. Ch 5, skip 2 sts, sc in the next st. Rep from * 10 more times. Ch 5, skip 2 sts, then join with a sl st to the first sc. (12 ch-5 loops)
The math: 36 sts ÷ 3 sts per repeat = 12 loops.
Round 6: Sl st to the center of the first loop, ch 1, sc in the same loop. Ch 5, sc in the next loop. Rep from * 10 more times. Ch 5, join to the first sc. (12 ch-5 loops)
Placing each sc in the middle of a loop staggers the knots, and that is what creates the diamonds.
Round 7 (increase): Sl st to the center of the first loop, ch 1. In the same loop work (sc, ch 5, sc). Ch 5, sc in the next loop, ch 5. In the next loop work (sc, ch 5, sc). Ch 5, sc in the next loop, ch 5. Rep from * 4 more times. Join to the first sc. (18 ch-5 loops)
Each of the 6 repeats places 3 sc, and each sc starts one new loop. 6 × 3 = 18 loops.
Rounds 8–9: Sl st to the center of the first loop, ch 1, sc in the same loop. Ch 6, sc in the next loop. Rep from * 16 more times. Ch 6, join. (18 ch-6 loops)
Rounds 10–15: Work the same as Round 8, but use ch 7 instead of ch 6. (18 ch-7 loops)
This forms the belly of the teardrop, where the diamonds are largest.
Rounds 16–17: Work the same as Round 8, with ch 6. (18 ch-6 loops)
Round 18: Work the same as Round 8, but use ch 5. (18 ch-5 loops)
Round 19 (decrease): Sl st to the center of the first loop, ch 1, sc in the same loop, ch 5. Work loop-sc2tog over the next 2 loops, ch 5. Sc in the next loop, ch 5, loop-sc2tog over the next 2 loops, ch 5. Rep from * 4 more times. Join to the first sc. (12 ch-5 loops)
Each repeat uses 3 old loops and makes 2 new knots, so 6 × 2 = 12 loops.
Round 20: Work the same as Round 6. (12 ch-5 loops)
Top Band
Round 21: Ch 1. Work 4 sc into each ch-5 loop around, then join to the first sc. (48 sc)
The math: 12 loops × 4 sc = 48 sc.
Rounds 22–23: Ch 1, sc in each st around, join. (48 sc)
Number the stitches of Round 23 from 1 to 48, starting with the first sc after the join. Mark sts 45 and 4. The 8 sts from 45 through 48 and 1 through 4 are centered over the seam, so the seam is hidden under the strap. Do not fasten off.
Hanging Strap
Now you work in rows on the 8 strap sts only, turning at the end of each row.
Row 1: Sl st into st 45 from the RS. Ch 1, sc in sts 45, 46, 47, 48, 1, 2, 3, and 4. Turn. (8 sc)
Row 2: Ch 1, sc in each st. Turn. (8 sc)
Row 3: Ch 1, sc2tog, sc in the next 4 sts, sc2tog. Turn. (6 sc)
Rows 4–6: Ch 1, sc in each st. Turn. (6 sc)
Row 7: Ch 1, sc2tog, sc in the next 2 sts, sc2tog. Turn. (4 sc)
Rows 8–24: Ch 1, sc in each st. Turn. (4 sc)
The strap now has 24 rows. It is 5.3 in (13.5 cm) long, narrowing from 2 in (5.1 cm) wide at the base to 1 in (2.5 cm).
Hanging loop: At the end of Row 24, ch 16. Bend the chain over and sl st into the first sc of Row 24, at the opposite edge. Turn. Work 20 sc into the ch-16 space, then sl st into the last sc of Row 24. Fasten off. (20 sc around the loop)
The 20 sc pack the chain firmly, so the loop holds its shape over a hook.
Border
Border gauge: Work 1 sc in each stitch and 1 sc in each row end. Because sc rows are slightly taller than sc stitches are wide, one sc per row end gives a firm edge on the strap that does not ruffle.
Top Border
Round 1: With the RS facing, join Color B in st 5 of Round 23. Ch 1 and work these sections, then join to the first sc. (108 sc)
– Sc in sts 5 through 44 along the front opening. (40 sc)
– Sc in each row end up the first side of the strap. (24 sc)
– Sc in each sc around the hanging loop. (20 sc)
– Sc in each row end down the other side of the strap. (24 sc)
Round 2: Ch 1, rev sc in each st around, then join. Fasten off. (108 rev sc)
Why the math works: The front opening uses all 48 top-band sts except the 8 strap sts, so 48 − 8 = 40. Each strap side has exactly 24 rows, and the loop has 20 sc. That gives 40 + 24 + 20 + 24 = 108, and no stitches are added at any corner.
Bottom Border
Turn the holder upside down. Join Color B in any free loop of the foundation chain.
Round 1: Ch 1, sc in each free loop of the foundation chain, then join. (36 sc)
Round 2: Ch 1, rev sc in each st around, join. Fasten off. (36 rev sc)
One sc per foundation chain keeps the ring at exactly 9 in (22.9 cm) around, matching Round 1.
Weave in all ends along the solid bands, not through the mesh, where they would show.
Final Blocking
- Spray the whole holder lightly with water until the yarn is damp, but not dripping.
- Stuff it firmly with a rolled towel, or put in a balloon inflated to about 9 in (22.9 cm) across.
- Gently pull the mesh so the diamonds line up evenly in straight diagonal lines.
- Pinch the top band into an oval and the bottom ring into a circle.
- Lay the strap flat and straighten the hanging loop.
- Let it dry completely, then remove the stuffing.
Final Quality-Control Checklist
- The bottom ring measures 4.5 in (11.4 cm) laid flat and is not twisted.
- The mesh has 12, then 18, then 12 loops, with no skipped loops.
- The diamonds are larger at the belly (ch 7) and smaller near each end (ch 5).
- The top band has 48 sc and lies 6 in (15.2 cm) flat.
- The strap is centered over the round seam.
- The cream top border has 108 sts and the bottom border has 36 sts.
- The hanging loop slides easily over a standard wall hook.
- All ends are hidden in the solid bands.
Troubleshooting
The mesh twists in a spiral: You probably missed the sl sts to the center of the loop. Every round must start from the middle of a loop.
There are too many or too few loops: Count the knots, not the chains. Rounds 7 and 19 are the only rounds that change the loop count.
The bags fall out the bottom: Your bottom ring is too loose. Work Rounds 1–4 with a hook one size smaller.
The strap flares: Check that you worked exactly one sc per row end in the border.
The rev sc edge is tight: Make each rev sc loop slightly taller, or use a hook one size larger for the border only.
The holder is too short: Add one more ch-7 round after Round 15. Each extra round adds about 0.9 in (2.3 cm).
Care
Hand wash in cool water, press out the water in a towel, and reshape it to dry flat. Don’t wring it or tumble dry it, because that stretches the mesh.
Final Notes
Every measurement in this pattern follows from the bottom band. The 36-st bottom band sets the 9 in (22.9 cm) ring and the 12 set-up loops. Those 12 loops increase to 18 for the belly, which is about 9 in (22.9 cm) wide when filled, then decrease back to 12. The 12 loops become the 48-st top band, 6 in (15.2 cm) flat. Taking 8 of those sts for the strap leaves 40 front sts, which gives the 108-st cream border. If your gauge is right at Round 4, every later count will fall into place.
Happy crocheting!