

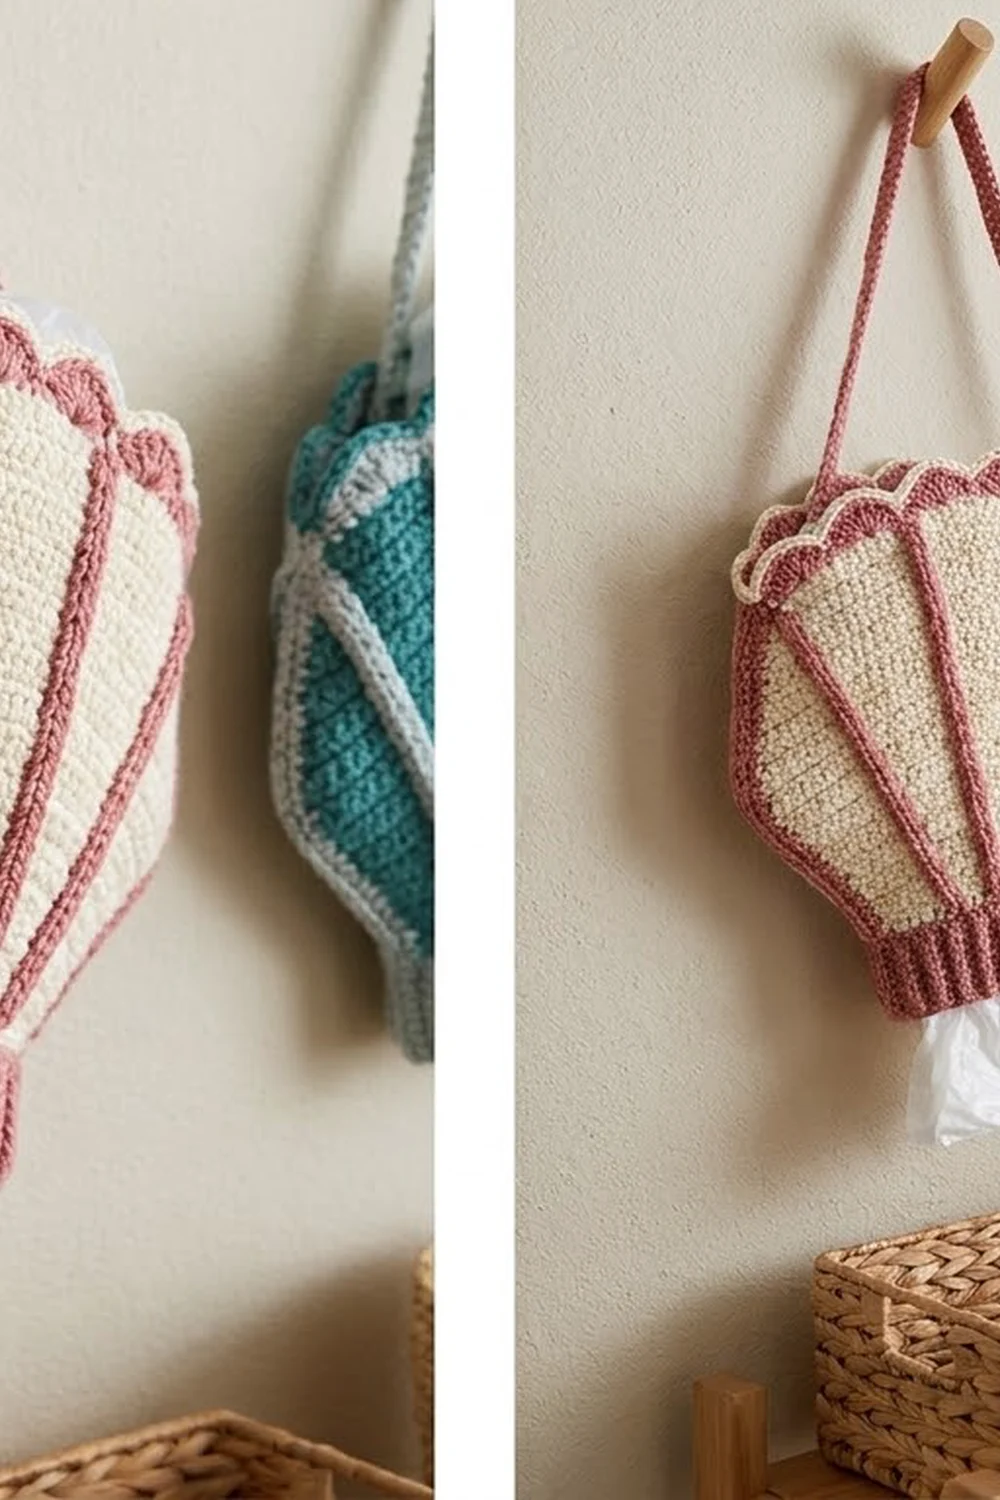
This scallop shell bag holder is a practical piece of kitchen decor. It has two fan-shaped panels with raised ribs, a scalloped opening at the top, and a ribbed dispenser band at the bottom. You push plastic bags in at the top and pull them out one at a time from the bottom.
The sample uses two colors. The wedges are soft cream, and the raised ribs, side outline, scallops, base band and strap are dusty rose. A final cream round outlines the scallops. The style is coastal and calm. It also works well in teal and pale gray, as shown in the second sample.
This pattern uses US crochet terms. The finished holder is about 10.5 in (26.7 cm) wide and 9.5 in (24.1 cm) tall, not counting the strap.
Here is the construction in short. You work two identical panels in turned rows of dc, fanning up from a narrow base. You add rose surface slip stitches over the raised ribs, then seam the panels along the sides. Next you work the ribbed base band and the scalloped top border in the round. Last, you sew on a simple strap.
Finished Size and Construction
- Finished size: 10.5 in (26.7 cm) wide x 9.5 in (24.1 cm) tall, plus the strap
- Skill level: Intermediate (post stitches, surface slip stitch)
- Terminology: US
- Yarn weight: Worsted (#4), cotton or a cotton blend
- Hook: 5.0 mm (H-8)
- Number of pieces: 3 (2 panels and 1 strap)
- Layout: Front panel and back panel, wrong sides together, seamed at the sides
- Panel size: 3.75 in (9.5 cm) across the base, 10 in (25.4 cm) across the top, 7 in (17.8 cm) tall
- Size before border and band: 7 in (17.8 cm) tall once seamed
- Border depth: Top border 1 in (2.5 cm); base band 1.5 in (3.8 cm)
Materials
Choose a smooth, firm worsted cotton of about 170 m per 100 g. Cotton holds the fan shape and shows the ribs clearly. Avoid fuzzy or very soft acrylic, because the holder will sag once it is full of bags.
- Color A, cream: 50 g (about 85 m), used for the panels and the final border round
- Color B, dusty rose: 50 g (about 85 m), used for the ribs, seams, band, scallops and strap
Both quantities include a safety margin of roughly 15%.
Tools:
– 5.0 mm (H-8) crochet hook
– Tapestry needle
– 4 locking stitch markers
– Scissors
– Measuring tape
– Blocking mat and pins
– Spray bottle
Abbreviations (US Terms)
- ch: chain
- sl st: slip stitch
- sc: single crochet
- dc: double crochet
- sc2tog: single crochet 2 together
- fpdc: front post double crochet
- bpdc: back post double crochet
- sk: skip
- st(s): stitch(es)
- RS / WS: right side / wrong side
Rib stitch (special stitch): On RS rows, work fpdc around the rib stitch below. On WS rows, work bpdc around the rib stitch below. Both versions push the post toward the RS, so the rib stays raised on the front of the panel.
Surface slip stitch: Hold the yarn behind the work. Insert the hook from front to back through the fabric, pull up a loop, and draw it through the loop on the hook.
Gauge and Checkpoints
Gauge: 14 dc and 8 rows = 4 in (10.2 cm). One dc row is 0.5 in (1.3 cm) tall.
Make one full panel before you start the second one. It works as your gauge test.
Checkpoints:
1. Row 1: 13 sts measure 3.75 in (9.5 cm).
2. Row 14: The panel is 7 in (17.8 cm) tall, and the top edge measures 10 in (25.4 cm) straight across.
3. After seaming: Each side seam measures 7 in (17.8 cm).
4. After the base band: The holder is 8.5 in (21.6 cm) tall.
5. After the border: The holder is 9.5 in (24.1 cm) tall and 10.5 in (26.7 cm) wide.
If the panel is too big, go down one hook size. If it is too small, go up one hook size. Do not change any stitch counts, because the border and band depend on them.
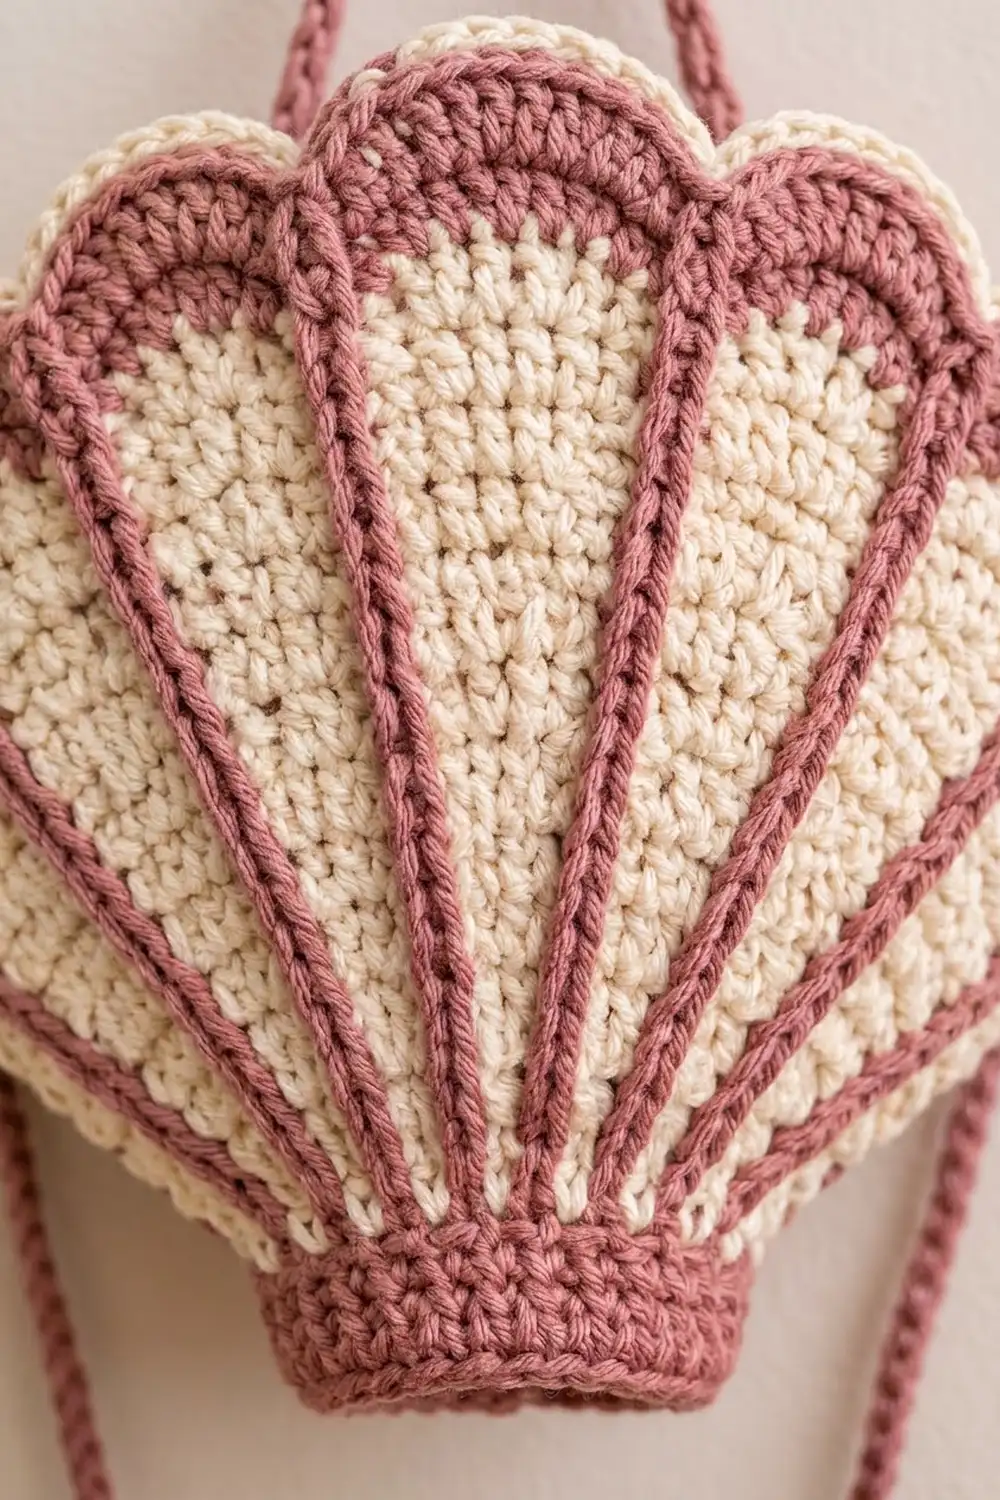
Panel (Make 2)
Use Color A (cream). The ch-2 at the start of each row does not count as a stitch.
Each row has the same layout:
– 1 edge dc at each end
– 6 cream wedges
– 5 rib sts, one between each pair of wedges
The wedges start 1 stitch wide and grow by 1 stitch on every third row.
Row 1 (RS): Ch 15. Dc in 3rd ch from hook and in each ch across. Turn. (13 sts)
Place a marker in the 3rd, 5th, 7th, 9th and 11th sts. These are the rib sts. The layout is now: edge, [wedge 1, rib] x 5, wedge 1, edge.
Row 2 (WS): Ch 2. Dc in first st. Dc in next st, bpdc around next st (rib). Repeat from * 4 more times. Dc in next st, dc in last st. Turn. (13 sts)
Row 3 (RS, increase): Ch 2. Dc in first st. 2 dc in next st, fpdc around next st. Repeat from * 4 more times. 2 dc in next st, dc in last st. Turn. (19 sts; each wedge is 2 sts)
Rows 4–5: Ch 2. Dc in first st. Dc in each wedge st, then work a rib st. Repeat from * 4 more times. Dc in each st of the last wedge, dc in last st. Turn. (19 sts)
Row 6 (WS, increase): Ch 2. Dc in first st. 2 dc in first wedge st, dc in next wedge st, bpdc around rib. Repeat from * 4 more times. 2 dc in first st of last wedge, dc in next st, dc in last st. Turn. (25 sts; wedges 3 sts)
Rows 7–8: Work even as in Rows 4–5. (25 sts)
Row 9 (RS, increase): Work as in Row 6, with 2 dc in the first st of each wedge and dc in the remaining wedge sts. (31 sts; wedges 4 sts)
Rows 10–11: Work even. (31 sts)
Row 12 (WS, increase): Work as in Row 9. (37 sts; wedges 5 sts)
Rows 13–14: Work even. (37 sts)
Fasten off and weave in the ends.
Stitch count check: 2 edge sts + (6 wedges x 5 sts) + 5 rib sts = 2 + 30 + 5 = 37. ✓
Checkpoint: The panel is 7 in (17.8 cm) tall and fans out from a 3.75 in (9.5 cm) base to a 10 in (25.4 cm) top edge.
Rose Rib Lines
With the RS facing, join Color B with a sl st at the base of the first rib, in the foundation chain. Work surface slip stitches straight up the center of the raised rib, 2 sl sts per row, to the top of Row 14 (28 sl sts). Fasten off.
Repeat for all 5 ribs, then do the same on the second panel.
Keep the slip stitches loose. If they are tight, the ribs will pucker and the panel will cup inward.
Make All Pieces
Make these pieces before you start joining:
- Panels: 2, each worked in Color A with 5 Color B rib lines
- Strap: 1 in Color B, worked after the border (see Strap below)
Layout (side view of the stack):
[ Front panel, RS out ]
[ Back panel,  RS out ]
 WS faces WS, with tops, bases and side edges matched
Joining
Place the panels WS together with the RS facing outward. Match the top edges (Row 14), the bases (foundation chains) and the side edges.
Method: Join Color B at the bottom left corner, working through both layers. Sc through the row ends of both panels up the side, 2 sc per dc row (28 sc). Fasten off.
Repeat on the right side, again working from the bottom corner up to the top.
Stitch logic: Each row end on the front lines up with the matching row end on the back, so the 2 sc always pass through the same row on both panels. If the edges drift, check that you are in matching rows.
Tension: Work at your normal tension, or slightly looser. A tight seam pulls the sides inward and narrows the top opening.
Checkpoint: Each seam is 7 in (17.8 cm) long. Leave the top and base open. The rose seam becomes the outer side outline of the shell.
Base Band
Join Color B at one bottom seam. Work in rounds with the RS facing, and join each round with a sl st to the first st.
Rnd 1: Ch 1. Sc in each foundation-chain loop across the front panel (13 sc), then across the back panel (13 sc). (26 sc)
Rnds 2–3: Ch 2 (does not count as a st). Fpdc around next st, bpdc around next st. Repeat from * around. (26 sts)
Rnd 4: Ch 1. Sc in next 2 sts, sc2tog. Repeat from * 5 more times. Sc in last 2 sts. (20 sts)
Fasten off.
Checkpoint: The band is 1.5 in (3.8 cm) deep, the opening is about 5 in (12.7 cm) around, and the holder is now 8.5 in (21.6 cm) tall.
Border
Border gauge: Each border round adds height. Rnd 1 adds about 0.25 in (0.6 cm), Rnd 2 about 0.5 in (1.3 cm), and Rnd 3 about 0.25 in (0.6 cm), for 1 in (2.5 cm) in total.
Starting count: 2 panels x 37 sts per top edge = 74 sts. The side seams do not add any extra stitches.
Rnd 1 (Color B): Join at the top of one side seam. Ch 1. Sc in each of the 37 sts across the front top edge and each of the 37 sts across the back top edge. Join with a sl st. (74 sc)
These sc sit directly above Row 14, so the edge sts, wedge sts and rib sts are in the same positions as on the panel.
Rnd 2 (Color B, scallops): Ch 1. Work the following across the front panel:
– Sc in the edge st.
– Sk 2 sts, 7 dc in the next st (the center st of the wedge), sk 2 sts, sc in the next st (above the rib). Repeat from * 4 more times.
– Sk 2 sts, 7 dc in the next st, sk 2 sts, sc in the last edge st.
Repeat across the back panel. Join with a sl st. Fasten off.
Per panel: 7 sc + 6 shells x 7 dc = 49 sts. Total: 98 sts (14 sc + 84 dc).
Rnd 3 (Color A, outline trim): Join at any sc. Ch 1. Sc in each st around, working 2 sc in the 4th (center) dc of each shell. Join with a sl st. Fasten off.
Count: 98 sts worked 1 per existing st + 12 extra sts (1 per shell) = 110 sc.
Why the math works:
– Each wedge is exactly 5 sts wide. “Sk 2, shell in 1, sk 2” uses those 5 sts and lands each sc above a rib.
– 6 wedges + 5 ribs + 2 edges = 37, so the repeat fits each panel exactly.
– The 2 extra sc at each shell tip in Rnd 3 keep the rounded scallops from cupping.
Checkpoint: The holder is 9.5 in (24.1 cm) tall and 10.5 in (26.7 cm) wide across the scallops.
Strap
With Color B, ch 51.
Row 1: Sc in 2nd ch from hook and in each ch across. (50 sc)
The strap is 12.5 in (31.8 cm) long. Fasten off, leaving a 10 in (25.4 cm) tail at each end.
Sew one end to the inside of each side seam, just below the border, using several firm passes of the tail.
Final Blocking
- Dampen the holder with the spray bottle until it is evenly moist but not dripping.
- Stuff it lightly with a dry towel so the panels sit apart.
- Lay it flat on the blocking mat and shape the fan so the ribs radiate evenly from the base.
- Pin each scallop tip so all 12 sit at the same height.
- Check the measurements: 10.5 in (26.7 cm) wide and 9.5 in (24.1 cm) tall.
- Let it dry completely, then remove the towel and pins.
Final Quality-Control Checklist
- Each panel has 37 sts in Row 14 and 6 wedges of 5 sts.
- All 10 rib lines are straight and lie flat.
- Each side seam has 28 sc and measures 7 in (17.8 cm).
- The base band has 20 sts and the opening is about 5 in (12.7 cm) around.
- Border Rnd 2 has 12 shells, with every sc sitting above a rib or an edge st.
- Border Rnd 3 has 110 sc.
- The strap is attached securely at both seams.
- All ends are woven in on the inside.
Troubleshooting
- Ribs lean to one side: You worked the post stitch around the wrong st. Count the wedge sts on each row.
- Panel cups or ruffles: Your increase rows are in the wrong place. Increase only on Rows 3, 6, 9 and 12.
- Ribs pucker: The surface slip stitches are too tight. Redo them more loosely, or use a 5.5 mm hook.
- Scallops don’t line up with the ribs: Border Rnd 1 does not have 37 sts per panel. Count and correct it.
- Bags fall out of the base: Add a second decrease round: sc 3, sc2tog 4 times (16 sts).
- Strap stretches: Work a second row of sl sts along the strap.
Care
Hand wash in cool water and lay flat to dry, reshaping the scallops while the holder is damp. Do not tumble dry.
Final Notes
Here is the measurement chain for the whole holder:
– Row 1: 13 sts, 3.75 in (9.5 cm) wide
– Row 14: 37 sts, with a 10 in (25.4 cm) top edge and 7 in (17.8 cm) panel height
– Side seams: 28 sc per side
– Base band: 26 sts, decreased to 20, which brings the holder to 8.5 in (21.6 cm) tall
– Border: 74 sc, then 98 sts in the scallop round, then 110 sc, for a finished holder 9.5 in (24.1 cm) tall and 10.5 in (26.7 cm) wide
If every checkpoint matches, your shell will hang neatly and hold a generous stack of bags.
Happy crocheting!