

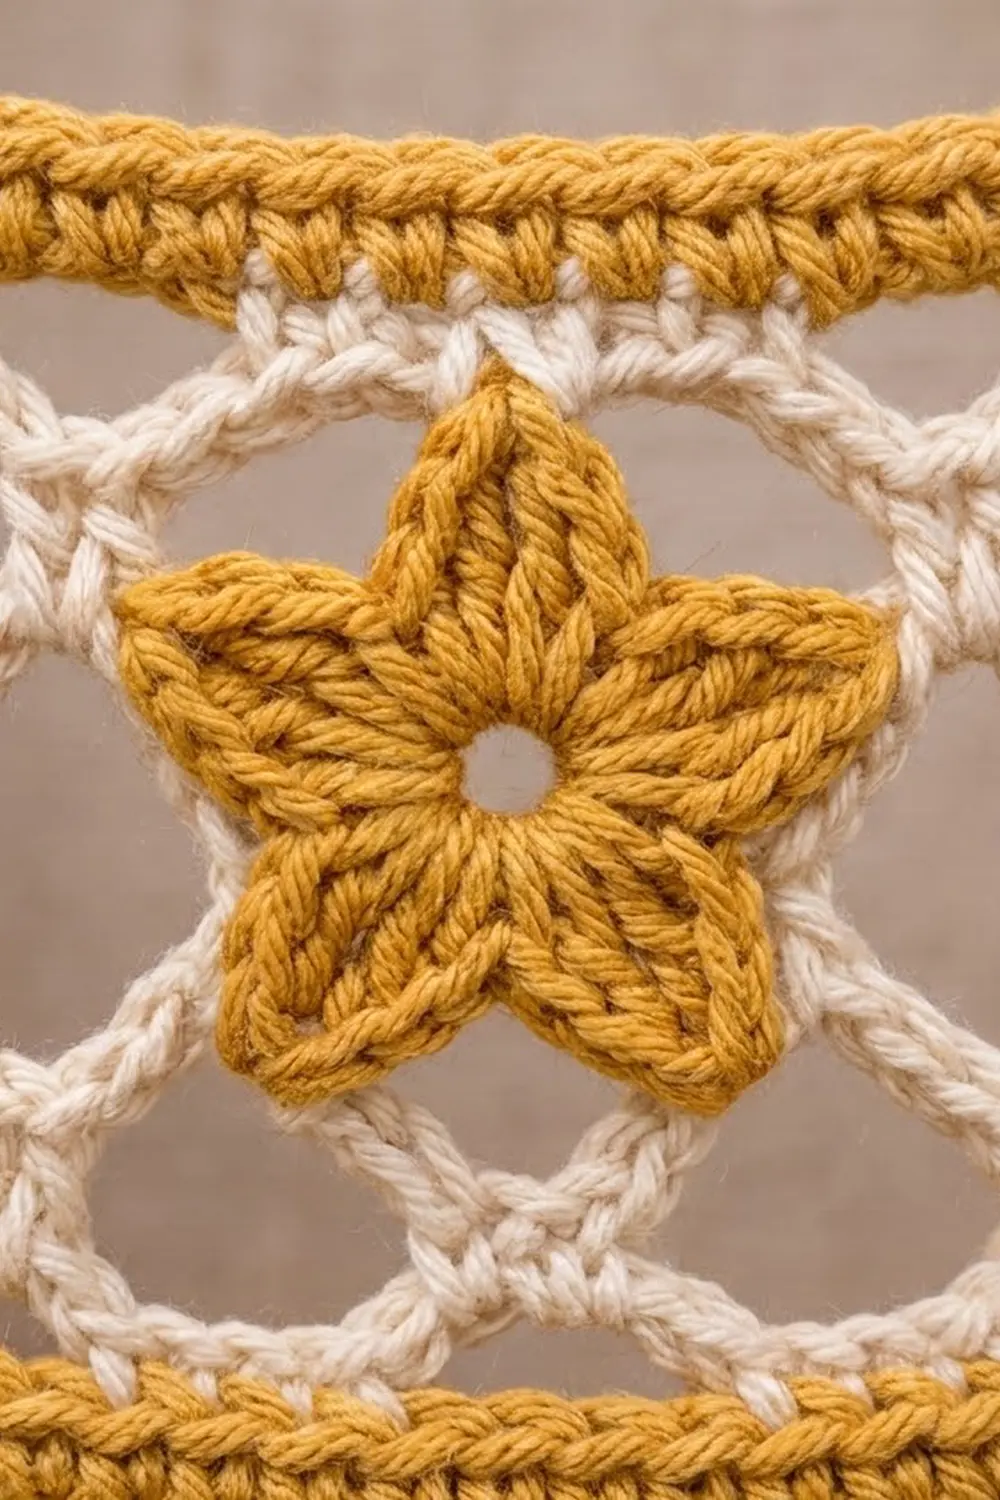
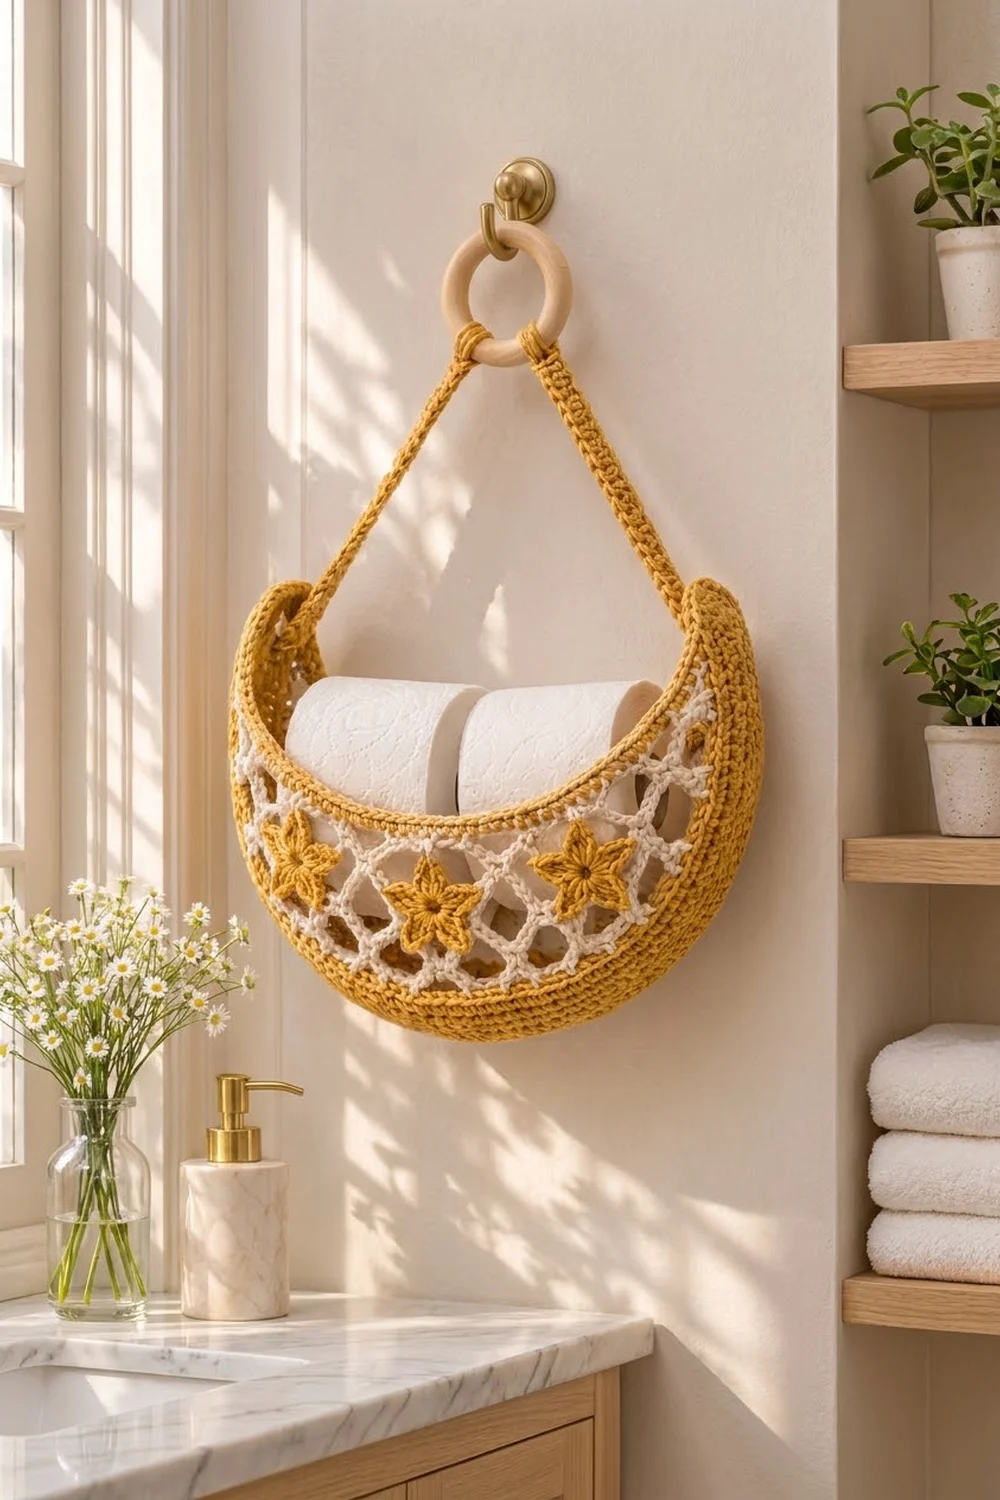
This half-moon wall basket combines warm mustard gold with a cream diamond mesh. Five little gold stars are sewn across the front. It hangs from a wooden ring and holds two toilet paper rolls, a small hand towel or a few bath items.
The front panel has a solid gold band at the top and bottom with an open cream net in between. The back panel is solid gold single crochet that sits flat against the wall. A rounded reverse single crochet edge finishes the opening.
The pattern uses US crochet terms. On the wall, the basket measures about 12 in (30.5 cm) across the front tips. The body is 4.25 in (10.8 cm) deep at the center front, and the total hanging height is about 12 in (30.5 cm) including the ring.
Construction overview: You work two curved panels flat in rows, starting from the short inner (top) edge and increasing outward so each panel bends into an arc. Next, crochet five stars and two straps. Sew the stars onto the mesh, join the panels along their curved outer edge, add a two-round border around the opening, and attach the straps to a wooden ring.
Finished Size and Construction
- Hung size: about 12 in (30.5 cm) wide across the front tips; about 3.5 in (8.9 cm) deep from front to back at the center
- Skill level: Intermediate
- Terminology: US
- Yarn weight: worsted (#4) cotton
- Hook: 5.0 mm (H-8)
- Number of pieces: 9 (1 front panel, 1 back panel, 5 stars, 2 straps), plus 1 wooden ring
- Layout: front panel over back panel, joined along the curved outer edge; stars spaced across the front mesh; one strap at each front tip
- Front panel before border: 10 in (25.4 cm) along the inner curve, 18 in (45.7 cm) along the outer curve, 4 in (10.2 cm) deep
- Back panel before border: the same inner and outer curve lengths, 2.9 in (7.4 cm) deep
- Size before border: the front is 4 in (10.2 cm) deep at center
- Border depth: 0.25 in (0.6 cm), which brings the front to 4.25 in (10.8 cm) and the back to 3.15 in (8.0 cm)
Materials
Use a smooth, firm worsted-weight cotton or cotton blend. Cotton holds the crescent shape and doesn’t stretch much when the basket is loaded. Avoid fuzzy yarns, because they blur the mesh.
- Color A, mustard gold: 100 g / about 170 m (186 yd)
- Color B, cream: 25 g / about 43 m (47 yd)
Both quantities include a margin of about 15% for your gauge swatch and tension differences.
Tools:
– 5.0 mm (H-8) crochet hook
– Wooden ring, 2 in (5.1 cm) diameter
– Tapestry needle
– 6 locking stitch markers
– Rust-proof pins and a blocking mat
– Measuring tape
– Scissors
Abbreviations (US Terms)
- ch – chain
- sl st – slip stitch
- sc – single crochet
- hdc – half double crochet
- dc – double crochet
- sk – skip
- sp – space
- st(s) – stitch(es)
- RS / WS – right side / wrong side
- rev sc – reverse single crochet (crab stitch)
Special stitch – rev sc: Without turning, work from left to right (right to left if you crochet left-handed). Insert the hook into the next stitch to the right, yarn over, pull up a loop, then yarn over and pull through both loops. This makes the rounded rope edge.
Gauge and Checkpoints
Gauge: 16 sc x 18 rows = 4 in (10.2 cm) in Color A. That works out to 4 sc and 4.5 rows per inch.
Make the back panel first, because it doubles as your gauge check. Use these checkpoints:
- Back Row 1: 40 sc should measure 10 in (25.4 cm) laid straight.
- Back Row 13: 72 sc should measure 18 in (45.7 cm) along the outer curve.
- Back depth after Row 13: 2.9 in (7.4 cm) at the center.
- Front Row 9: 69 sc should measure 17.25 in (43.8 cm) along the curve.
- Front depth after Row 13: 4 in (10.2 cm) at the center.
If your Row 1 is longer than 10 in (25.4 cm), switch to a 4.5 mm hook. If it’s shorter, switch to a 5.5 mm hook. Gauge matters most along the outer edge: both panels must reach 72 sts and about 18 in (45.7 cm) there so the seam sits flat.
Back Panel (Make 1)
Use Color A throughout. Turn at the end of every row. The ch 1 at the start of each row does not count as a stitch.
Row 1: Ch 41, sc in 2nd ch from hook and in each ch across. (40 sc)
Row 2: Ch 1, sc in each st across. (40 sc)
Row 3: Ch 1, sc in next 7 sts, 2 sc in next st 5 times. (45 sc)
Row 4: Ch 1, sc across. (45 sc)
Row 5: Ch 1, sc in next 8 sts, 2 sc in next st 5 times. (50 sc)
Row 6: Ch 1, sc across. (50 sc)
Row 7: Ch 1, sc in next 9 sts, 2 sc in next st 5 times. (55 sc)
Row 8: Ch 1, sc across. (55 sc)
Row 9: Ch 1, sc in next 10 sts, 2 sc in next st 5 times. (60 sc)
Row 10: Ch 1, sc in next 11 sts, 2 sc in next st 5 times. (65 sc)
Row 11: Ch 1, sc in next 12 sts, 2 sc in next st 5 times. (70 sc)
Row 12: Ch 1, sc across. (70 sc)
Row 13: Ch 1, sc in next 34 sts, 2 sc in next st, sc in next 34 sts, 2 sc in last st. (72 sc)
Fasten off. The panel now curves into a deep arc that is 2.9 in (7.4 cm) deep, with 40 sts on the inner edge and 72 sts on the outer edge.
Front Panel (Make 1)
Rows 1–4 (Color A):
Row 1: Ch 41, sc in 2nd ch from hook and in each ch across. (40 sc)
Row 2: Ch 1, sc across. (40 sc)
Row 3: Ch 1, sc in next 7 sts, 2 sc in next st 5 times. (45 sc)
Row 4: Ch 1, sc across. (45 sc) Fasten off Color A.
Checkpoint: the gold band is about 0.9 in (2.3 cm) deep.
Rows 5–8 (Color B mesh):
Row 5: Join B in the first st. Ch 1, sc in first st, ch 5, sk 3 sts, sc in next st 11 times. (12 sc, 11 ch-5 loops) Check: 1 + (11 x 4) = 45 sts used.
Row 6: Ch 6 (counts as dc + ch 3), sc in first ch-5 loop, ch 5, sc in next ch-5 loop 10 times, ch 3, dc in last sc. (11 sc, 10 ch-5 loops, 2 ch-3 half loops)
Row 7: Ch 1, sc in first dc, ch 6, sc in next ch-5 loop 10 times, ch 6, sc in 3rd ch of turning ch. (12 sc, 11 ch-6 loops)
Row 8: Ch 7 (counts as dc + ch 4), sc in first ch-6 loop, ch 6, sc in next ch-6 loop 10 times, ch 4, dc in last sc. (11 sc, 10 ch-6 loops, 2 ch-4 half loops) Fasten off B.
The longer loops in Rows 7–8 widen the mesh so it keeps following the arc. Checkpoint: the mesh is about 2 in (5.1 cm) deep.
Rows 9–13 (Color A):
Row 9 (conversion row): Join A in the dc. Ch 1, sc in dc, 3 sc in ch-4 sp, sc in next sc, 5 sc in next ch-6 loop, sc in next sc 10 times, 3 sc in ch-4 sp, sc in 3rd ch of turning ch.
Count: 13 sc worked one into each existing stitch (1 dc, 11 sc, 1 turning ch) + 56 sc worked into the spaces (3 + 50 + 3) = 69 sc.
Row 10: Ch 1, sc across. (69 sc)
Row 11: Ch 1, sc in next 22 sts, 2 sc in next st 3 times. (72 sc)
Rows 12–13: Ch 1, sc across. (72 sc) Do not fasten off yet if you want to go straight into joining. Otherwise, fasten off.
Checkpoint: the panel is 4 in (10.2 cm) deep at the center, with 40 sts on the inner edge and 72 sts on the outer edge. Each side edge has 13 row-ends: 9 gold rows and 4 mesh rows.
Star Appliqués (Make 5)
Use Color A.
Rnd 1: Make a magic ring, ch 1, work 10 sc in the ring and join with sl st to the first sc. Pull the ring snug but leave a small center hole. (10 sc)
Rnd 2: Ch 4, sl st in 2nd ch from hook, sc in next ch, hdc in next ch, sk 1 sc, sl st in next sc 5 times. (5 points)
Fasten off and leave a 10 in (25.4 cm) tail for sewing. Each star measures about 1.5 in (3.8 cm) across from point to point.
Straps (Make 2)
Use Color A.
Row 1: Ch 5, sc in 2nd ch from hook and in each ch across. (4 sc)
Rows 2–32: Ch 1, sc across. (4 sc)
Fasten off and leave a 12 in (30.5 cm) tail. Each strap measures 1 in (2.5 cm) wide and about 7 in (17.8 cm) long.
Make All Pieces
By color:
– Color A: back panel, front Rows 1–4 and 9–13, 5 stars, 2 straps, joining seam, border
– Color B: front Rows 5–8 only
Star placement. Place the stars on the front panel, RS facing, centered over Row 7 loops 2, 4, 6, 8 and 10:
Inner edge (Rows 1-4, gold)   ==========================
Mesh (Rows 5-8, cream)        <> * <> * <> * <> * <> * <>
                              loop: 2    4    6    8    10
Outer edge (Rows 9-13, gold)  ==========================
Pin each star so its center hole sits over the middle of a mesh diamond and one point faces the inner edge. Use the tail to whipstitch the tips and the center ring to the mesh chains. Weave in all ends on the WS.
Joining
Method: Single crochet seam through both layers.
Lay the back panel down with RS facing down. Lay the front panel on top with RS facing up, so the WS of the two panels are together. Line up the outer edges (Row 13 of each panel) and place a marker at each end and at the center (st 36).
Join A at the right-hand end. Work 1 sc through st 1 of the front and st 1 of the back, then 1 sc through each matching pair across. (72 sc)
Each panel has exactly 72 sts on this edge, so the seam pairs them 1 to 1. Don’t add or skip stitches. Fasten off.
Tension: Keep the seam stitches the same height as your fabric stitches. If you pull them tight, the bottom curve shortens and the basket bends sharply. If you work them loose, the bottom of the basket bulges.
Checkpoint: The seam measures 18 in (45.7 cm) along the curve. The front stands taller than the back. Because the two panels share the same edge lengths but have different depths, the front pushes forward and forms the pocket.
Border
Border gauge: 4 sc per inch along the edges, which is the same as the fabric gauge. Gold row-ends take 1 sc each. Each mesh row-end is about 0.5 in (1.3 cm) tall, so it takes 2 sc.
Edge counts per segment:
– Front inner edge: 40 sc, worked in the free loops of the foundation chain
– Each front side edge: 4 (Rows 1–4) + 8 (Rows 5–8, 2 each) + 5 (Rows 9–13) = 17 sc
– Each back side edge: 13 sc
– Back inner edge: 40 sc
Rnd 1: With RS of the front facing, join A at the right front tip, in the first foundation loop. Ch 1. Work 40 sc across the front inner edge. Work 1 extra sc in the same corner st (tip). Work 17 sc down the left front side to the seam, then 13 sc up the left back side. Work 40 sc across the back inner edge. Work 13 sc down the right back side and 17 sc up the right front side. Work 1 extra sc at the right front tip. Join with sl st to the first sc.
Count: 140 sc along the edges (40 + 17 + 13 + 40 + 13 + 17) + 2 extra sc at the front tips = 142 sc.
Rnd 2: Ch 1, rev sc in each st around. Join. (142 rev sc)
Fasten off.
Why the math works: Each segment count matches its length at 4 sc per inch. For example, 40 sc covers the 10 in (25.4 cm) inner edge, and 17 sc covers the front side, which is about 4.25 in (10.8 cm). The edge therefore lies flat without ruffling or cupping. The only extra stitches are the 2 tip stitches, which let the edge turn the sharp front corners. The back corners are softer and don’t need extras.
Attach the Straps
Pin one strap end to the WS of each front tip so it overlaps the panel by 0.75 in (1.9 cm). Whipstitch around all 4 sides of the overlap.
Wrap the other end of each strap around the wooden ring, folding 1 in (2.5 cm) back on itself, and sew it down securely. Each strap should drop about 5.25 in (13.3 cm) from the ring to the basket. Before you sew the second strap, check that both are the same length.
Final Blocking
- Spray the basket lightly with water until it is damp but not soaked.
- Fill it with two toilet paper rolls, or two rolled towels, to open the pocket.
- Shape the front curve so the mesh diamonds open evenly and the stars lie flat.
- Pinch the front tips upward so the crescent points stand up.
- Lay the basket on its back on a mat. Pin the inner edges to 10 in (25.4 cm) each and the seam to 18 in (45.7 cm).
- Let it dry completely, which takes 24 hours, before you remove the fill.
Final Quality-Control Checklist
- Back panel: 40 sts on the inner edge, 72 on the outer edge, 2.9 in (7.4 cm) deep
- Front panel: 13 rows, 11 even mesh loops in Rows 5 and 7, 4 in (10.2 cm) deep
- Five stars, evenly spaced, with tips secured
- 72-st seam with no gaps and 18 in (45.7 cm) long
- Border: 142 sts in both rounds, lying flat
- Straps the same length and sewn through both layers
- All ends woven in on the WS
Troubleshooting
- The panel stays straight instead of curving: Your increases are missing. Recount Rows 3–13 against the stated totals.
- The panel cups like a bowl: You’ve added too many increases or your tension is tight. Check that Row 13 has exactly 72 sts.
- The mesh slants: You skipped the wrong number of sts in Row 5. It should be sk 3 each time and use 45 sts in total.
- The seam puckers: One panel has more than 72 sts. Undo the seam and fix that panel.
- The border ruffles: Work 1 sc per mesh row-end instead of 2, and check your total again.
- The basket tilts on the wall: The straps aren’t the same length. Re-sew the fold at the ring.
Care
Hand wash in cool water and press the water out in a towel. Reshape the basket around rolled towels and let it dry flat.
Final Notes
Each stage depends on the one before it. A gauge of 4 sc per inch gives a 10 in (25.4 cm) inner edge of 40 sts and an 18 in (45.7 cm) outer edge of 72 sts on both panels. Those matching 72-st edges join 1 to 1, and the 142-st border fits the opening at the same gauge. If each count matches, the crescent will hang evenly with its stars facing out.
Happy crocheting!