

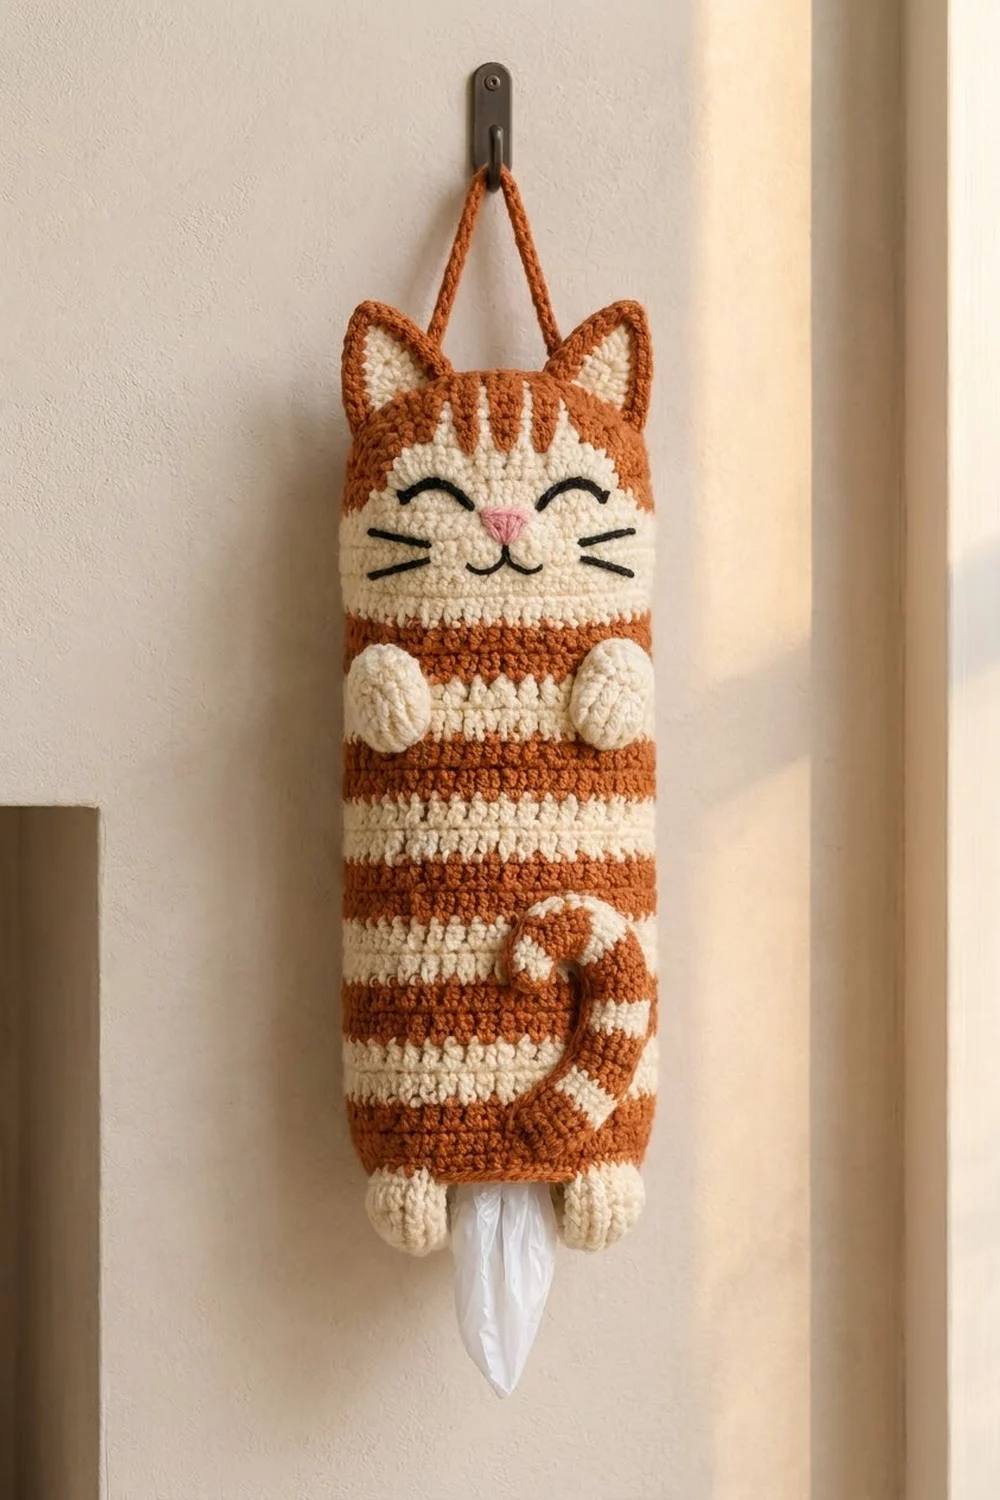
This happy tabby keeps your plastic bags in one tidy place. You push bags in through the open top behind the ears and pull them out one at a time through the small opening between the feet.
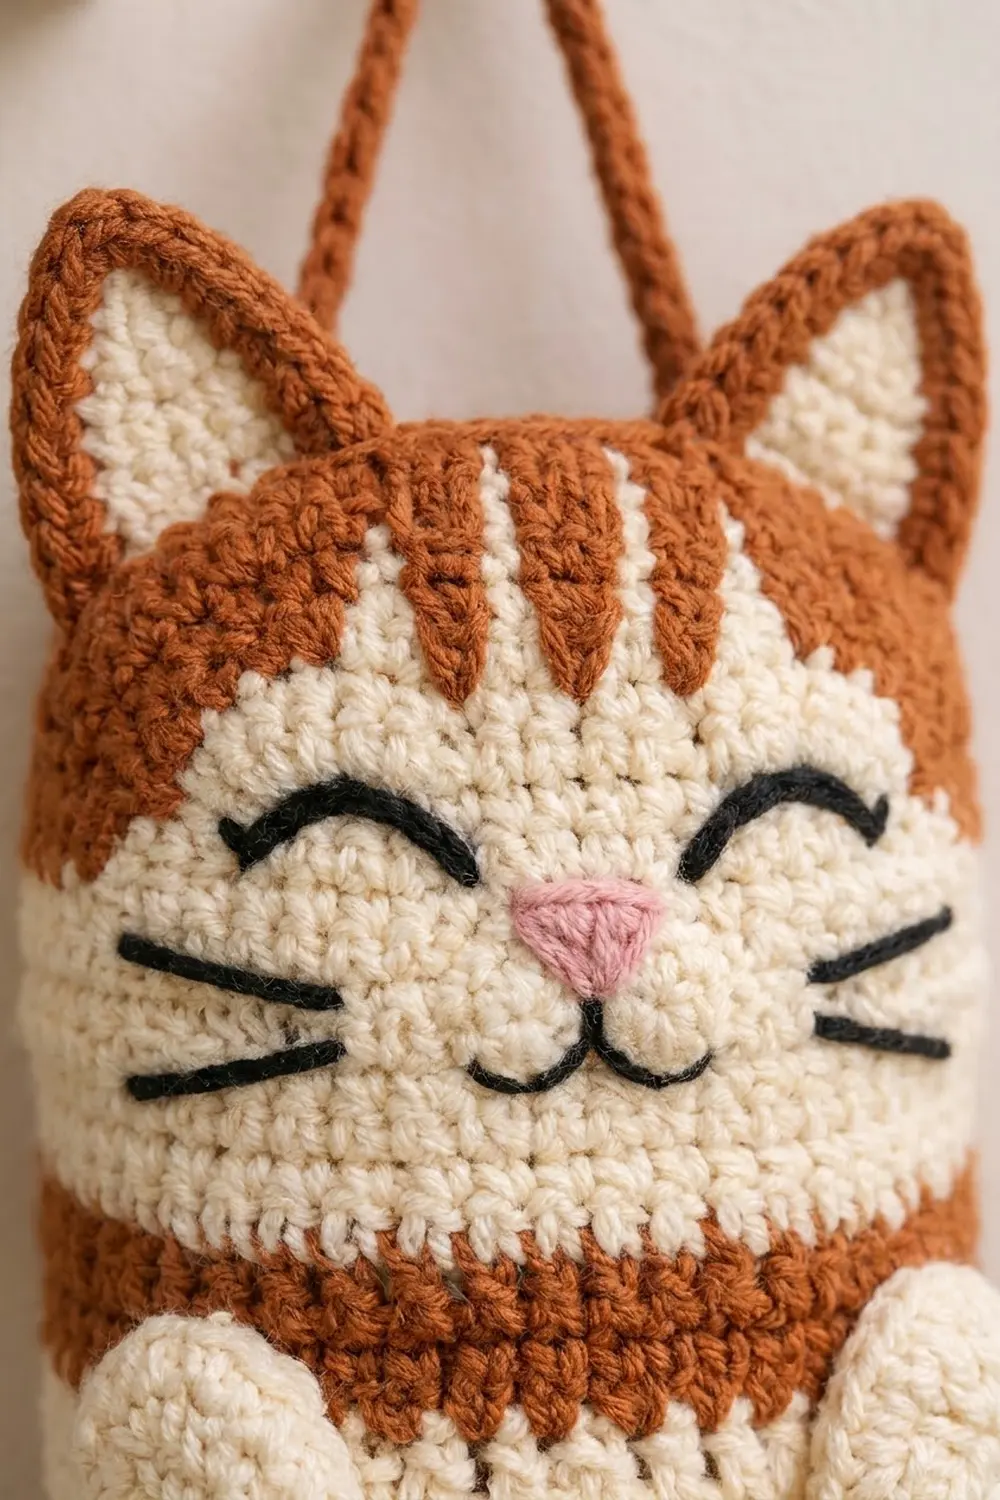
The design uses two main colors: warm rust-orange and soft cream, worked in two-round stripes. The face is a cream band under a rust forehead with cream tabby marks. The features are embroidered in black and pink. Puffy arm paws, round feet and a curled striped tail give the cat its cozy character.
The pattern uses US crochet terms. The finished holder is 17.8 in (45.2 cm) tall and 6 in (15.2 cm) wide when laid flat, not counting the hanging strap.
Construction is simple. You work the body from the bottom up as one tube in joined rounds of half double crochet. You then add a single crochet rim, make the small parts, sew them on, and finish with embroidery.
Finished Size and Construction
- Finished size: 17.8 in (45.2 cm) tall × 6 in (15.2 cm) flat width
- Skill level: Easy–Intermediate
- Terminology: US terms
- Yarn weight: Worsted (#4)
- Hook: 5.0 mm (H-8)
- Number of pieces: 1 body tube plus 11 small parts (2 ears, 2 inner ears, 2 arm paws, 2 feet, 1 tail, 1 hanging strap, 1 nose done as embroidery)
- Layout: Single item, so there is no grid
- Body circumference: 12 in (30.5 cm), which is 42 stitches
- Size before border (rim): 17.3 in (43.9 cm) tall
- Border depth: 0.5 in (1.3 cm), from 2 rounds of sc
Materials
Use a smooth, firm cotton or cotton-acrylic worsted yarn. Cotton holds its shape well and shows the stripes clearly.
- Cream: 80 g / 160 m
- Rust: 70 g / 140 m
- Black: 3 m, for the eyes, mouth and whiskers
- Pink: 1 m, for the nose
All quantities include a margin of about 15%.
Tools:
– 5.0 mm (H-8) crochet hook
– Tapestry needle
– 4 stitch markers
– Small amount of fiberfill for the paws
– Scissors and a measuring tape
– Pins, for placing parts before sewing
Abbreviations (US Terms)
- ch: chain
- sl st: slip stitch
- sc: single crochet
- hdc: half double crochet
- sc2tog: single crochet 2 together
- sc3tog: single crochet 3 together
- MR: magic ring
- st(s): stitch(es)
- Rnd: round
Color change: Work the last stitch of the round until 2 loops remain on the hook (for hdc, 3 loops). Yarn over with the new color and pull through to finish the stitch. Join with a sl st in the new color.
Carry the unused color loosely up the inside of the tube for stripes. For longer gaps, cut it.
Gauge and Checkpoints
- hdc gauge: 14 sts and 10 rnds = 4 in (10.2 cm). That is 3.5 sts and 2.5 rnds per inch, so each hdc round is 0.4 in (1.0 cm) tall.
- sc gauge: 16 sts and 16 rnds = 4 in (10.2 cm). That is 4 sts and 4 rnds per inch, so each sc round is 0.25 in.
Test first: Before you start the body, make one foot (see below). It should measure about 1.75 in (4.4 cm) across. If it does, your sc tension is right.
Checkpoints:
– After Rnd 2: The bottom ring should be 7 in (17.8 cm) around.
– After Rnd 3: The circumference should be 12 in (30.5 cm), which is 6 in (15.2 cm) flat.
– After Rnd 12: The height should be 4.5 in (11.4 cm).
– After Rnd 30: The height should be 11.7 in (29.7 cm).
– After Rnd 44: The height should be 17.3 in (43.9 cm).
– After Rnd 46: The height should be 17.8 in (45.2 cm).
If your piece is off:
– Too big: Go down 0.5 mm in hook size.
– Too small: Go up 0.5 mm in hook size.
– Change the hook rather than the stitch counts. The face, paw and tail placements depend on the 42-stitch round.
Body
Every round is joined with a sl st, and the beginning ch does not count as a stitch. Place the join at center back.
Once Rnd 3 is done, number the 42 sts as follows:
– Sts 12–32: front (21 sts)
– Sts 33–42 and 1–11: back (21 sts)
– Center front: st 22
Mark sts 12, 22 and 32.
Bottom ring (cream, sc):
Rnd 1: With cream, ch 28 and join with a sl st to the first ch, taking care not to twist. Ch 1, then sc in each ch around. Join. (28 sc)
Rnd 2: Ch 1, sc in each st around. Join. (28 sc)
This firm ring makes the bag opening. It is 7 in (17.8 cm) around, so the opening is about 2.2 in (5.6 cm) across.
Conversion round (rust):
Rnd 3: Change to rust. Ch 2, then hdc in next st, 2 hdc in next st; repeat 14 times. Join. (28 + 14 = 42 hdc)
This round flares the bottom into a gathered edge.
Striped body:
Rnds 4–30: Ch 2, hdc in each st around. Join. (42 hdc each round)
Change colors every 2 rounds, counting from Rnd 3:
– Rnds 3–4: rust
– Rnds 5–6: cream
– Rnds 7–8: rust
– Rnds 9–10: cream
– Rnds 11–12: rust
– Rnds 13–14: cream
– Rnds 15–16: rust
– Rnds 17–18: cream
– Rnds 19–20: rust
– Rnds 21–22: cream
– Rnds 23–24: rust
– Rnds 25–26: cream
– Rnds 27–28: rust
– Rnds 29–30: cream
That makes 14 stripes, each 0.8 in (2.0 cm) tall.
Head:
Rnds 31–32 (rust, neck stripe): Hdc in each st around. (42 hdc)
Rnds 33–40 (cream, face band): Hdc in each st around. (42 hdc) This band is 3.2 in (8.1 cm) tall.
Rnds 41–44 (rust, forehead): Hdc in each st around. (42 hdc) This band is 1.6 in (4.1 cm) tall.
Check: 0.5 in + (42 rnds × 0.4 in) = 17.3 in (43.9 cm). Don’t fasten off. The rim follows in the Border section.
Ears (make 2)
Outer ear (rust), worked in rows:
Row 1: Ch 8, sc in 2nd ch from hook and in each ch across. (7 sc)
Row 2: Ch 1, turn. Sc2tog, sc in next 3 sts, sc2tog. (5 sc)
Row 3: Ch 1, turn. Sc in each st. (5 sc)
Row 4: Ch 1, turn. Sc2tog, sc in next st, sc2tog. (3 sc)
Row 5: Ch 1, turn. Sc in each st. (3 sc)
Row 6: Ch 1, turn. Sc3tog. (1 sc)
Fasten off and leave a 10 in (25.4 cm) tail. The ear is 1.75 in (4.4 cm) wide at the base and 1.5 in (3.8 cm) tall.
Inner ear (cream):
Row 1: Ch 5, sc in 2nd ch from hook and across. (4 sc)
Row 2: Ch 1, turn. Sc2tog twice. (2 sc)
Row 3: Ch 1, turn. Sc2tog. (1 sc)
Fasten off. The inner ear is 1 in (2.5 cm) wide at the base and 0.75 in (1.9 cm) tall.
Center each inner ear on the front of an outer ear, with the bottom edges matching, and whipstitch it in place.
Arm Paws (make 2, cream)
Rnd 1: 6 sc in MR. (6)
Rnd 2: 2 sc in each st. (12)
Rnds 3–5: Sc in each st. (12)
Rnd 6: Sc in next st, sc2tog; repeat 4 times. (8)
Stuff lightly and flatten. Fasten off, leaving a long tail. Each paw is about 1.25 in (3.2 cm) across.
To shape the toes, wrap cream yarn twice over the tip of the paw to make 2 toe dents.
Feet (make 2, cream)
Rnd 1: 6 sc in MR. (6)
Rnd 2: 2 sc in each st. (12)
Rnd 3: Sc in next st, 2 sc in next st; repeat 6 times. (18)
Rnds 4–7: Sc in each st. (18)
Rnd 8: Sc in next st, sc2tog; repeat 6 times. (12)
Stuff firmly.
Rnd 9: Sc2tog 6 times. (6)
Close the hole and leave a long tail. Each foot is 1.75 in (4.4 cm) wide and 2 in (5.1 cm) tall.
Tail
Rnd 1 (rust): 6 sc in MR. (6)
Rnd 2: Sc in next st, 2 sc in next st; repeat 3 times. (9)
Rnds 3–24: Sc in each st. (9)
Change colors every 3 rounds, counting from Rnd 1:
– Rnds 1–3: rust
– Rnds 4–6: cream
– Rnds 7–9: rust
– Rnds 10–12: cream
– Rnds 13–15: rust
– Rnds 16–18: cream
– Rnds 19–21: rust
– Rnds 22–24: cream
Don’t stuff the tail. Flatten it and fasten off with a long tail. It is 6 in (15.2 cm) long.
Hanging Strap (rust)
Row 1: Ch 51, sc in 2nd ch from hook and across. (50 sc)
Row 2: Ch 1, turn. Sc in each st. (50 sc)
Fasten off and leave long tails at both ends. The strap is 12.5 in (31.8 cm) long and 0.5 in (1.3 cm) wide.
Border: Top Rim
Border gauge: 4 sc per inch. Work the rim with the rust yarn still attached at Rnd 44.
Rnd 45: Ch 1, sc in each st around. Join. (42 sc: 21 front + 21 back)
Rnd 46: Ch 1, sc in each st around. Join. (42 sc: 21 front + 21 back)
Fasten off and weave in the end.
Why the math works: The rim has one sc in each hdc, so each flattened side keeps its 21 stitches. A tube has no corners, so you don’t add any corner stitches.
At sc gauge, 42 sts measure 10.5 in (26.7 cm) around. That is 5.25 in (13.3 cm) flat. This slight, deliberate pull-in firms the opening so the bags stay inside, but you can still push them through easily.
The rim adds 2 × 0.25 in = 0.5 in (1.3 cm), bringing the total height from 17.3 in to 17.8 in (45.2 cm).
The bottom edge needs no extra border. The 28-stitch sc ring from Rnds 1–2 is already its finished edge.
Assembly and Embroidery
Ears: Sew the bases so that each ear stands upright from the rim.
– First ear: front sts 12–18
– Second ear: front sts 26–32
– The 7 sts between them (19–25) stay free.
– Stitch each base across Rnds 44–46 so the ear stands up straight.
Strap: Sew one end inside the rim at st 11 and the other end at st 33, just behind each side fold. Overlap each end by 0.75 in (1.9 cm) and sew it securely.
Eyes: Use black yarn to backstitch 2 closed smiling arcs on Rnd 37. Each arc is 0.75 in (1.9 cm) wide, over sts 17–19 and sts 25–27.
Nose: Use pink to satin-stitch a small triangle at st 22 across Rnds 35–36.
Mouth: Use black to stitch a small “w” shape under the nose on Rnd 34.
Whiskers: Make 3 straight stitches, each 1 in (2.5 cm) long, on each side across Rnds 34–36. Place them outward from sts 15 and 29.
Tabby marks: Use cream to make 3 short vertical straight stitches on the forehead. Space them 0.75 in (1.9 cm) apart, centered on st 22, over Rnds 42–44.
Arm paws: Sew them on Rnds 27–28, centered at sts 14 and 30, with the toes pointing up.
Feet: Sew them to the front of Rnds 1–3, centered at sts 15 and 29 in Rnd 3 numbering. About half of each foot should hang below the bottom edge.
Tail: Pin the cream base at Rnd 6 near st 28. Curve the tail upward and to the right, then let the rust tip curl back toward the center at about Rnd 18. Sew along the inner side of the curve and tack the tip.
Final Blocking
- Weave in all ends inside the tube.
- Lightly spray the body with water until it is damp.
- Slide a rolled towel inside the tube.
- Lay the holder flat. Pat it to 6 in (15.2 cm) wide and 17.8 in (45.2 cm) tall.
- Straighten the stripes so they run level.
- Pin the ears upright against the towel.
- Let it dry completely, then remove the towel.
Final Quality-Control Checklist
- [ ] Every body round has 42 sts, the bottom ring has 28 sts, and both rim rounds have 42 sts.
- [ ] There are 14 body stripes and they line up evenly.
- [ ] The flat width is 6 in (15.2 cm) and the height is 17.8 in (45.2 cm).
- [ ] The ears are symmetric, with 7 front sts between them.
- [ ] The eyes are level, and the nose is centered on st 22.
- [ ] The feet hang evenly on each side of the opening.
- [ ] The strap is secure and the holder hangs straight.
- [ ] A bag pulls out smoothly through the bottom ring.
Troubleshooting
- Stripes zigzag at the join: Join with a sl st in the new color, and keep the joins stacked at center back.
- Tube twists: Check that Rnd 1 wasn’t twisted when you joined. Count the stitches every round.
- Bags fall out the bottom: Work Rnds 1–2 with a 4.5 mm hook to tighten the ring.
- Rim ruffles: Your sc tension is loose. Redo the rim with a smaller hook.
- Ears flop: Sew the base along both Rnd 44 and Rnd 46. Add a sc edging if needed.
- Tail won’t curl: Tack it at 3 points along the inside of the curve.
Care
Hand wash in cool water and lay flat to dry, keeping its shape. Don’t wring the stuffed paws.
Final Notes
Here is the full measurement chain:
– The 28-stitch sc ring is 7 in (17.8 cm) around.
– Rnd 3 converts it to 42 hdc, which is 12 in (30.5 cm) around and 6 in (15.2 cm) flat.
– 42 hdc rounds at 0.4 in each, plus the 0.5 in (1.3 cm) bottom ring, bring the body to 17.3 in (43.9 cm).
– 2 rim rounds add another 0.5 in (1.3 cm), for a total of 17.8 in (45.2 cm).
Check your gauge, count at each checkpoint, and your tabby will come out just right.
Happy crocheting!