

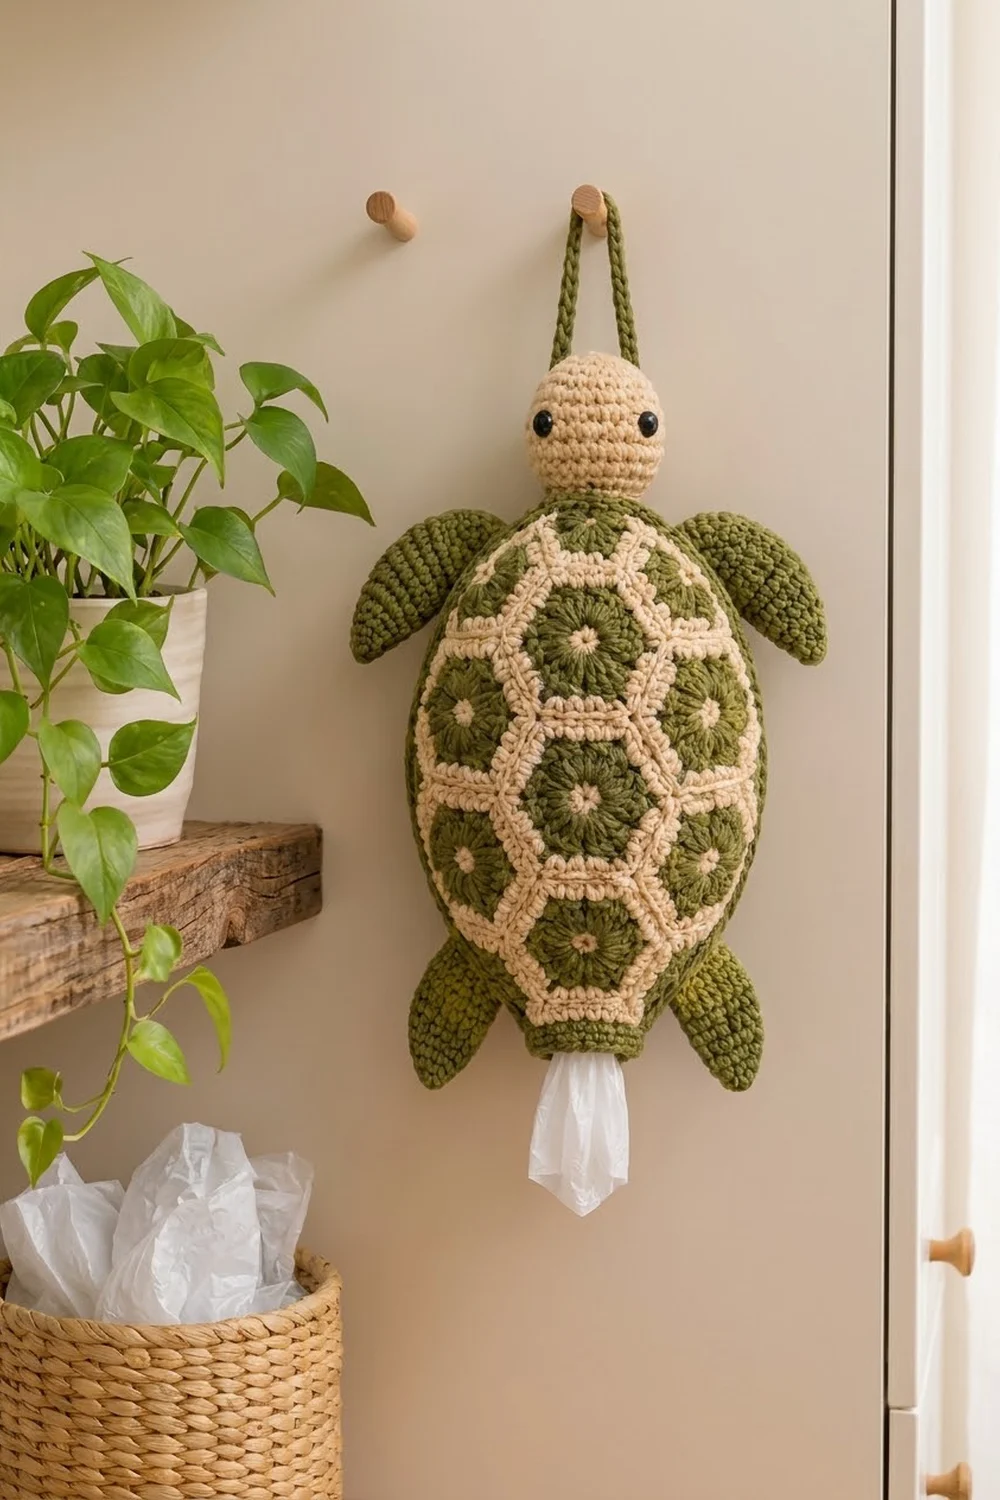
This turtle bag holder hangs from a peg and hands you one plastic bag at a time from the opening under its tail. The shell is a honeycomb of hexagon motifs. Each one has a small cream center, a thick olive-green ring and a raised cream outline, so the shell reads clearly from across the room.
The palette is olive green and natural cream, with black safety eyes on a round cream head. The style is part granny motif, part amigurumi. If you want a cooler version, swap the green for denim blue and the cream for pale aqua.
The pattern uses US crochet terms. The finished shell is about 9 in (22.9 cm) wide laid flat and about 14 in (35.6 cm) long. With the head, the turtle measures about 16.5 in (41.9 cm), not counting the loop.
Construction is simple. You make 24 hexagons and sew them into a tube of 4 staggered rows. Then you crochet a green band onto each open edge, add the head, flippers and loop, and block.
Finished Size and Construction
- Finished size: 9 in (22.9 cm) wide flat, 18 in (45.7 cm) around, about 14 in (35.6 cm) shell length
- Skill level: Intermediate
- Terminology: US
- Yarn weight: Worsted (#4), cotton or cotton blend
- Hook: 4.5 mm (US 7)
- Number of pieces: 24 hexagons, 1 head, 4 flippers, 1 loop
- Layout: 4 rows of 6 hexagons, point-up, staggered, joined into a tube
- Hexagon size: 3.5 in (8.9 cm) point to point, 3 in (7.6 cm) flat to flat, 1.75 in (4.4 cm) per side
- Size before border: 18 in (45.7 cm) around, about 11.4 in (29.0 cm) tall measured point to point
- Border depth: about 1.5 in (3.8 cm) at each end, past the hexagon points
Materials
Choose a smooth cotton so the stitches stay crisp and the bags slide out easily. Acrylic also works but gives a softer, fuzzier outline.
- Olive green: 200 g (about 340 m)
- Cream: 130 g (about 221 m)
- 4.5 mm (US 7) crochet hook
- Two 8 mm black safety eyes
- About 20 g polyester fiberfill
- Tapestry needle, stitch markers, scissors, pins
These quantities include a margin of roughly 15%. The meter figures assume about 1.7 m per gram, so check your own yarn label.
Abbreviations (US Terms)
- ch – chain
- sl st – slip stitch
- sc – single crochet
- hdc – half double crochet
- dc – double crochet
- tr – treble crochet
- sc2tog / dc2tog / tr2tog – work 2 stitches together with that stitch height (2 stitches become 1)
- inc – 2 sc in the same stitch
- dec – sc2tog
- MR – magic ring
- sp – space
Special stitch – standing sc2tog across a seam: Make a slip knot on the hook. Insert the hook into the first ch-2 corner space, yarn over and pull up a loop. Insert into the neighboring hexagon’s ch-2 corner space, yarn over and pull up a loop. Yarn over and pull through all 3 loops.
Gauge and Checkpoints
Gauge: 16 sc and 18 rounds = 4 in (10.2 cm).
Make one hexagon before anything else and check these sizes:
- After Round 1: about 1 in (2.5 cm) across
- After Round 2: about 2 in (5.1 cm) across
- After Round 3: about 3 in (7.6 cm) corner to corner
- After Round 4: 3.5 in (8.9 cm) point to point, 3 in (7.6 cm) flat to flat, 1.75 in (4.4 cm) per side
If the hexagon is bigger than this, go down half a hook size. If it is smaller, go up half a size. A 0.25 in (0.6 cm) error on each hexagon adds up to 1.5 in (3.8 cm) around the shell, so check before you make all 24.

Hexagon Motif (Make 24)
Round 1 (cream): In a MR, ch 2 (does not count as a stitch), then work 12 hdc. Join with a sl st to the first hdc and fasten off. (12 hdc)
Round 2 (green): Join green in any stitch. Ch 3 (counts as dc), dc in the same stitch, then work 2 dc in each stitch around. Join to the top of the ch-3. (24 dc)
Round 3 (green): Ch 3 (counts as dc). Dc in the next 2 stitches, then (dc, ch 2, dc) in the next stitch. Dc in the next 3 stitches, (dc, ch 2, dc) in the next stitch. Repeat from * 4 more times and join. Fasten off. (30 dc: 5 dc per side, plus 6 ch-2 corners)
Round 4 (cream): Join cream in any ch-2 corner. Ch 1, then (sc, ch 2, sc) in the corner space and sc in the next 5 dc. Repeat from * 6 times in total and join. Fasten off. (42 sc: 7 sc per side, plus 6 ch-2 corners)
In this pattern, “per side” means the 7 sc between two ch-2 corner spaces. The corner spaces are counted separately.
Weave in the ends on the wrong side. Steam lightly so the sides lie straight.
Make All Pieces
- Hexagons: 24, each using cream for Rounds 1 and 4 and green for Rounds 2 and 3
- Head: 1, cream
- Front flippers: 2, green
- Back flippers: 2, green
- Loop: 1, green
Layout (point-up hexagons, rows offset by half a hexagon, wrapping into a tube):
Row 4 (top):    A4  B4  C4  D4  E4  F4
Row 3:            A3  B3  C3  D3  E3  F3
Row 2:          A2  B2  C2  D2  E2  F2
Row 1 (bottom):   A1  B1  C1  D1  E1  F1
The right edge of F joins the left edge of A in each row, which closes the tube.
Joining
Join with cream on the wrong side, using a whipstitch through the back loops only. This leaves the front loops standing up, so you get the raised cream outline shown on the finished turtle.
Stitch-to-stitch logic: Each side has 9 match points: a corner ch-2 space, 7 sc, and another corner ch-2 space. Line up the two pieces point for point. Make one whipstitch per sc and two per corner space.
- Join each row into a ring. Join the vertical sides of A to B, B to C, and so on, then F to A. That is 6 seams per row and 24 seams in total.
- Join the rows together. Each hexagon in a higher row sits in the valley between two hexagons below it. Its lower-left side joins the upper-right side of one, and its lower-right side joins the upper-left side of the other. That is 12 seams per row join and 36 seams in total.
Tension: Pull each stitch snug but not tight. The seam should lie flat, with no gaps and no puckering.
Checkpoint: The tube measures 18 in (45.7 cm) around and 9 in (22.9 cm) wide when flattened. Its height from point to point is about 11.4 in (29.0 cm): one hexagon of 3.5 in (8.9 cm) plus three row steps of about 2.6 in (6.6 cm).
Border (Top and Bottom Bands)
Border gauge: 4 sc per inch (2.5 cm), the same as the main gauge.
Both open edges of the tube zigzag. Six hexagon points stick out, with six valleys between them where two hexagons meet. Work the bottom band first, then repeat it exactly on the top edge.
Round 1 (green): Make a standing sc2tog across the two corner spaces at any valley. Sc in the next 7 sc, 3 sc in the point ch-2 space, sc in the next 7 sc, then sc2tog across the next valley’s two corner spaces. Repeat from * 4 more times. To finish, work sc in the next 7 sc, 3 sc in the point space and sc in the next 7 sc, then join to the first stitch.
That gives 18 sts per hexagon: 7 + 3 + 7 + 1, so 6 × 18 = 108 sts. The valley sc2tog is the seam stitch, and it is already included in each hexagon’s 18. Nothing extra is added at the seams.
Round 2 (leveling): This round fills the valleys with tall stitches and keeps the points short. It also brings the count down to 12 sts per hexagon.
Ch 4 in the valley stitch (counts as tr). Tr2tog, dc2tog, hdc in the next stitch, sc2tog, then sc in each of the 3 point stitches. Sc2tog, hdc in the next stitch, dc2tog, tr2tog, then tr in the next valley stitch. Repeat from * around, leaving out the last tr, and join to the top of the ch-4.
Each hexagon takes 1 valley stitch, 7 stitches on the first side, 3 at the point and 7 on the second side: 18 stitches in total. It gives back 1 + 4 + 3 + 4 = 12. (6 × 12 = 72 sts)
Why the math works: 72 sts at 4 sts per in (2.5 cm) is 18 in (45.7 cm), which matches the tube. The band will lie flat with no ruffle and no pulling.
Round 3: Sc in each stitch around. (72)
Round 4: Sc 4, dec around. (60)
Round 5: Sc 3, dec around. (48)
Round 6: Sc 2, dec around. (36)
Rounds 7–8: Sc in each stitch around. (36)
Round 9: Sl st in each stitch around for a firm edge. (36) Fasten off.
The opening measures 9 in (22.9 cm) around and about 4.5 in (11.4 cm) across when flattened. Work the same 9 rounds on the top edge. The top opening is where you load the bags.
Head
Use cream and work in continuous rounds.
- Round 1: 6 sc in MR (6)
- Round 2: Inc in each stitch (12)
- Round 3: Sc, inc around (18)
- Round 4: Sc 2, inc around (24)
- Round 5: Sc 3, inc around (30)
- Rounds 6–11: Sc around (30)
- Round 12: Sc 3, dec around (24)
- Round 13: Sc 2, dec around (18)
Insert the safety eyes between Rounds 8 and 9, 6 stitches apart. Stuff the head firmly.
- Round 14: Sc, dec around (12)
- Round 15: Dec around (6)
Close the hole and leave a long tail for sewing. The head should measure about 2.5 in (6.4 cm) wide and 3 in (7.6 cm) tall.
Flippers
Use green and work in continuous rounds.
Front flipper (make 2):
- Round 1: 6 sc in MR (6)
- Round 2: Sc, inc around (9)
- Round 3: Sc 2, inc around (12)
- Round 4: Sc 3, inc around (15)
- Round 5: Sc 4, inc around (18)
- Rounds 6–12: Sc around (18)
- Round 13: Sc 4, dec around (15)
- Round 14: Sc 3, dec around (12)
- Round 15: Sc around (12)
Do not stuff. Flatten the flipper and sc 6 across, working through both layers. Each front flipper is about 3.25 in (8.3 cm) long, in a leaf shape.
Back flipper (make 2): Work Rounds 1–3 as for the front flipper (12). Then sc around for 5 more rounds, which is Rounds 4–8 (12). Flatten and sc 6 across through both layers. Each back flipper is about 2 in (5.1 cm) long.
Loop and Assembly
Loop: With green, ch 36. Sc in the 2nd ch from the hook and in each ch across. (35 sc) The strip is about 8.75 in (22.2 cm) long. Fold it in half and sew both ends to the top back of the head, so the loop stands about 4 in (10.2 cm) high.
Head: Sew the base of the head to the front 18 stitches of the top band’s Round 9. Go around twice, because the head carries the whole weight. The back 18 stitches stay open, so you can push bags in behind the head.
Front flippers: Sew them to the sides at the seam between Rows 3 and 4, angled up and out.
Back flippers: Sew them to the sides of the bottom band at Rounds 2–4, angled down.
Final Blocking
- Lay the turtle flat with the front facing up.
- Shape the shell to 9 in (22.9 cm) wide and pin along the sides.
- Straighten each hexagon outline with your fingers.
- Steam the shell, holding the iron about 1 in (2.5 cm) above the fabric. Do not press.
- Steam the flippers lightly and shape them into a soft curve.
- Let it dry completely before you unpin.
Final Quality-Control Checklist
- 24 hexagons, each 3.5 in (8.9 cm) point to point
- All 60 seams sewn through the back loops, with the cream outlines raised
- Shell is 18 in (45.7 cm) around
- Both bands follow the counts 108 → 72 → 60 → 48 → 36
- Eyes are level and locked in place
- Head is sewn securely to the front half of the top rim
- Loop is firmly attached
- All ends are woven in
Troubleshooting
- Hexagon cups: Round 3 is too tight. Go up a hook size for the green rounds.
- Hexagon ruffles: Your chain-2 corners are too loose. Try ch 1 at the corners instead.
- The band ruffles: Check that Round 2 really ends with 72 stitches.
- The bottom opening is too tight for bags: Skip Round 9, or end at 48 stitches.
- The head droops: Add a second pass of stitching and anchor it to the loop seam.
- The seams show gaps: Whipstitch through both corner spaces twice.
Care
Hand wash in cool water, press out the water in a towel, and lay flat to dry. Do not tumble dry, because the stuffed head can lose its shape.
Final Notes
The measurement chain is short. Each hexagon is 3 in (7.6 cm) flat to flat. Six of them make 18 in (45.7 cm) around. Each band starts with 18 stitches per hexagon, so 108, then levels to 72 to match the tube, and narrows to 36 stitches for a 9 in (22.9 cm) opening. If your hexagons match the gauge, every other number follows.
Happy crocheting!