

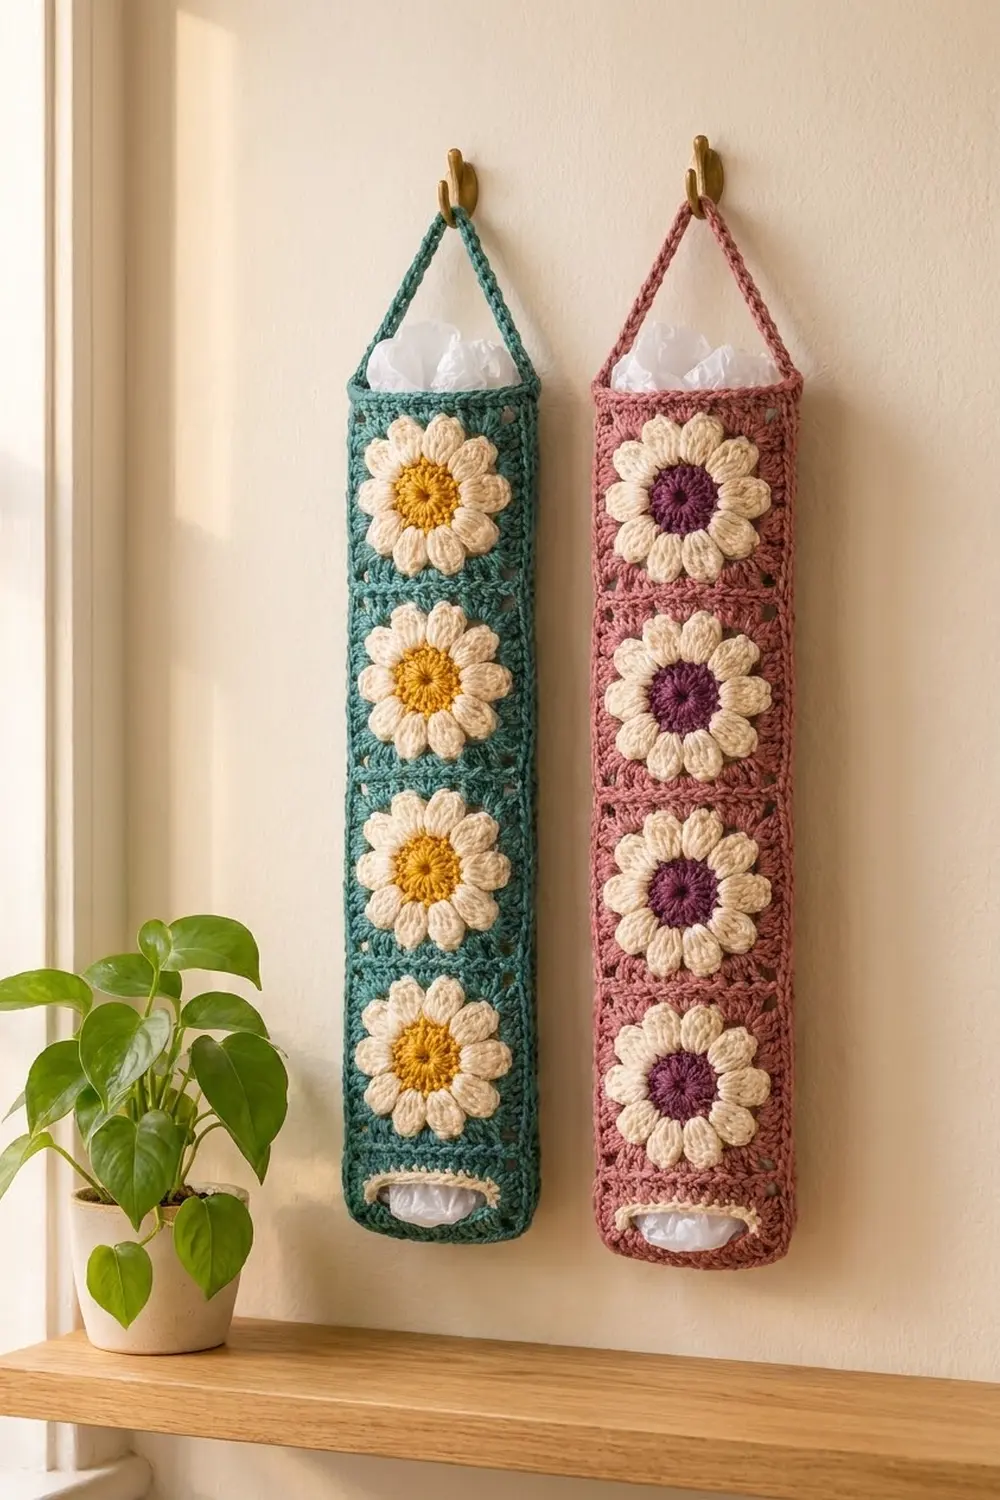
This hanging bag holder stacks four daisy granny squares in a single column. It makes a slim tube that hangs from a hook and lets you pull grocery bags out one at a time through a rimmed opening at the bottom. It is practical, but it looks good enough to leave on a kitchen or pantry wall.
The sample uses teal for the frames, cream for the puffy petals and mustard yellow for the flower centers. A dusty rose version with plum centers works just as well. Any three colors with strong contrast between the petals and the frame will show off the daisies.
This pattern uses US crochet terms. The finished body is 4 in (10.2 cm) wide and about 18.25 in (46.4 cm) tall. The hanger adds about 5 in (12.7 cm), so the total hanging height is about 23.25 in (59.1 cm).
You will make eight identical daisy squares: four for the front and four for the back. Join each set of four into a strip, then seam the two strips along their long edges to make a tube. Finally, work a sc band and hanging strap at the top, and a narrowing section with a cream rim at the bottom.
Finished Size and Construction
- Finished size (body): 4 in wide x 18.25 in tall (10.2 x 46.4 cm), laid flat
- Total height with hanger: about 23.25 in (59.1 cm)
- Skill level: Easy-intermediate
- Terminology: US crochet terms
- Yarn weight: Worsted (#4), cotton or cotton blend
- Hook: 4.5 mm (US 7)
- Number of pieces: 8 daisy squares
- Layout: 1 square wide x 4 squares tall, front and back
- Piece size: 4 x 4 in (10.2 x 10.2 cm)
- Size before border: 4 x 16 in (10.2 x 40.6 cm) flat tube
- Border depth: top band 1 in (2.5 cm); bottom section 1.25 in (3.2 cm)
Materials
Cotton or a cotton blend is the best choice. It holds its shape, does not stretch under the weight of the bags, and makes crisp petals. Avoid very splitty yarn, because the puff petals need clean loops.
- Color A, teal (frames, seams, bands, hanger): 110 g, about 187 m
- Color B, cream (petals, bottom rim): 45 g, about 77 m
- Color C, mustard (centers): 25 g, about 43 m
All quantities include about a 15% margin for your gauge test and weaving in ends.
Tools:
– 4.5 mm (US 7) crochet hook
– Tapestry needle
– 4 stitch markers
– Scissors
– Measuring tape
– Blocking mat and rust-proof pins
– Spray bottle
Abbreviations (US Terms)
- ch – chain
- sl st – slip stitch
- sc – single crochet
- dc – double crochet
- tr – treble crochet
- sc2tog – single crochet 2 together
- sp – space
- BLO – back loop only
- st(s) – stitch(es)
- RS / WS – right side / wrong side
- rev sc – reverse single crochet (crab stitch): sc worked from left to right (right-handed)
Special stitch: Petal (puff stitch). Yo, insert hook in the stitch and pull up a loop to about 0.5 in (1.3 cm) tall. Repeat from * to * 3 more times, for 9 loops on the hook. Yo and pull through all 9 loops, then ch 1 to lock it. The locking ch-1 does not count as a stitch.
Gauge and Checkpoints
Gauge: 16 sc and 18 rows = 4 in (10.2 cm) in sc with Color A.
Make one complete square before committing to all eight, and measure it at each checkpoint:
- After Round 2 (mustard disc): 1.75 in (4.4 cm) across
- After Round 3 (petals): 3 in (7.6 cm) across, point to point
- After Round 5: 3.5 in (8.9 cm) square
- After Round 6: 4 in (10.2 cm) square
If your square is too big: go down a hook size (4 mm), or pull the petal loops up a little shorter.
If your square is too small: go up to 5 mm. Check that your dc rounds aren’t cupping. If they are, your tension is too tight.
The squares must measure 4 in (10.2 cm). If they don’t, the bands won’t match the tube’s circumference, and the bottom opening will end up the wrong size.
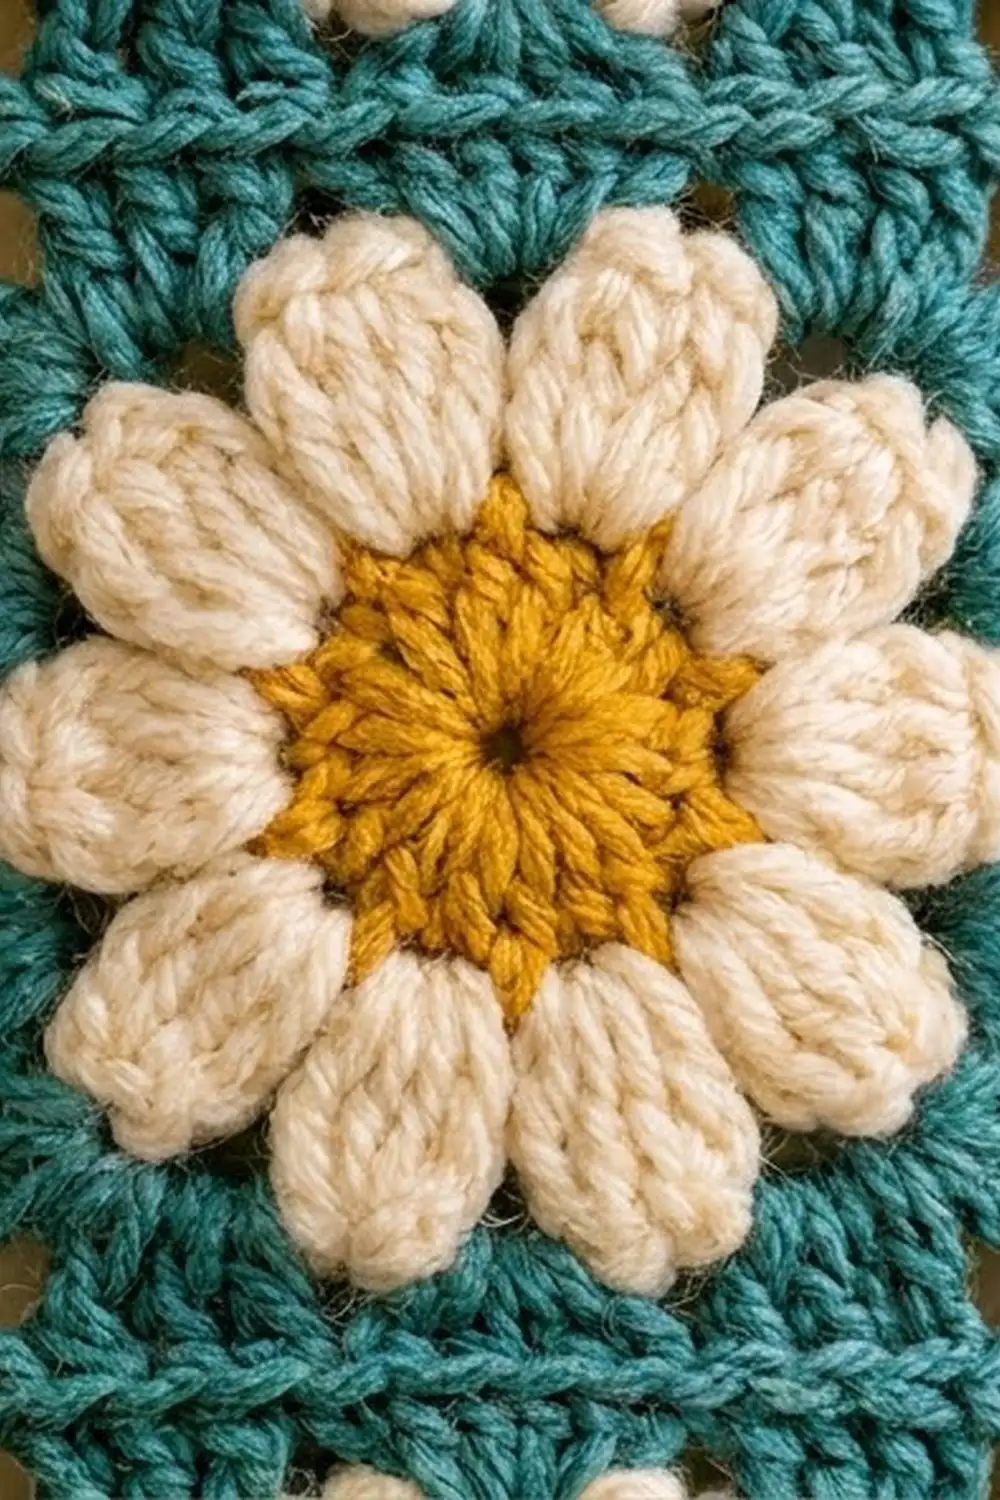
Daisy Square (Make 8)
Round 1 (Color C): Make a magic ring. Ch 3 (counts as dc), work 11 dc in the ring, then sl st to the top of ch-3. Pull the ring closed. (12 dc)
Round 2 (Color C): Ch 3 (counts as dc), dc in the same st, then 2 dc in each st around. Sl st to the top of ch-3 and fasten off. (24 dc)
Checkpoint: the disc lies flat and measures 1.75 in (4.4 cm).
Round 3 (Color B): Join in any st. Ch 2 (does not count), then work a Petal in the same st and ch 2. Skip next st, Petal in next st, ch 2. Repeat from * to * 10 more times. Sl st to the top of the first Petal and fasten off. (12 Petals, 12 ch-2 sps)
Each Petal sits on one mustard stitch, and the skipped stitches leave room for the petals to puff out.
Round 4 (Color A): Join in any ch-2 sp. This round squares off the circle, using 3 ch-2 sps per side.
– Corner: ch 4 (counts as tr), then (tr, ch 2, 2 tr) in the same sp.
– 3 dc in each of the next 2 ch-2 sps; then (2 tr, ch 2, 2 tr) in the next ch-2 sp.
– Repeat from * to * 2 more times, then 3 dc in each of the last 2 ch-2 sps. Sl st to the top of ch-4.
Each side between corner spaces has 2 tr + 3 dc + 3 dc + 2 tr. (10 sts per side, 40 sts, 4 corner ch-2 sps)
Round 5 (Color A): Sl st into the next st and into the corner ch-2 sp.
– Ch 3 (counts as dc), then (dc, ch 2, 2 dc) in the same sp.
– Dc in each of the next 10 sts, then (2 dc, ch 2, 2 dc) in the corner sp.
– Repeat from * to * 2 more times, then dc in each of the last 10 sts. Sl st to the top of ch-3.
Each side between corner spaces has 2 + 10 + 2. (14 dc per side, 56 dc, 4 corner ch-2 sps)
Round 6 (Color A): Ch 1. Sc in each dc around, working 2 sc in each corner ch-2 sp. Sl st to the first sc and fasten off. Leave a 12 in (30.5 cm) tail on four of the squares for seaming.
This round has 14 sc per side, worked 1 per existing dc, plus 2 sc in each corner (56 + 8). (64 sc)
Side-count definition: One corner’s 2 sc are split between the two sides they touch. Each side therefore has 1 corner sc + 14 sc + 1 corner sc = 16 sts per side, including its 2 corner stitches (16 x 4 = 64 ✓). Place markers in the corner sc if that helps.
Checkpoint: the square measures 4 x 4 in (10.2 x 10.2 cm).
Make All Pieces
- Color C centers: 8
- Color B petal rounds: 8
- Color A frames: 8
- Total: 8 complete daisy squares
Block all eight squares lightly to 4 x 4 in (10.2 x 10.2 cm) before joining, so the seams line up stitch for stitch.
Layout grid (top to bottom):
FRONT      BACK
[F1]       [B1]
[F2]       [B2]
[F3]       [B3]
[F4]       [B4]
All petal rounds should face the same way. Turn the squares so the Round 1 joins all sit in the same position.
Joining
Step 1 – Join each strip. Hold F1 and F2 with RS together and the edges matching. With Color A, sl st through the BLO of both layers across the 16 sts of one side. Join F2 to F3 and F3 to F4 the same way, then repeat for B1 to B4.
Each seam joins 16 sts to 16 sts. No stitches are added at the seams, so each strip is 1 square wide and 4 squares long.
- Long edge of each strip: 4 x 16 = 64 sts
- Short ends: 16 sts each
Step 2 – Make the tube. Place the front and back strips WS together, with the squares aligned and all seams matching. With Color A, join at the top corner of one long edge. Work 1 sc through both loops of both layers in each of the 64 sts down the edge. Fasten off and repeat for the second long edge. (64 sc per side seam)
The sc seams make the raised ridge along both sides of the holder.
Tension advice: Keep the seams as loose as the fabric. If a seam puckers, undo it and go up one hook size (5 mm) just for the joins.
Checkpoint: the flat tube measures 4 x 16 in (10.2 x 40.6 cm), and the top opening goes around 32 sts (16 front + 16 back).
Border: Top Band, Hanger, and Bottom Opening
Border gauge: The bands follow the 16 sc = 4 in (10.2 cm) gauge, so 16 sts sit flat across each 4 in (10.2 cm) square. The border has no extra or missing stitches, so it stays flat without ruffling or pulling in.
Top Band (Color A)
Round 1: Join at the top of one side seam. Ch 1, then sc in each st around: 16 across the front and 16 across the back. Sl st to the first sc. (32 sc)
Rounds 2–4: Ch 1, sc in each st around, then sl st to the first sc. Do not fasten off after Round 4. (32 sc each round)
Band depth: 1 in (2.5 cm).
Why it works: front side = 1 square x 16 sts, and back side = 1 square x 16 sts. 16 + 16 = 32. No stitches are worked into the seams, because the seam stitches are already the corner stitches of each square’s side count.
Hanging Strap (Color A)
The working loop should sit at the side seam, at st 1 of the round. St 17 is at the opposite side seam.
Row 1: Ch 36. Sl st in st 17 of the band to attach the chain at the opposite side.
Row 2: Turn, then sc in each of the 36 ch. Sl st in st 1 of the band and fasten off. (36 sc)
The strap is 9 in (22.9 cm) long. Hung from a hook, it makes a triangle about 4 in (10.2 cm) tall.
Loop: Join Color A in the 18th sc of the strap and ch 12. Sl st in the 19th sc, then turn. Work 18 sc into the ch-12 loop, then sl st in the 18th strap sc. Fasten off. (18 sc)
The teardrop loop stands about 1 in (2.5 cm) tall, so the hanger adds about 5 in (12.7 cm) in total.
Bottom Section
Round 1 (Color A): Join at the bottom of one side seam. Ch 1, then sc in each st around: 16 across the front and 16 across the back. Sl st to the first sc. (32 sc)
Round 2 (Color A): Ch 1, sc in each st, then sl st to the first sc. (32 sc)
Round 3 (Color A): Ch 1. Sc in each of the next 6 sts, sc2tog. Repeat from * to * 3 more times, then sl st to the first sc. This round works (6 sc + 1 sc2tog) x 4 = 24 sc + 4 sc2tog. (28 sts)
Round 4 (Color A): Ch 1, sc in each st, then sl st to the first sc. Fasten off. (28 sc)
Round 5 (Color B): Join in any st. Ch 1, sc in each st, then sl st to the first sc. (28 sc)
Round 6 (Color B): Ch 1, then rev sc in each st around. Sl st to the first st and fasten off. (28 rev sc)
The crab stitch rolls into the raised cream rim. The opening goes around 28 sts, or 7 in (17.8 cm), which gives a gap about 2.2 in (5.6 cm) across. That is wide enough to pull a bag through but small enough to hold the rest inside. The bottom section is 1.25 in (3.2 cm) deep.
Final Blocking
- Weave in all ends along seams or inside the tube.
- Stuff the tube with a rolled towel so it measures 4 in (10.2 cm) wide when flattened.
- Mist it evenly with water until damp but not dripping.
- Lay it flat and pin the side seams straight, keeping the body at 18.25 in (46.4 cm) long.
- Pinch each Petal into a rounded puff with your fingers.
- Shape the bottom rim into a smooth oval.
- Pin the strap straight, at 9 in (22.9 cm) long.
- Let it dry completely, at least 12 hours, before removing the towel.
Final Quality-Control Checklist
- [ ] All 8 squares measure 4 x 4 in (10.2 x 10.2 cm)
- [ ] Each square has 12 Petals and 64 sc in Round 6
- [ ] All the strip seams line up between the front and back
- [ ] Each side seam has 64 sc
- [ ] The top band has 32 sc in every round
- [ ] The strap is attached exactly at both side seams (sts 1 and 17)
- [ ] The bottom opening has 28 sts and a smooth cream rim
- [ ] The body measures 4 x 18.25 in (10.2 x 46.4 cm)
- [ ] All ends are secure and hidden
Troubleshooting
The petals lie flat instead of puffing. Pull the puff loops up taller, to a full 0.5 in (1.3 cm), and lock each one firmly with the ch-1.
The square cups after Round 4. Your tr may be too short. Pull the first loop of each tr up a little taller.
The square ruffles after Round 5. Your tension is too loose. Go down half a hook size for the teal rounds only.
The seams pucker. Use a larger hook for joining, and recheck that you worked exactly 16 sts per side.
The tube twists when hanging. The strap is attached off-center. Count again and attach at sts 1 and 17.
Bags fall out on their own. Rework Round 3 of the bottom section as (sc 5, sc2tog) x 4 to get 24 sts, which makes a smaller opening of 6 in (15.2 cm) around.
Bags are hard to pull out. Skip the sc2tog round so the opening stays at 32 sts, then work the cream rim over those 32 sts.
Care
Hand wash in cool water with mild soap, press out the water in a towel, and dry flat with the towel roll inside. Avoid the dryer, because heat can flatten the petals and shrink the cotton.
Final Notes
Each step of this pattern depends on the one before it, so measure as you go:
- The mustard disc is 1.75 in (4.4 cm).
- The petals are 3 in (7.6 cm).
- The finished square is 4 in (10.2 cm), with 16 sts per side.
- Four squares make a 16 in (40.6 cm) strip with 64 sts per long edge.
- Two strips make a 32-st tube.
- The top band adds 1 in (2.5 cm) and the bottom adds 1.25 in (3.2 cm), for a body of 4 x 18.25 in (10.2 x 46.4 cm).
- The strap and loop add about 5 in (12.7 cm) above that.
If your first square measures 4 in (10.2 cm), everything after it will fit.
Happy crocheting!