

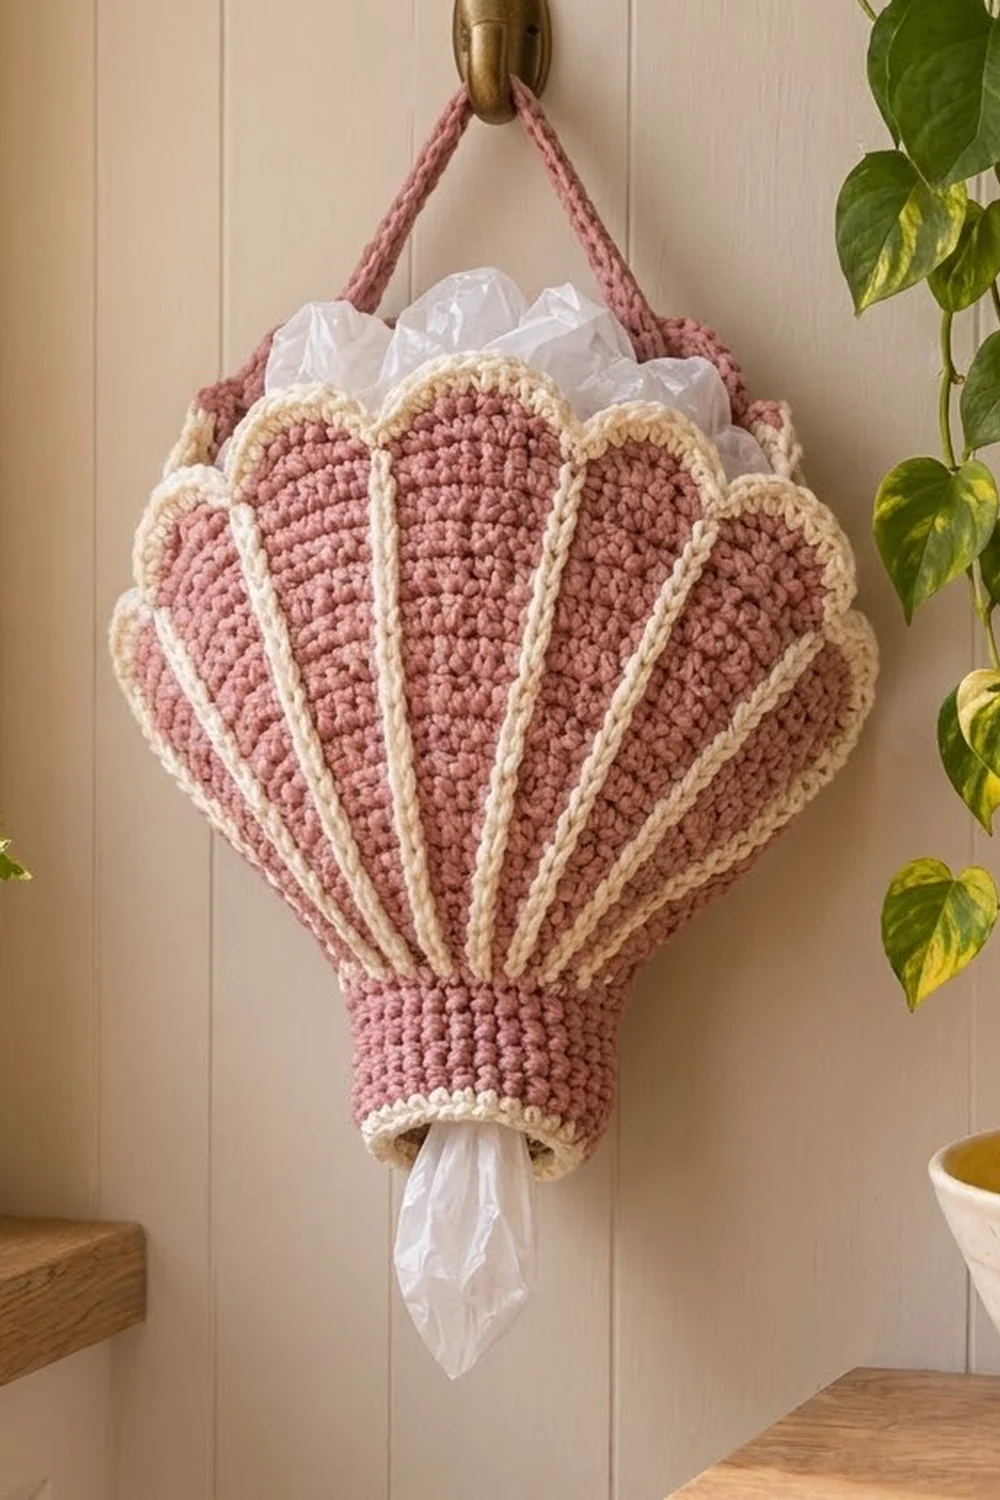
Plastic bags are not pretty, but the holder you keep them in can be. The Seaside Scallop Bag Holder is shaped like a scallop shell. A narrow cuff at the bottom opens into a wide fan, and the top edge has rounded scallops.
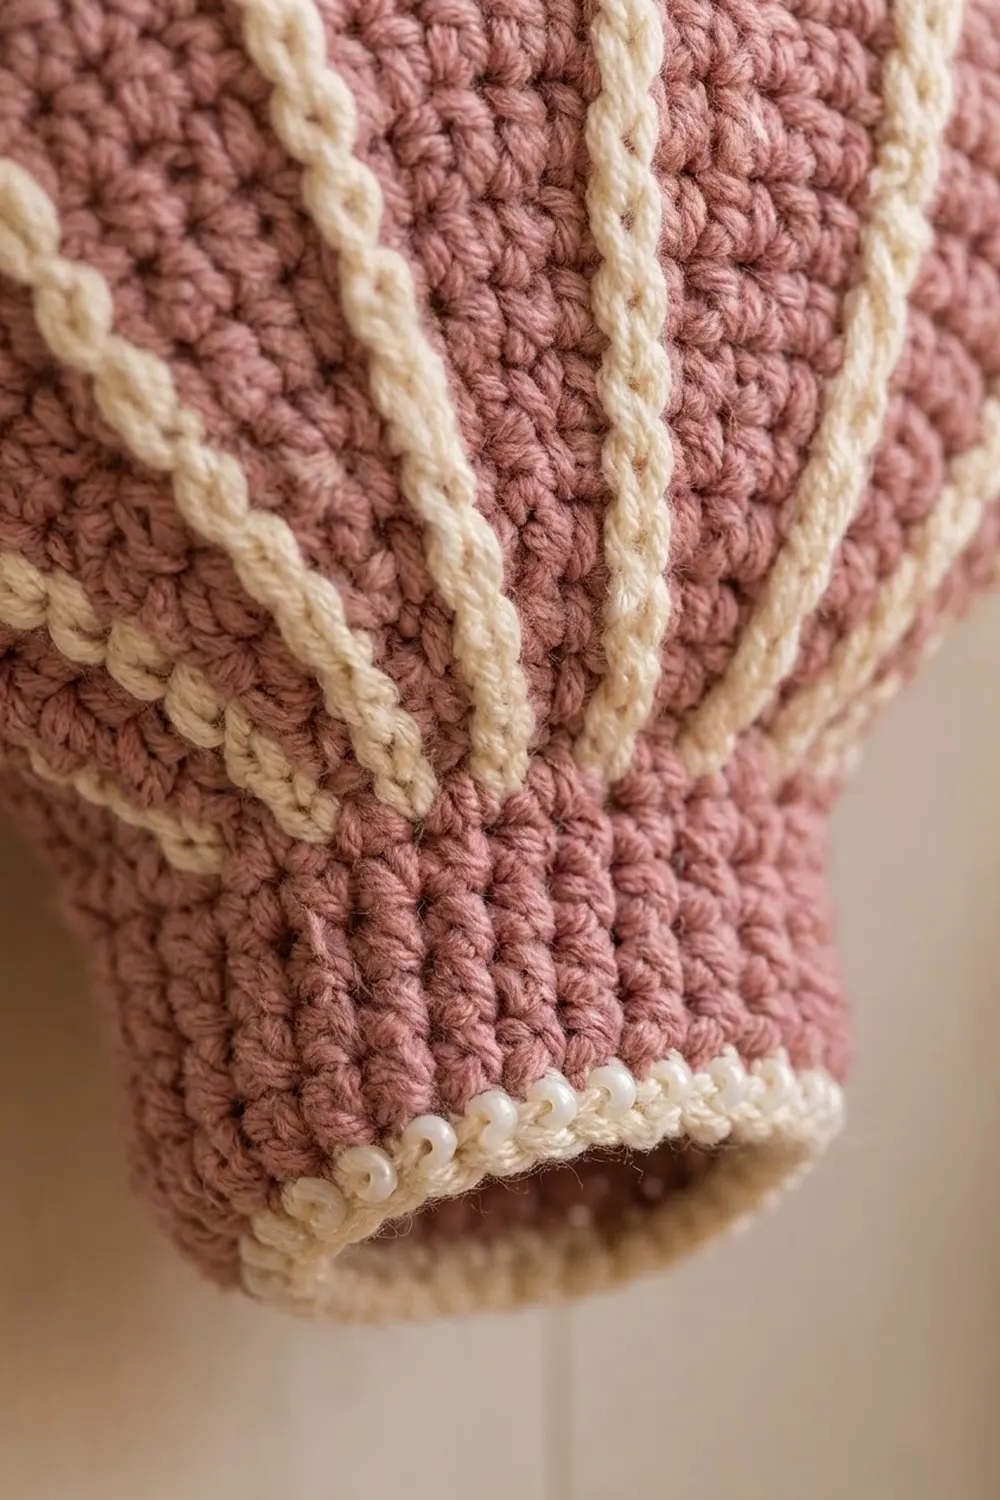
The body is dusty rose. Cream yarn is used for the raised ribs that run up the shell, the outline around the scallops, and the beaded edge on the cuff. It suits a cottage or seaside kitchen, and it also works well in sage green or any soft pastel with cream.
This pattern uses US crochet terms. The finished holder is about 8¾ in (22.2 cm) wide and 9 in (22.9 cm) tall, not counting the hanging strap.
You work the body in one piece from the bottom up, in joined rounds of single crochet. Start with the cuff, increase in three steps to make the flare, then finish with a scallop round. The cream ribs are added afterward in surface slip stitch. Last, you trim the cuff and sew a short strap inside the back.
Finished Size and Construction
- Finished size: 8¾ in (22.2 cm) wide × 9 in (22.9 cm) tall, laid flat
- Skill level: Easy-intermediate
- Terminology: US
- Yarn weight: Worsted (#4)
- Hook: 5.0 mm (H-8)
- Number of pieces: 2 (the body, worked in the round, and the strap)
- Layout: One 3D pouch, flattened so it shows 7 scallops on the front and 7 on the back
- Cuff: 3½ in (8.9 cm) wide flat, 7 in (17.8 cm) around
- Size before edging: 8¾ in (22.2 cm) wide × about 8¼ in (21.0 cm) tall
- Edging depth: ¼ in (0.6 cm) at the scallops, ½ in (1.3 cm) at the cuff
Materials
Use a smooth worsted-weight cotton or cotton blend. Cotton keeps the shell shape firm and shows the slip-stitch ribs clearly. Avoid fuzzy or very stretchy acrylic, because the holder will sag once it is full of bags.
- Main color (MC), dusty rose: 70 g / 120 m (131 yd)
- Contrast color (CC), cream: 25 g / 45 m (49 yd)
Both amounts include a margin of about 20%.
Tools:
– 5.0 mm (H-8) crochet hook
– 4.0 mm (G-6) hook for the surface ribs (optional)
– 14 locking stitch markers
– Tapestry needle
– Scissors
– Measuring tape
– Rust-proof pins and a spray bottle for blocking
Abbreviations (US Terms)
- ch: chain
- sl st: slip stitch
- sc: single crochet
- hdc: half double crochet
- dc: double crochet
- inc: 2 sc in the same stitch
- sc2tog: single crochet 2 together
- rev sc: reverse single crochet (crab stitch)
- st(s): stitch(es)
- rnd(s): round(s)
Special stitch, surface slip stitch (surf sl st): Hold the CC yarn inside the holder. Push the hook through the fabric from the outside, between two stitch columns, and pull up a loop. Move up one round, insert the hook in the same gap, pull up a new loop, and draw it through the loop on the hook. Each surf sl st covers exactly one round of height.
Gauge and Checkpoints
Gauge: 16 sc × 18 rnds = 4 in (10.2 cm) in joined rounds of sc, with the 5.0 mm hook.
Make a test cuff before you go further. Work Rnds 1–8 and lay the tube flat. Check these measurements as you go:
- After Rnd 8: 3½ in (8.9 cm) wide flat, about 1¾ in (4.4 cm) tall
- After Rnd 9: 5¼ in (13.3 cm) wide flat
- After Rnd 12: 7 in (17.8 cm) wide flat
- After Rnd 17: 8¾ in (22.2 cm) wide flat
- After Rnd 34: about 7½ in (19.1 cm) tall from the foundation chain
If your cuff is wider than 3½ in (8.9 cm), change to a 4.5 mm hook. If it is narrower, change to a 5.5 mm hook. If only the height is off, add or remove straight rounds in the Rnds 18–34 section. Do not change any of the increase rounds.
Pattern: Body
Work every round as a joined round: ch 1 to start (it does not count as a stitch), and sl st into the first sc to finish. Joined rounds keep the 14 shell sections lined up straight. The join seam will be hidden under one of the cream ribs.
Cuff
With MC, ch 28 and join with a sl st to the first ch to form a ring. Check that the chain is not twisted.
Rnd 1: Ch 1, sc in each ch around, join. (28 sts)
Rnds 2–8: Ch 1, sc in each st around, join. (28 sts)
The cuff should be a firm, straight tube 3½ in (8.9 cm) wide flat.
Flare
From here on, the body is divided into 14 sections. Every section ends with an inc, so the border between sections stays in the same column all the way up. That column is where each cream rib will go later.
Rnd 9: Ch 1, (sc in next st, inc in next st), repeat from * 13 more times, join. (42 sts)
Rnds 10–11: Ch 1, sc in each st around, join. (42 sts)
Rnd 12: Ch 1, (sc in next 2 sts, inc in next st), repeat from * 13 more times, join. (56 sts)
Rnds 13–16: Ch 1, sc in each st around, join. (56 sts)
Rnd 17: Ch 1, (sc in next 3 sts, inc in next st), repeat from * 13 more times, join. (70 sts)
Each section is now 5 stitches wide (70 ÷ 14 = 5).
Rnds 18–34: Ch 1, sc in each st around, join. (70 sts)
Before you go on, place a locking marker in the gap after the 5th stitch of each section, so there are 14 markers around Rnd 34. The first marker sits on the join seam.
Scallop Round
Rnd 35: Ch 1, (sc in next st, hdc in next st, 3 dc in next st, hdc in next st, sc in next st), repeat from * 13 more times, join. Fasten off MC. (98 sts: 14 scallops of 7 sts)
Each scallop uses exactly one 5-stitch section. Where two scallops meet, there are 2 sc side by side, and that dip sits right on a marker.
Pattern: Cream Ribs
Use CC, and the 4.0 mm hook if you have one, so the ribs stay neat. Work one rib at each of the 14 markers.
- Start at the first marker gap at the top of Rnd 8, right where the cuff meets the flare. Pull up a loop of CC from the inside.
- Work 1 surf sl st into the same gap in each round from Rnd 9 to Rnd 34. (26 surf sl sts per rib)
- Finish at the dip between two scallops. Pull the yarn through to the inside and fasten off.
Repeat for all 14 ribs, for a total of 364 surf sl sts. Keep the loops the same length as a sc is tall. Ribs worked too tight will pucker the shell.
Flatten the holder so that ribs 1 and 8 run along the two side folds. That leaves 6 ribs and 7 scallops on each face.
Pattern: Strap
With MC, ch 51.
Row 1: Sc in 2nd ch from hook and in each ch across, turn. (50 sts)
Rows 2–3: Ch 1, sc in each st across, turn. (50 sts)
Fasten off and leave a 12 in (30.5 cm) tail. The strap measures 12½ in (31.8 cm) × ¾ in (1.9 cm).
Choose one face to be the back. On the inside of the back, line up 1 in (2.5 cm) of one strap end along the side fold, just below Rnd 34. Whipstitch it in place through the inner loops only, so no stitches show on the front. Attach the other end at the opposite fold in the same way. That leaves a hanging loop of 10½ in (26.7 cm).
Edging (Border)
Edging gauge: 1 scallop is 1¼ in (3.2 cm) wide, and 7 scallops make up one face.
Scallop Edging
Join CC in the first hdc of Rnd 35.
Rnd 36: Ch 1, (sc in hdc, sc in next dc, 3 sc in center dc, sc in next dc, sc in hdc, sc2tog over the next 2 sc), repeat from * 13 more times. The last sc2tog uses the final sc of the round and the first sc of the round. Join. (112 sts)
That is 8 sts per scallop: 7 scallops × 8 = 56 sts per face.
Why the math works:
– Each 7-st scallop gives 1 + 1 + 3 + 1 + 1 = 7 sc, plus 1 sc2tog that is shared with the next scallop, for 8 per repeat.
– The 3-sc corner at each tip adds 2 sts, so the cream outline wraps the curve without cupping.
– The sc2tog pulls each dip in sharply, so the scallops read clearly.
Cuff Edging
Turn the holder upside down. Join CC in any free loop of the foundation chain, aligned with rib 1.
Rnd A: Ch 1, sc in each free loop around, join. (28 sts, 14 per face)
Rnd B: Ch 1, rev sc in each st around, join. (28 sts) Fasten off.
Because the cuff edging keeps exactly the same count as the cuff, the opening stays 7 in (17.8 cm) around. It is snug enough to hold the bags in but still lets one pull out easily. Weave in all ends on the inside.
Final Blocking
- Turn the holder right side out and flatten it with ribs 1 and 8 along the folds.
- Mist both faces lightly until damp. Do not soak the piece.
- Stuff the shell with a folded towel or crumpled bags until it is 8¾ in (22.2 cm) wide.
- Pin each scallop tip so the curves open evenly. Space the tips 1¼ in (3.2 cm) apart.
- Pinch the ribs straight along their gap lines.
- Roll a small towel into the cuff so it dries as a round tube 3½ in (8.9 cm) wide.
- Leave it to dry completely, then take out the pins and padding.
Final Quality-Control Checklist
- [ ] The cuff measures 3½ in (8.9 cm) flat and is 7 in (17.8 cm) around
- [ ] The body measures 8¾ in (22.2 cm) wide at the top
- [ ] There are 14 scallops in total, 7 on each face
- [ ] There are 14 ribs, each with 26 surf sl sts, and each ends in a dip
- [ ] The scallop edging has 112 sts (56 per face)
- [ ] The cuff edging has 28 rev sc
- [ ] The strap ends are hidden inside the back, and the loop is 10½ in (26.7 cm)
- [ ] All ends are woven in on the inside
Troubleshooting
The ribs drift off the dips. You probably lost a section count, so check that Rnds 9, 12, and 17 each ended with exactly 14 increases. Also make sure you joined every round instead of spiraling.
The ribs pucker the body. Your surf sl sts are too tight. Rip back and redo them with a larger hook or a looser loop.
The scallops ruffle. Your dc may be too loose. Try the dc in the scallop round with a 4.5 mm hook.
The scallops look flat. You may have worked an sc instead of an sc2tog at a dip. Recount: you need 8 sts per scallop.
The cuff flares out. The rev sc is too loose. Redo Rnd B with the smaller hook.
The holder sags when full. The fabric is too loose. Remake it with a hook one size smaller.
Care
Hand wash in cool water and lay flat to dry, reshaping the scallops while the holder is damp. Do not tumble dry.
Final Notes
Each measurement depends on the one before it. The 28-stitch cuff sets the 3½ in (8.9 cm) opening. Three increase rounds take it to 70 stitches and 8¾ in (22.2 cm) of width. Those 70 stitches split evenly into 14 sections, which become 14 scallops and 14 ribs. If you check your gauge at the cuff, everything above it will fall into place. Pick a color for your kitchen and fill it with bags.
Happy crocheting!