

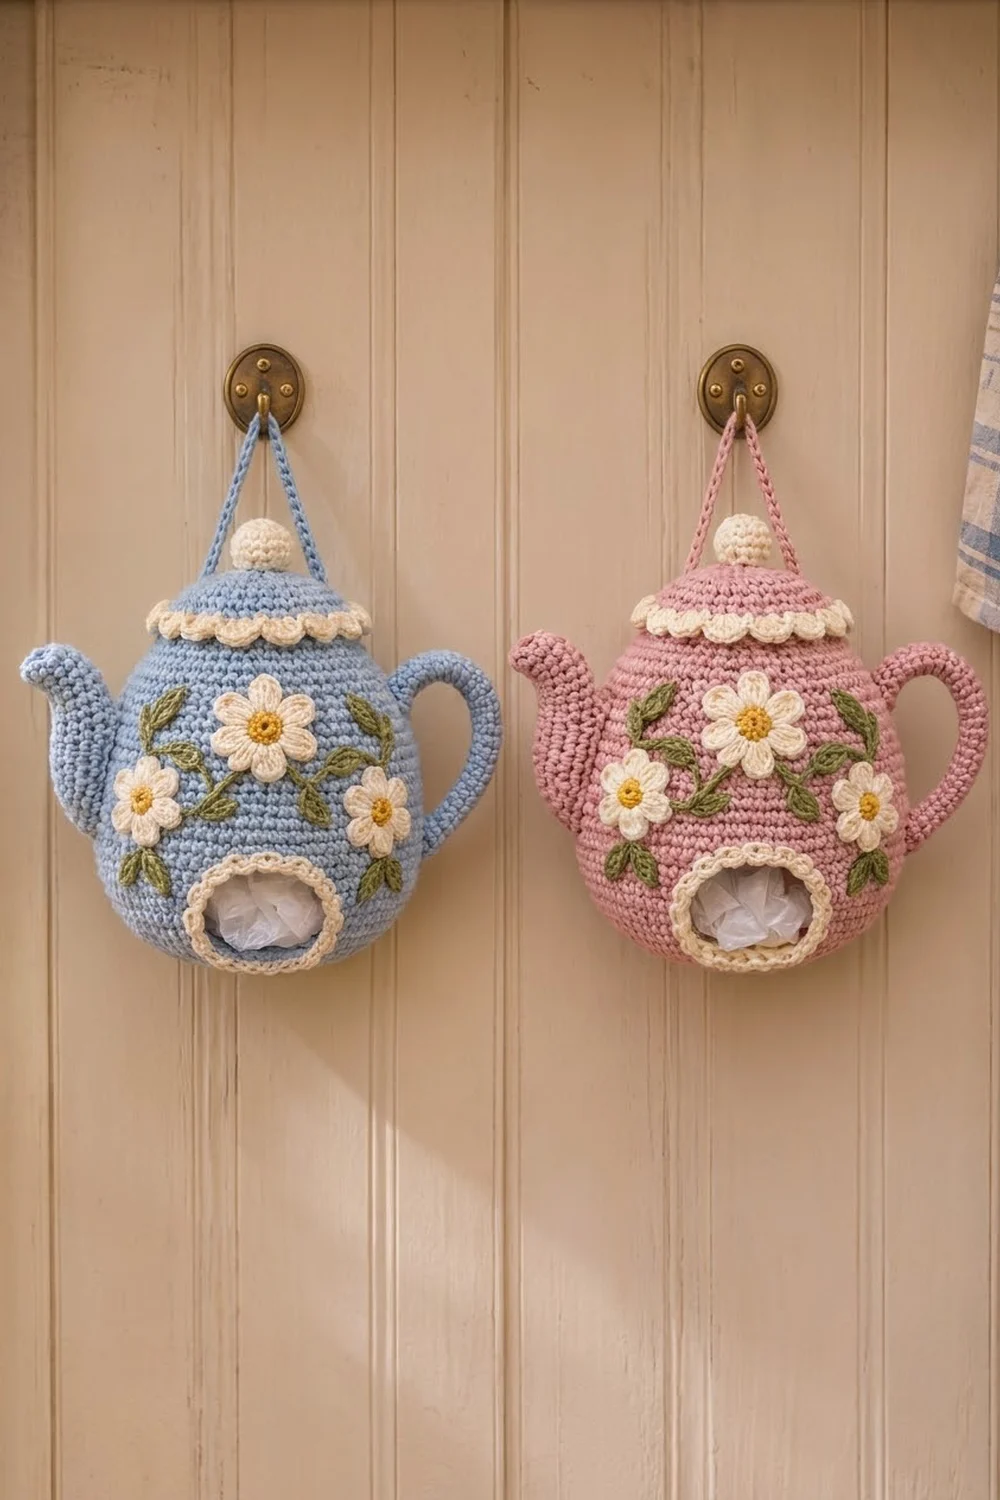
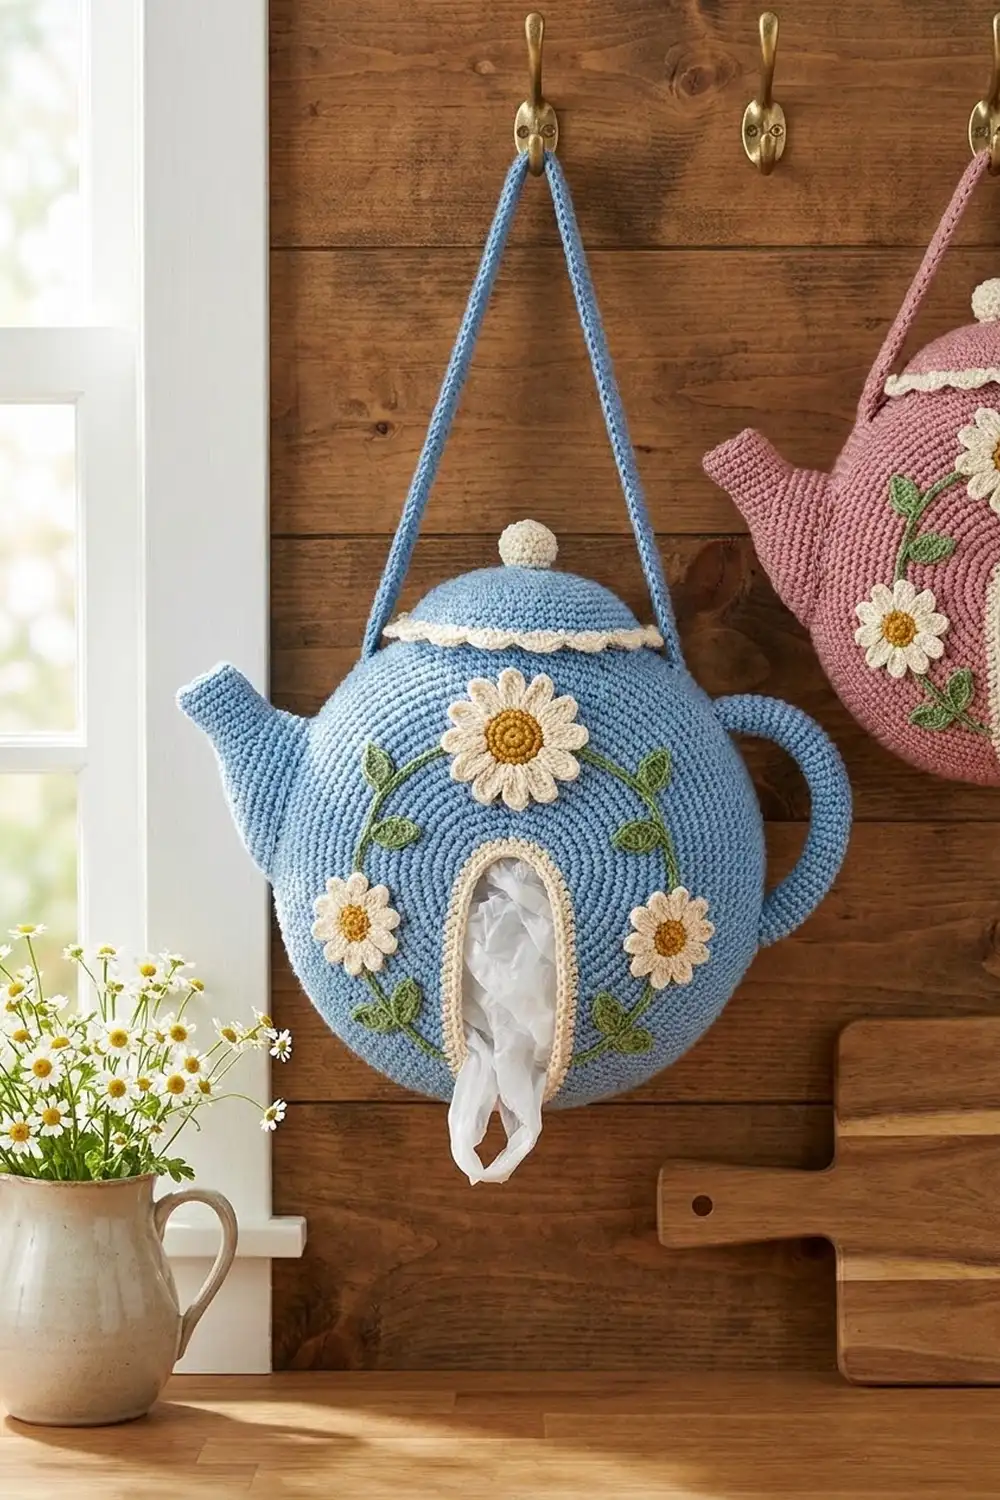
This teapot-shaped bag holder hangs on a hook and keeps your plastic grocery bags out of sight. Bags go in under the lid and come out one at a time through an arched opening at the front. The body is soft powder blue with a cream scalloped lid, a round cream knob, and a cream rim around the opening. Three cream daisies with golden centers and green leafy vines decorate the front.
The style is cottage-kitchen and a little vintage. It looks good next to floral jugs, wooden boards, and checked tea towels. You could also make it in dusty pink with the same cream, yellow, and green accents.
The pattern uses US crochet terms. Filled with bags and hung against a wall, the body is about 7 in (17.8 cm) wide and 6.5 in (16.5 cm) tall. With the spout and handle it is about 12 in (30.5 cm) wide. With the lid and knob it is about 9 in (22.9 cm) tall, and the hanging strap adds about 5 in (12.7 cm) above that.
The body is worked from the bottom up in single crochet spiral rounds. Ten turned rows leave the dispensing opening, and a chain closes the gap above it. Then you crochet the lid, knob, spout, handle, and strap separately and sew them on. Last, you add the opening trim, the daisies, and the leaves.
Finished Size and Construction
- Finished size: body 7 in (17.8 cm) wide x 6.5 in (16.5 cm) tall when filled; overall 12 in (30.5 cm) wide x 9 in (22.9 cm) tall, plus a 5 in (12.7 cm) strap loop
- Skill level: Intermediate
- Terminology: US
- Yarn weight: worsted (#4)
- Hook: 4.0 mm (G-6)
- Number of pieces: one finished holder made from sewn components (body, lid, knob, spout, handle, strap, 3 daisies, 8 leaves)
- Layout: single 3D item; there are no repeated pieces to join
- Body size: 72 sts around at the widest point, 18 in (45.7 cm) circumference
- Opening before border: 4 in (10.2 cm) wide x 2.5 in (6.4 cm) tall
- Border depth: 0.5 in (1.3 cm) of cream trim around the opening
Materials
Use a smooth worsted cotton or cotton blend. It shows stitch definition, holds the teapot shape, and won’t stretch out under the weight of the bags. Acrylic works too, but the body will be a little softer.
- Powder blue (MC): 150 g / 300 m
- Cream (CC1): 25 g / 50 m
- Golden yellow (CC2): 5 g / 10 m
- Leaf green (CC3): 10 g / 20 m
All quantities include a margin of about 15%.
Tools:
– 4.0 mm (G-6) crochet hook
– Tapestry needle
– 4 locking stitch markers
– Small amount of polyester fiberfill
– Scissors
– Optional: one pipe cleaner for the handle
– Straight pins for placing appliqués
Abbreviations (US Terms)
- ch – chain
- sl st – slip stitch
- sc – single crochet
- hdc – half double crochet
- dc – double crochet
- inc – 2 sc in the same stitch
- dec – single crochet 2 together
- MR – magic ring
- st(s) – stitch(es)
- rnd(s) – round(s)
- RS / WS – right side / wrong side
- rev sc – reverse single crochet (crab stitch)
Special stitch – reverse sc: with RS facing, work from left to right. Insert the hook into the next stitch to the right, yarn over, pull up a loop, yarn over, and draw through both loops. This makes a corded, beaded edge.
Gauge and Checkpoints
Gauge: 16 sc x 16 rnds = 4 in (10.2 cm) in sc worked in the round.
Make the base circle (Rnds 1–8) first as your gauge test.
- After Rnd 8: the base is a flat circle about 3.8 in (9.7 cm) across.
- After Rnd 12: the circumference is 18 in (45.7 cm).
- After Row 24: the gap measures 4 in (10.2 cm) wide x 2.5 in (6.4 cm) tall.
- After Rnd 36: the neck circumference is 10.5 in (26.7 cm).
- Lid after Rnd 8: about 3.8 in (9.7 cm) across.
If your base comes out larger than 3.8 in (9.7 cm), go down a hook size. If it’s smaller, go up a hook size. Fabric that’s too loose will let bags push through the stitches, so check this before you go further.
Body
Start with MC. Work in continuous spiral rounds and move the marker up each round.
Rnd 1: 6 sc in MR. (6)
Rnd 2: inc in each st. (12)
Rnd 3: (sc 1, inc) x 6. (18)
Rnd 4: (sc 2, inc) x 6. (24)
Rnd 5: (sc 3, inc) x 6. (30)
Rnd 6: (sc 4, inc) x 6. (36)
Rnd 7: (sc 5, inc) x 6. (42)
Rnd 8: (sc 6, inc) x 6. (48)
Increasing in the next four rounds without any plain rounds between them makes the rounded bottom of the pot.
Rnd 9: (sc 7, inc) x 6. (54)
Rnd 10: (sc 8, inc) x 6. (60)
Rnd 11: (sc 9, inc) x 6. (66)
Rnd 12: (sc 10, inc) x 6. (72)
Rnds 13–14: sc in each st. (72)
Dispensing Opening
Now work back and forth over 56 sts and leave 16 sts unworked. Those 16 sts mark the front center of the teapot.
Row 15 (RS): sc in next 56 sts, turn. Leave the last 16 sts of the round unworked. (56)
Rows 16–24: ch 1, sc in each st across, turn. (56)
Row 24 is a WS row, so it ends at the same edge where Row 15 started.
Closing chain: ch 16 and sl st into the first sc of Row 24, across the gap. Turn so RS faces.
Rnd 25: sc in each of the 16 ch, then sc in the next 56 sts. Place the marker. (72)
Rnd 26: sc in each st. (72)
Shoulders and Neck
Rnd 27: (sc 10, dec) x 6. (66)
Rnd 28: sc around. (66)
Rnd 29: (sc 9, dec) x 6. (60)
Rnd 30: sc around. (60)
Rnd 31: (sc 8, dec) x 6. (54)
Rnd 32: sc around. (54)
Rnd 33: (sc 7, dec) x 6. (48)
Rnd 34: sc around. (48)
Rnd 35: (sc 6, dec) x 6. (42)
Rnd 36: sc around, sl st to join. Fasten off MC. (42)
Neck rim: join CC1.
Rnd 37: ch 1, sc in each st, sl st to join. (42)
Rnd 38: ch 1, rev sc in each st, sl st to join. (42)
Fasten off.
Lid
Start with MC.
Rnds 1–8: work as for Body Rnds 1–8. (48)
Rnds 9–10: sc in each st. These rounds bend the edge down into a shallow dome. (48)
Change to CC1.
Rnd 11: sc in each st, sl st to join. (48)
Rnd 12 (scallops): skip 1 st, 5 dc in next st, skip 1 st, sl st in next st; repeat 12 times. (12 scallops)
Each scallop uses 4 sts, and 12 x 4 = 48, so the repeat closes evenly. The finished lid measures about 4.25 in (10.8 cm) across. That’s wide enough to drape over the 10.5 in (26.7 cm) neck.
Knob
With CC1:
Rnd 1: 6 sc in MR. (6)
Rnd 2: inc in each st. (12)
Rnds 3–4: sc around. (12)
Rnd 5: dec x 6. (6)
Stuff the knob firmly, close the hole, and leave a long tail. The knob is about 1 in (2.5 cm) across. Sew it to the center of the lid.
Spout
With MC, ch 12 and join with a sl st to form a ring.
Rnds 1–4: sc in each ch or st. (12)
Rnd 5: (sc 3, inc) x 3. (15)
Rnd 6: sc around. (15)
Rnd 7: (sc 4, inc) x 3. (18)
Rnd 8: sc around. (18)
Rnd 9: (sc 5, inc) x 3. (21)
Rnd 10: sc around. (21)
Rnd 11: (sc 6, inc) x 3. (24)
Rnd 12: sc around. (24)
Row 13 (angled base): sc in next 12 sts, sl st in next st. Fasten off and leave a long tail.
The spout is 3 in (7.6 cm) long and 6 in (15.2 cm) around at the base. The extra half-row on one side makes the spout tilt upward when it’s sewn on. Put that side at the bottom.
Handle
With MC, ch 8 and join to form a ring.
Rnds 1–22: sc in each st. (8)
Fasten off. The tube is 5.5 in (14.0 cm) long and 2 in (5.1 cm) around. Stuff it lightly, or slide in a pipe cleaner, and bend it into a C-shape.
Hanging Strap
With MC, ch 49.
Row 1: sc in 2nd ch from hook and in each ch across, turn. (48)
Row 2: ch 1, sc across. (48)
Fasten off. The strap is 12 in (30.5 cm) long.
Daisies and Leaves
Large daisy (make 1):
– Rnd 1: with CC2, 8 sc in MR. (8)
– Rnd 2: inc in each st, sl st to join. Fasten off. (16)
– Rnd 3: join CC1. (sc, hdc, 2 dc, hdc, sc) in next st, sl st in next st; repeat 8 times. (8 petals)
The large daisy is about 2.25 in (5.7 cm) across.
Small daisy (make 2):
– Rnd 1: with CC2, 8 sc in MR, sl st to join. Fasten off. (8)
– Rnd 2: join CC1. (sl st, ch 2, 2 dc, ch 2, sl st) in next st; repeat 8 times. (8 petals)
Each small daisy is about 1.75 in (4.4 cm) across.
Leaf (make 8): with CC3, ch 7. Sc in 2nd ch from hook, then hdc, dc, dc, hdc in the next 4 ch, and 3 sc in the last ch. Rotate and work along the other side of the chain: hdc, dc, dc, hdc, sc. Sl st to the first sc. Each leaf is about 1.5 in (3.8 cm) long.
Assembly
- Flatten the body so the opening is centered at the front. Sew the spout to the left side between Rnds 18 and 28. Sew the handle to the right side, with the top end at Rnd 32 and the bottom end at Rnd 14.
- Pin the large daisy at the front center between Rnds 27 and 33, above the opening. Pin one small daisy on each side of the opening between Rnds 18 and 24.
- With CC3, work surface slip stitches to make two curved vines, each about 4 in (10.2 cm) long. Each vine runs from the large daisy down to one small daisy.
- Sew the leaves along the vines in pairs. Put 4 on each side.
- Sew the daisies through their centers and petal tips.
- Sew one strap end inside the neck on each side, in line with the spout and the handle.
- Lay the lid on the neck. Sew the back half of lid Rnd 10 to neck Rnd 37 across 21 sts. The front half stays free so you can lift it to refill.
Opening Border
Border gauge: same as the body, 4 sc and 4 rows per inch (2.5 cm). Because the gauge is square, working 1 sc into each row-end keeps the side edges flat.
Join CC1 at the right end of the 16 unworked stitches, with RS facing.
Rnd 1:
– Bottom: 2 sc in first st, sc in next 14 sts, 2 sc in last st. (18)
– Left side: 1 sc in each of the 10 row-ends. (10)
– Top: 2 sc in first ch, sc in next 14 ch, 2 sc in last ch. (18)
– Right side: 1 sc in each of the 10 row-ends. (10)
– Sl st to join.
Total: 52 sts worked 1-per-stitch or row-end, plus 4 extra corner sts = 56. Each corner’s 2 sc are counted inside the top or bottom count, so no stitch is counted twice.
Rnd 2: ch 1, rev sc in each st, sl st to join. (56)
Fasten off. Why the math works: each side gets 1 st per stitch or row-end, which matches the gauge. The 4 corner increases let the rim turn without cupping. The rev sc rolls outward and softens the rectangle into an arch. The finished opening is about 3 in (7.6 cm) wide x 1.5 in (3.8 cm) tall.
Final Blocking
- Fill the body loosely with crumpled bags or a towel until it’s round.
- Lightly mist the body, the lid scallops, and the opening rim with water.
- Pin each lid scallop into an even fan.
- Shape the handle into a smooth C-shape and bend the spout upward.
- Press the daisy petals flat with your fingers.
- Let everything dry completely, then take out the filling.
Final Quality-Control Checklist
- Neck is 10.5 in (26.7 cm) around and the lid covers it
- Lid has 12 even scallops
- Opening border has 56 sts and lies flat
- Opening is centered under the large daisy
- Spout and handle are level with each other
- Strap is sewn securely on both sides
- All yarn ends are woven in on the WS
Troubleshooting
- Bags pull out in bunches: add a third round of sc to the opening border to make the opening smaller.
- Body is too loose: use a smaller hook. Loose fabric will sag.
- Lid slides off: add two small stitches at the front edge, or sew on a button and loop.
- Spout droops: stuff the spout more firmly.
- Border ruffles: skip the corner increases on Rnd 1.
Care
Hand wash in cool water and dry flat. Reshape the lid and spout while damp.
Final Notes
The whole teapot follows one chain of measurements. The base is 3.8 in (9.7 cm) across. The body grows to 18 in (45.7 cm) around. The opening starts at 4 x 2.5 in (10.2 x 6.4 cm), and the neck finishes at 10.5 in (26.7 cm). The border takes the opening to about 3 x 1.5 in (7.6 x 3.8 cm). If each checkpoint matches, the lid, spout, and handle will all fit.
Happy crocheting!