

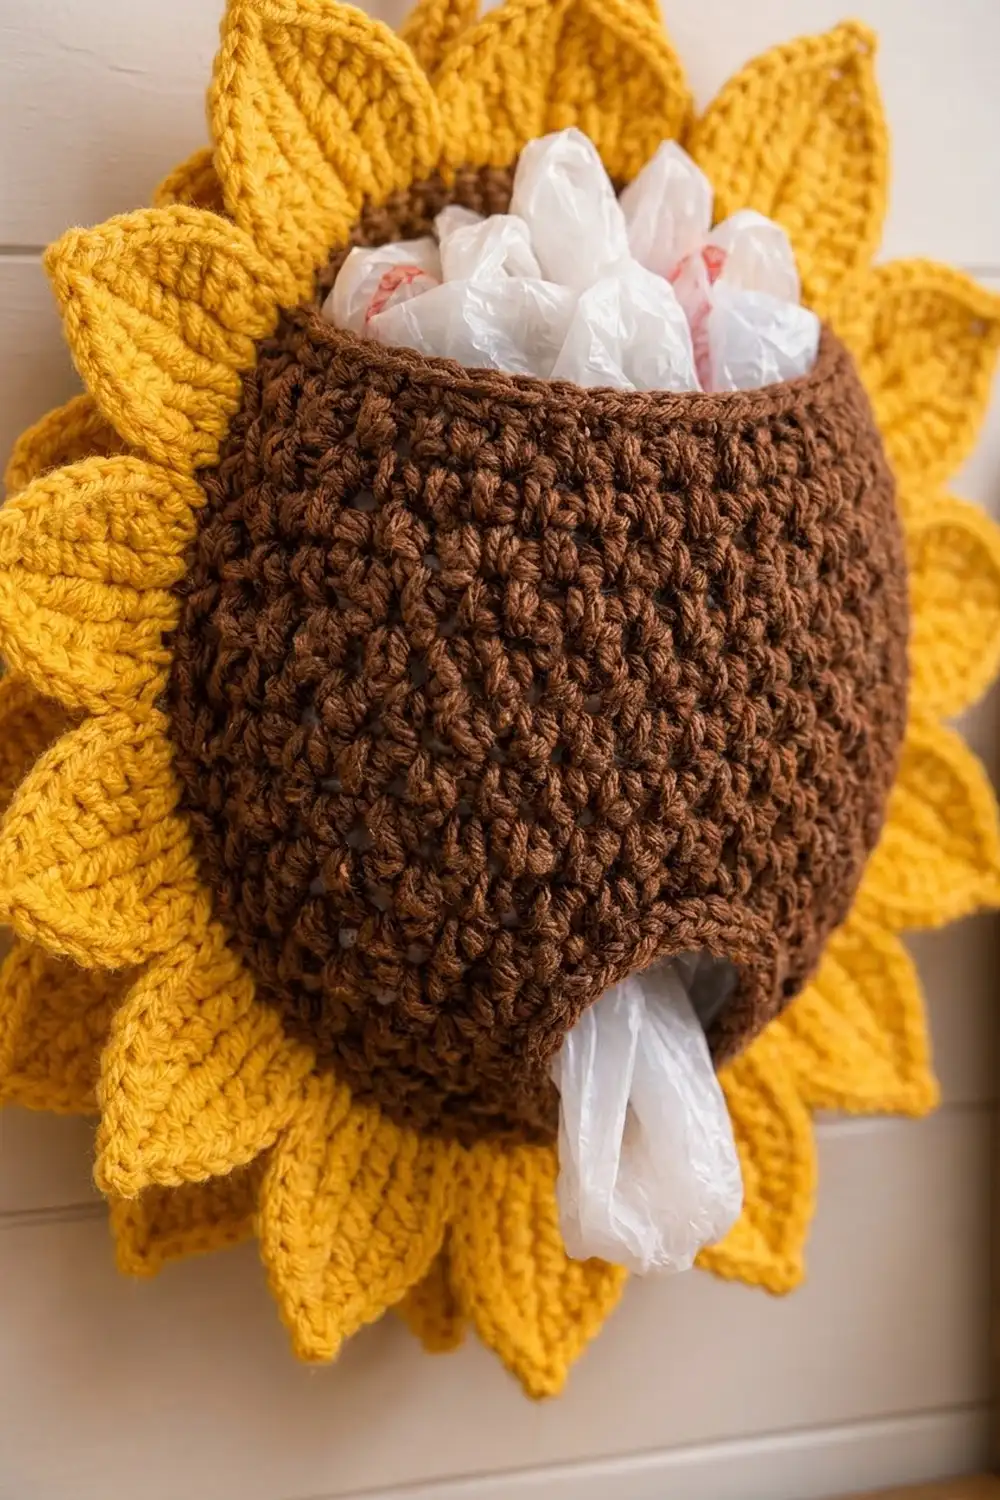
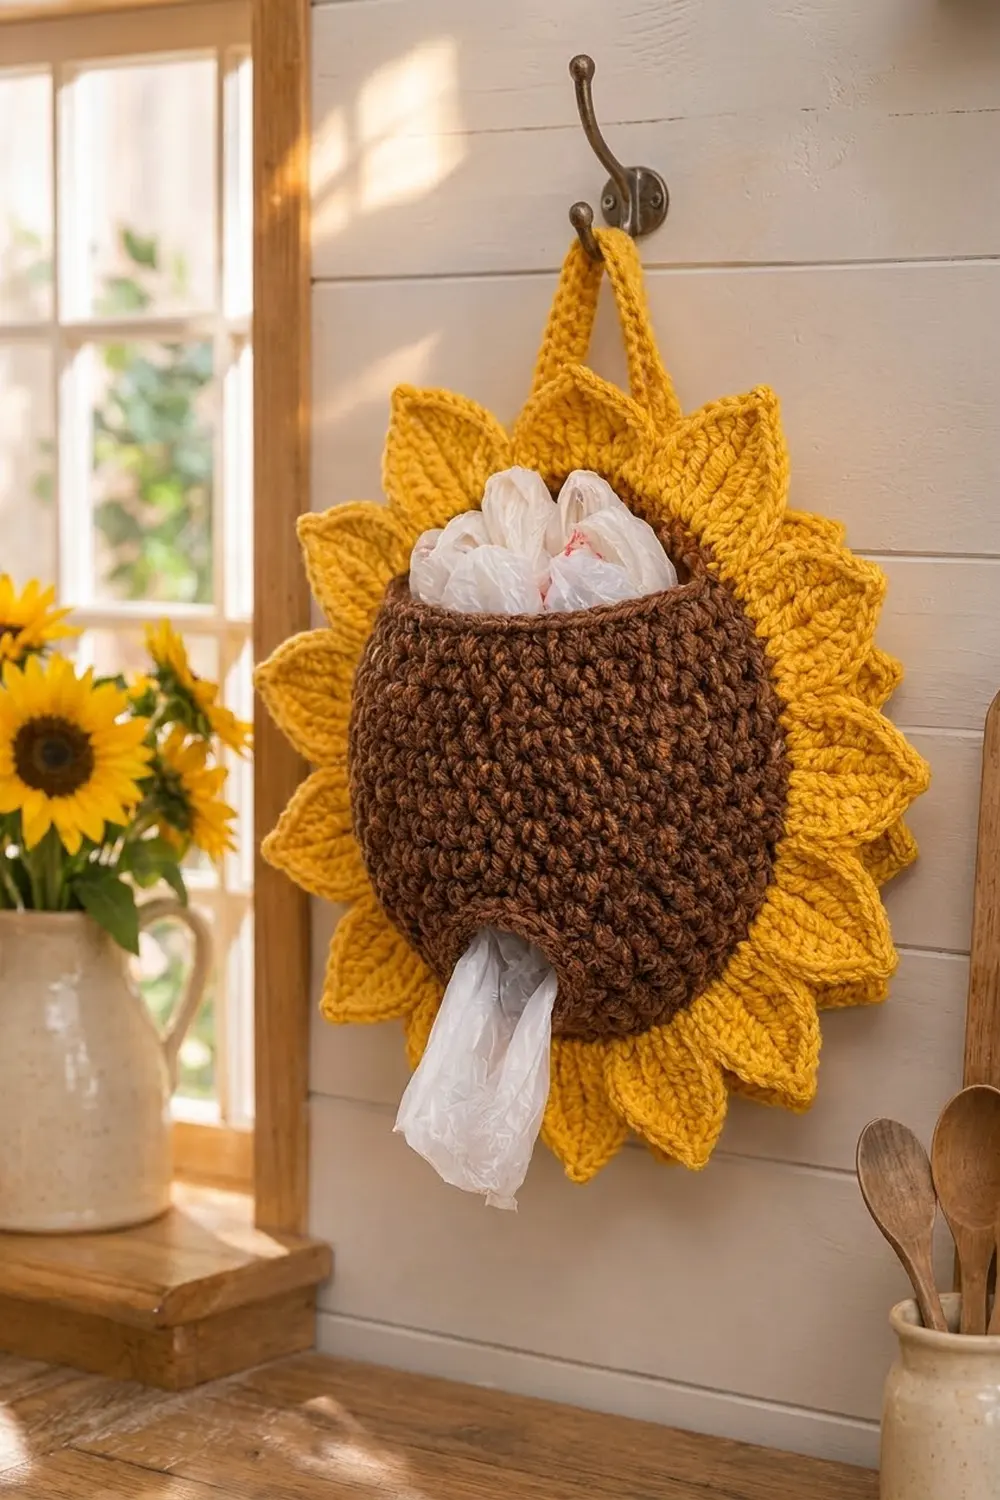
This sunflower bag holder hangs on a hook and keeps plastic grocery bags in one tidy spot. You stuff bags in through the wide opening at the top and pull them out one at a time through a small round hole at the bottom. It’s useful, and it brightens up a kitchen wall, pantry door or laundry nook.
The design uses two colors. A chocolate brown single crochet pouch sits on a brown disc, which works as the flower’s center. Around the disc is a ring of 16 pointed golden yellow petals. Each petal has a raised outline and a ridged, leaf-like texture. A short yellow strap at the top holds it on a wall hook. The style is cozy farmhouse, and it suits a late-summer or autumn kitchen.
All instructions use US crochet terms. The finished holder measures about 13.25 in (33.7 cm) across from petal tip to petal tip. The pouch is about 6 in (15.2 cm) wide and 6 in (15.2 cm) tall.
You will make four kinds of components: one flat back disc, one pouch worked in the round, 16 petals and one strap. Sew the petals around the edge of the disc, sew the pouch to the front of the disc and attach the strap at the back. The result is one finished holder.
Finished Size and Construction
- Finished size: about 13.25 in (33.7 cm) in diameter, petals included
- Skill level: Easy to Intermediate
- Terminology: US crochet terms
- Yarn weight: Worsted (#4)
- Hook: 5.0 mm (H-8)
- Number of pieces: one finished holder, made from 1 disc, 1 pouch, 16 petals and 1 strap
- Layout: pouch centered on the disc, with petals evenly spaced around the disc edge
- Disc size: 7.25 in (18.4 cm) in diameter
- Size before the petal ring: 7.25 in (18.4 cm), the bare disc
- Petal ring depth: each petal extends 3 in (7.6 cm) past the disc edge
Materials
Choose a smooth worsted-weight yarn. Acrylic or a cotton blend works best because both hold their shape well and stand up to frequent handling. Avoid fuzzy or very soft yarns. They make the pouch sag and blur the ridged petal outline. The amounts below are based on a yarn with about 183 m (200 yd) per 100 g.
- Chocolate brown: 70 g, about 128 m (140 yd), for the disc and pouch
- Golden yellow: 40 g, about 73 m (80 yd), for the petals and strap
These amounts include a safety margin of about 25%, so you can make a gauge swatch or redo a round if needed.
Optional colorway: For an autumn version, use burnt orange instead of golden yellow. It takes the same amount of yarn.
Tools:
- 5.0 mm (H-8) crochet hook
- Tapestry needle
- 4 locking stitch markers
- Straight pins
- Scissors
- Measuring tape
- Blocking mat and spray bottle
Abbreviations (US Terms)
- ch: chain
- sl st: slip stitch
- sc: single crochet
- hdc: half double crochet
- dc: double crochet
- inc: 2 sc in the same stitch
- sc2tog: single crochet 2 together
- BLO: back loop only
- MR: magic ring
- st(s): stitch(es)
- sp: space
Special stitch, sc2tog: Insert the hook in the next st, yarn over and pull up a loop. Insert the hook in the following st, yarn over and pull up a loop. Yarn over and pull through all 3 loops on the hook.
Gauge and Checkpoints
Gauge: 16 sc and 18 rounds = 4 in (10.2 cm) with a 5.0 mm hook.
Make the back disc first and treat it as your gauge test. The disc sets the size of everything else, including the petal spacing and how the pouch fits. Measure it lying flat on a table without stretching it.
Checkpoints:
- Disc after Rnd 8 (48 sts): 3.5 in (8.9 cm) across
- Disc after Rnd 16 (96 sts): 7.25 in (18.4 cm) across, lying flat
- Pouch after Rnd 6 (56 sts): about 3.5 in (8.9 cm) across when flattened
- Finished pouch: 6 in (15.2 cm) tall
- One petal: 3.25 in (8.3 cm) long and 1.75 in (4.4 cm) wide
If your disc is too big, go down to a 4.5 mm hook. If it is too small, go up to a 5.5 mm hook. If the disc ruffles, you are working too loosely. If it cups, you are working too tightly. Fix the disc before you start the pouch. A disc that is off by even 0.5 in (1.3 cm) will change how the petals space out and how much room the pouch has.
Back Disc
Use chocolate brown. Work in continuous rounds and move a marker up to the first st of each round.
Rnd 1: 6 sc in MR. (6 sts)
Rnd 2: Inc in each st around. (12 sts)
Rnd 3: (Sc 1, inc) 6 times. (18 sts)
Rnd 4: (Sc 2, inc) 6 times. (24 sts)
Rnd 5: Sc 1, inc, (sc 3, inc) 5 times, sc 2. (30 sts)
Rnd 6: (Sc 4, inc) 6 times. (36 sts)
Rnd 7: Sc 2, inc, (sc 5, inc) 5 times, sc 3. (42 sts)
Rnd 8: (Sc 6, inc) 6 times. (48 sts)
Rnds 9–16: Keep adding 6 sts in every round. In Rnd N, work (sc N−2, inc) 6 times. On odd rounds, move the first increase halfway along the first repeat so the increases do not stack. Each round ends with 6 × N sts, so Rnd 9 has 54, Rnd 10 has 60, Rnd 11 has 66, Rnd 12 has 72, Rnd 13 has 78, Rnd 14 has 84, Rnd 15 has 90 and Rnd 16 has 96.
After Rnd 16, sl st into the next st and fasten off. You should have 96 sts, and the disc should measure 7.25 in (18.4 cm) across.
Mark the disc: Place a marker in any st of Rnd 16 and call it the top center. Counting from that st, put markers every 24 sts. The four markers divide the disc into quarters.
Pouch
Use chocolate brown. The pouch starts at the small bag-exit hole and is worked upward toward the open top. Use firm single crochet so the pouch holds its rounded shape even when it’s full of bags.
Foundation: Ch 16. Join with a sl st to the first ch to form a ring, being careful not to twist it.
Rnd 1: Ch 1, sc in each ch around. Do not join. (16 sts) This ring is the bag-exit hole and measures about 1.25 in (3.2 cm) across.
Rnd 2: (Sc 1, inc) 8 times. (24 sts)
Rnd 3: (Sc 2, inc) 8 times. (32 sts)
Rnd 4: (Sc 3, inc) 8 times. (40 sts)
Rnd 5: (Sc 4, inc) 8 times. (48 sts)
Rnd 6: (Sc 5, inc) 8 times. (56 sts)
Rnds 1–6 shape the rounded base. Flattened, the base measures about 3.5 in (8.9 cm) across.
Rnds 7–24: Sc in each st around. (56 sts) This section is 18 rounds, or 4 in (10.2 cm), and forms the rounded body.
Rnd 25: (Sc 5, sc2tog) 8 times. (48 sts) This decrease pulls the top in slightly so the opening curves like a bowl.
Rnds 26–27: Sc in each st around. (48 sts)
Rnd 28 (trim round): Sl st in each st around. This round is 48 sl sts + 0 added sts = 48 sts. Fasten off and leave a 24 in (61.0 cm) tail for sewing.
The pouch should measure 6 in (15.2 cm) tall from the hole to the rim. When it is pressed lightly against the disc, it should be about 6 in (15.2 cm) wide.
Petals (Make 16)
Use golden yellow. Each petal is worked around both sides of a foundation chain, so the chain becomes a center vein. The BLO outline in Rnd 2 gives the petal its raised, ridged edge.
Foundation: Ch 13.
Rnd 1: Start at the tip end. Sc in the 2nd ch from the hook, hdc in the next ch, dc in each of the next 8 ch, hdc in the next ch, then work 4 dc in the last ch at the base. Rotate and work along the other side of the chain: hdc in the next ch, dc in each of the next 8 ch, hdc in the next ch, sc in the tip ch, ch 2. Do not join yet.
Count for Rnd 1: 11 sts on the first side + 4 base dc + 11 sts on the second side = 26 sts, plus a ch-2 tip sp.
Rnd 2 (trim round, BLO): Work in BLO. Sc in each of the first 11 sts, 2 sc in each of the 4 base dc, sc in each of the next 11 sts, then work (sc, ch 2, sc) in the ch-2 tip sp. Sl st to the first sc.
Count for Rnd 2: 26 sts worked 1 per stitch + 4 increases at the base + 2 sc at the tip = 32 sc, plus a ch-2 tip.
Fasten off and leave a 12 in (30.5 cm) tail. Each petal measures 3.25 in (8.3 cm) long and 1.75 in (4.4 cm) wide, and has a sharp ch-2 point. Lay all 16 petals side by side and compare them. Remake any petal that is noticeably longer or shorter than the rest.
Strap
Use golden yellow.
Row 1: Ch 41. Sc in the 2nd ch from the hook and in each ch across. Turn. (40 sts)
Row 2: Ch 1, sc in each st across. (40 sts)
Fasten off and leave a 12 in (30.5 cm) tail. The strap measures 10 in (25.4 cm) long and 0.5 in (1.3 cm) wide.
Border: Petal Ring
The petals are the border, and they are attached to Rnd 16 of the disc.
Border gauge: Each petal base covers 6 sts of the disc edge, which is 1.5 in (3.8 cm).
The math: Rnd 16 has 96 sts, and 96 ÷ 16 petals = 6 sts per petal, with nothing left over. The markers split the edge into four quarters of 24 sts each, and 24 ÷ 6 = 4 petals per quarter. Every quarter therefore holds exactly 4 petals and every petal gets the same 6 sts. Because each petal is 1.75 in (4.4 cm) wide but sits on only 1.5 in (3.8 cm), neighboring petals overlap by about 0.25 in (0.6 cm). The overlap gives the ring a full, layered look with no gaps.
Attaching the petals:
- Turn the disc wrong side up.
- Center the first petal over the top-center marker, so it covers the 3 sts on each side of the marker. Its base should overlap the back of the disc by 0.25 in (0.6 cm).
- Pin each petal to its 6 sts, then whipstitch the 4-dc base to the back loops of Rnd 16. Keep your stitches snug but not tight. Pulling too hard will cup the disc edge.
- Check each quarter as you go. It should hold exactly 4 petals between markers.
- When all 16 petals are attached, each petal should reach 3 in (7.6 cm) past the disc edge.
Measurement check: 7.25 in (18.4 cm) + 3 in (7.6 cm) + 3 in (7.6 cm) = 13.25 in (33.7 cm) across.
Assembly: Pouch and Strap
- Flatten the pouch so the bag-exit hole points down and slightly forward.
- Place it on the right side of the disc, centered side to side. The top rim should sit 1 in (2.5 cm) below the top-center marker, and the hole should sit just above the bottom marker.
- Pin the back 24 sts of Rnd 27 to the disc. With the long tail, whipstitch these 24 sts in place and leave the front 24 sts free.
- Keep sewing along the back of the pouch on both sides, down to Rnd 6. Leave the front half free so the pouch bulges about 2 in (5.1 cm) off the disc.
- Fold the strap in half. Sew both ends to the back of the disc 1 in (2.5 cm) on either side of the top-center marker, overlapping the disc by 1 in (2.5 cm). This leaves a hanging loop about 4 in (10.2 cm) tall.
Sew through both the pouch and the disc with every stitch. When you finish, nothing should show through on the petal side except small brown stitches inside the disc.
Final Blocking
- Lay the holder face down on a blocking mat.
- Mist the petals until they are damp but not soaked.
- Pin each petal tip straight out from the center, 3 in (7.6 cm) from the disc edge.
- Stuff the pouch with a folded towel so it dries rounded.
- Leave it to dry completely, which takes about 12 hours.
- Remove the pins and check the finished diameter: 13.25 in (33.7 cm).
Final Quality-Control Checklist
- The disc has 96 sts and measures 7.25 in (18.4 cm).
- The pouch rim has 48 sts, and the bag-exit hole has 16 sts.
- There are 16 petals of 32 sc each, and every point is sharp.
- Each quarter of the disc holds exactly 4 petals.
- The front half of the pouch rim is free, so bags drop in easily.
- The strap is sewn securely and centered.
- All yarn ends are woven in on the wrong side.
Troubleshooting
- Disc ruffles: Work tighter or use a smaller hook. Recount the rounds, since an extra increase round adds 6 sts.
- Disc cups: Loosen your tension or use a larger hook.
- Bags stick in the hole: Stretch the hole open while blocking, or work Rnd 1 more loosely on your next holder.
- Petals curl: Block them pinned flat. Make sure Rnd 2 is worked in BLO only.
- Gap between petals: Each petal must cover exactly 6 sts. Recount from the markers.
- Pouch sags forward: Add a few extra stitches to the sides where they meet the disc.
Care
Hand wash in cool water, press out the water in a towel and dry flat. Reshape the petals while they are damp.
Final Notes
Every measurement in this pattern builds on the one before it. Gauge sets the disc at 96 sts and 7.25 in (18.4 cm). Those 96 sts give each of the 16 petals exactly 6 sts. Each petal adds 3 in (7.6 cm) on every side, for a finished holder 13.25 in (33.7 cm) across. The pouch is 6 in (15.2 cm) tall and fits inside the disc, with room left for the strap. Check the disc carefully, and the rest of the holder will fit together.
Happy crocheting!