

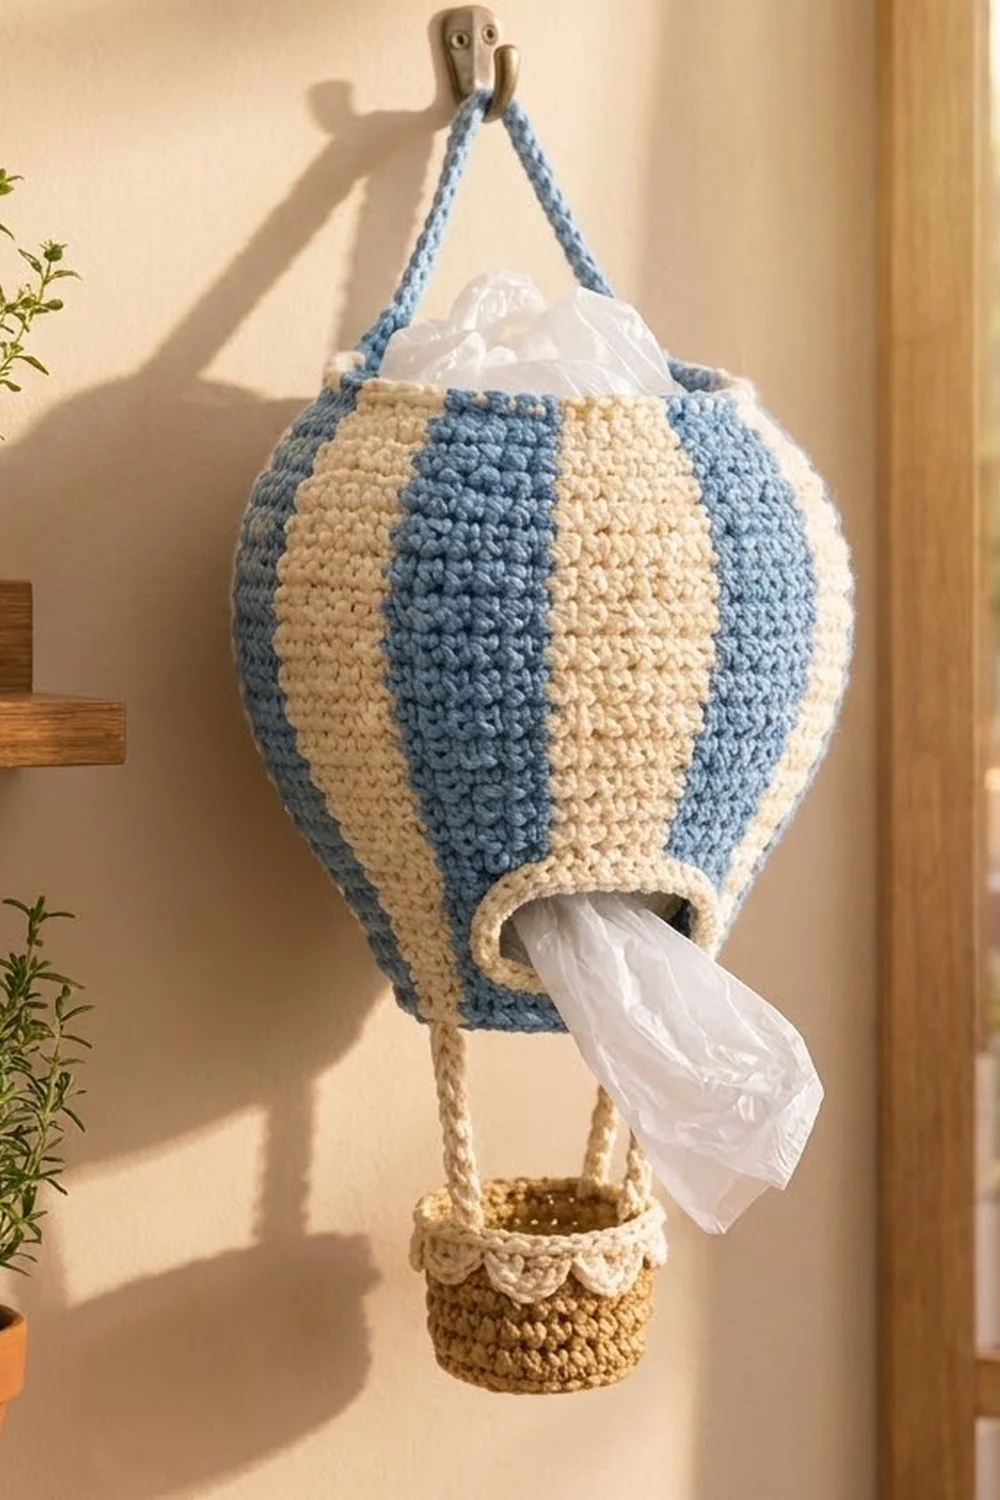
Plastic bags pile up fast, and a cheerful holder makes them easier to live with. The Sky Drift Bag Holder is a striped hot air balloon that hangs from a hook. You stuff bags in through the open top and pull them out one at a time through an oval slot near the bottom.
The sample uses soft denim blue and cream for the balloon stripes, a warm tan for the little basket, and cream for every trim: the top rim, slot edging, cords, strap, and basket scallops. It also works well in mustard and cream, or any two colors that suit your kitchen.
This pattern uses US crochet terms. The finished balloon is about 8.5 in (21.6 cm) tall and 6.75 in (17.1 cm) across at its widest. The basket is about 2.5 in (6.4 cm) across and 2 in (5.1 cm) tall. Hung from its strap, the whole piece measures about 18 in (45.7 cm) from the top of the strap to the bottom of the basket.
You work the balloon from the bottom up in joined rounds of single crochet. It starts as a flat base, then the stripes begin and grow wider as the body expands. You make the basket separately and attach it with two crocheted cords.
Finished Size and Construction
- Finished size: balloon 8.5 in (21.6 cm) tall, 6.75 in (17.1 cm) across at its widest; basket 2.5 in (6.4 cm) across, 2 in (5.1 cm) tall
- Skill level: Easy–Intermediate (tapestry-style color changes)
- Terminology: US
- Yarn weight: Worsted (#4)
- Hook: 4.0 mm (G-6)
- Number of pieces: 1 finished item, made from 2 crocheted parts (balloon and basket) plus 2 cords and 1 strap
- Layout: basket hangs centered below the balloon on 2 cords
- Balloon circumference: 21 in (53.3 cm) at its widest, 15 in (38.1 cm) at the top
- Size before rim: 8 in (20.3 cm) tall
- Rim depth: 2 rounds, about 0.5 in (1.3 cm)
Materials
Use a smooth worsted cotton or a cotton blend. Cotton keeps its shape well and doesn’t stretch out under the weight of the bags. Avoid fuzzy yarns, because they hide the stripes.
- Color A, Denim Blue: 55 g / 110 m
- Color B, Cream: 70 g / 140 m
- Color C, Tan: 15 g / 30 m
These quantities include a small safety margin.
Tools:
– 4.0 mm (G-6) crochet hook
– Stitch marker
– Tapestry needle
– Scissors
– Measuring tape
– Pins (for blocking)
Abbreviations (US Terms)
- ch – chain
- sl st – slip stitch
- sc – single crochet
- dc – double crochet
- inc – 2 sc in the same stitch
- sc2tog – single crochet 2 together
- BLO – back loop only
- MR – magic ring
- st(s) – stitch(es)
- sk – skip
Color change (tapestry method): Work the last sc of a stripe until 2 loops remain on the hook. Yarn over with the new color and pull it through. Carry the unused color along the tops of the stitches and work over it, so it is hidden inside the fabric.
Joined rounds: Each round starts with ch 1 (not counted) and ends with a sl st in the first sc. Joined rounds keep the stripes straight and vertical.
Gauge and Checkpoints
Gauge: 16 sc and 18 rounds = 4 in (10.2 cm) in sc worked in rounds, with the second color carried.
Test with the balloon base first. Rounds 1–6 form a flat circle that should measure 2.75 in (7.0 cm) across. If it’s bigger, go down half a hook size. If it’s smaller, go up half a size. Redo the circle until it matches before you go any further.
Checkpoints:
– After Rnd 6: base is 2.75 in (7.0 cm) across.
– After Rnd 15: circumference is 21 in (53.3 cm), and the wall is 2 in (5.1 cm) tall above the base ridge.
– After Rnd 33: wall is 6 in (15.2 cm) tall.
– After Rnd 42: wall is 8 in (20.3 cm) tall, and the top circumference is 15 in (38.1 cm).
– Basket after Rnd 4: base is 2.5 in (6.4 cm) across.
If the wall height is short but the stitch gauge is right, add one plain round between Rnds 16 and 33. Don’t add rounds anywhere else, or the shaping will shift.
Part 1: Balloon Base
Work in Color A.
Rnd 1: MR, ch 1, 6 sc in ring, sl st to first sc. (6 sts)
Rnd 2: Ch 1, inc in each st around, sl st to join. (12 sts)
Rnd 3: Ch 1, [sc 1, inc] 6 times, join. (18 sts)
Rnd 4: Ch 1, [sc 2, inc] 6 times, join. (24 sts)
Rnd 5: Ch 1, [sc 3, inc] 6 times, join. (30 sts)
Rnd 6: Ch 1, [sc 4, inc] 6 times, join. (36 sts)
Check the 2.75 in (7.0 cm) gauge now.
Part 2: Striped Balloon Body
From here on, the body has 12 stripes. Odd-numbered stripes are in Color A and even-numbered stripes are in Color B. Stripe 1 always starts right after the join, so the join runs down the back. Join each round with a sl st in Color A.
Rnd 7 (conversion round): Ch 1. Working in BLO, [3 sc in A, 3 sc in B] 6 times, join. Count: 36 sc worked 1-per-stitch + 0 added = 36 sts (12 stripes of 3). The unused front loops form the ridge at the edge of the base.
Rnd 8: Ch 1, [3 sc A, 3 sc B] 6 times, join. (36 sts)
Rnd 9 (increase): Ch 1. In each stripe: sc 1, inc, sc 1, keeping each stripe in its own color. Join. (48 sts; stripes of 4)
Rnd 10: Work even, matching the colors below. (48 sts)
Rnd 11 (increase): In each stripe: sc 1, inc, sc 2. (60 sts; stripes of 5)
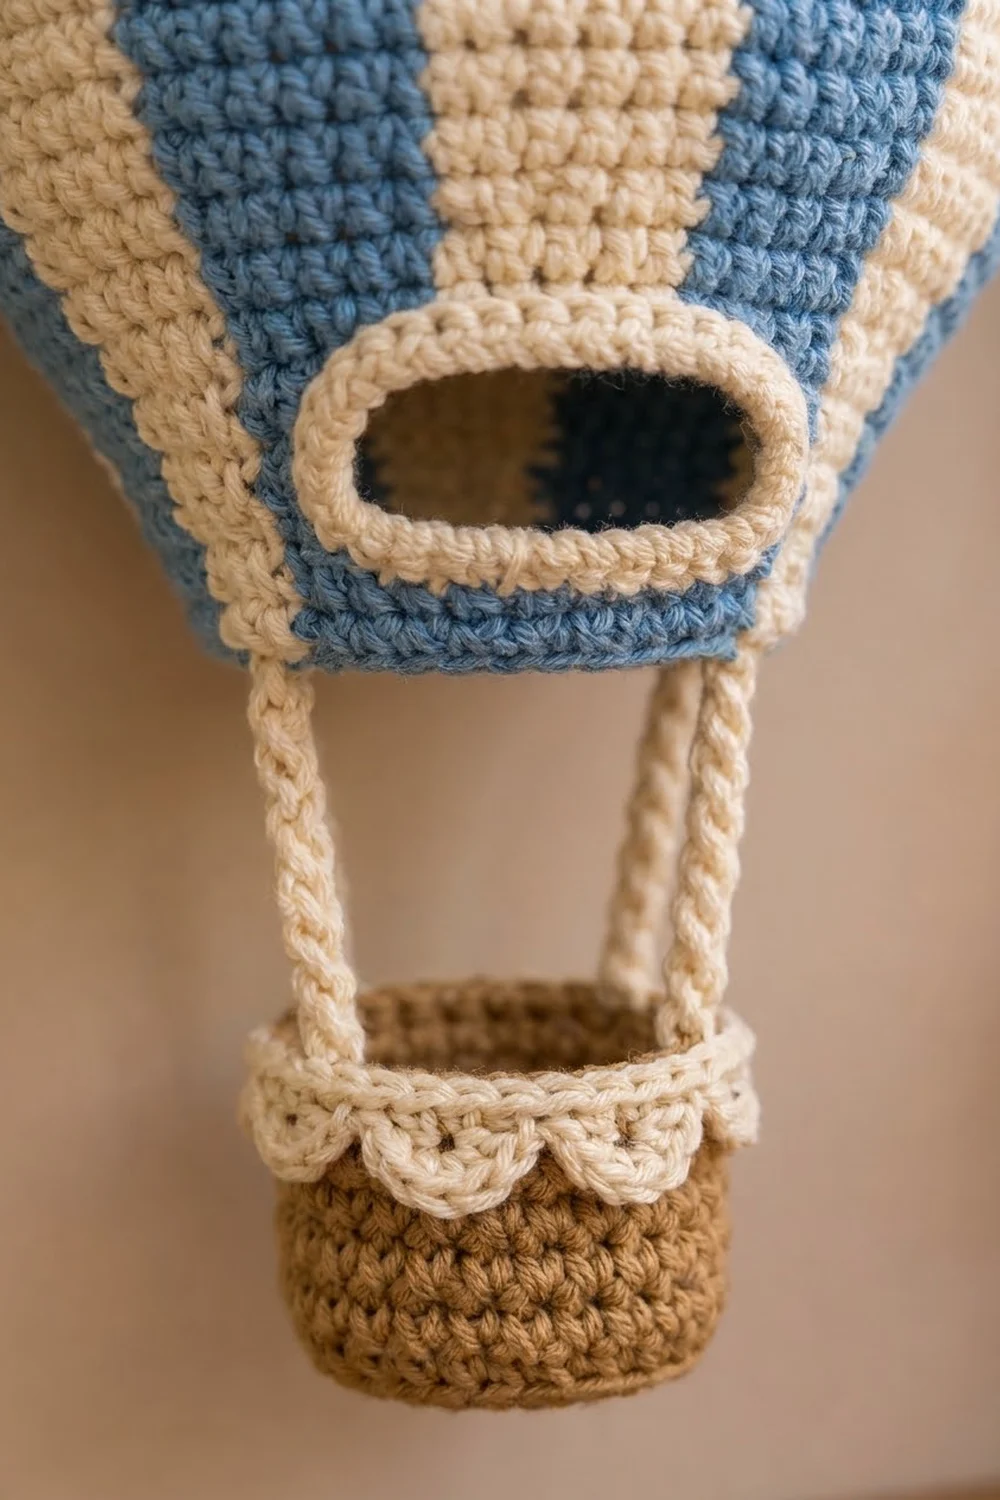
Rnd 12 (opening round): Ch 1. Work Stripes 1–5 as set (25 sc). With B, ch 5. With A, ch 5. Skip the next 10 sts (Stripes 6 and 7). Work Stripes 8–12 as set (25 sc). Join. Count: 50 sc + 10 ch = 60 sts.
This places the slot at the front, directly opposite the join.
Rnd 13 (increase): In each stripe: sc 2, inc, sc 2. Over Stripes 6 and 7, work into the chains in their matching colors, treating each ch as a stitch. (72 sts; stripes of 6)
Rnd 14: Work even. (72 sts)
Rnd 15 (increase): In each stripe: sc 2, inc, sc 3. (84 sts; stripes of 7)
Checkpoint: the circumference should be 21 in (53.3 cm).
Rnds 16–33 (18 rounds): Work even. (84 sts)
This is the full, round part of the balloon. Check that the wall measures 6 in (15.2 cm) from the base ridge.
Rnd 34 (decrease): In each stripe: sc 2, sc2tog, sc 3. (72 sts; stripes of 6)
Rnds 35–37: Work even. (72 sts)
Rnd 38 (decrease): In each stripe: sc 2, sc2tog, sc 2. (60 sts; stripes of 5)
Rnds 39–42: Work even. (60 sts)
Fasten off Color A. Keep Color B attached.
Checkpoint: the wall is 8 in (20.3 cm) tall, and the top circumference is 15 in (38.1 cm).
Part 3: Basket
Work in Color C.
Rnd 1: MR, ch 1, 8 sc, join. (8 sts)
Rnd 2: Inc in each st. (16 sts)
Rnd 3: [sc 1, inc] 8 times. (24 sts)
Rnd 4: [sc 2, inc] 8 times. (32 sts)
Checkpoint: the base is 2.5 in (6.4 cm) across.
Rnd 5: BLO sc in each st. (32 sts) This round turns the base up into the wall.
Rnds 6–11: Sc in each st. (32 sts)
Fasten off Color C. You’ll add the cream trim in the Border section.
Part 4: Cords and Assembly
Cords (make 2, Color B): Ch 16. Sc in the 2nd ch from the hook and in each ch across. (15 sts)
Each cord is 3.75 in (9.5 cm) long. Leave a 10 in (25.4 cm) tail at both ends for sewing.
Attaching the cords:
– To the balloon: On the base ridge from Rnd 7, mark the two side points. Count 9 sts each way from the front center, so the marks sit exactly opposite each other. Sew the top 2 sts, about 0.5 in (1.3 cm), of each cord to the inside of the ridge at one of these marks.
– To the basket: Sew the bottom 2 sts of each cord to the inside wall of the basket, on opposite sides (16 sts apart), just below Rnd 11.
About 3 in (7.6 cm) of each cord shows between the balloon and the basket. Before you weave in the ends, check that the basket hangs level.
Border: Top Rim, Slot Edging, Strap, and Basket Scallops
All border work is in Color B. The rims are worked 1 sc into each stitch, so the gauge stays at 4 sts per inch. Because nothing is added, the balloon keeps its exact shape.
Top rim
Rim Rnd 1: Ch 1, sc in each st, join. (60 sts)
Rim Rnd 2: Ch 1, sc in each st, join. (60 sts)
Don’t fasten off.
The math: Rnd 42 has 60 sts, and each rim round is 60 sts worked 1 per stitch. The top stays at 15 in (38.1 cm) around. Together the two rim rounds add about 0.5 in (1.3 cm), bringing the balloon to 8.5 in (21.6 cm) tall.
Hanging strap
- Sl st along the rim to the side point. That’s 15 sts from the join, at the stripe boundary halfway between the back and the front.
- Ch 45. Sl st in the rim stitch 30 sts away, on the opposite side.
- Ch 1, turn. Sc in each of the 45 ch.
- Sl st into the rim where you started, then fasten off.
The strap is 45 sts long, which is 11.25 in (28.6 cm). It forms an arch about 4.5 in (11.4 cm) above the rim. Because both ends sit at the sides, the balloon hangs flat against the wall with the slot facing out.
Slot edging
Join Color B at the right end of the slot.
Slot Rnd 1: Sc 10 along the bottom edge (into the tops of the 10 skipped sts from Rnd 11). Work 2 sc in the corner gap. Sc 10 into the free bottom loops of the chain. Work 2 sc in the other corner gap. Join. Count: 10 + 2 + 10 + 2 = 24 sts.
Slot Rnd 2: Ch 1, sc in each st, join. (24 sts)
Fasten off. Gently fold this rim outward so it forms a raised lip.
The math: there’s 1 sc for each skipped stitch and 1 for each chain, plus 2 at each end to turn the curve. This keeps the slot 2.5 in (6.4 cm) wide. When you pull bags through, it opens to about 0.75 in (1.9 cm) tall.
Basket band and scallops
Rnd 12: Join B. Ch 1, sc in each st, join. (32 sts)
Rnd 13: [Sk 1, 5 dc in next st, sk 1, sl st in next st] 8 times. Make the final sl st in the first st. (8 scallops)
The math: each scallop uses 4 sts, and 8 × 4 = 32, so the scallops close evenly with no partial repeat. The scallops tip slightly outward over the tan wall.
Final Blocking
- Weave in all ends on the inside, working each one through the carried strands so it stays put.
- Lightly spray the balloon with water, or hold a steamer above it without touching the yarn.
- Fill the balloon with a rolled towel or a plastic bag stuffed with more bags, so it takes on its round shape.
- Smooth the stripes so they run straight up from the base ridge.
- Press the slot lip outward with your fingers and pin it open while it dries.
- Stuff the basket with a small ball of yarn so the walls stand upright. Pin the scallops so they tip outward evenly.
- Let everything dry completely. Remove the forms, and check that the balloon measures 8.5 in (21.6 cm) tall.
Final Quality-Control Checklist
- The balloon has 12 stripes, alternating A and B, all running vertically.
- The color jogs line up at the back, opposite the slot.
- The stitch counts are 36, 48, 60, 72, 84, 72, and 60 in the correct rounds.
- The widest circumference is 21 in (53.3 cm), and the top is 15 in (38.1 cm).
- The slot sits on Stripes 6–7, has a 24-st edging, and is 2.5 in (6.4 cm) wide.
- The strap ends are exactly opposite each other, 30 sts apart.
- The cords are the same length, with 3 in (7.6 cm) of each showing.
- The basket hangs level and has 8 scallops all around.
- No carried strands show on the outside.
Troubleshooting
Stripes lean or spiral: Make sure you join every round with a sl st and start each round with ch 1. Working in a continuous spiral makes the stripes drift.
Color peeks through: Tighten the carried strand a little, and always change color on the final yarn-over of the last stitch.
Fabric puckers: The carried strand is too tight. Spread your stitches out along it before you finish each stripe.
Slot gapes too much: Work Slot Rnd 2 with slightly firmer tension, or use sl sts instead of sc.
Balloon too short: Add plain rounds between Rnds 16 and 33 only.
Basket tilts: Re-sew one cord so both show the same length.
Strap stretches: Make the strap again on a hook one size smaller.
Care
Hand wash the holder in cool water with mild soap. Reshape it over a rolled towel and lay it flat or hang it to dry. Don’t tumble dry.
Final Notes
Here is the measurement chain. A base of 2.75 in (7.0 cm) grows to a 21 in (53.3 cm) widest round. That narrows to a 15 in (38.1 cm) top, which reaches 8 in (20.3 cm) of wall before the rim. The rim brings the balloon to 8.5 in (21.6 cm), and the 2.5 in (6.4 cm) basket hangs below it on 3 in (7.6 cm) of cord. If you check your gauge at the base and again at Rnd 15, everything else falls into place.
Happy crocheting!