

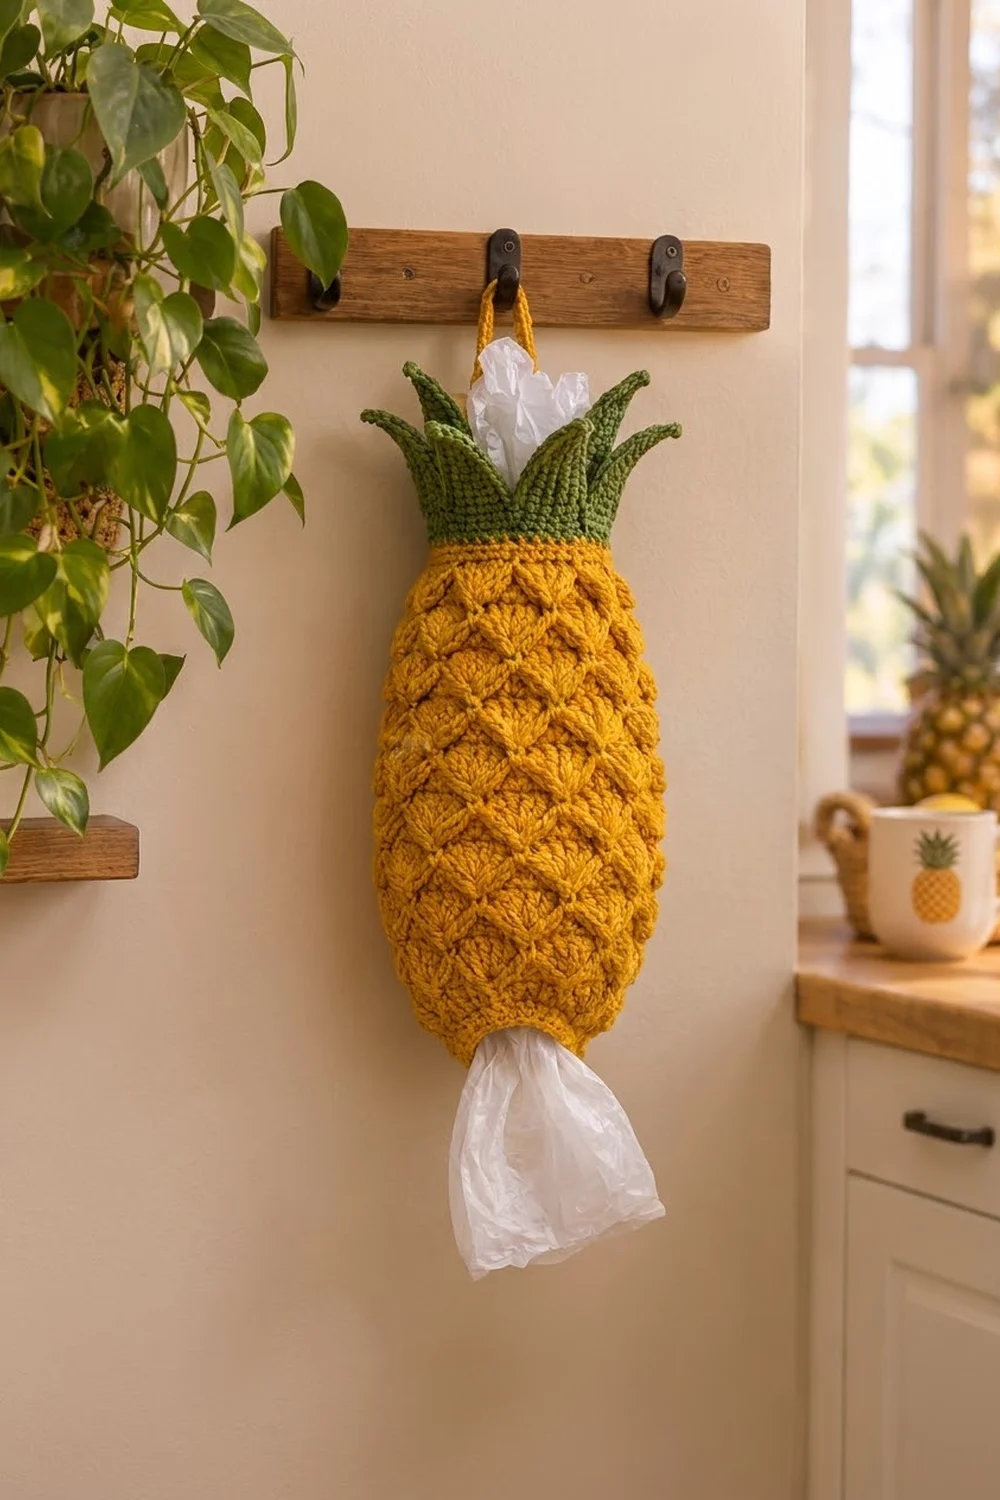
Plastic grocery bags tend to take over a kitchen drawer. This pineapple bag holder gives them a cheerful home. You push bags in through the leafy crown and pull them out one at a time from the small opening at the bottom.
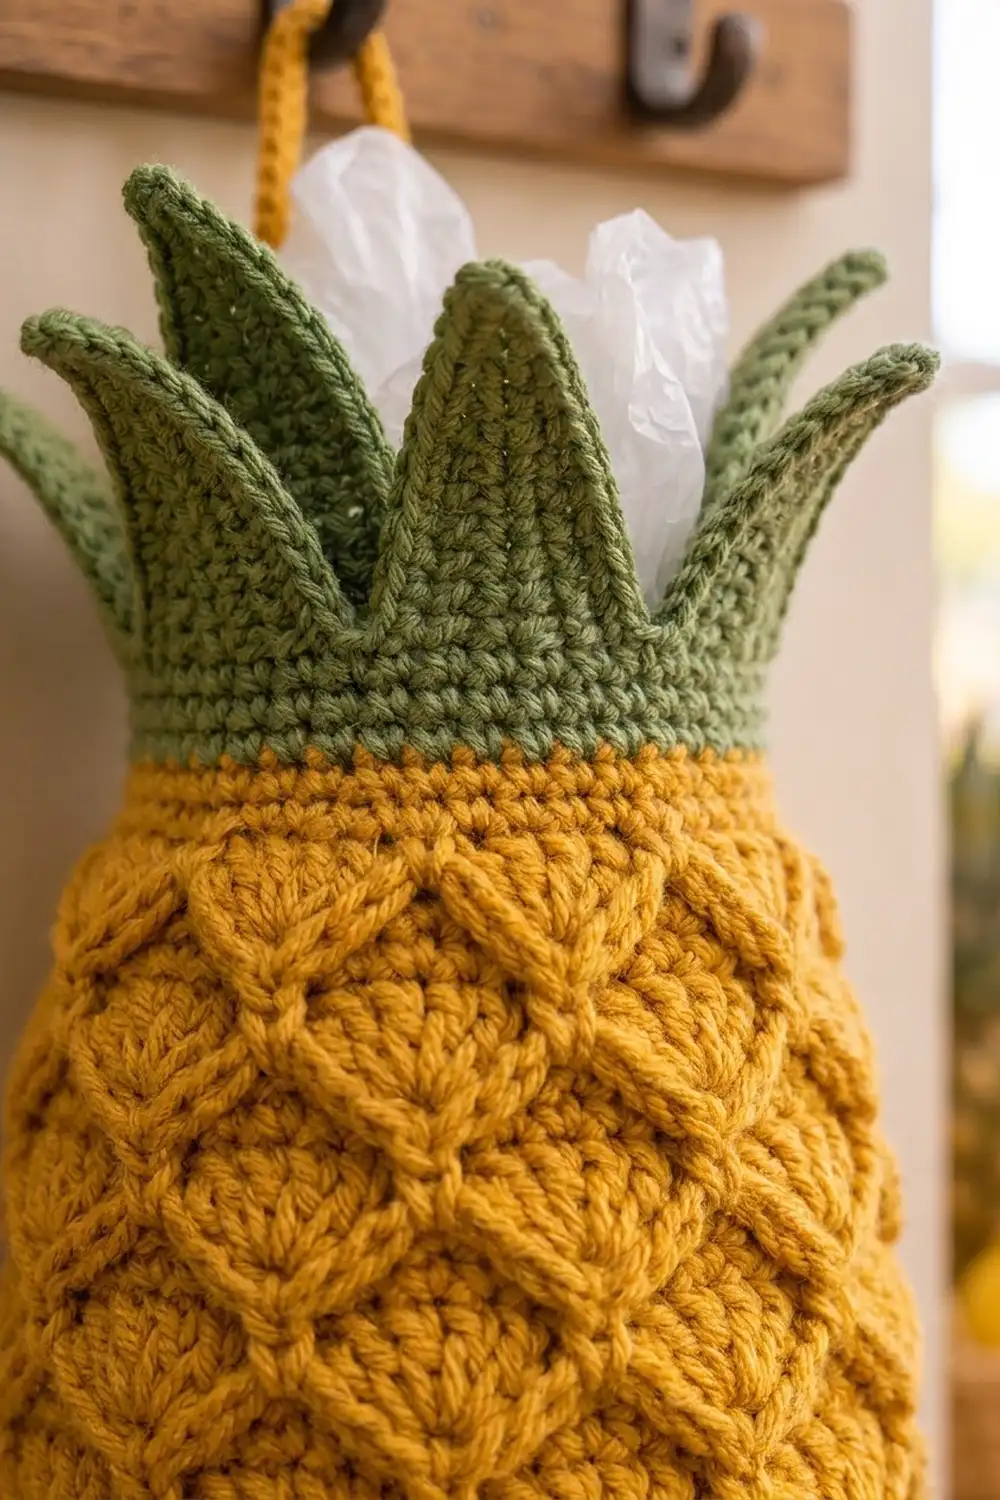
The body is worked in a warm mustard-gold yarn with an all-over raised shell texture. Each round of 5-dc shells sits offset from the round below, so the fans nest into each other and form the diamond scales of a real pineapple. A sage-green band and a crown of nine pointed leaves finish the top, and a sturdy loop lets it hang from any hook. A soft peach version works just as well if you want something lighter.
This pattern uses US crochet terms. The finished holder measures about 6.75 in (17.1 cm) wide when laid flat. The body is 15.5 in (39.4 cm) long, and the holder is about 18 in (45.7 cm) from the bottom edge to the leaf tips, not counting the hanging loop.
The construction is simple and has no seams. You start at the bottom with a chain ring and work single crochet rounds that widen the tube. Then you switch to the shell pattern, narrow slightly at the top and change to green for the band. The leaves are worked in short rows directly into the last round, then edged. A border round firms up the bottom opening, and the hanging loop goes on last.
Finished Size and Construction
- Finished size: 6.75 in (17.1 cm) wide flat, 18 in (45.7 cm) tall to the leaf tips
- Hanging loop: rises about 3 in (7.6 cm) above the top band
- Skill level: Easy-intermediate
- Terminology: US crochet terms
- Yarn weight: Worsted (#4), cotton or cotton blend
- Hook: 5.0 mm (H-8)
- Number of pieces: 1 (one continuous tube, with the leaves worked directly into the top)
- Layout: Single vertical tube, open at both ends
- Body circumference: 54 sts = 13.5 in (34.3 cm)
- Size before border: body 15 in (38.1 cm), leaves 2.25 in (5.7 cm)
- Border depth: 0.5 in (1.3 cm) at the bottom opening; the leaf edging adds 0.25 in (0.6 cm) to each leaf
Materials
Choose a smooth worsted-weight cotton or cotton blend. Cotton holds the shell texture crisply, doesn’t stretch much under the weight of the bags, and washes well. Acrylic also works, but the holder will relax and lengthen a little more over time.
- Mustard gold (main color): 160 g, about 272 m (297 yd)
- Sage green (crown): 30 g, about 51 m (56 yd)
- Alternate: use peach instead of mustard, in the same quantity
The quantities include a margin of about 15% for gauge differences and swatching.
Tools:
- 5.0 mm (H-8) crochet hook
- Stitch marker
- Yarn needle
- Scissors
- Measuring tape
- Rust-proof pins and a spray bottle for blocking
Abbreviations (US Terms)
- ch – chain
- sl st – slip stitch
- sc – single crochet
- dc – double crochet
- sc2tog – single crochet 2 together
- dc2tog – double crochet 2 together
- dc3tog – double crochet 3 together
- st(s) – stitch(es)
- rnd(s) – round(s)
- rep – repeat
Special stitch – Shell: work 5 dc in the same stitch. The 3rd dc of a shell is its center dc.
Picot tip: ch 2, sl st in the 2nd ch from the hook.
Gauge and Checkpoints
- Single crochet: 16 sc and 16 rnds = 4 in (10.2 cm)
- Shell pattern: 1 repeat (1 shell + 1 sc, counted as 6 sts) = 1.5 in (3.8 cm) wide; 4 pattern rnds = 2.5 in (6.4 cm) tall
Test before you commit: work Rnds 1–6 and the first 4 shell rounds (Rnds 7–10). This is your swatch. If the gauge matches, just keep going.
Checkpoints:
- After Rnd 1, the ring lies flat at about 9 in (22.9 cm) around, or 4.5 in (11.4 cm) wide when flattened.
- After Rnd 6, the tube is 13.5 in (34.3 cm) around and 1.5 in (3.8 cm) tall.
- After Rnd 10, the shell section is 2.5 in (6.4 cm) tall and the tube is 6.75 in (17.1 cm) wide flat.
- After Rnd 26, the body is 14 in (35.6 cm) tall.
- After Rnd 30, the body is 15 in (38.1 cm) tall and about 5.6 in (14.2 cm) wide flat at the band.
If your piece is too big, go down a hook size (4.5 mm). If it’s too small, go up to 5.5 mm. Don’t change the stitch counts, because the shell pattern needs a multiple of 6 sts.
Body
Work in joined rounds with the right side always facing you. Don’t turn.
Foundation: With mustard, ch 36. Join with a sl st to the first ch to form a ring, taking care not to twist it.
Rnd 1: Ch 1, sc in each ch around, sl st to first sc. (36 sc)
Rnd 2: Ch 1, sc in each st around, sl st to first sc. (36 sc)
Rnd 3: Ch 1, sc in next 3 sts, 2 sc in next st; rep from * 8 more times, sl st to first sc. (45 sc)
Rnd 4: Ch 1, sc in each st around, sl st to first sc. (45 sc)
Rnd 5: Ch 1, sc in next 4 sts, 2 sc in next st; rep from * 8 more times, sl st to first sc. (54 sc)
Rnd 6: Ch 1, sc in each st around, sl st to first sc. (54 sc)
These six rounds make the gently tapered bottom. Check your gauge here.
Shell Section
Rnd 7 (setup, Pattern A): Ch 1, sc in first st, skip 2 sts, shell in next st, skip 2 sts, sc in next st; rep from * 7 more times, skip 2 sts, shell in next st, skip 2 sts, sl st to first sc. (9 shells and 9 sc = 54 sts)
Rnd 8 (Pattern B): Ch 3 (counts as dc), 2 dc in same st as join (half shell), sc in center dc of next shell, shell in next sc; rep from * 7 more times, sc in center dc of last shell, 2 dc in base of beginning ch-3 to complete the first shell, sl st to top of ch-3. (9 shells and 9 sc = 54 sts)
Rnd 9 (Pattern A): Ch 1, sc in same st as join (center of the split shell), shell in next sc, sc in center dc of next shell; rep from * 7 more times, shell in last sc, sl st to first sc. (9 shells and 9 sc = 54 sts)
Every shell now sits on an sc of the round below, and every sc anchors the center of a shell below. That offset creates the diamond scales.
Rnds 10–26: Alternate Pattern B (even rounds) and Pattern A (odd rounds), ending with Rnd 26 as Pattern B. (54 sts each round)
You now have 20 shell rounds, or about 12.5 in (31.8 cm) of texture. The body is about 14 in (35.6 cm) tall in total.
Top Narrowing
Rnd 27 (conversion): Ch 1, sc in each dc and each sc around, counting the ch-3 as a st, sl st to first sc. (54 sc worked 1 per existing stitch + 0 added = 54 sc)
Rnd 28: Ch 1, sc in next 4 sts, sc2tog; rep from * 8 more times, sl st to first sc. (36 sc + 9 sc2tog = 45 sts) Change to green on the final yarn-over of the joining sl st. Fasten off mustard.
Rnd 29: With green, ch 1, sc in each st around, sl st to first sc. (45 sc)
Rnd 30: Ch 1, sc in each st around, sl st to first sc. (45 sc) Don’t fasten off.
The green band is about 0.5 in (1.3 cm) tall. The top now measures about 11.25 in (28.6 cm) around, a little narrower than the body.
Crown Leaves
The crown has 9 leaves, each worked over 5 sts of Rnd 30 (9 x 5 = 45). Work each leaf in rows, turning at the end of each row. Then fasten off and start the next leaf in the following stitch.
Leaf (make 9):
Row 1: In the first st of Rnd 30 (or the next unworked st for later leaves), sl st into the st, ch 3 (counts as dc), dc in next 4 sts. (5 dc)
Row 2: Ch 3 (counts as dc), turn, dc in next 3 sts, dc in top of turning ch. (5 dc)
Row 3: Ch 2 (doesn’t count), turn, dc2tog over next 2 sts, dc in next st, dc2tog over last 2 sts. (3 sts)
Row 4: Ch 2 (doesn’t count), turn, dc3tog over all 3 sts. (1 st) Make a picot tip. Fasten off.
Rejoin green in the next unworked st of Rnd 30 and repeat until all 9 leaves are done. Each leaf is about 1.25 in (3.2 cm) wide at the base and 2.25 in (5.7 cm) tall. The leaves sit edge to edge with no gaps.
Border
Two borders finish the holder: a crown edging that sharpens the leaf points, and a bottom edge that keeps the opening firm.
Border gauge: the same as the body sc gauge, 16 sc = 4 in (10.2 cm). Along the leaf sides, work 2 sc per dc row end.
Crown Edging
Rnd 1: Join green at the base of any leaf, in the valley between two leaves. For each leaf, work 8 sc up the side (2 per row end x 4 rows), 3 sc in the picot tip and 8 sc down the other side. Then sl st in the valley before the next leaf. Join to the first sc. (19 sc per leaf x 9 leaves = 171 sc, plus 9 sl sts) Fasten off.
Why the math works: each dc row end is about 0.5 in (1.3 cm) tall. Working 2 sc per row end matches the 4 sc per inch gauge, so the sides lie flat. The 3 sc in the tip turn the point without flaring it, and the sl st in each valley keeps the leaves separate.
Bottom Opening Edge
Rnd 1: Turn the holder upside down. Join mustard in the remaining loop of any foundation ch. Ch 1, sc in each remaining loop around, sl st to first sc. (36 sc, 1 per foundation ch)
Rnd 2: Ch 1, reverse sc in each st around, sl st to first st. (36 reverse sc) Fasten off.
Why the math works: the foundation has exactly 36 chains, so working 1 sc per chain keeps the opening at 9 in (22.9 cm) around. Adding stitches would make the opening ruffle and let bags fall out. Skipping stitches would make the bags hard to pull out.
Hanging Loop
With mustard, join with a sl st in st 1 of Rnd 30, on the inside of the green band. Ch 32, about 8 in (20.3 cm). Skip 22 sts across the top and sl st in st 23, so the loop spans the opening. Turn and work 1 sc in each ch back across. (32 sc) Sl st into st 1 and fasten off.
Final Blocking
- Weave in all ends on the inside, running each tail at least 2 in (5.1 cm) through stitches of the same color.
- Spray the holder lightly until it is damp but not soaked.
- Stuff the body with a rolled towel so it is 6.75 in (17.1 cm) wide flat.
- Gently shape the shells so each fan is open and the diamonds look even.
- Pin each leaf upright, pulling the picot tip to a sharp point. Each leaf should be about 2.5 in (6.4 cm) tall including the edging.
- Pinch the bottom opening into a neat round.
- Let it dry fully before removing the towel.
Final Quality-Control Checklist
- Every shell round has 9 shells and 9 sc (54 sts).
- The shells alternate cleanly, with no columns stacking straight up.
- The body is 15.5 in (39.4 cm) from the bottom edge to the top of the band.
- The top band holds 45 sts and lies flat.
- All 9 leaves are the same height and evenly spaced.
- The bottom opening has 36 sts and grips a bag lightly.
- The hanging loop is centered and firmly attached at both ends.
- All ends are woven in on the inside.
Troubleshooting
Shells look crowded or ruffled: your dc tension is loose. Go down a hook size or make your yarn-overs shorter.
Shells stack instead of nesting: you probably put a shell into a shell center. Shells always go into an sc.
Stitch count drifts: place a marker in the first st of each round and count the shells after every round.
Leaves flop over: tighten the crown edging and block the leaves upright with pins.
Bags fall out of the bottom: work Rnd 1 of the bottom edge with a 4.5 mm hook for a firmer opening.
Holder stretches too long: cotton blends relax less than acrylic. If needed, cut back to 18 shell rounds.
Care
Hand wash, or machine wash on a gentle cold cycle in a laundry bag. Reshape while damp and lay flat to dry.
Final Notes
The measurement chain is simple. The 36 foundation chains give a 9 in (22.9 cm) bottom opening. Increases bring the tube to 54 sts and 13.5 in (34.3 cm) around, and 20 shell rounds add 12.5 in (31.8 cm) of pineapple texture. The top narrows to 45 sts for the green band, and the nine 5-stitch leaves use every one of those 45 stitches. The finished holder stands about 18 in (45.7 cm) tall to the leaf tips. Check your gauge after the first 10 rounds and everything else falls into place.
Happy crocheting!