

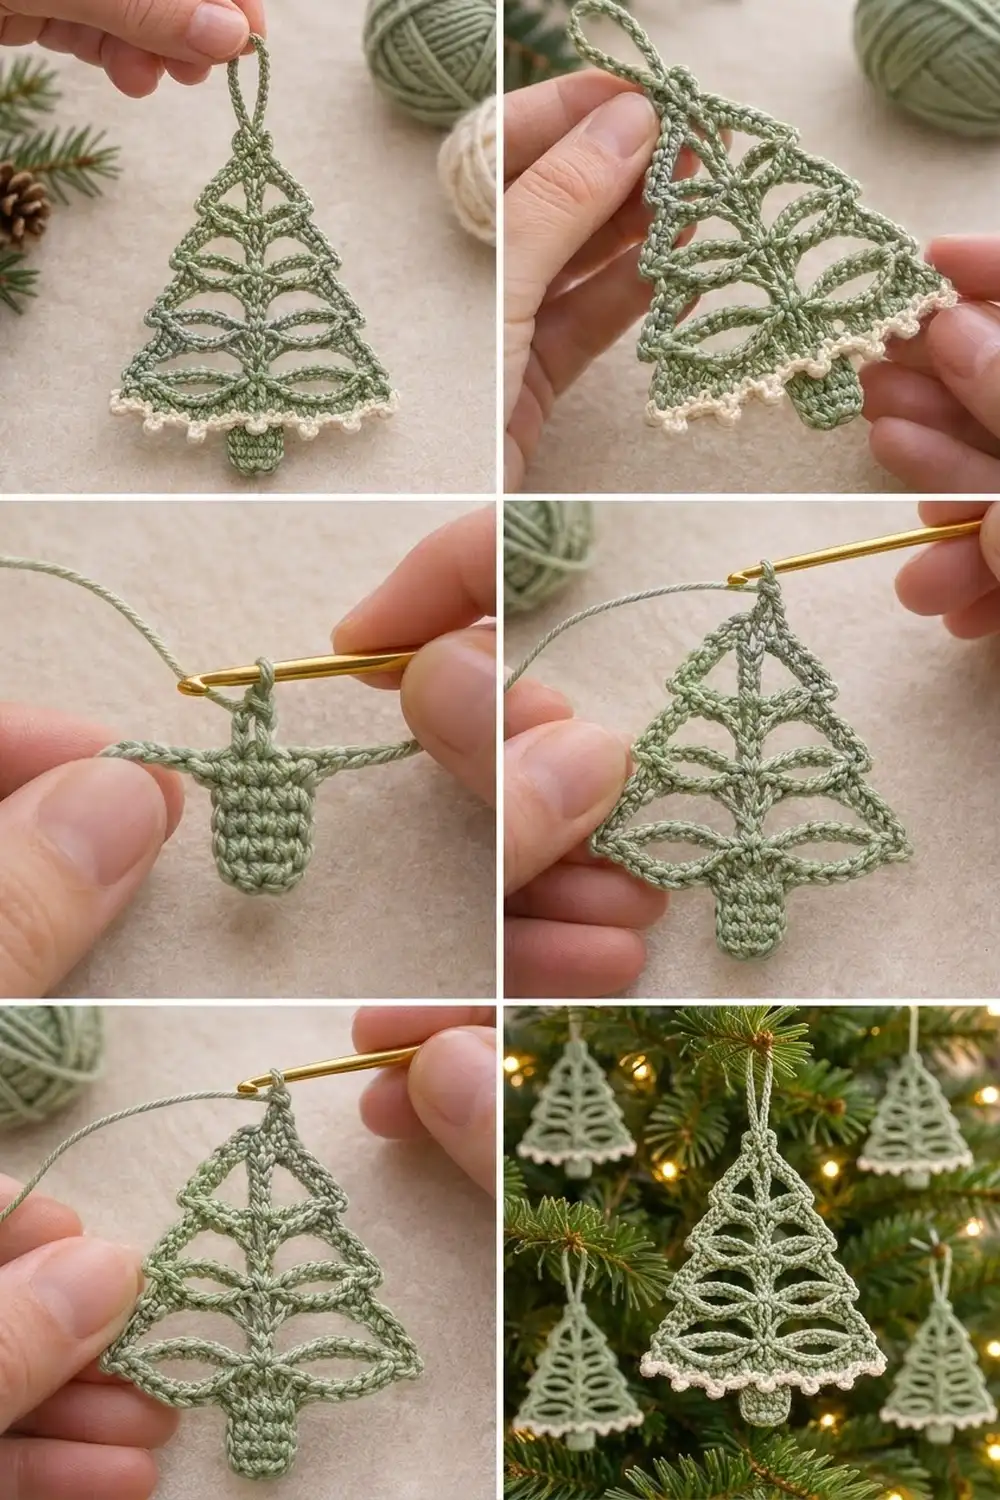
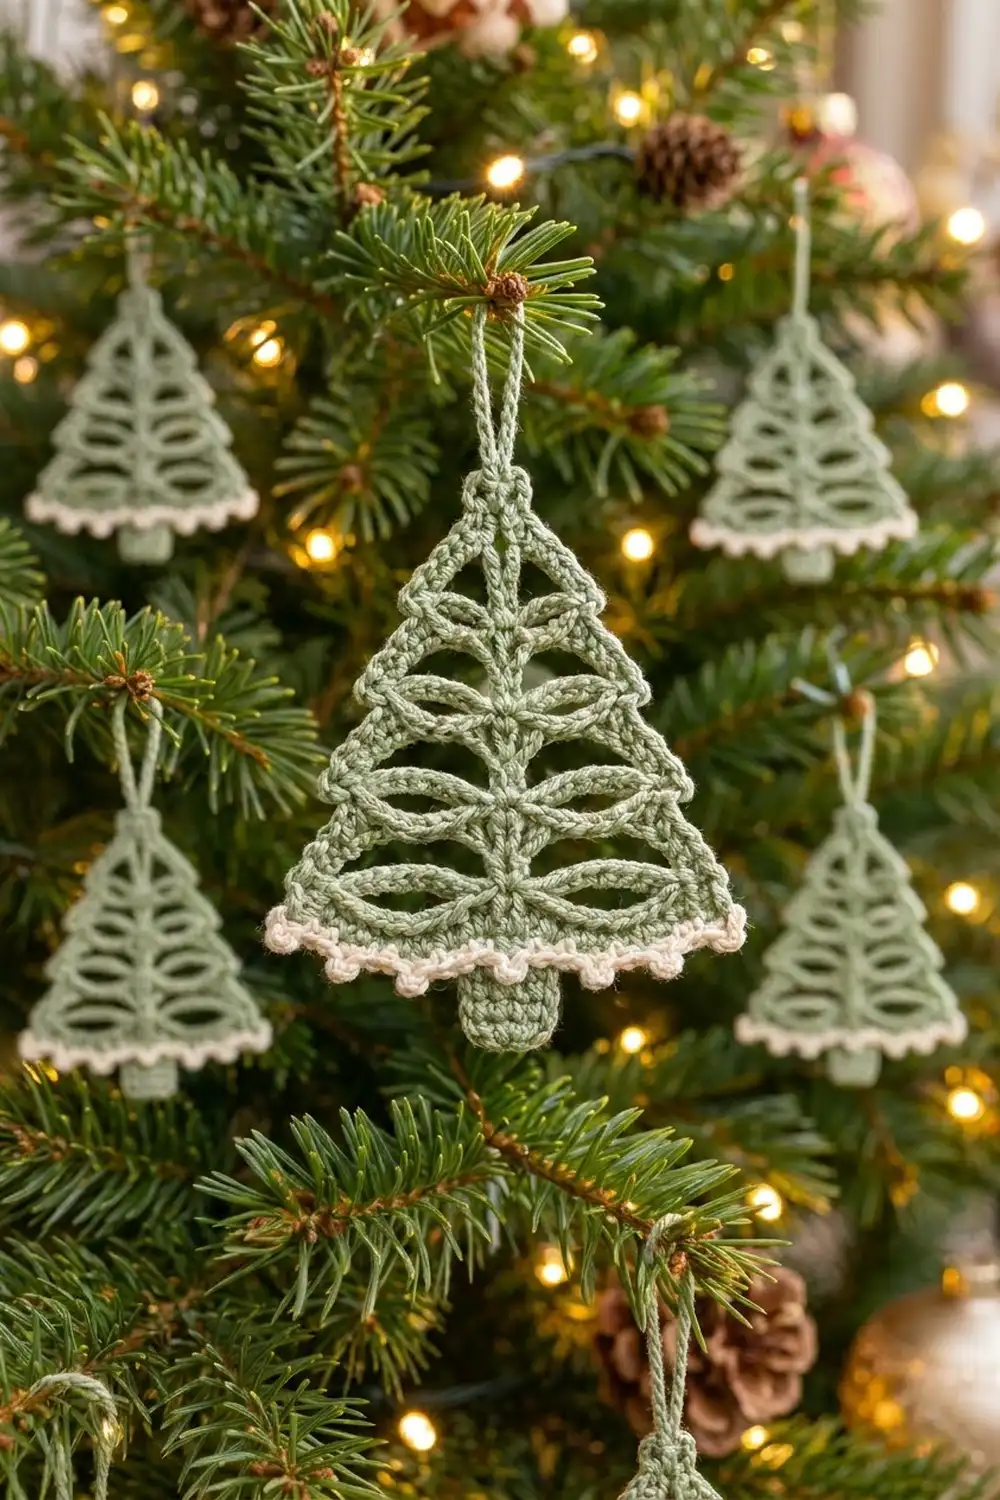
This little tree is all lace. Above a solid trunk, the triangle is built from chain arches that open into pairs of leaf shapes on either side of a straight center spine, one tier above the next, narrowing to a neat point with a hanging loop. A cream picot trim runs along the bottom edge on each side of the trunk, like a light dusting of snow.
The palette is calm and natural: soft sage green for the tree and trunk, and creamy ivory for the picot edge. The style is airy and modern-rustic, and it looks good on a real tree, on a gift tag, or hanging in a window.
The pattern uses US crochet terms. The finished ornament is about 4.25 in (10.8 cm) wide at the base and 4.75 in (12.1 cm) tall from the tip of the trunk to the peak, not counting the hanging loop.
Construction is simple and all in one piece. You crochet the trunk in rows first, chain out on both sides to make the base of the tree, and then work upward in tiers of three short rows each. Green edging goes along the slanted sides, the hanging loop comes from the peak, and the cream picot trim is added last along the bottom edge.
Finished Size and Construction
- Finished size: 4.25 in (10.8 cm) wide x 4.75 in (12.1 cm) tall, excluding loop
- Hanging loop: about 2 in (5.1 cm) deep
- Skill level: Intermediate (chain-arch lace, working into free loops)
- Terminology: US
- Yarn weight: Sport (2), cotton or cotton blend
- Hook: 2.75 mm (US C-2)
- Number of pieces: 1 (a single ornament)
- Layout: Trunk at the bottom center, triangle body above, loop at the peak
- Piece size before border: 4 in (10.2 cm) wide x 4 in (10.2 cm) tall body, plus a 0.75 in (1.9 cm) trunk
- Border depth: green side edging adds 0.125 in (0.3 cm) per side; cream picot trim is 0.25 in (0.6 cm) deep
Materials
Pick a smooth, tightly plied cotton in sport weight. Mercerized cotton shows the chain arches best and holds its shape after blocking. Don’t use fuzzy or very splitty yarns, because they hide the leaf shapes.
- Sage green (Color A): 8 g, about 24 m
- Cream (Color B): 2 g, about 6 m
These quantities include a margin for your gauge swatch and weaving in ends.
Tools:
- 2.75 mm (US C-2) crochet hook
- Tapestry needle
- 2 locking stitch markers
- Scissors
- Blocking mat, rustproof pins, and a spray bottle
Abbreviations (US Terms)
- ch – chain
- sl st – slip stitch
- sc – single crochet
- sc2tog – single crochet 2 together
- sc3tog – single crochet 3 together
- st(s) – stitch(es)
- sp – space
- sk – skip
Picot: Ch 3, sl st in the 3rd ch from the hook (the first ch made).
Free loop: The single strand left on the underside of a foundation chain after stitches were worked into it.
Gauge and Checkpoints
Gauge: 25 sc = 4 in (10.2 cm) and 8 sc rows = 1 in (2.5 cm) with the 2.75 mm hook.
Make the trunk first and treat it as your swatch. It should measure 0.8 in (2.0 cm) wide x 0.75 in (1.9 cm) tall.
Checkpoints along the way:
- After the Base Row: 4 in (10.2 cm) wide, 0.25 in (0.6 cm) tall.
- After Tier 1: body about 0.95 in (2.4 cm) tall. The Tier 1 bar is 3.4 in (8.6 cm) wide.
- After Tier 3: body about 2.35 in (6.0 cm) tall.
- After Tier 5: body about 3.75 in (9.5 cm) tall.
- After the Peak: body 4 in (10.2 cm) tall.
If the trunk is wider than 0.8 in (2.0 cm), go down to a 2.5 mm hook. If it’s narrower, go up to a 3.0 mm hook. If only the height is off, the ornament will still work, but the tiers will look squat or stretched. Check how tightly you are pulling up the loops of each sc.
Pattern
Trunk
With Color A:
Row 1: Ch 6, sc in 2nd ch from hook and in each ch across. Turn. (5 sc)
Rows 2–6: Ch 1, sc in each st across. Turn. (5 sc)
Fasten off. The trunk measures 0.8 in (2.0 cm) x 0.75 in (1.9 cm).
Base of the Tree
This makes the chain extensions on both sides of the trunk.
Foundation: With Color A and a slipknot on your hook, ch 10. With the last row of the trunk facing up, sc in each of the 5 sts across Row 6 of the trunk. Ch 11. Turn.
Base Row: Sc in 2nd ch from hook and in next 9 ch, sc in each of the next 5 sc, sc in each of the 10 ch of the first chain. Turn. (25 sc)
Place a marker in the center sc, which is the 13th st. That is the spine. The free loops of both ch-10 sections stay open for the picot trim later.
Tiers
Each tier has three rows. Leaf Row A makes the long lower arch of each leaf, Leaf Row B makes the shorter upper arch, and the Bar Row covers the upper arch with sc. The lower arch is left free so it drops into a curve, and that opens the leaf shape between the two arches.
The anchors are always the 3rd st, the center st, and the 3rd-from-last st of the previous row. This moves each edge in by 2 sts per tier, so the triangle stays straight.
General formula for a row of n sts, where M = (n − 7) ÷ 2:
- Leaf Row A: Ch 1, sl st in first 2 sts, sc in next st, ch (M + 4), sk M sts, sc in center st, ch (M + 4), sk M sts, sc in next st. Leave the last 2 sts unworked. Turn. (3 sc, 2 arches)
- Leaf Row B: Ch 1, sc in first sc, ch (M + 2), sc in center sc, ch (M + 2), sc in last sc. Turn. (3 sc, 2 arches)
- Bar Row: Ch 1, sc in first sc, M sc in the Leaf Row B ch-sp, sc in center sc, M sc in the next Leaf Row B ch-sp, sc in last sc. Turn. (2M + 3 sts)
When you work the Bar Row, push the Leaf Row A chain toward the back and work only into the Leaf Row B spaces. Move the spine marker up as you go.
Tier 1 (worked on 25 sts, M = 9):
- Leaf Row A: Ch 1, sl st in first 2 sts, sc in next st, ch 13, sk 9, sc in center st, ch 13, sk 9, sc in next st. Turn. (3 sc, 2 ch-13 arches)
- Leaf Row B: Ch 1, sc in first sc, ch 11, sc in center sc, ch 11, sc in last sc. Turn. (3 sc, 2 ch-11 arches)
- Bar Row: Ch 1, sc in first sc, 9 sc in ch-11 sp, sc in center sc, 9 sc in next ch-11 sp, sc in last sc. Turn. (21 sc)
Tier 2 (worked on 21 sts, M = 7):
- Leaf Row A: Ch 1, sl st in first 2 sts, sc in next st, ch 11, sk 7, sc in center st, ch 11, sk 7, sc in next st. Turn. (3 sc, 2 ch-11 arches)
- Leaf Row B: Ch 1, sc in first sc, ch 9, sc in center sc, ch 9, sc in last sc. Turn. (3 sc, 2 ch-9 arches)
- Bar Row: Ch 1, sc in first sc, 7 sc in ch-9 sp, sc in center sc, 7 sc in next ch-9 sp, sc in last sc. Turn. (17 sc)
Tier 3 (worked on 17 sts, M = 5):
- Leaf Row A: Ch 1, sl st in first 2 sts, sc in next st, ch 9, sk 5, sc in center st, ch 9, sk 5, sc in next st. Turn. (3 sc, 2 ch-9 arches)
- Leaf Row B: Ch 1, sc in first sc, ch 7, sc in center sc, ch 7, sc in last sc. Turn. (3 sc, 2 ch-7 arches)
- Bar Row: Ch 1, sc in first sc, 5 sc in ch-7 sp, sc in center sc, 5 sc in next ch-7 sp, sc in last sc. Turn. (13 sc)
Tier 4 (worked on 13 sts, M = 3):
- Leaf Row A: Ch 1, sl st in first 2 sts, sc in next st, ch 7, sk 3, sc in center st, ch 7, sk 3, sc in next st. Turn. (3 sc, 2 ch-7 arches)
- Leaf Row B: Ch 1, sc in first sc, ch 5, sc in center sc, ch 5, sc in last sc. Turn. (3 sc, 2 ch-5 arches)
- Bar Row: Ch 1, sc in first sc, 3 sc in ch-5 sp, sc in center sc, 3 sc in next ch-5 sp, sc in last sc. Turn. (9 sc)
Tier 5 (worked on 9 sts, M = 1):
- Leaf Row A: Ch 1, sl st in first 2 sts, sc in next st, ch 5, sk 1, sc in center st, ch 5, sk 1, sc in next st. Turn. (3 sc, 2 ch-5 arches)
- Leaf Row B: Ch 1, sc in first sc, ch 3, sc in center sc, ch 3, sc in last sc. Turn. (3 sc, 2 ch-3 arches)
- Bar Row: Ch 1, sc in first sc, 1 sc in ch-3 sp, sc in center sc, 1 sc in next ch-3 sp, sc in last sc. Turn. (5 sc)
The body should now be about 3.75 in (9.5 cm) tall.
Peak
Peak Row 1: Ch 1, sc2tog, sc in center st, sc2tog. Turn. (3 sts)
Peak Row 2: Ch 1, sc3tog. (1 st)
Hanging loop: Ch 24, sl st in the top of the sc3tog. Don’t fasten off. The loop hangs about 2 in (5.1 cm) deep.
Border
The border has two parts: green edging along the two slanted sides, and cream picot trim along the bottom edge on each side of the trunk.
Border gauge: Same as the body, 6.25 sc per inch (2.5 cm). Each slanted side is about 4.5 in (11.4 cm) long, so it needs 28 sc.
Green Side Edging (Color A)
Side 1: Continuing from the loop, work down the first slanted side:
- 2 sc over the ends of the two Peak rows.
- 5 sc along the side of each tier, from Tier 5 down to Tier 1: 1 sc in the end of the Bar Row, 2 sc around the end of Leaf Row B, and 2 sc around the Leaf Row A step. That is 25 sc for the five tiers.
- 1 sc over the ends of the Base Row and Foundation.
That makes 2 + 25 + 1 = 28 sc. Fasten off.
Side 2: Join Color A at the other bottom corner and work up the second side the same way in reverse: 1 sc over the Base Row and Foundation, 5 sc per tier (25), 2 sc over the Peak rows, then sl st in the sc3tog at the base of the loop. (28 sc) Fasten off.
The width is now 4.25 in (10.8 cm).
Cream Picot Trim (Color B)
Work the trim in two identical sections, one on each side of the trunk.
Section 1, Row 1: With the bottom edge facing up, join Color B in the bottom-most sc of the green edging. Sc in that same st, sc in each of the 10 free loops of the foundation chain, then sc in the side of trunk Row 6, where it meets the base. Turn. (12 sc)
Section 1, Row 2: Ch 1, *sc in next sc, picot, sc in next sc; repeat from * 5 more times. (12 sc, 6 picots) Fasten off.
Section 2: Join Color B in the side of trunk Row 6 on the other side of the trunk. Work Rows 1–2 the same as Section 1, ending in the bottom-most sc of the green edging on that side. (12 sc, 6 picots)
Why the math works: Each section starts with 1 corner st + 10 free loops + 1 trunk-side st = 12 sc. Each picot repeat uses 2 sc, so 12 ÷ 2 = 6 repeats. That gives 6 evenly spaced picots per side, or 12 in total, and every repeat is complete. The 28 side sc match 6.25 sc per inch over a 4.5 in (11.4 cm) slant, so the edges lie flat instead of ruffling or pulling in.
Final Blocking
- Weave in all ends along the bar rows or the trunk, not through the open arches.
- Wet the ornament fully in cool water and gently press out the water in a towel.
- Pin it to the mat as a triangle 4.25 in (10.8 cm) wide at the base and 4 in (10.2 cm) tall from the base to the peak.
- Pin the spine straight from the peak to the center of the trunk.
- Use a pin to draw each lower arch downward until every leaf is an even oval.
- Pin the trunk straight. It should measure 0.8 in (2.0 cm) wide.
- Pin each cream picot out into a round point.
- Let it dry completely, at least 12 hours. For a crisper ornament, mist it with a light spray starch before it dries.
Final Quality-Control Checklist
- Body: 25 sc at the base, tapering to 21, 17, 13, 9, 5, 3, 1
- Ten leaf shapes in all, two per tier, symmetrical about the spine
- Spine runs straight from the peak to the trunk
- Each slanted side has 28 sc and lies flat
- Each cream section has 12 sc and 6 picots
- Finished size: 4.25 in (10.8 cm) x 4.75 in (12.1 cm)
- The hanging loop is secure and about 2 in (5.1 cm) deep
- All ends are hidden and trimmed
Troubleshooting
Leaves don’t open: You may have caught the Leaf Row A chain in the Bar Row. Work only into the Leaf Row B spaces.
Tree leans to one side: Count the skipped sts in Leaf Row A. Each side must skip exactly M.
Sides ruffle: Too many edging sc. Pull out and work exactly 5 per tier.
Sides pull in: Too few edging sc, or they’re too tight. Use the full 28, or go up a hook size for the edging.
Picots look crowded: Check that Row 1 has 12 sc, not 13 or 14.
Trunk too wide for the base: Your gauge is loose. Remake it with a smaller hook.
Care
Hand wash in cool water with mild soap, press out the water, and dry flat while pinned to shape. Store flat or hanging so the arches don’t crush.
Final Notes
The measurement chain is short. The trunk swatch is 0.8 in (2.0 cm) wide, the base row is 25 sc at 4 in (10.2 cm), and five tiers bring the height to 3.75 in (9.5 cm). The peak finishes the body at 4 in (10.2 cm). The edging adds 0.125 in (0.3 cm) per side for a 4.25 in (10.8 cm) width, and the trunk brings the total height to 4.75 in (12.1 cm). If your trunk matches gauge, every later number follows.
Happy crocheting!