

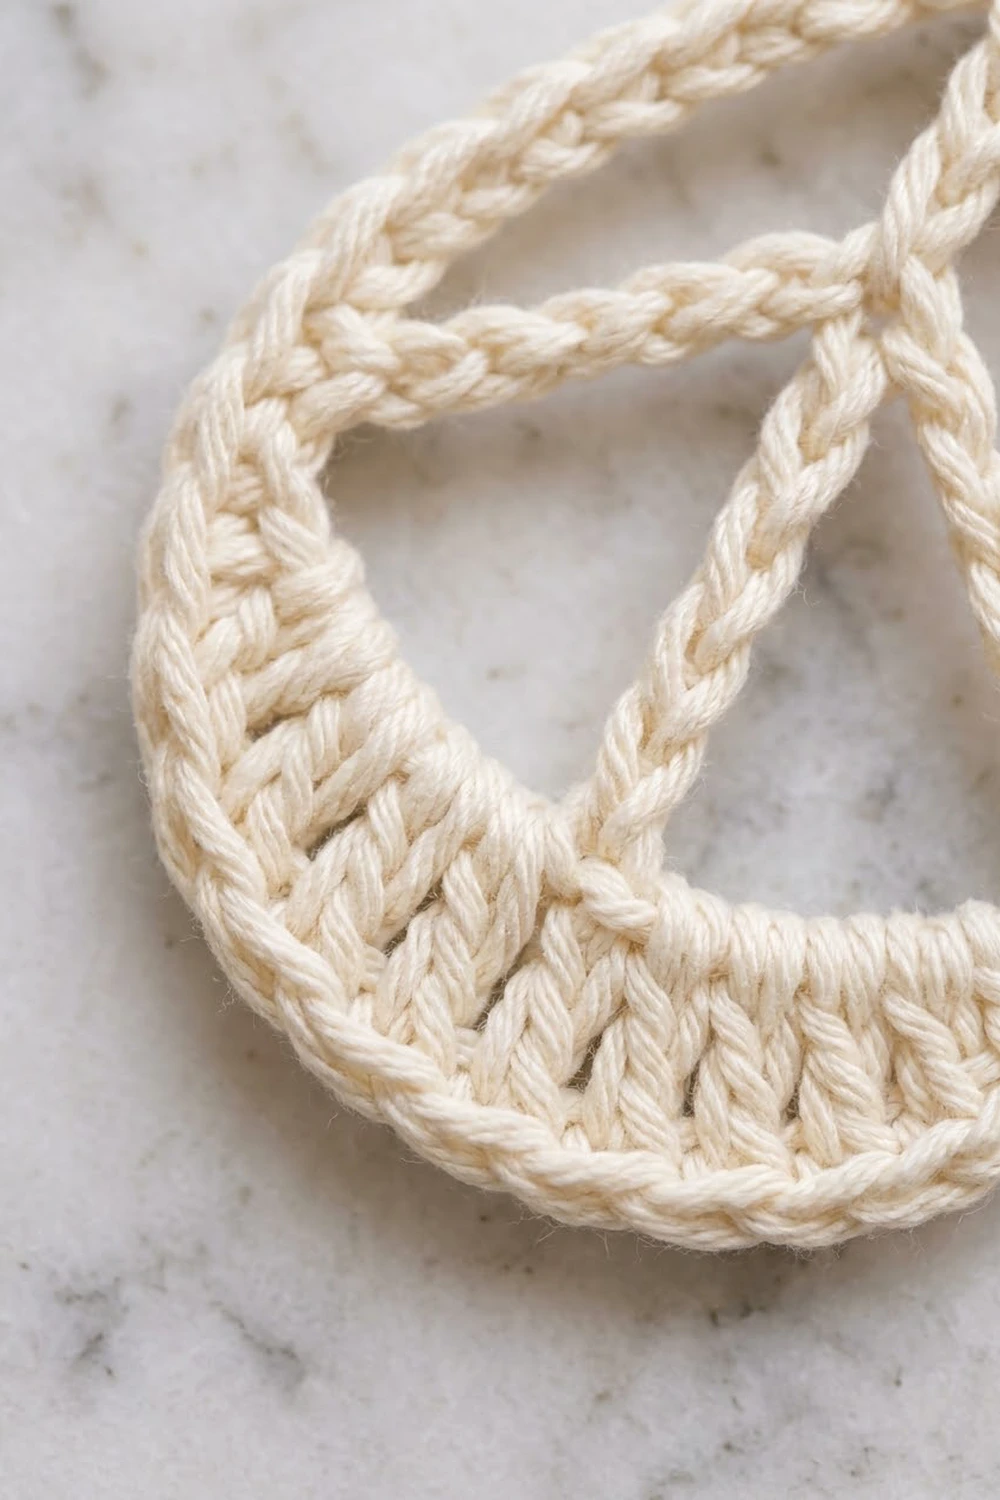
The Winter Dewdrop is a small, airy Christmas ornament shaped like a falling drop of water. A corded teardrop frame surrounds an open interior split by a center spine and two angled branches. A dense crescent of upright stitches fills the bottom, so the ornament hangs straight and has a little weight at its base.
It is worked in one color, a soft cream mercerized cotton. That keeps the look clean, Scandinavian and a little vintage, and it shows up well against dark green branches and warm string lights. White, silver-gray or pale gold also work well.
This pattern uses US crochet terms. The finished body measures 2.75 in (7.0 cm) wide by 3.5 in (8.9 cm) tall. Including the hanging loop, the ornament is about 4.7 in (11.9 cm) tall.
Construction is in one piece. You chain a ring and single crochet around it to make the frame, then work three short rows into the inside of the ring to fill the bottom. Next you add the spine and branches with chains and slip stitches. A shaped single crochet border with a built-in hanging loop finishes the piece.
Finished Size and Construction
- Finished size: 2.75 in (7.0 cm) wide x 3.5 in (8.9 cm) tall, plus a 1.2 in (3.0 cm) loop
- Skill level: Easy-intermediate
- Terminology: US crochet terms
- Yarn weight: Sport (#2) mercerized cotton
- Hook: 3.25 mm (US D-3)
- Number of pieces: 1
- Layout: Single motif, hung vertically
- Piece size: 2.75 in x 3.5 in (7.0 cm x 8.9 cm)
- Size before border: 2.35 in x 3.1 in (6.0 cm x 7.9 cm)
- Border depth: 0.2 in (0.5 cm) on every edge
Materials
Yarn: Use a smooth, tightly plied mercerized cotton in sport weight, about 3 m per gram. Cotton holds the teardrop shape after blocking and makes the stitch definition you see in the cords. Avoid fuzzy or very stretchy yarns, because the spine and branches can sag.
- Cream: 6 g, about 18 m (20 yd) per ornament
The quantity includes a margin for your gauge test, the tails and weaving in. If you plan a set, a 50 g ball makes about eight ornaments.
Tools:
- 3.25 mm (US D-3) crochet hook
- 2 locking stitch markers
- Tapestry needle
- Scissors
- Rust-proof pins and a blocking board or foam mat
- Paper template: a teardrop 2.75 in (7.0 cm) wide x 3.5 in (8.9 cm) tall
- Optional: light spray starch
Abbreviations (US Terms)
- ch – chain
- sl st – slip stitch
- sc – single crochet
- hdc – half double crochet
- dc – double crochet
- st(s) – stitch(es)
- sc2tog – single crochet 2 together
- dc2tog – double crochet 2 together
- rnd – round
Special technique, slip stitch cord: Chain the stated number. Then work 1 sl st into the back bump of each chain, heading back toward where you started. This turns a plain chain into a firm, braided-looking cord. All the interior lines of this ornament are made this way.
Gauge and Checkpoints
Gauge: 6 sc = 1 in (2.5 cm), and 13 ch = 2 in (5.1 cm), both measured relaxed.
Rather than a flat swatch, use the frame itself as your test. Work Rnd 1 and check it before you continue.
Checkpoints:
- After Rnd 1: Lay the ring flat as a circle. The outer diameter should be about 2.6 in (6.6 cm).
- After Band Row 1: The hdc row should be about 0.25 in (0.6 cm) deep at the center.
- After Band Row 3: The band should be about 0.75 in (1.9 cm) deep at the center, and the top edge about 1.8 in (4.6 cm) wide.
- After the spine and branches: Shaped as a teardrop, the piece should be 2.35 in x 3.1 in (6.0 cm x 7.9 cm).
- After the border and blocking: 2.75 in x 3.5 in (7.0 cm x 8.9 cm).
If your piece is too big: Change to a 3.0 mm hook, or tighten your chain tension. Loose chains are the most common cause.
If your piece is too small: Change to a 3.5 mm (US E-4) hook.
A difference of up to 1/8 in (0.3 cm) is fine, because blocking will correct it. Don’t add or remove stitches, since the band and border counts depend on 48 frame stitches.
Part 1: Frame
Foundation: Ch 48. Join with a sl st to the first ch to form a ring, taking care not to twist the chain.
Rnd 1: Ch 1. Work 1 sc into the back bump of each ch around. Join with a sl st to the first sc. (48 sc)
Working into the back bumps leaves the neat V of each chain facing the inside of the ring. That clean inner edge is where you will work the band.
Place a marker in the first sc. This is st 1, the top point of the teardrop. Count clockwise around the ring: st 25 is the bottom center, directly opposite st 1. Fasten off.
Number the inner chains the same way: foundation ch 1 sits under st 1, ch 13 under st 13, and so on.
Part 2: Bottom Band
You will work this crescent into the inner chain loops along the bottom of the ring, using foundation chains 17 through 33 (17 chains centered on ch 25).
Row 1 (right side): Join yarn with a sl st under both loops of foundation ch 17. Ch 2 (does not count as a st). Work 1 hdc in ch 17 and 1 hdc in each ch through ch 33. (17 hdc) Turn.
Row 2: Ch 3 (counts as the first dc). Work dc2tog twice, 1 dc in each of the next 7 sts, dc2tog twice, then 1 dc in the last st. Turn. (13 sts: 1 + 1 + 1 + 7 + 1 + 1 + 1)
This row uses 1 + 2 + 2 + 7 + 2 + 2 + 1 = 17 stitches, so all of Row 1 is consumed. These dc posts make the upright ribbing at the bottom of the ornament.
Row 3: Ch 1. Work sc2tog, 1 sc in each of the next 9 sts, then sc2tog. (11 sc) Fasten off.
This row uses 2 + 9 + 2 = 13 stitches. The decreases at each end shorten the top edge so it fits across the inside of the teardrop like a gentle smile.
Place the second marker in the 6th sc of Row 3. This is the center of the band, where the spine lands.
Part 3: Spine and Branches
Spine chain: Join yarn with a sl st into foundation ch 1 on the inside of the top point. Ch 13. Sl st through both loops of the marked 6th sc of Band Row 3. The chain should reach without stretching or sagging. If it doesn’t, redo it with 12 or 14 chains.
Lower spine: Sl st into the back bump of each of the next 5 ch, working upward from the band. You are now at the branch point.
Right branch: Ch 7. Sl st under both loops of foundation ch 13 on the inside of the frame. Sl st into the back bump of each of the 7 ch, back to the spine. Sl st into the same spine ch to secure it.
Left branch: Ch 7. Sl st under both loops of foundation ch 37. Sl st into the back bump of each of the 7 ch, back to the spine. Sl st into the same spine ch.
Foundation chains 13 and 37 are mirror images across the center line. Any chain k is matched by chain 50 − k, so the branches will sit evenly.
Upper spine: Sl st into the back bump of each of the remaining 8 ch, up to the top. Sl st into foundation ch 1. Fasten off.
The spine uses 5 + 8 = 13 sl sts, one for each spine chain. The branches slope down and outward from the spine and meet the frame at its widest point, forming the inverted-V.
Checkpoint: Gently shape the piece into a teardrop. It should measure 2.35 in x 3.1 in (6.0 cm x 7.9 cm). The spine should be taut but shouldn’t pucker the top point.
Border with Hanging Loop
Border gauge: Same as the frame, 6 sc = 1 in (2.5 cm). The border is worked into the sc tops on the outer edge of Rnd 1.
Rnd 2: Join yarn with a sl st in st 1. Ch 1. Work as follows:
- Top point: In st 1, work (sc, ch 16, sc). That’s 2 sc, plus a ch-16 loop that isn’t counted as stitches.
- Right side: Work 1 sc in each of sts 2–14. (13 sc)
- Bottom curve: Work (2 sc in next st, 1 sc in each of next 3 sts) 5 times over sts 15–34, then 2 sc in st 35. (27 sc)
- Left side: Work 1 sc in each of sts 36–48. (13 sc)
Join with a sl st to the first sc.
Rnd 2 total: 2 + 13 + 27 + 13 = 55 sc, which is 48 sc worked one per stitch plus 7 increases. The increases fall on sts 1, 15, 19, 23, 27, 31 and 35. They are symmetrical, because each one has a mirror stitch at 50 − k, and st 25 has none.
Rnd 3 (loop wrap only): Sl st into the ch-16 loop. Work 24 sc over the loop, packing them evenly. Sl st into the base at st 1. Fasten off. (24 sc on the loop)
Why the math works: The two straight upper sides are nearly flat, so a 1:1 sc lies flat on them with no increases. Working outward around a curve lengthens the edge by about 2π x the border depth. That’s 6.28 x 0.17 in, or about 1.07 in (2.7 cm), which is roughly 6 stitches at 6 sc per inch. All 6 of those increases go on the bottom curve. The seventh increase at the top lets the edge turn the point cleanly on either side of the loop.
The border adds 0.2 in (0.5 cm) on each side. That brings 2.35 in x 3.1 in (6.0 cm x 7.9 cm) up to 2.75 in x 3.5 in (7.0 cm x 8.9 cm).
Final Blocking
- Weave in all ends along the frame cord, not through the open interior.
- Soak the ornament in cool water for 5 minutes, then roll it in a towel to remove excess water.
- Lay the paper template on your blocking board and place the ornament on top.
- Pin the top point and the bottom center first. Then pin the widest points so the width is 2.75 in (7.0 cm).
- Pin the spine straight and pull each branch taut toward the frame.
- Pin the hanging loop upright so it is 1.2 in (3.0 cm) tall.
- If you like, mist lightly with spray starch for a crisper hanging shape.
- Leave it to dry completely, at least 12 hours, before unpinning.
Final Quality-Control Checklist
- Rnd 1 has 48 sc, and the ring is not twisted.
- Band rows count 17, 13 and 11 stitches.
- The spine lands on the 6th sc of Row 3, and the chain isn’t stretched.
- The branches attach at foundation chains 13 and 37 and look symmetrical.
- The border has 55 sc plus a ch-16 loop wrapped with 24 sc.
- The blocked size is 2.75 in x 3.5 in (7.0 cm x 8.9 cm), within 1/8 in (0.3 cm).
- The ornament hangs straight, with no twist at the loop.
- No ends are visible from the front.
Troubleshooting
The frame ruffles: Your chains are looser than your sc. Redo the foundation with a smaller hook, then switch back to the main hook for Rnd 1.
The band cups or pulls the frame inward: Check your Row 2 count of 13. If you still see cupping, work Row 2 with a slightly looser dc.
The spine sags: Rework it with 1 fewer chain, or work the sl sts more firmly.
The branches are uneven: Recount from st 1. Even a one-stitch shift tilts the inverted-V.
The ornament hangs crooked: Make sure the loop sits exactly in st 1, then re-block with the loop pinned straight up.
The border ruffles at the bottom: Your increases may be bunched together. Check that each one is followed by 3 single sc.
Care
Hand wash in cool water, press out the moisture in a towel, and re-block flat to dry. Store it flat in tissue so the loop and spine keep their shape.

Final Notes
Here is how the measurements build: 48 frame stitches make a 2.6 in (6.6 cm) ring. The band adds 0.75 in (1.9 cm) of depth at the bottom. Shaped with the 13-chain spine, the teardrop measures 2.35 in x 3.1 in (6.0 cm x 7.9 cm). The 55-stitch border adds 0.2 in (0.5 cm) on every edge, for a finished body of 2.75 in x 3.5 in (7.0 cm x 8.9 cm) and a 1.2 in (3.0 cm) loop. Check each stage as you go, and every ornament in your set will match.
Happy crocheting!