

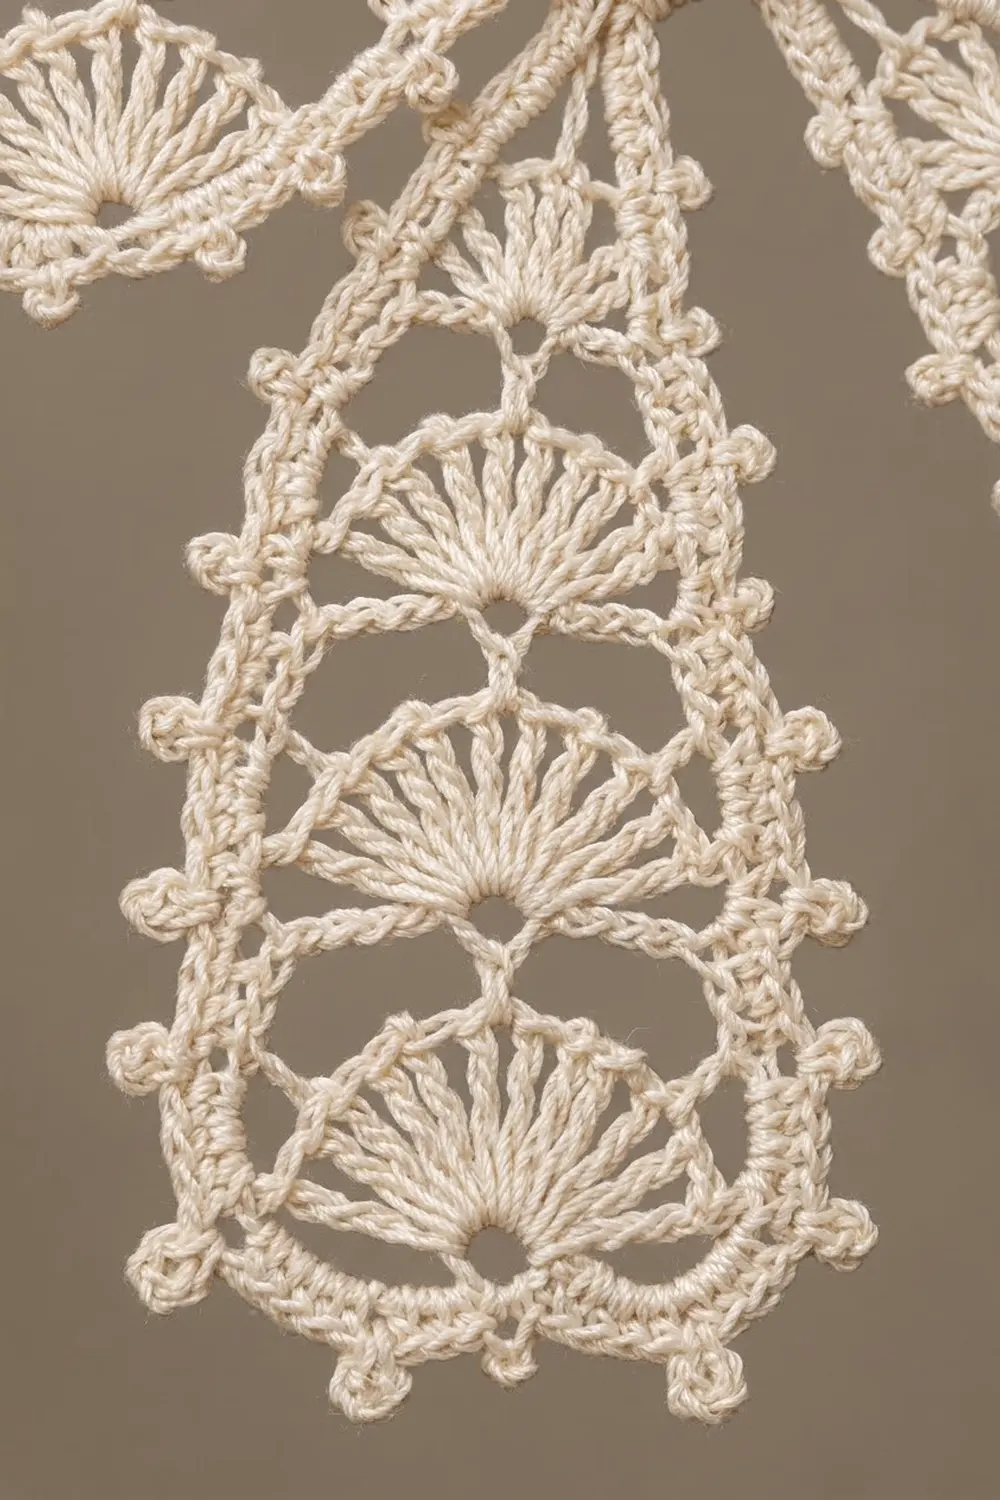
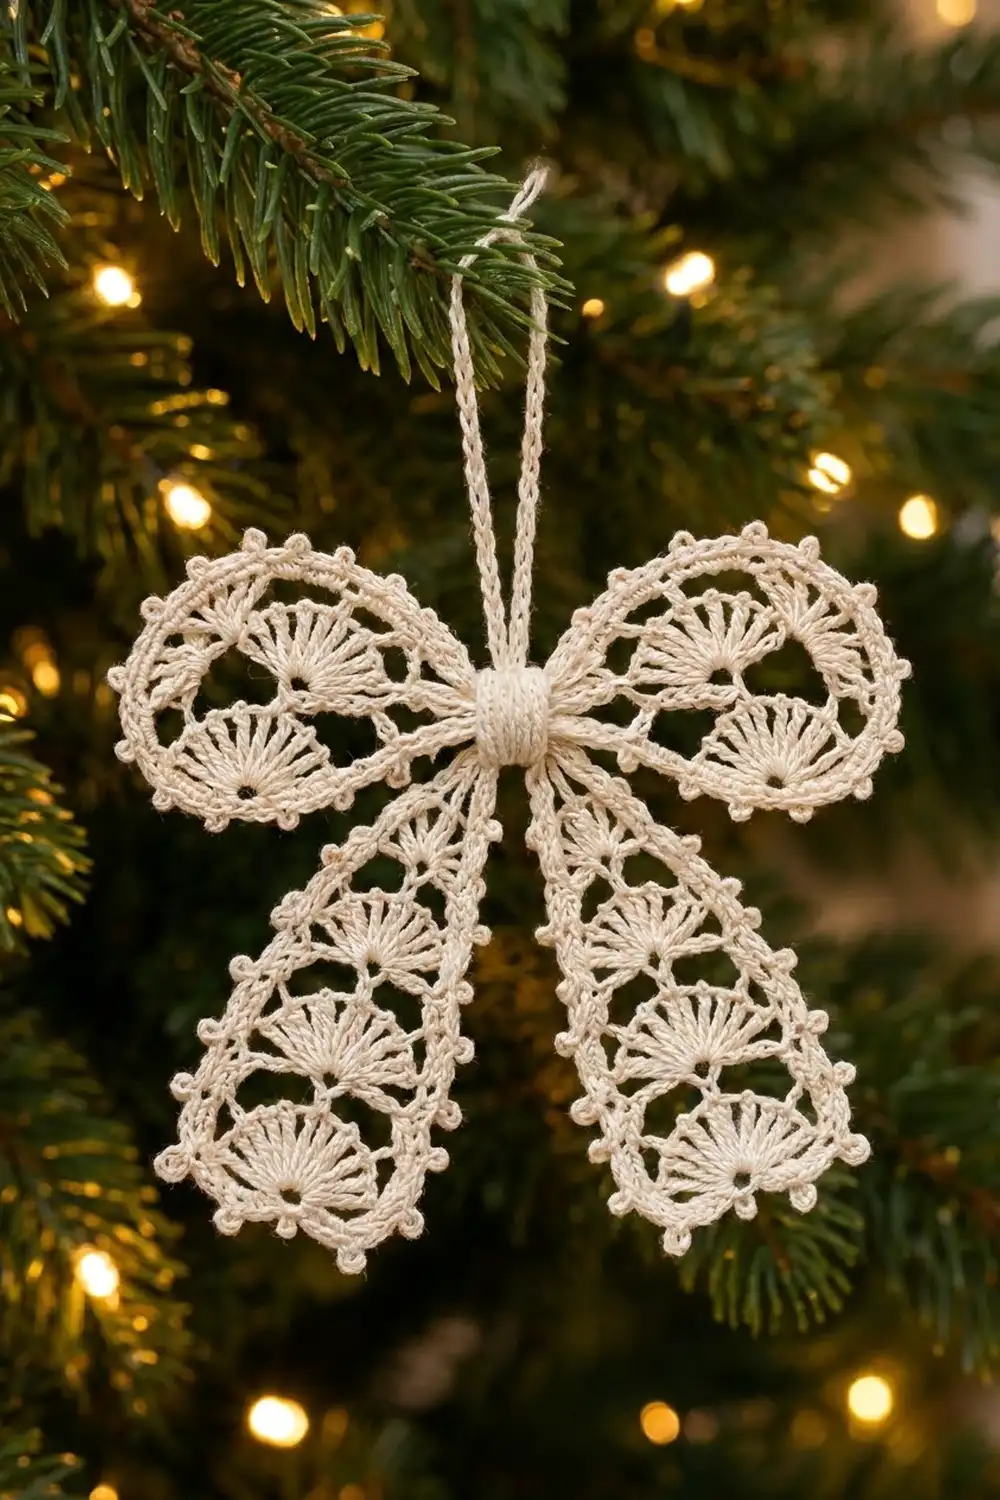
The Snowlace Bow is a small lace ornament worked in fine cream cotton thread. It has two rounded loops filled with fan shells and two long tails made of stacked fans, and a picot edging runs around the whole outline. A wrapped center band and a thin hanging loop finish it, so it’s ready to go on the tree.
It’s made in one color, a soft ivory or cream, so the lace texture does the decorating. The style is classic and quiet. It suits a natural-themed tree, gift toppers, or a window hung with several bows.
This pattern uses US crochet terms. After blocking, the bow measures 4 in (10.2 cm) wide × 4.5 in (11.4 cm) tall, not counting the hanging loop.
You start with a small chain ring and work each of the four parts in short rows straight off that ring. Next comes a two-round picot edging that travels continuously around all four parts. Last, you work a small band that wraps over the center, then add the hanging loop. Everything stays attached, so there is nothing to sew together.
Finished Size and Construction
- Finished size: 4 in (10.2 cm) wide × 4.5 in (11.4 cm) tall
- Skill level: Intermediate (thread work, working into row ends)
- Terminology: US
- Yarn weight: Lace (0), size 10 crochet thread
- Hook: 1.75 mm steel hook
- Number of pieces: 1
- Layout: One motif: four parts (2 loops, 2 tails) around a central ring
- Piece size: 4 in × 4.5 in (10.2 cm × 11.4 cm)
- Size before edging: about 3.6 in × 4.1 in (9.1 cm × 10.4 cm)
- Edging depth: about 0.2 in (0.5 cm) per edge, picots included
Materials
Thread: Use mercerized cotton crochet thread in size 10. It holds stiffener well and keeps the picots crisp. Avoid fuzzy or very soft threads, because the open fans will lose their shape.
- Cream/Ivory: about 8 g (26 m) for one bow
These quantities include a margin of about 25% for your gauge swatch and the weaving-in tails. If you’re making a set, one standard ball will make many bows.
Tools:
- 1.75 mm steel crochet hook
- Fine tapestry needle
- Small sharp scissors
- 2 stitch markers
- Foam blocking board and rust-proof pins
- Fabric stiffener or a starch solution
- Ruler or tape measure
Abbreviations (US Terms)
- ch: chain
- sl st: slip stitch
- sc: single crochet
- dc: double crochet
- tr: treble crochet
- sp: space
- st(s): stitch(es)
- tch: turning chain
- RS / WS: right side / wrong side
Special stitches:
- Picot: ch 3, then sl st into the front loop and left vertical bar of the sc just made.
- 7-dc fan: work 7 dc into the stitch or space given.
Gauge and Checkpoints
Gauge is not critical for an ornament. Still, the edging math and the finished size depend on it, so make the center ring and one tail first, then measure.
- Center ring after Round 1: 0.6 in (1.5 cm) across the outside edge
- Tail after Row 4: 1 in (2.5 cm) long, measured from the ring edge
- Tail after Row 11: 2.75 in (7.0 cm) long
- Loop after Row 2: 0.75 in (1.9 cm) long, measured from the ring edge
- Loop after Row 4: 1.25 in (3.2 cm) long
- After edging: loop 1.5 in (3.8 cm) long; tail 3 in (7.6 cm) long
If your pieces are too big, go down to a 1.5 mm hook. If they’re too small, go up to a 2 mm hook. Don’t change any stitch counts, because the edging depends on them.
Center Ring
Round 1 (RS): Ch 10, sl st in first ch to form a ring. Ch 1, work 20 sc into the ring, then sl st in first sc. Fasten off. (20 sc)
Put a marker in the first sc, which is the top center of the bow. The 20 sc split into four groups of 5, counting clockwise from the marker with RS facing:
- sc 1–5: right loop
- sc 6–10: right tail
- sc 11–15: left tail
- sc 16–20: left loop
Measure now: the ring should be 0.6 in (1.5 cm) across.
Loops (Make 2)
Work the right loop on sc 1–5 and the left loop on sc 16–20.
Row 1 (RS): Join thread with a sl st in the first sc of the group. Ch 4 (counts as tr), ch 3, tr in next sc, ch 3; repeat from * 2 more times, then tr in last sc of the group. Turn. (5 tr, 4 ch-3 sp)
These five spokes spread out from the ring to form the loop’s base.
Row 2 (WS): Ch 4 (counts as tr), ch 5, tr in next tr, ch 5; repeat from * 2 more times, then tr in top of the tch. Turn. (5 tr, 4 ch-5 sp)
Checkpoint: the loop should be 0.75 in (1.9 cm) long, measured from the ring edge.
Row 3 (RS): Ch 3 (counts as dc), 7-dc fan in next ch-5 sp, dc in next tr; repeat from * 3 more times, working the last dc in the top of the tch. Turn. (33 dc: 1 + 4 × 8)
This row makes the tier of four fan shells.
Row 4 (WS): Ch 1, sc in first dc, ch 4, skip 3 dc, sc in next dc; repeat from * 7 more times. The last sc goes in the top of the tch. (9 sc, 8 ch-4 sp)
This is the outer chain mesh. To check the count, the sc land on dc 1, 5, 9 and so on, up to dc 33. Fasten off.
Checkpoint: the loop should be 1.25 in (3.2 cm) long, with the arc gently curved.
Tails (Make 2)
Work the right tail on sc 6–10 and the left tail on sc 11–15.
Row 1 (RS): Join thread in the first sc of the group. Ch 3 (counts as dc), then dc in each of the next 4 sc. Turn. (5 dc)
Row 2 (WS): Ch 5 (counts as dc + ch 2), skip next dc, dc in next dc (the center), ch 2, skip next dc, dc in top of tch. Turn. (3 dc, 2 ch-2 sp)
Row 3 (RS): Ch 3 (counts as dc), ch 1, 7-dc fan in the center dc, ch 1, dc in 3rd ch of the tch. Turn. (9 dc, 2 ch-1 sp)
Row 4 (WS): Ch 5 (counts as dc + ch 2), skip the ch-1 sp and the first 3 dc of the fan, dc in 4th (center) dc of the fan, ch 2, dc in top of tch. Turn. (3 dc, 2 ch-2 sp)
Checkpoint: the tail should be 1 in (2.5 cm) long, measured from the ring edge.
Rows 5–10: Repeat Rows 3–4 three more times. That gives 4 fans in total, in Rows 3, 5, 7 and 9. Row 10 ends with 3 dc, 2 ch-2 sp.
Row 11 (RS): Ch 3 (counts as dc), ch 1, 9 dc in the center dc, ch 1, dc in 3rd ch of the tch. (11 dc, 2 ch-1 sp) Fasten off.
The larger final fan gives the tail its flared, rounded end. Checkpoint: the tail should be 2.75 in (7.0 cm) long. The whole bow should now measure about 3.6 in × 4.1 in (9.1 cm × 10.4 cm).
Edging
The edging is worked as one continuous round over all four parts, with the RS facing. Wherever two parts meet at the ring, work 1 sl st into the ring between them. These transition sl sts are not counted.
Edging gauge: 2 sc per dc row end and 4 sc per tr row end, worked around the post of the end stitch. The edging should lie flat without rippling.
Round 1 (sc foundation): Join thread at the base of the right loop, on the side next to sc 1. Work around each part in order: right loop, right tail, left tail, left loop.
Each loop (63 sc):
- First side, 12 sc: 4 sc around the Row 1 tr, 4 sc around the Row 2 tr, 3 sc around the Row 3 dc, then 1 sc in the end sc of Row 4.
- Top, 39 sc: 4 sc in each of the 8 ch-4 sp, plus 1 sc in each of the 7 sc between them (32 + 7).
- Second side, 12 sc: 1 sc in the end sc of Row 4, 3 sc around the Row 3 dc, 4 sc around the Row 2 tr, 4 sc around the Row 1 tr.
Each tail (57 sc):
- First side, 22 sc: 2 sc around each of the 11 row ends.
- Bottom, 13 sc: 1 sc in the ch-1 sp, 1 sc in each of the next 4 dc, 3 sc in the 5th (center) dc to form the point, 1 sc in each of the next 4 dc, 1 sc in the ch-1 sp.
- Second side, 22 sc: 2 sc around each of the 11 row ends.
Sl st in the first sc to close the round. (240 sc total: 2 × 63 + 2 × 57)
Round 2 (picot round): Ch 1. On each part, sc in next sc, sc in next sc and make a picot, sc in next sc; repeat from * across the part. Sl st into the ring at each transition, then repeat on the next part. Join and fasten off.
- Each loop: 21 repeats, 21 picots
- Each tail: 19 repeats, 19 picots
- Total: 240 sc, 80 picots
Why the math works: Both 63 and 57 divide evenly by 3, so every part takes a whole number of 3-stitch repeats and no repeat gets cut short. The picots land on sc 2, 5, 8 and so on. On a loop, that puts a picot on sc 32, the exact top center of the 63. On a tail, it puts a picot on sc 29, the middle of the 3 sc at the point. Both edges come out mirror-symmetrical.
Center Band and Hanging Loop
Band: Join thread with a sl st at the back of the ring, at sc 1. Ch 6.
- Row 1: Sc in 2nd ch from hook and in each of the next 4 ch. Turn. (5 sc)
- Rows 2–10: Ch 1, sc in each sc across. Turn. (5 sc each row)
The band should measure 0.5 in (1.3 cm) wide × 1.25 in (3.2 cm) long. Wrap it from back to front over the ring so it covers the ring and the bases of all four parts. Sew the last row to the first row at the back, then pull it slightly snug so the center pinches.
Hanging loop: Join thread at the top edge of the band. Ch 40, then sl st back into the same stitch. Sl st in each ch around the loop for a corded finish. (40 sl st) The loop stands about 1.75 in (4.4 cm) tall. Fasten off and weave in all ends along the stitches on the back.
Final Blocking
- Soak the bow in fabric stiffener, or in starch mixed according to its directions.
- Squeeze out the excess gently. Don’t wring it.
- Pin the center band first, at the middle of your board.
- Angle the loops up and out at about 30°. Pin each loop into a rounded teardrop, 1.5 in (3.8 cm) long.
- Angle the tails slightly outward. Pin each tail straight to 3 in (7.6 cm) long and pin the point.
- Pin open every fan and every ch-4 mesh space.
- Pin each picot outward so it stands clear of the edge.
- Check the totals: 4 in (10.2 cm) wide × 4.5 in (11.4 cm) tall.
- Let it dry completely, usually 12–24 hours, before unpinning.
Final Quality-Control Checklist
- Ring has 20 sc, divided into four groups of 5
- Each loop: 5 tr spokes, 33 dc fan row, 9 sc / 8 ch-4 sp mesh
- Each tail: 4 fans of 7 dc plus a final fan of 9 dc
- Edging Round 1: 63 sc per loop, 57 sc per tail, 240 sc total
- Edging Round 2: 80 picots, with one at each loop top and each tail point
- Center band covers the ring completely
- Hanging loop is centered and secure
- Both loops match, and both tails match
- Size is 4 in × 4.5 in (10.2 cm × 11.4 cm)
Troubleshooting
Loop edge ruffles: You have too many sc on the top. Recount 39 sc, with 4 per ch-4 space.
Loop edge cups: The ch-4 spaces are too tight. Go up a hook size for Row 4 only.
Tails twist: Hold your tension evenly on the WS bar rows, and block the tails pinned straight.
Point is off-center: Make sure the 3 sc go into the 5th of the 9 dc in the final fan.
Picot is missing at a loop top: Your Round 1 count is off. Fix the 63 before working Round 2.
Ring shows past the band: Add 1–2 rows to the band, then sew it again.
Care
Hand-wash cool with mild soap and press out the water in a towel. Re-block with stiffener if the bow softens, and store it flat in tissue.
Final Notes
Each step’s measurement builds on the one before it. The ring measures 0.6 in (1.5 cm). The loops reach 1.25 in (3.2 cm) before the edging, and the tails reach 2.75 in (7.0 cm). That gives a bow of about 3.6 in × 4.1 in (9.1 cm × 10.4 cm) before the edging. The 0.2 in (0.5 cm) edging brings it to 4 in × 4.5 in (10.2 cm × 11.4 cm). Check each step against these numbers and every bow will match.
Happy crocheting!