

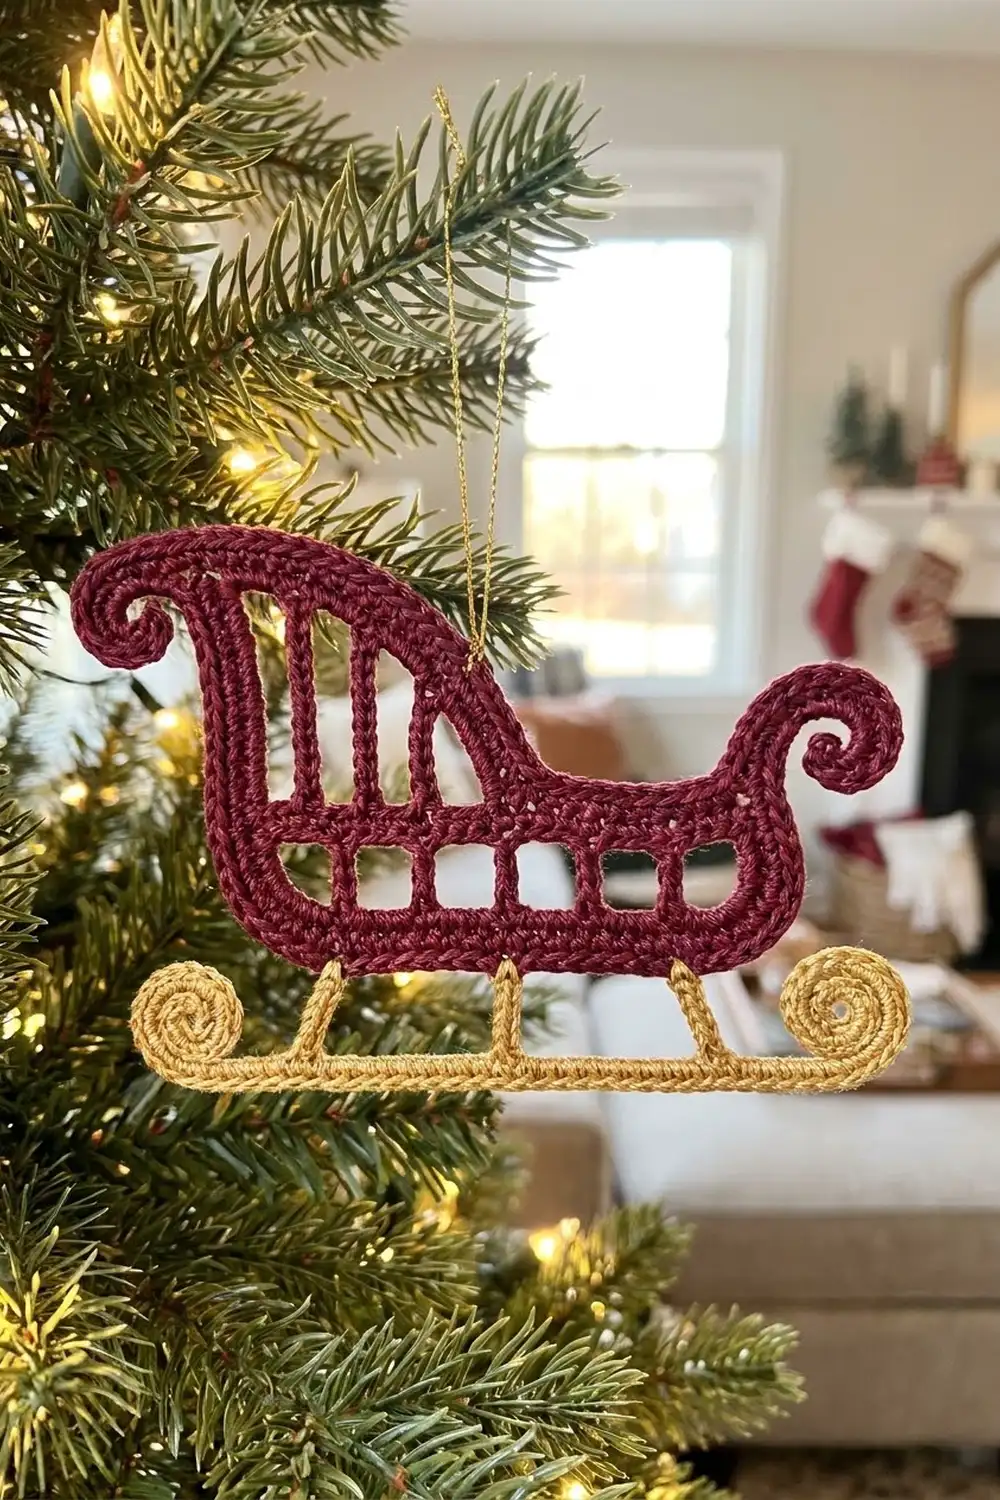
This little sleigh is an openwork ornament, so you can see through it. The body is a deep burgundy outline with a lattice of windows inside, and it sits on a shiny gold runner with a scroll at each end. Hung on the tree, the lights shine through the windows, and the gold runner catches the light.
The style is vintage Christmas: a tall curved back, a low seat, and a curled front tip. Only two colors are used, burgundy and gold, plus a fine gold thread for hanging. The pattern uses US crochet terms throughout.
The finished ornament measures about 5.5 in (14.0 cm) wide and 2.75 in (7.0 cm) tall, including the back scroll.
Construction is simple and flat. You work the burgundy body in five short rows to form the lattice. Next you work a burgundy border all around it, which gives the corded edge and adds the two body curls. Then you make a gold runner with scrolled ends and attach it with three slip-stitch struts.
Finished Size and Construction
- Finished size: 5.5 in (14.0 cm) wide × 2.75 in (7.0 cm) tall
- Skill level: Easy-Intermediate
- Terminology: US crochet terms
- Yarn weight: Sport weight (2), mercerized cotton
- Hook: 2.75 mm (C-2)
- Number of pieces: 1 ornament (body and runner are joined as you finish)
- Layout: a single standalone ornament
- Body size before border: 4.2 in (10.7 cm) wide × 1.7 in (4.3 cm) tall at the back
- Body size after border: 4.5 in (11.4 cm) wide × 2.0 in (5.1 cm) tall at the back
- Border depth: about 0.2 in (0.5 cm) on each side
Materials
Use a smooth mercerized cotton. It gives clean stitch definition, holds the curls well, and has the soft shine you see on the finished piece. Avoid fuzzy or very stretchy yarns, because the windows will lose their crisp shape.
- Burgundy (Color A): 6 g / 20 m sport-weight cotton
- Gold (Color B): 3 g / 10 m sport-weight cotton (a gold cotton with a slight sheen looks best)
- Hanging thread: one 8 in (20.3 cm) length of fine gold metallic thread
Tools:
– 2.75 mm (C-2) crochet hook
– Tapestry needle
– Scissors
– Blocking mat and rust-proof pins
– Spray bottle with water
– Optional: liquid fabric stiffener
All yarn quantities include a margin of about 25%, so one small skein of each color is plenty.
Abbreviations (US Terms)
- ch – chain
- sl st – slip stitch
- sc – single crochet
- tr – treble crochet
- dtr – double treble crochet (yarn over 3 times, insert hook, pull up a loop, then [yarn over, pull through 2 loops] 4 times)
- sp – space
- st(s) – stitch(es)
- RS – right side
Special stitch – Scroll Curl: Ch the number given, then work 3 sc in the 2nd ch from the hook and 3 sc in each remaining ch. Putting 3 sc into each chain makes the strip twist into a tight spiral.
Gauge and Checkpoints
Gauge: 12 sc = 2 in (5.1 cm), and 6 sc rows = 1 in (2.5 cm), with a 2.75 mm hook.
Because this ornament is a single piece, the body itself works as your test piece. Make Rows 1–3 and measure before you go on.
Checkpoints:
– After Row 1: 25 sc = 4.2 in (10.7 cm)
– After Row 3: front section height = 0.8 in (2.0 cm)
– After Row 5: back section height = 1.7 in (4.3 cm)
– After Border Rnd 1: body width = 4.5 in (11.4 cm)
– Runner Row 1: 33 sc = 5.5 in (14.0 cm)
If your piece is too big, go down to a 2.5 mm hook, or tighten your chains. Loose chains are the usual cause of wide windows.
If your piece is too small, go up to a 3.0 mm hook.
Getting the runner width right matters most. The struts depend on the runner lining up with the body: runner st 4 must sit under body foundation st 1.
Sleigh Body (Color A, Burgundy)
The stitches are numbered from the back end of the sleigh (st 1) to the front end (st 25) in every row.
Row 1: Ch 26. Sc in 2nd ch from hook and in each ch across. (25 sc)
The last sc you work is st 1, at the back end.
Row 2 (lower windows): Ch 4 (counts as tr), turn. Ch 3, skip next 3 sts, tr in next st; repeat from * 5 more times.
(7 tr + 18 ch = 25 sts; 6 windows)*
The tr posts sit on sts 1, 5, 9, 13, 17, 21 and 25. You finish at the front end.
Row 3 (middle bar): Ch 1, turn. Sc in first tr, 3 sc in next ch-3 sp, sc in next tr; repeat from * 5 more times, working the last sc in the top of the turning ch.
(7 + 18 = 25 sc)*
You finish at the back end. Checkpoint: the front section is 0.8 in (2.0 cm) tall.
Row 4 (tall back windows): Ch 5 (counts as dtr), turn. Work over the back section only: Ch 3, skip next 3 sts, dtr in next st; repeat from * 2 more times. Leave sts 14–25 unworked.
(4 dtr + 9 ch = 13 sts; 3 tall windows)*
The dtr posts sit on sts 1, 5, 9 and 13. Each one is about 0.7 in (1.8 cm) tall.
Row 5 (back top bar): Ch 1, turn. Sc in first dtr, 3 sc in next ch-3 sp, sc in next dtr; repeat from * 2 more times, working the last sc in the top of the turning ch.
(4 + 9 = 13 sc)*
Fasten off. Checkpoint: the back section is 1.7 in (4.3 cm) tall and the whole body is 4.2 in (10.7 cm) wide.
The body now has 6 square windows along the bottom, 3 tall windows above them at the back, and a low, open-topped front section.
Runner (Color B, Gold)
Row 1: Ch 34. Sc in 2nd ch from hook and in each ch across. (33 sc)
Checkpoint: 5.5 in (14.0 cm).
Row 2 (scrolls and top edge): Turn. Work a Scroll Curl of ch 9 (3 sc in each of 8 ch = 24 sc), then sl st in st 1 of Row 1.
Sl st in sts 2–32. Work a second Scroll Curl of ch 9 (24 sc), then sl st in st 33.
(33 sl sts across + 2 curls of 24 sc each)
Fasten off, leaving a 6 in (15.2 cm) tail.
Pinch each curl so it coils upward and inward toward the middle of the runner.
Border (Color A, Burgundy)
Border gauge: same as the body, 6 sc = 1 in (2.5 cm).
For every edge, the corner groups are listed separately from the straight stretches. The center sc of each 3-sc group is the corner st, so nothing is counted twice.
Rnd 1 (RS): Join Color A with a sl st in st 14 of Row 3. This is the first front-section st next to the back post. Ch 1, then work:
- Front top: sc in sts 14–24 → 11 sc
- Front-top corner: 3 sc in st 25 → 3 sc
- Front edge: 3 sc down the side of the Row 2 tr post → 3 sc
- Front-bottom corner: 3 sc in foundation st 25 → 3 sc
- Bottom: sc into the underside of foundation sts 24–2 → 23 sc
- Back-bottom corner: 3 sc in foundation st 1 → 3 sc
- Back edge: 3 sc along Row 2, 1 sc in the end of Row 3, 4 sc along Row 4 → 8 sc
- Back-top corner: 3 sc in st 1 of Row 5 → 3 sc
- Back top: sc in sts 2–12 of Row 5 → 11 sc
- Inner top corner: 3 sc in st 13 of Row 5 → 3 sc
- Inner step: 4 sc down the side of the st-13 dtr post to Row 3 → 4 sc
Join with a sl st to the first sc. (75 sc)
Why the math works: The bottom edge is 23 sc plus the 2 corner center sts, which equals 25. That matches the 25 foundation sts exactly. Each 3-sc corner adds one extra st on each side of the body. So the outer width becomes 25 + 2 = 27 sts, and 27 ÷ 6 = 4.5 in (11.4 cm). The side counts match the row heights: about 1 sc per sc row, 3 sc per tr row and 4 sc per dtr row. That keeps the edges flat with no ruffling or cupping.
Rnd 2 (corded edge and curls): Do not turn. Sl st in each sc around, working fairly snugly so the edge rolls slightly and looks corded. Add the curls as you go:
– At the center sc of the back-top corner, work a Scroll Curl of ch 6 (3 sc in each of 5 ch = 15 sc), then sl st again in the same corner st.
– At the center sc of the front-top corner, work a Scroll Curl of ch 8 (3 sc in each of 7 ch = 21 sc), then sl st again in the same corner st.
Join with a sl st to the first sl st. (75 sl sts + 2 curls)
Fasten off and weave in the ends.
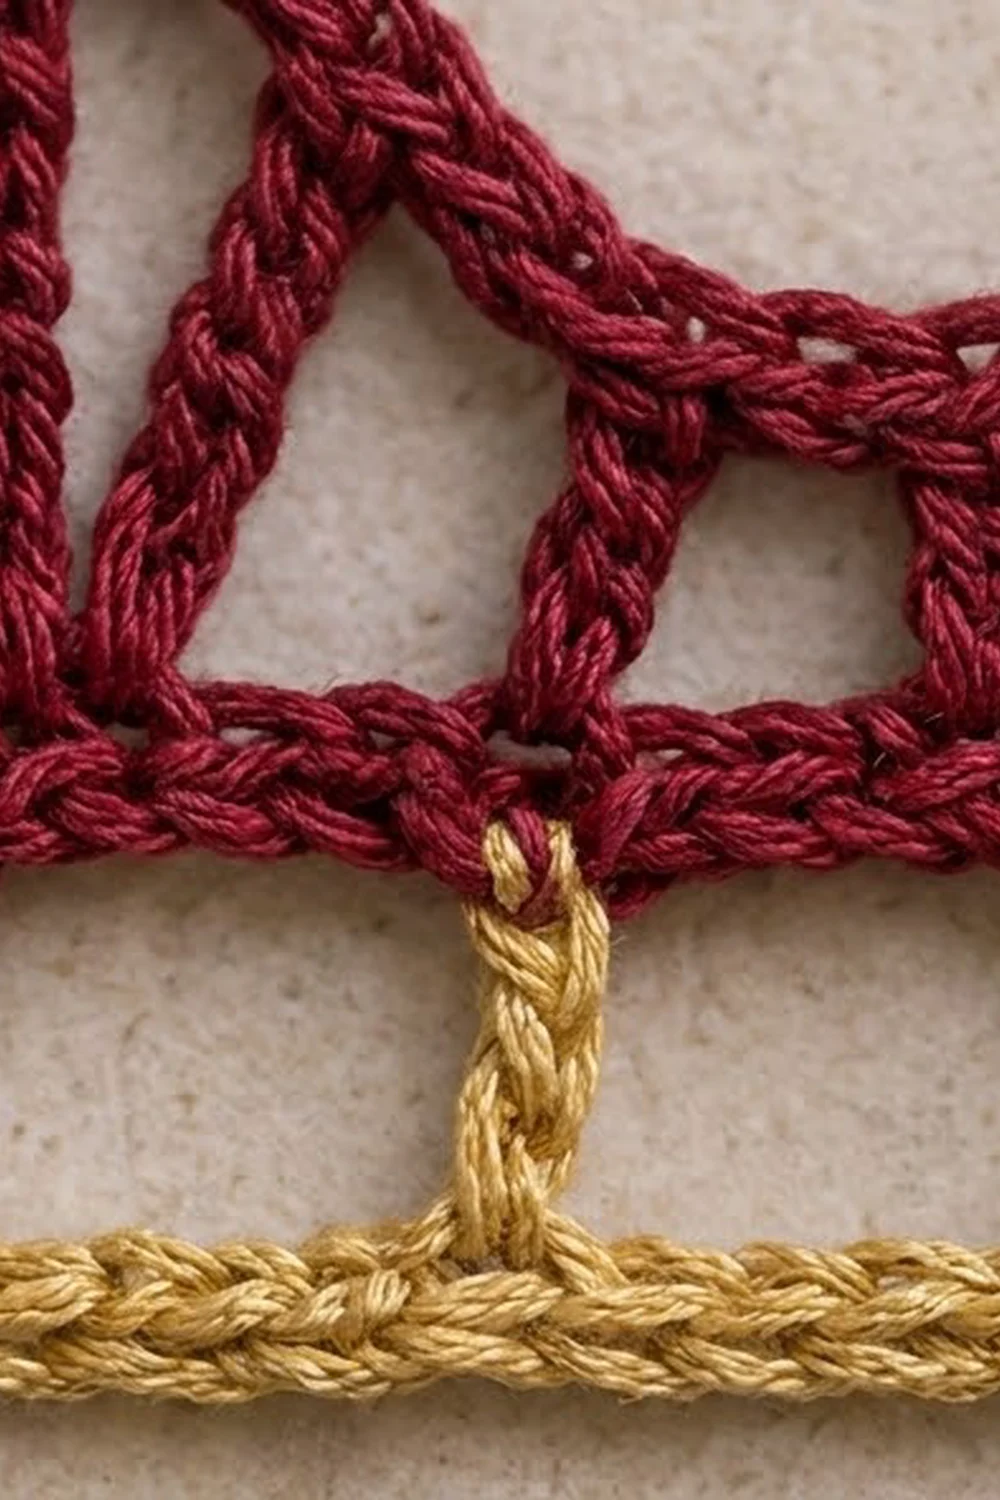
Attaching the runner (gold struts): Lay the body above the runner. Line up runner st 4 under the back-bottom corner center sc, and runner st 30 under the front-bottom corner center sc. Then make 3 struts:
- Join Color B with a sl st in runner st 9. Ch 3, then sl st into the Rnd 1 sc worked into foundation st 5. Sl st back down each of the 3 ch, and sl st in runner st 9 again. Fasten off.
- Repeat the same strut from runner st 17 to the border sc on foundation st 13.
- Repeat the same strut from runner st 25 to the border sc on foundation st 21.
Each strut lines up with a Row 2 tr post. They are 0.5 in (1.3 cm) long, so the runner hangs evenly below the body. The runner extends 0.5 in (1.3 cm) beyond the body at each end (3 sts), which leaves room for the scrolls.
Hanging loop: Thread the 8 in (20.3 cm) gold thread through the back-top border above st 7 of Row 5. Knot the ends together to make a loop.
Final Blocking
- Weave in all the tails before you block. Leave the hanging loop off for now if you plan to use stiffener.
- Mist the ornament until it is evenly damp, but not dripping.
- Lay it RS up on the blocking mat. Pin the runner straight at 5.5 in (14.0 cm).
- Pin the body square, 4.5 in (11.4 cm) wide at the bottom, with the back section standing straight at 2.0 in (5.1 cm).
- Open each window with a pin in every corner so the posts stand straight.
- Shape the curls: coil the runner scrolls upward, curl the back scroll toward the back, and curl the front scroll up and back over the front.
- If you want, brush on a light coat of stiffener. This helps a lot with the curls.
- Let it dry completely, then add the hanging loop.
Final Quality-Control Checklist
- Body is 4.5 in (11.4 cm) wide and runner is 5.5 in (14.0 cm) long
- Total height is 2.75 in (7.0 cm), including the back scroll
- 6 square windows at the bottom and 3 tall windows at the back
- All posts are vertical and the windows are even
- Border Rnd 1 has 75 sc, and the edges lie flat
- The front curl is larger than the back curl
- 3 struts line up with the posts at foundation sts 5, 13 and 21
- Runner scrolls are matched and coiled upward
- The ornament hangs level from its loop
Troubleshooting
The windows slant: You probably skipped the wrong number of sts. Recount: there are always 3 skipped sts between posts.
The border ruffles: You have too many side sts. Recheck the back edge (8 sc) and the front edge (3 sc).
The border pulls in: Your sl sts in Rnd 2 are too tight. Go up a hook size for that round only.
The curls won’t spiral: Make sure you work 3 sc in every chain. Stiffener also helps them hold their shape.
The runner is too short or too long: Rework it with a different hook size until 33 sc = 5.5 in (14.0 cm).
The ornament tilts when hung: Move the loop one st toward the heavier end.
Care
Hand wash gently in cool water, press out the moisture with a towel, and reshape and pin it flat to dry. Store it flat or hanging so the curls stay crisp.
Final Notes
Each stage of this sleigh builds on the one before. If your 25-st foundation measures 4.2 in (10.7 cm), the border brings it to 4.5 in (11.4 cm). That width fits evenly over a 33-st runner of 5.5 in (14.0 cm), so the three struts land right under the posts. The back stands 2.0 in (5.1 cm) tall, and with the struts, runner and back scroll the finished ornament is 2.75 in (7.0 cm) tall. If you check each measurement at its checkpoint, the finished sleigh will come out balanced and sit level on the tree.
Happy crocheting!