

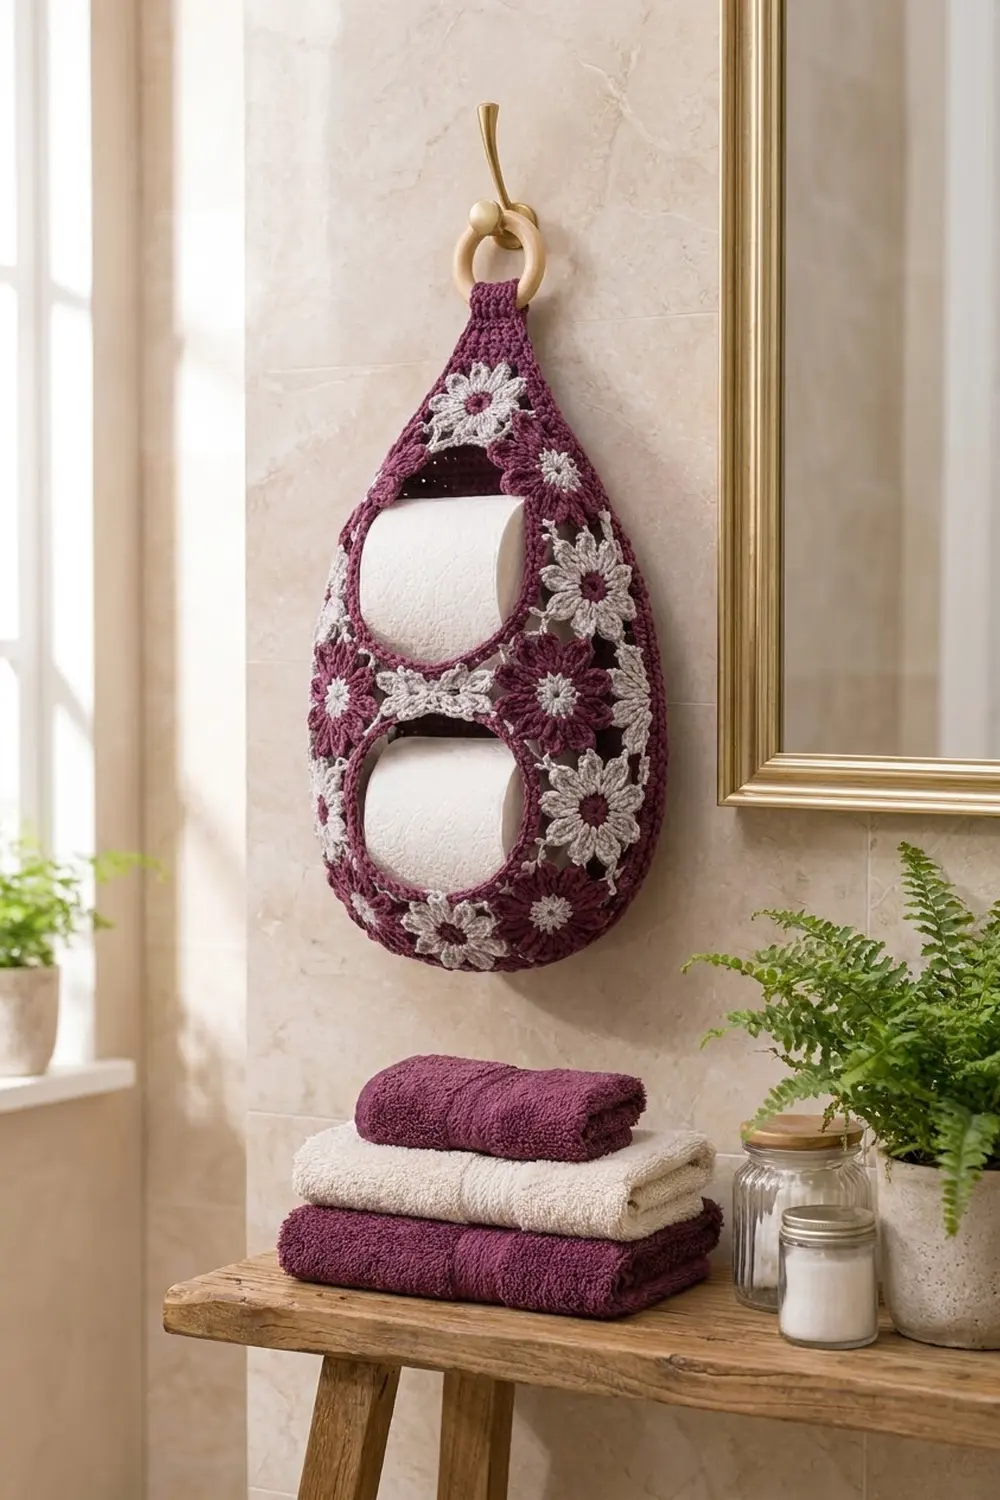
This hanging toilet paper holder is a teardrop-shaped wall pouch. The front is made of joined flower motifs, and the back is a solid panel. Two oval openings on the front hold two standard rolls stacked one above the other. The whole piece hangs from a short tab looped around a wooden ring.
The palette is deep plum with a soft light gray. Plum flowers have gray centers, gray flowers have plum centers, and a light gray lacy round links every motif. The back panel, side wall, top cap, and opening trims are solid plum, so the flowers really stand out.
This pattern uses US crochet terms. The finished holder measures 12.5 in (31.8 cm) wide and 22.5 in (57.2 cm) tall, with a side wall 2.25 in (5.7 cm) deep. The hanging loop adds height on top of that.
Here’s how it’s built. You make 11 flower motifs and join them as you go into a front panel with two empty cells for the openings. Then you work a plum border round, fill the shoulders and add a top cap, and crochet a side wall up from the border. Finally you crochet the wall to a solid back panel and sew on the hanging tab.
Finished Size and Construction
- Finished size: 12.5 in (31.8 cm) wide x 22.5 in (57.2 cm) tall x 2.25 in (5.7 cm) deep
- Skill level: Intermediate
- Terminology: US
- Yarn weight: Worsted (#4)
- Hook: 5 mm (H-8)
- Number of pieces: 13 (11 flower motifs, 1 back panel, 1 hanging tab)
- Layout: 3 columns x 5 rows. The top row has only a center motif, and the center cell in Rows 2 and 4 is left empty to form the openings.
- Motif size: 4 in (10.2 cm) flat side to flat side
- Front panel before border: 12 in (30.5 cm) wide x 20 in (50.8 cm) tall
- Border depth: Round 1 adds 0.25 in (0.6 cm) all around. The wall adds 2.25 in (5.7 cm) of depth.
Materials
Choose a worsted-weight cotton or cotton blend. It holds its shape better than acrylic and survives a humid bathroom. Amounts below assume about 180 m per 100 g.
- Plum (MC): 250 g / 450 m
- Light gray (CC): 80 g / 144 m
These quantities include a margin of roughly 15%.
Tools:
– 5 mm (H-8) hook
– Tapestry needle
– 10 locking stitch markers
– Wooden ring, 2 in (5.1 cm) inner diameter
– Scissors, rustproof pins, a blocking mat, and a spray bottle
Abbreviations (US Terms)
- ch – chain
- sl st – slip stitch
- sc – single crochet
- hdc – half double crochet
- dc – double crochet
- tr – treble crochet
- sc2tog / sc3tog – single crochet 2 / 3 together
- BLO – back loop only
- sp – space
- st(s) – stitch(es)
- RS / WS – right side / wrong side
Petal: (hdc, dc, 2 tr, dc, hdc) all in the same st.
Joining loop: ch 3, sl st into the center of the neighboring motif’s matching loop, ch 3. Each half of a joined loop is a ch-3 “half-loop.”
Gauge and Checkpoints
Fabric gauge: 14 sc and 16 rows = 4 in (10.2 cm), which works out to 3.5 sts per inch.
Before anything else, make one complete motif and a 4 in (10.2 cm) sc swatch. Check them at each stage:
- Motif after Rnd 3: 2.75 in (7.0 cm) across
- Motif after Rnd 4: 3.25 in (8.3 cm)
- Motif after Rnd 5: 4 in (10.2 cm) flat side to flat side
- Joined front: 12 in (30.5 cm) x 20 in (50.8 cm)
If the motif comes out bigger than 4 in (10.2 cm), go down half a hook size. If it’s smaller, go up half a size. Accurate openings matter here, because each opening needs to stretch around a roll.
Flower Motif
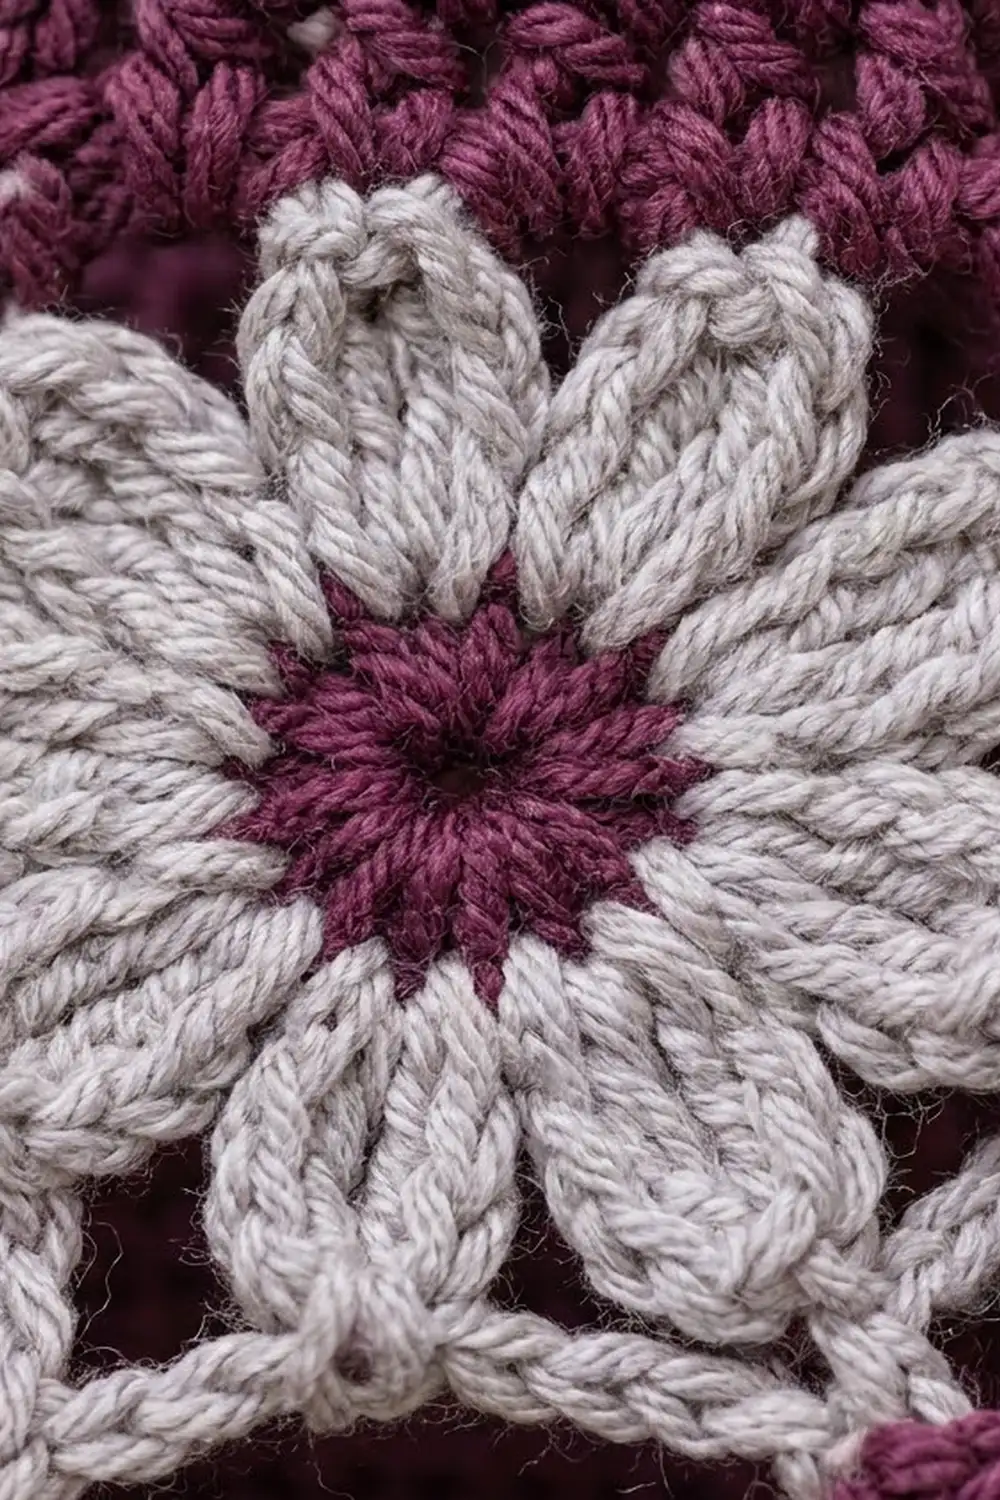
Make 6 plum flowers (gray center, plum petals) and 5 gray flowers (plum center, gray petals). Rnds 4 and 5 are always light gray.
Rnd 1 (center color): Magic ring, ch 1, 8 sc in ring, sl st to first sc. (8 sts)
Rnd 2: Ch 1, 2 sc in each st around, sl st to first sc. (16 sts) Fasten off.
Rnd 3 (petal color): Join with sl st in any st. Petal in next st, sl st in next st, repeat 8 times. The last sl st lands in the joining st. (8 petals, 8 sl sts) Fasten off.
Rnd 4 (gray): Join with sc between the 2 tr of any petal. Ch 3, tr in the next sl st between petals, ch 3, sc between the 2 tr of the next petal, repeat around. On the last repeat, replace the final sc with a sl st to the first sc. (8 sc, 8 tr, 16 ch-3 sps)
Rnd 5 (gray, loop round): Sl st in each of the next 3 ch and in the next tr. Sc in tr, ch 6, skip (ch-3, sc, ch-3), repeat around and sl st to the first sc. (8 sc, 8 ch-6 loops) Each loop arches over one petal.
On the first motif, fasten off now. On every later motif, work Rnd 5 using joining loops wherever a loop meets a motif that’s already done (see Joining below).
Hold each motif with one loop centered at the top. Going clockwise, its loops are T, TR, R, BR, B, BL, L, and TL. T, R, B, and L are the side loops, and the other four are corner loops.
Make All Pieces and Layout
| Col 1 | Col 2 | Col 3 | |
|---|---|---|---|
| Row 1 | empty | Gray | empty |
| Row 2 | Plum | OPENING | Plum |
| Row 3 | Gray | Plum | Gray |
| Row 4 | Plum | OPENING | Plum |
| Row 5 | Gray | Plum | Gray |
That’s 6 plum flowers and 5 gray flowers. Work the motifs in order, top row first and left to right within each row. You will also make 1 back panel and 1 hanging tab, both in plum.
Joining (Join-As-You-Go)
Side loops join only to side loops: R joins to the neighbor’s L, and B joins to the T of the motif below. Corner loops join at the grid points. Every motif that touches a grid point joins its corner loop there. If a joining sl st already exists at that point, sl st into that st instead of into a loop. Any loop that faces an empty cell or an opening stays free.
Here’s what that looks like in practice. The R2C1 motif joins only its TR to the top motif’s BL. R3C2 joins its L to R3C1 and its two top corners to the existing joins, while its T loop stays free below Opening 1.
Tension: Keep each ch-3 as long as the chains in your free loops. If you pull a join tight, the panel will buckle at the grid points.
Checkpoint: Lay the panel flat. It should measure 12 in (30.5 cm) across Rows 2–5 and 20 in (50.8 cm) from the top of the top motif to the bottom edge.
Back Panel
Use plum throughout.
Row 1: Ch 29, sc in the 2nd ch from the hook and in each ch across. (28)
Rows 2–8: Ch 1, turn, 2 sc in the first st, sc across to the last st, 2 sc in the last st. (30, 32, 34, 36, 38, 40, 42) Checkpoint: 12 in (30.5 cm) wide.
Rows 9–66: Ch 1, turn, sc across. (42) Checkpoint: 16.5 in (41.9 cm) tall.
Rows 67–84: Ch 1, turn, sc2tog, sc across to the last 2 sts, sc2tog. (40 in Row 67, ending with 6 in Row 84)
Rows 85–88: Ch 1, turn, sc across. (6) Checkpoint: 22 in (55.9 cm) tall.
Don’t fasten off. Go straight into the back edging in the Border section.
Hanging Tab
Row 1: With plum, ch 7, sc in the 2nd ch from the hook and in each ch across. (6)
Rows 2–20: Ch 1, turn, sc across. (6)
The tab measures 1.7 in (4.3 cm) x 5 in (12.7 cm). Fasten off and leave a long tail for sewing.
Border
The border gauge is the same as the fabric gauge, 3.5 sts per inch. Each straight motif side gets 4 + 6 + 4 = 14 sts over 4 in (10.2 cm), which is exactly 3.5 sts per inch. That’s why the edge lies flat with no ruffling and no pulling in.
Front Rnd 1 (plum)
With the RS facing, work 6 sc in each free loop and 4 sc in each ch-3 half-loop that lies on the outer edge. Work nothing at the join sl sts. (212 sts)
Here’s how that total breaks down:
– Top motif: 38
– R2C1 and R2C3: 26 each
– R3 and R4 side motifs: 14 each
– R5C1 and R5C3: 26 each
– R5C2: 14
Shoulder Wedges (plum, make 2)
Each shoulder is the notch where the top motif meets R2C1 or R2C3. It covers 20 Rnd 1 sts: the top motif’s side loop (6) and its corner half (4), then the R2 motif’s corner half (4) and its T loop (6).
- Row 1: Sc 9, sc2tog, sc 9. (19)
- Rows 2–9: Ch 1, turn, sc to the center 3 sts, sc3tog, sc to the end. (17, 15, 13, 11, 9, 7, 5, 3)
- Row 10: Ch 1, turn, sc3tog. (1) Fasten off.
The rows shrink into the notch and turn it into a smooth diagonal shoulder.
Top Cap (plum)
Work over the 18 Rnd 1 sts on the top motif’s TL, T, and TR loops.
- Row 1: Sc across. (18)
- Rows 2–7: Ch 1, turn, sc2tog, sc across to the last 2 sts, sc2tog. (16, 14, 12, 10, 8, 6) Fasten off.
Front Rnd 2 (plum, BLO)
This is a conversion round: 1 sc in BLO of each remaining Rnd 1 st and each st of the cap top, plus 1 sc in each row end and in the top st of each wedge. (216 sts)
Place markers between these sections as you go:
– Cap top: 6
– Cap right edge: 7
– Right wedge: 21 (10 row ends + 1 top st + 10 row ends)
– Right side: 54
– Bottom: 46
– Left side: 54
– Left wedge: 21
– Cap left edge: 7
Working in BLO folds the stitches forward and starts the side wall.
Wall Rnds 3–10
Sc in each st around. (216 per round) The wall should measure 2.25 in (5.7 cm) deep. Fasten off.
Opening Trims (plum, each opening)
Rnd 1: Work 7 sc in each of the 4 side loops that face the opening, and 2 sc in each of the 2 half-loops facing it at each corner. (4 x 7 + 4 x 4 = 44)
Rnd 2: Sc around and sl st to join. (44)
The opening should measure about 4 in (10.2 cm) across and stretch to 4.5 in (11.4 cm).
Back Edging (plum)
Continue from Row 88. Section totals must match Front Rnd 2:
- Top: 6 sc across Row 88.
- Taper (each side): 28 sc. Work 1 sc in each of the 4 row ends of Rows 85–88, then 24 sc over the 18 taper row ends: 1 sc in each, plus a 2nd sc in every 3rd row end.
- Sides (each): 54 sc over the 58 row ends of Rows 9–66. Skip 1 row end about every 14 rows.
- Bottom: 46 sc. Work 9 sc over the 8 curve row ends, 28 sc across the foundation, and 9 sc over the other curve.
Total: 6 + 28 + 54 + 46 + 54 + 28 = 216. The shape is symmetrical, so you can mark it the same way as the front.
Assembly Round
Place the back panel behind the wall, WS together, matching the section markers. With plum, sc through both layers. (216) Fasten off.
Thread the tab through the ring and fold it in half. Lay one end over the front cap and the other end against the top of the back panel, overlapping each by 1 in (2.5 cm), then whipstitch it in place. That leaves 1.5 in (3.8 cm) of free loop on each side.
Final Blocking
- Mist the whole holder until it’s damp, not soaked.
- Pin the back panel flat to 12.5 in (31.8 cm) x 22.5 in (57.2 cm).
- Stuff the pouch with folded towels so the wall stands at 2.25 in (5.7 cm).
- Pin out each petal tip and open up the gray loops.
- Ease each opening round to 4 in (10.2 cm).
- Let it dry completely, about 24 hours.
Final Quality-Control Checklist
- 11 motifs, colors placed as shown in the grid
- Every joining loop is secure, and no grid point is left unjoined
- Front Rnd 1 has 212 sts, and Rnd 2 and the wall have 216
- Back edging has 216 sts, matched section by section
- Openings have 44 sts each and fit a roll
- The tab is sewn through both layers
- All ends are woven in
Troubleshooting
- Front ruffles: Your Rnd 1 tension is loose. Work it with a hook half a size smaller.
- Front cups or pulls in: Lengthen your joining chains, or make sure you aren’t skipping half-loops in Rnd 1.
- Back panel is shorter than the front: Check your row gauge. Add 1–2 straight rows within Rows 9–66, then skip 1 more row end per side in the edging so each side still has 54 sts.
- Section counts don’t match: Move the markers before you add stitches. Spread the difference within a single section.
- Rolls won’t fit: Rework the opening trim with 8 sc per side loop (48 sts).
- Holder sags: Use cotton yarn, and keep your wall stitches firm.
Care
Hand wash in cool water and lay flat to dry, reshaping the openings while the holder is still damp. Don’t wring it.
Final Notes
Here’s the full measurement chain:
– 4 in (10.2 cm) motifs join into a 12 in (30.5 cm) x 20 in (50.8 cm) front.
– Front Rnd 1 gives 212 sts at 14 sts per motif side.
– The wedges and cap bring the count to 216 sts.
– The wall is 2.25 in (5.7 cm) deep.
– The back panel is 216 sts around at 12.5 in (31.8 cm) x 22.5 in (57.2 cm).
If every checkpoint matches, the pieces line up stitch for stitch.
Happy crocheting!