

This holder gives a plain kitchen wall some cottage charm. A row of three daisy granny squares sits across the top. Two crocheted straps hang from it and hold two wooden dowels: the upper one for a paper towel roll and the lower one for a dish towel.
The palette is warm and simple. The background, border, and straps are rust. The petals are creamy white and the flower centers are mustard gold. The petals are puffy clusters, so each daisy stands slightly raised from the square around it.
This pattern uses US crochet terms. The finished top panel measures 16 in wide x 6 in tall (40.6 x 15.2 cm). Each strap is about 13 in long x 1.25 in wide (33.0 x 3.2 cm) before you fold it.
To build it, you crochet three squares, slip-stitch them into a row, and add a two-round border with hanging loops. Then you make two straps, sew them to the back of the panel, and fold each one into two dowel loops.
Finished Size and Construction
- Finished panel size: 16 x 6 in (40.6 x 15.2 cm)
- Skill level: Easy-intermediate
- Terminology: US crochet terms
- Yarn weight: Worsted (#4), cotton or cotton blend
- Hook: 5.0 mm (H-8)
- Number of pieces: 5 (3 daisy squares, 2 straps)
- Layout: 3 squares in 1 row (3 x 1)
- Size of one square: 5 x 5 in (12.7 x 12.7 cm)
- Panel size before border: 15 x 5 in (38.1 x 12.7 cm)
- Border depth: 0.5 in (1.3 cm) on each side
Materials
Use a smooth worsted-weight cotton. Cotton keeps the stitches crisp and holds its shape when the straps carry weight. Avoid fuzzy or very stretchy acrylic, because the loaded straps may sag over time.
- Rust: 80 g / about 130 m
- Cream: 20 g / about 32 m
- Mustard gold: 6 g / about 10 m
All quantities include a margin of about 20 percent for swatching and weaving in ends.
Tools:
– 5.0 mm (H-8) crochet hook
– Tapestry needle
– 4 locking stitch markers
– Two wooden dowels, 0.75 in (1.9 cm) in diameter and 18 in (45.7 cm) long
– Two wall pegs or hooks
– Tape measure, scissors, and blocking pins
Abbreviations (US Terms)
- ch – chain
- sl st – slip stitch
- sc – single crochet
- hdc – half double crochet
- dc – double crochet
- sp – space
- st(s) – stitch(es)
- rep – repeat
- 3-dc cl (3-double-crochet cluster): *Yarn over, insert the hook in the indicated st, yarn over and pull up a loop, yarn over and pull through 2 loops; rep from * 2 more times (4 loops on hook). Yarn over and pull through all 4 loops.
- Petal: Working all in the same st: ch 3, 3-dc cl, ch 3, sl st.
Gauge and Checkpoints
Make one complete square before you commit to the full project. Gauge matters here because the dowels have to fit through the strap loops and the roll has to fit between the straps.
Gauge: one finished square (Rounds 1–6) measures 5 x 5 in (12.7 x 12.7 cm). That works out to 19 sc across one side, or about 3.8 sts per inch.
Measure the square at each stage:
– After Round 2 (flower): about 3 in (7.6 cm) across
– After Round 4: about 3.75 in (9.5 cm) square
– After Round 5: about 4.5 in (11.4 cm) square
– After Round 6: 5 in (12.7 cm) square
If your square is too big, go down a hook size, to 4.5 mm (7). If it is too small, go up to 5.5 mm (I-9). Do not change the stitch counts, because the border math depends on them.
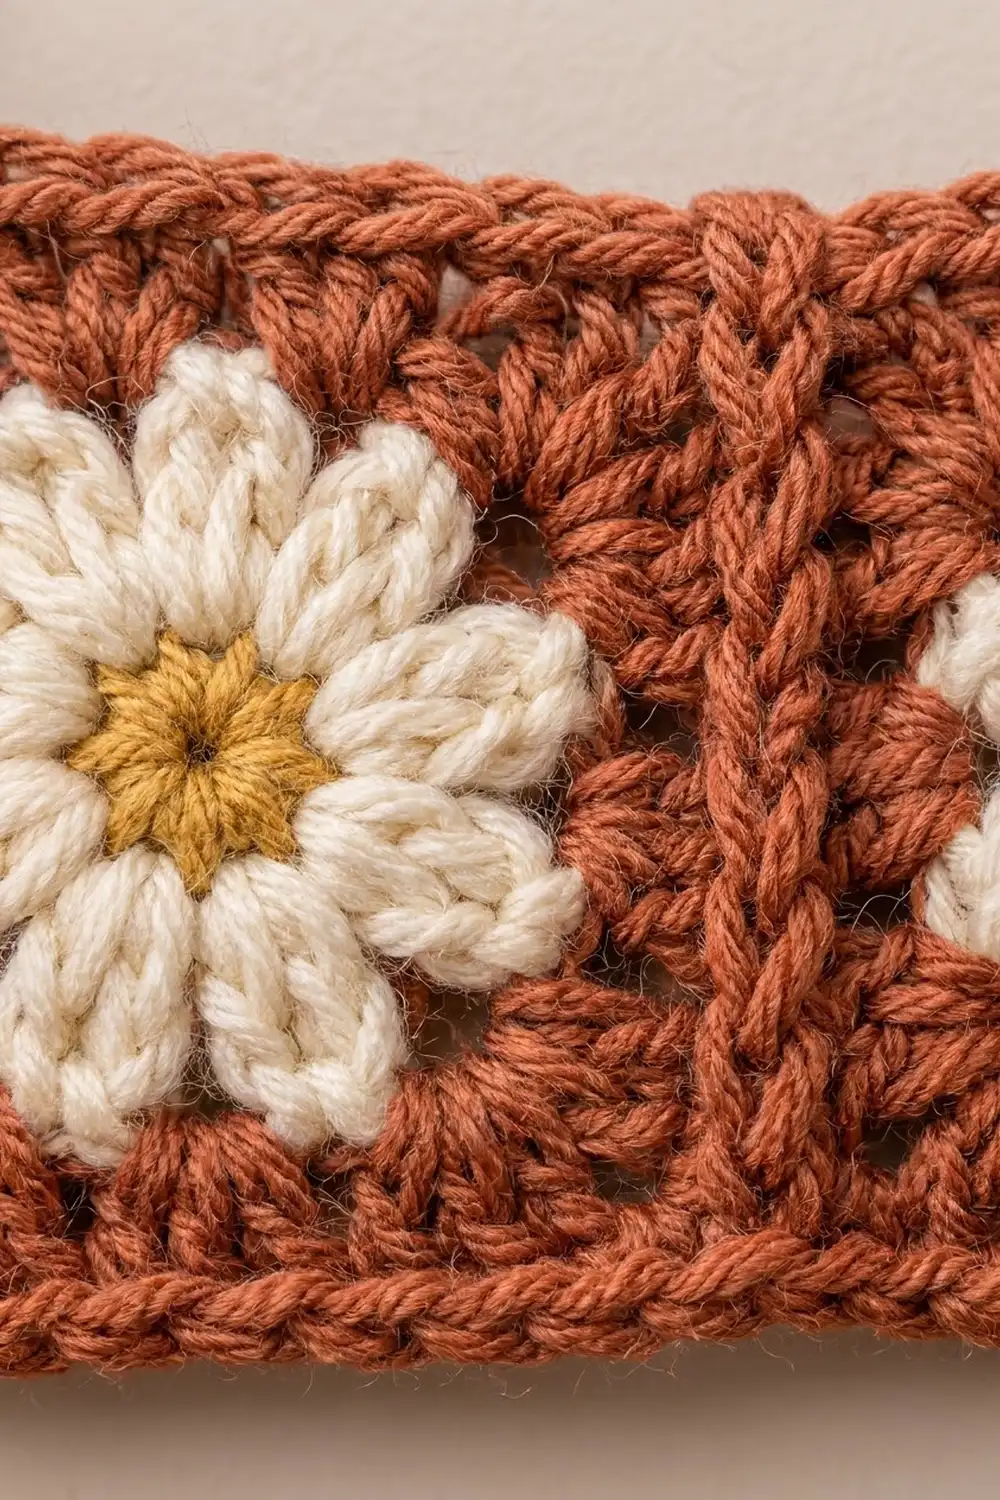
Daisy Square (Make 3)
Round 1 (mustard gold): Make a magic ring. Ch 1, then work 8 sc into the ring. Sl st to the first sc. Pull the ring closed and fasten off. (8 sc)
Round 2 (cream): Join cream with a sl st in any sc. Work 1 Petal in the current sc, then sl st in the next sc; rep from * 7 more times. The final sl st lands in the joining st. Fasten off. (8 petals)*
Each petal sits in its own sc. The ch-3 on either side of the cluster stretches the petal into a long oval.
Round 3 (rust): Join rust with a sc in the top of any petal cluster. Ch 4, sc in the top of the next cluster; rep from * 6 more times. Ch 4, then sl st to the first sc. (8 sc, 8 ch-4 sps)*
Keep the ch-4s relaxed so the petals lie flat and do not cup.
Round 4: Sl st into the next ch-4 sp. Ch 3 (counts as dc), then work (2 dc, ch 2, 3 dc) in the same sp to make the first corner.
Dc in the next sc, 3 dc in the next ch-4 sp, dc in the next sc, (3 dc, ch 2, 3 dc) in the next ch-4 sp; rep from * 2 more times.
Dc in the next sc, 3 dc in the next ch-4 sp, dc in the next sc, then sl st to the top of the beginning ch-3. (44 dc: 11 dc per side, plus 4 corner ch-2 sps)*
To check one side: 3 + 1 + 3 + 1 + 3 = 11 dc between corner spaces. This round turns the circle into a square.
Round 5: Sl st in the next 2 dc and into the corner ch-2 sp. Ch 3 (counts as dc), then work (dc, ch 2, 2 dc) in the same sp.
Dc in each of the next 11 dc, (2 dc, ch 2, 2 dc) in the next ch-2 sp; rep from * 2 more times.
Dc in each of the last 11 dc, then sl st to the top of the beginning ch-3. (60 dc: 15 dc per side, plus 4 corner ch-2 sps)*
The count per side is 2 + 11 + 2 = 15. This is a growth round: 44 dc from the last round plus 16 new corner dc makes 60.
Round 6: Sl st in the next dc and into the corner ch-2 sp. Ch 1, then work 3 sc in the same sp.
Sc in each of the next 15 dc, 3 sc in the next ch-2 sp; rep from * 2 more times.
Sc in each of the last 15 dc, then sl st to the first sc. Fasten off. (72 sc)*
Count this round as a trim round: 60 sc worked one per dc, plus 12 sc worked in the corners, makes 72.
Stitches per side: In each 3-sc corner, the middle stitch is the corner stitch. Counted from corner stitch to corner stitch, both included, each side has 1 + 1 + 15 + 1 + 1 = 19 sts. To check: 4 sides x 19 sts, minus the 4 corner stitches that were counted twice, = 72.
Measure the square now. It should be 5 x 5 in (12.7 x 12.7 cm).
Straps (Make 2)
Foundation: With rust, ch 51.
Row 1: Dc in the 4th ch from the hook and in each ch across. The 3 skipped chains count as the first dc. Turn. (49 dc)
Row 2: Ch 1, then sc in each st across. Turn. (49 sc)
Row 3: Ch 3 (counts as dc), then dc in each st across. (49 dc)
Fasten off, leaving a 24 in (61.0 cm) tail for sewing.
Checkpoint: Each strap should measure about 13 in long x 1.25 in wide (33.0 x 3.2 cm). The sc row in the middle firms up the strip so it stretches less under load.
Make All Pieces
- Squares: 3. Each uses gold for Round 1, cream for Round 2, and rust for Rounds 3–6.
- Straps: 2, all rust.
Layout, seen from the front:
[ Daisy ] [ Daisy ] [ Daisy ]
   |                     |
 strap                 strap
Joining
Method: Slip-stitch join worked from the right side. This makes the raised ridge you see between the daisies.
- Place two squares with their wrong sides together and the right sides facing out. Line up the edges stitch for stitch.
- Join rust in the corner stitch at one end of the edge, working through both squares.
- Sl st through both loops of both squares in each stitch along the edge, so that each stitch on one square matches one stitch on the other. You will work 19 sl sts, from corner stitch to corner stitch. Fasten off.
- Join the third square to the free side of the middle square the same way.
Tension: Keep the slip stitches about as loose as your sc. If they are too tight, the seam will pucker and pull the panel shorter. If needed, go up one hook size for the seams only.
Size checkpoint: The joined panel should measure 15 x 5 in (38.1 x 12.7 cm).
Border
Border gauge: Same as the squares, about 3.8 sts per inch. You work one border stitch into each edge stitch. Because the edge stitches are already at gauge, the border lies flat without ruffling or cupping.
Starting counts:
– Long sides: 3 squares x 19 sts = 57 sts. At each seam, the corner stitches of both neighboring squares each get their own border stitch, and no extra stitches are added.
– Short sides: 1 square x 19 sts = 19 sts.
– Total edge stitches: (2 x 57) + (2 x 19) − 4 shared outer corners = 148 sts.
Border Round 1 (rust): Join with a sc in the top-right outer corner stitch, then work 2 more sc in that same stitch.
Sc in each stitch around. Work 3 sc in each of the other 3 outer corner stitches. Sl st to the first sc.
(148 sts worked 1 per stitch + 8 extra corner sts = 156 sc)
Per side, including the corner stitches: long sides 59, short sides 21. To check: (2 x 59) + (2 x 21) − 4 = 156.
Border Round 2: Sl st into the middle sc of the corner. Ch 2 (does not count), then work 3 hdc in the same stitch.
Hdc in each stitch around, working 3 hdc in the middle sc of each corner. Sl st to the first hdc.
(156 sts worked 1 per stitch + 8 extra corner sts = 164 hdc)
Per side, including the corner stitches: long sides 61, short sides 23. To check: (2 x 61) + (2 x 23) − 4 = 164. Do not fasten off yet.
Why the math works: At 3.8 sts per inch, 61 sts comes to 16 in (40.6 cm) and 23 sts comes to 6 in (15.2 cm). These match the planned finished size. The 3-stitch corners add exactly enough to turn each corner without cupping.
Hanging loops: Sl st along to the top-left corner hdc. Ch 10, sl st in the same stitch, ch 1, and work 14 sc over the ch-10 loop. Sl st to the base and fasten off. Repeat at the top-right corner.
Attaching the Straps and Dowels
Lay the panel face down. Put a marker in each strap at these stitches, counted from the end you plan to sew to the panel:
- Sts 1–6: overlap behind the panel, about 1.5 in (3.8 cm)
- Sts 7–15: drop, about 2.4 in (6.1 cm)
- Sts 16–25: upper loop, about 2.6 in (6.6 cm)
- Sts 26–38: middle drop, about 3.4 in (8.6 cm)
- Sts 39–47: lower loop, about 2.4 in (6.1 cm)
-
Sts 48–49: tail, about 0.5 in (1.3 cm)
-
Attach each strap. Line up the outer edge of the strap with the outer edge of the panel. Overlap sts 1–6 on the back of the bottom border and whipstitch all four sides through the back loops only, so the stitching does not show on the front.
- Make the upper loop. Fold sts 16–25 back so that st 16 meets st 25 behind the strap. Whipstitch across the full width.
- Make the lower loop. Fold sts 39–49 to the back. Sew the tail (sts 48–49) flat against the back of sts 37–38.
- Add the dowels. Slide the first dowel through both upper loops and the second dowel through both lower loops. The upper dowel sits about 2.8 in (7.1 cm) below the panel and the lower dowel about 7 in (17.8 cm) below it. That leaves room for a roll up to about 5.5 in (14.0 cm) across.
Final Blocking
- Before adding the dowels, wet the panel and straps, or steam them lightly.
- Pin the panel to 16 x 6 in (40.6 x 15.2 cm) on a blocking mat, keeping the edges straight.
- Pin each strap straight to 13 x 1.25 in (33.0 x 3.2 cm).
- Gently fluff the petals so they look rounded and even.
- Let everything dry completely. Then attach the straps and insert the dowels.
Final Quality-Control Checklist
- Each square has 72 sts in Round 6, with 19 sts per side.
- Each joining seam has 19 slip stitches, and the ridge looks even on the front.
- Border Round 1 has 156 sts, and Border Round 2 has 164 sts.
- The panel measures 16 x 6 in (40.6 x 15.2 cm).
- Both straps are the same length, and the loops sit at the same height.
- Both dowels sit level, and the roll turns freely.
- All ends are woven in securely on the back.
Troubleshooting
- Petals curl forward: Your Round 3 chains are too tight. Redo the round with looser ch-4s.
- The square ruffles at Round 5: Check that each side has exactly 11 dc before the corners.
- The square cups: You may have skipped a corner ch-2. Recount Round 4.
- The seam puckers: Rework it with a larger hook.
- The border waves: You have added extra stitches. Recount to 156 and 164.
- The straps stretch over time: Use 100 percent cotton, or work the straps with a hook one size smaller.
- The dowels won’t fit through the loops: Enlarge the loop by 1 stitch, and remove 1 stitch from the drop section next to it.
Care
Hand-wash in cool water, press out the excess water in a towel, and dry flat. Take out the dowels before washing.

Final Notes
Here is the full measurement chain. One 5 in (12.7 cm) square with 19 sts per side makes a 15 x 5 in (38.1 x 12.7 cm) panel of three squares. The two-round border brings it to 16 x 6 in (40.6 x 15.2 cm). Two 13 in (33.0 cm) straps then fold into four dowel loops. If each square reaches its target size, every later step will fit.
Happy crocheting!