

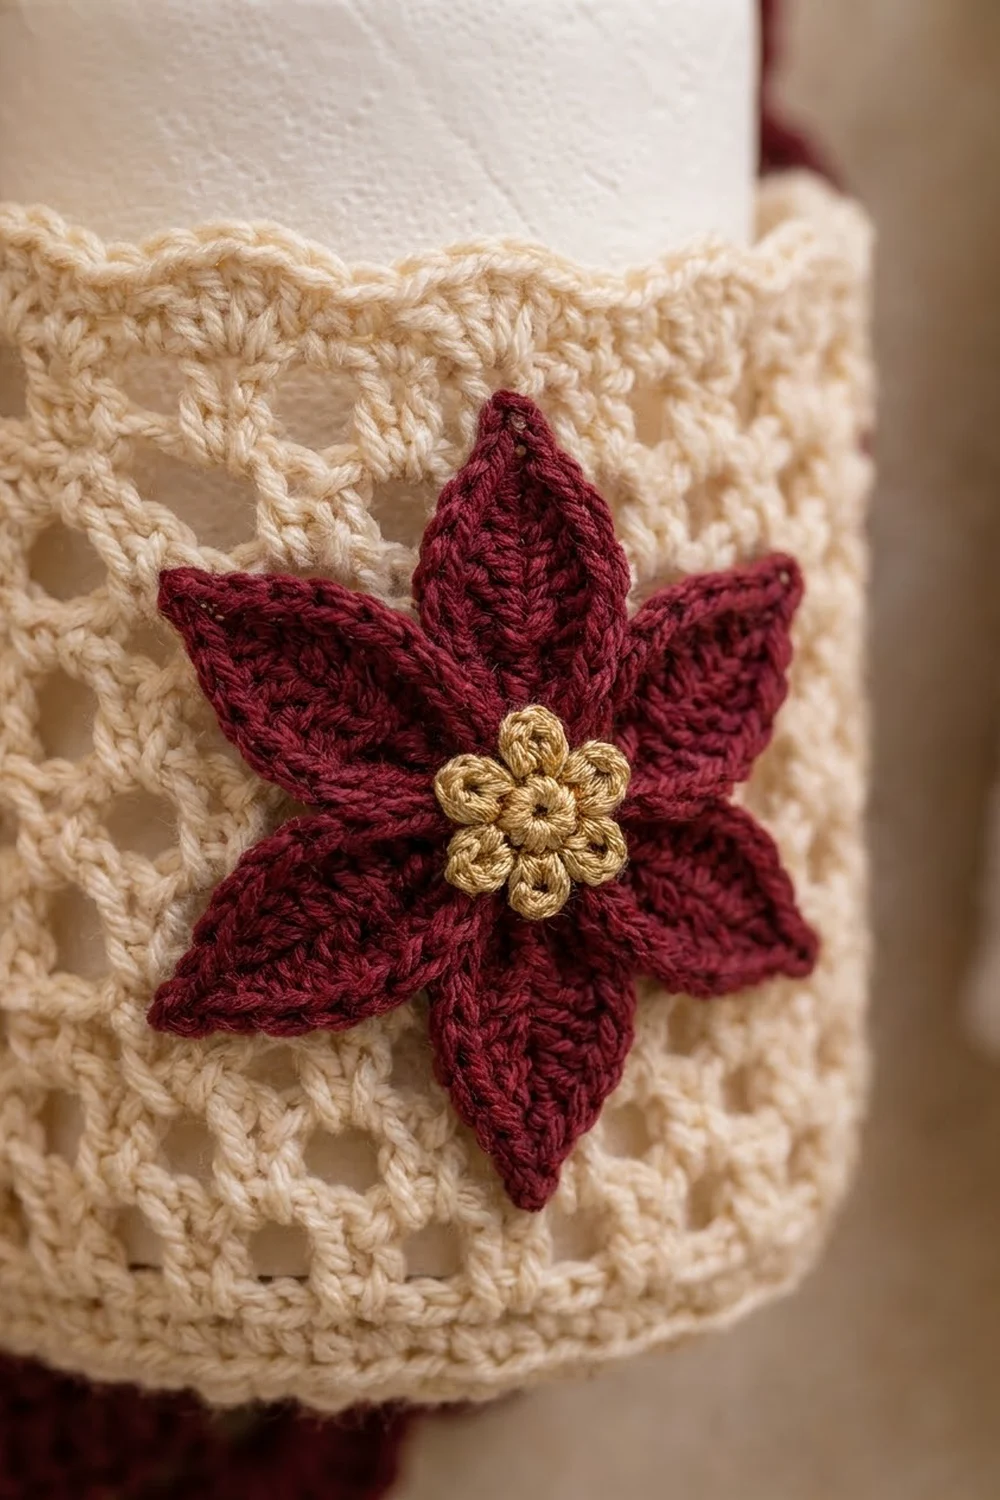
This hanging toilet paper holder brings holiday color to a small bathroom. A round burgundy panel with a scalloped edge holds two cream mesh pockets, and each pocket is topped with a poinsettia in deep burgundy with a small gold flower center.
The look is classic Christmas: wine red, warm ivory and a touch of antique gold. The burgundy backing is a solid circle edged with an eyelet ring and shells. The pockets use an open, staggered mesh that lets the roll show through, and the poinsettias add the texture.
The pattern is written in US crochet terms. The finished panel measures about 13.5 in (34.3 cm) across. With the hanging tab, the holder is about 16 in (40.6 cm) tall, not counting the ring.
Construction is simple. You crochet the panel in joined rounds, add the eyelet and scallop border, then work the tapered tab in rows straight off the top edge. The two cups are worked in rounds from the base up. The poinsettias and their centers are small appliqués. Everything is sewn together at the end.
Finished Size and Construction
- Finished panel: 13.5 in (34.3 cm) diameter, scallop tip to scallop tip
- Overall height: about 16 in (40.6 cm), excluding the ring
- Skill level: Intermediate
- Terminology: US
- Yarn weight: Worsted (#4)
- Hook: 5.0 mm (H-8)
- Number of pieces: 7 (1 panel with tab, 2 cups, 2 poinsettias, 2 flower centers)
- Layout: two cups side by side, centered across the lower half of the panel
- Cup size: 4.75 in (12.1 cm) diameter, 3.75 in (9.5 cm) tall
- Panel size before border: 10 in (25.4 cm) diameter after Round 10
- Border depth: about 1.75 in (4.4 cm) per side (eyelet section 1 in / 2.5 cm, plus scallops 0.75 in / 1.9 cm)
Materials
Use a smooth worsted-weight cotton or cotton blend. Cotton holds its shape better than acrylic when it carries the weight of two rolls, and it handles bathroom humidity well.
- Burgundy: 120 g, about 240 m (panel, tab and poinsettias)
- Cream: 70 g, about 140 m (two cups)
- Gold or tan: 5 g, about 10 m (flower centers)
These quantities include a margin of about 15%.
Tools:
– 5.0 mm (H-8) crochet hook
– Yarn needle
– 6 locking stitch markers
– One wooden ring, 2.75 in (7.0 cm) outer diameter
– Scissors, rust-proof pins and a measuring tape
Abbreviations (US Terms)
- ch: chain
- sl st: slip stitch
- sc: single crochet
- hdc: half double crochet
- dc: double crochet
- dc2tog: double crochet 2 together
- BLO: back loop only
- sp(s): space(s)
- st(s): stitch(es)
- RS: right side
Scallop: Skip 2 sts, work 7 dc in the next st, then skip 2 sts. Each scallop uses 6 sts once you include the sc that sits between scallops.
Vein slip stitch: With the yarn held behind the work, insert the hook between the two halves of the petal, along the center chain. Pull up a loop and draw it through the loop on the hook. This leaves a raised line on the RS.
Gauge and Checkpoints
Gauge: 14 dc and 8 rows = 4 in (10.2 cm). Each round of dc adds about 0.5 in (1.3 cm) to the radius, or 1 in (2.5 cm) to the diameter.
Make one cup first. It is the quickest gauge test, and it has to fit a standard 4.5 in (11.4 cm) roll.
Checkpoints:
– Cup base, Round 4: 4.25 in (10.8 cm)
– Cup base, Round 5: 4.75 in (12.1 cm)
– Finished cup: 3.75 in (9.5 cm) tall
– Panel, Round 4: 4.25 in (10.8 cm)
– Panel, Round 10: 10 in (25.4 cm)
– Panel, Round 12: 12 in (30.5 cm)
– Panel, Round 13: 13.5 in (34.3 cm)
– Poinsettia: 3.5 in (8.9 cm) tip to tip
If a piece is more than 0.25 in (0.6 cm) too big, go down one hook size. If it is too small, go up one hook size. If the panel ruffles, your stitches are too loose for the increases, so go down a hook size. If the panel cups, go up a hook size.
Cup (Make 2, Cream)
Base
Round 1: Make a magic ring. Ch 3 (counts as dc), then work 11 dc in the ring. Sl st to the top of the ch-3. (12 sts)
Round 2: Ch 3, dc in the same st, then 2 dc in each st around. Sl st to join. (24 sts)
Round 3: Ch 3, 2 dc in the next st, then dc in the next st, 2 dc in the next st around. Join. (36 sts)
Round 4: Ch 3, dc in the next st, 2 dc in the next st, then dc in the next 2 sts, 2 dc in the next st around. Join. (48 sts) The base should measure 4.25 in (10.8 cm).
Round 5: Ch 1, then sc in the next 11 sts, 2 sc in the next st 4 times. Join. (52 sts) The base should measure 4.75 in (12.1 cm).
Wall
Round 6: Ch 1, then sc BLO in each st around. Join. (52 sts) Working in the back loops makes the wall turn upward.
Round 7 (mesh A): Ch 4 (counts as dc + ch 1) and skip the next st. Then dc in the next st, ch 1, skip the next st 25 times. Sl st to the 3rd ch of the starting ch-4. (26 dc, 26 ch-1 sps)
Round 8 (mesh B): Sl st into the first ch-1 sp. Ch 4 (counts as dc + ch 1), then dc in the next ch-1 sp, ch 1 25 times. Join to the 3rd ch. (26 dc, 26 ch-1 sps) Each new dc sits above a space, which staggers the holes into a honeycomb.
Rounds 9–12: Repeat Round 8. (26 dc, 26 ch-1 sps in each round)
Round 13: Ch 1, then sc in each dc and each ch-1 sp around. Join. (52 sts)
Round 14: Ch 1, sc in each st around. Join. (52 sts)
Fasten off and weave in the ends. The cup should be 3.75 in (9.5 cm) tall: Round 6 adds 0.25 in, the mesh adds 3 in and the rim adds 0.5 in. Test it with a roll now.
Poinsettia (Make 2, Burgundy)
Round 1: Make a magic ring and work 10 sc in it. Sl st to the first sc. (10 sts)
Round 2 (petals): Sl st in the first sc. Then repeat the following 5 times:
- Ch 7.
- Working back along the chain from the 2nd ch from the hook: sl st, sc, hdc, dc, hdc, sc. (6 sts)
- Rotate the piece. Working in the free loops on the other side of the same chain, from the base out: sc, hdc, dc, hdc, sc, sl st. (6 sts)
- Ch 2 and sl st in the tip ch to form the point.
- Work 6 vein slip stitches down the center, back to the base.
- Sl st in the next 2 sc of the ring.
You now have 5 petals, each anchored on every other ring st. Fasten off, leaving a 12 in (30.5 cm) tail. The flower should measure 3.5 in (8.9 cm) tip to tip.
Flower Center (Make 2, Gold)
Round 1: Make a magic ring and work 6 sc in it. Join. (6 sts)
Round 2: (Sl st, ch 1, hdc, ch 1, sl st) in the next st 6 times. (6 small petals)
Fasten off, leaving an 8 in (20.3 cm) tail. The center should measure 0.75 in (1.9 cm).
Backing Panel (Burgundy)
Work Rounds 1–4 exactly as Cup Rounds 1–4. (48 sts, 4.25 in / 10.8 cm)
Round 5: Ch 3, dc in the next 2 sts, 2 dc in the next st, then dc in the next 3 sts, 2 dc in the next st around. Join. (60 sts)
Round 6: Increase every 5th st. (72 sts)
Round 7: Increase every 6th st. (84 sts)
Round 8: Increase every 7th st. (96 sts)
Round 9: Increase every 8th st. (108 sts)
Round 10: Increase every 9th st. (120 sts)
Each of these rounds is a complete round of 12 increases, so add 12 sts to the previous count. After Round 10 the panel measures 10 in (25.4 cm). Do not fasten off.
Border
The border uses the same gauge, 14 dc = 4 in (10.2 cm). Because the panel is a circle, the counts below are given per quarter. A quarter is 30 sts at Round 10.
Round 11 (eyelets): Ch 3, then dc in the next 3 sts, ch 2 and skip the next st. Then dc in the next 4 sts, ch 2, skip the next st around. Join. (96 dc + 24 ch-2 sps; per quarter, 24 dc + 6 ch-2 sps)
Round 12: Ch 3, dc in the next 3 dc, 2 dc in the ch-2 sp. Then dc in the next 4 dc, 2 dc in the ch-2 sp around. Join. This round has 96 sts worked one per existing dc, plus 48 sts worked into the spaces, for 144 sts (36 per quarter). The panel now measures 12 in (30.5 cm). Fasten off.
Mark the tab: Lay the panel flat and find the top center. Mark the 12 sts centered there: 6 on each side of the center line.
Round 13 (scallops): With the RS facing, join burgundy in the first st after the marked block. Sc in the next st, work a scallop 22 times. You will end exactly at the first marked st. Sc in each of the 12 marked sts, then sl st to the first sc. (22 scallops = 22 sc + 154 dc, plus 12 sc for the tab base = 188 sts)
The math works because 144 = 24 × 6, so the full round holds exactly 24 six-stitch scallop repeats. Setting aside 12 sts for the tab removes 2 repeats, which leaves 132 = 22 × 6. Every scallop lands evenly with no fudging. Measured across, the panel is 13.5 in (34.3 cm).
Hanging Tab
Work the tab in rows into the 12 tab sc. Do not fasten off after Round 13; turn instead.
Row 1: Ch 3 (counts as dc), dc in the next 11 sts. Turn. (12 sts, 3.4 in / 8.6 cm wide)
Row 2: Ch 2 (does not count), dc2tog, dc in the next 8 sts, dc2tog. Turn. (10 sts)
Row 3: Ch 3, dc in each st across. Turn. (10 sts)
Row 4: Ch 2, dc2tog, dc in the next 6 sts, dc2tog. Turn. (8 sts)
Row 5: Ch 3, dc in each st across. Turn. (8 sts)
Row 6: Ch 2, dc2tog, dc in the next 4 sts, dc2tog. Turn. (6 sts, 1.7 in / 4.3 cm wide)
Rows 7–9: Ch 3, dc in each st across. Turn. (6 sts)
Fasten off, leaving a 12 in (30.5 cm) tail. Rows 1–6 make the visible tab, 3 in (7.6 cm) tall. Rows 7–9 are the 1.5 in (3.8 cm) fold that wraps the ring.
Make All Pieces
- Burgundy: 1 panel with tab, 2 poinsettias
- Cream: 2 cups
- Gold: 2 flower centers
Layout (front view):
        [ ring ]
        [ tab  ]
   (  scalloped panel  )
   (  [Cup 1][Cup 2]   )
   (                   )
The cups touch at the vertical center line. Together they are 9.5 in (24.1 cm) wide.
Joining
Use the yarn tails and a yarn needle, and whipstitch everything.
1. Center to poinsettia: Sew each gold center over its poinsettia’s ring, catching each of the 6 sc of the center’s Round 1.
2. Poinsettia to cup: Center each poinsettia on a cup front at mid-mesh height, about 2 in (5.1 cm) above the base ridge. Tack the ring and each petal tip. Stitch into dc posts, not into the mesh holes, so the flower does not sag.
3. Cups to panel: Flatten each cup against the panel so that 13 rim sts (one quarter of 52) sit against the panel. Place the cups so their bases are 2.75 in (7.0 cm) above the lowest scallop tip. Their rims will then sit about 6.5 in (16.5 cm) above it, which is close to the middle of the panel.
4. Sew the cups down: Whipstitch those 13 rim sts to the panel stitch by stitch. Then sew down the two vertical lines of the wall where it meets the panel. Finally, sew the back quarter of the base ridge, which is also 13 sts. Keep the tension firm but flat. If the panel puckers between stitches, loosen up.
5. Tab: Pass Rows 7–9 through the ring to the back. Whipstitch Row 9 to the back of Rows 5–6, all 6 sts.
Checkpoint: The cups together should measure 9.5 in (24.1 cm) wide, and the panel should still be 13.5 in (34.3 cm) across and lying flat.
Final Blocking
- Lightly spray the whole holder with water.
- Pin the panel to a 13.5 in (34.3 cm) circle, pinning each scallop tip.
- Open each eyelet with a fingertip.
- Slide a roll wrapped in a plastic bag into each cup to set its round shape.
- Fan out the poinsettia petals and pinch each tip to a point.
- Let everything dry completely before you remove the pins.
Final Quality-Control Checklist
- The panel is 13.5 in (34.3 cm) across and lies flat.
- There are 24 eyelets, evenly spaced.
- There are 22 scallops, and none is missing beside the tab.
- The tab is centered and tapers from 12 sts to 6 sts.
- Each cup is 52 sts around and 3.75 in (9.5 cm) tall.
- Each poinsettia has 5 petals with visible veins.
- The cups sit level, and their bases are 2.75 in (7.0 cm) above the bottom tip.
- All ends are woven in securely.
Troubleshooting
- Panel ruffles: Your stitches are too loose for the increases. Go down a hook size or tighten your tension.
- Panel cups: Go up a hook size.
- Scallops don’t fit: Recount Round 12. You need exactly 144 sts, with 12 marked.
- Roll won’t fit: Rework Round 5 of the base with a 5.5 mm hook.
- Cup leans forward: Add tacking stitches along the two vertical wall lines.
- Vein disappears: Make sure you work the slip stitches with the yarn held behind the work.
- Tab stretches: Sew the fold through both layers using a doubled strand.
Care
Hand wash in cool water and lay flat to dry, reshaping the cups around a roll. Do not tumble dry.

Final Notes
Here is the full measurement chain. The cup base is 4.25 in (10.8 cm) at Round 4 and 4.75 in (12.1 cm) at Round 5, and the cup grows to 3.75 in (9.5 cm) tall. The panel reaches 10 in (25.4 cm) at Round 10, 12 in (30.5 cm) at Round 12 and 13.5 in (34.3 cm) after the scallops. The tab adds 3 in (7.6 cm) above Round 12. If each checkpoint matches, the cups and the poinsettias will fit as shown. Check your gauge early and count after every key round.
Happy crocheting!