

This hanging holder adds a bright touch to plain kitchen shelving. A horizontal panel of three sunflower granny squares sits between two sturdy beige straps. The straps carry two wooden dowels: the upper one holds a paper towel roll and the lower one works as a tea towel bar.
Each square has a dark brown center, a ring of twelve pointed golden-yellow petals, and a light beige lacy frame finished with a round of single crochet. A raised slip stitch seam joins the squares, so each seam shows as a neat beige ridge between the flowers. The style is warm and cottage-like, and the dense straps make it practical for daily use.
This pattern uses US crochet terms. The finished panel measures 11.6 in x 4.4 in (29.5 cm x 11.2 cm). Each strap measures 1.6 in x 16 in (4.1 cm x 40.6 cm). The full hanging unit is 14.8 in (37.6 cm) wide.
First you make three squares, join them in a row and add a two-round border. Then you make two straps with built-in dowel holes. To finish, sew the panel’s short edges to the straps, slide the dowels through, and hang the holder from two cup hooks under a shelf.
Finished Size and Construction
- Finished panel: 11.6 in x 4.4 in (29.5 cm x 11.2 cm)
- Strap: 1.6 in x 16 in (4.1 cm x 40.6 cm), make 2
- Skill level: Easy-intermediate
- Terminology: US
- Yarn weight: DK (weight 3) cotton or cotton blend
- Hook: 4.0 mm (G-6)
- Number of pieces: 5 crocheted pieces (3 squares and 2 straps), plus 2 wooden dowels
- Layout: 3 squares in one horizontal row (3 x 1)
- Square size: 3.6 in (9.1 cm), 18 sts per side
- Size before border: 10.8 in x 3.6 in (27.4 cm x 9.1 cm)
- Border depth: 0.4 in (1.0 cm) on each edge
Materials
Cotton works best for this project. It holds its shape, stands up to kitchen humidity and shows the petal texture clearly. Use the same brand and weight of smooth yarn for all three colors so the squares and straps match.
- Brown (center): 10 g / 23 m
- Golden yellow (petals): 20 g / 46 m
- Light beige (frames, border, straps): 70 g / 161 m
Tools and hardware:
- 4.0 mm (G-6) crochet hook
- Tapestry needle
- Stitch markers
- Scissors and tape measure
- 2 wooden dowels, 3/4 in (1.9 cm) thick and 17 in (43.2 cm) long
- 2 cup hooks or screws for mounting under a shelf
- Blocking mat and rust-proof pins
The yarn amounts include about 15% extra for a gauge swatch and for weaving in ends.
Abbreviations (US Terms)
- ch – chain
- sl st – slip stitch
- sc – single crochet
- hdc – half double crochet
- dc – double crochet
- tr – treble crochet
- sk – skip
- sp – space
- st(s) – stitch(es)
- RS / WS – right side / wrong side
Special stitch – Petal: Work (hdc, dc, tr, ch 2, tr, dc, hdc) all in the same stitch. The ch-2 makes the pointed tip, and the trebles on each side give the petal its leaf shape.
Gauge and Checkpoints
Gauge: 5 sc and 5 sc rows = 1 in (2.5 cm) on a 4.0 mm hook.
Make one complete square first and measure it at each stage:
- After Rnd 2: the center is 1.25 in (3.2 cm) across.
- After Rnd 3: the flower is about 2.75 in (7.0 cm) across, from petal tip to petal tip.
- After Rnd 5: the square is 3.2 in (8.1 cm).
- After Rnd 6: the square is 3.6 in (9.1 cm).
If your square is too big, go down one hook size. If it is too small, go up one hook size. Being off by just 0.1 in (0.3 cm) per square adds up to 0.3 in (0.8 cm) across the panel. The gap between the straps must be at least 11.3 in (28.7 cm) to fit a standard 11 in (27.9 cm) roll.
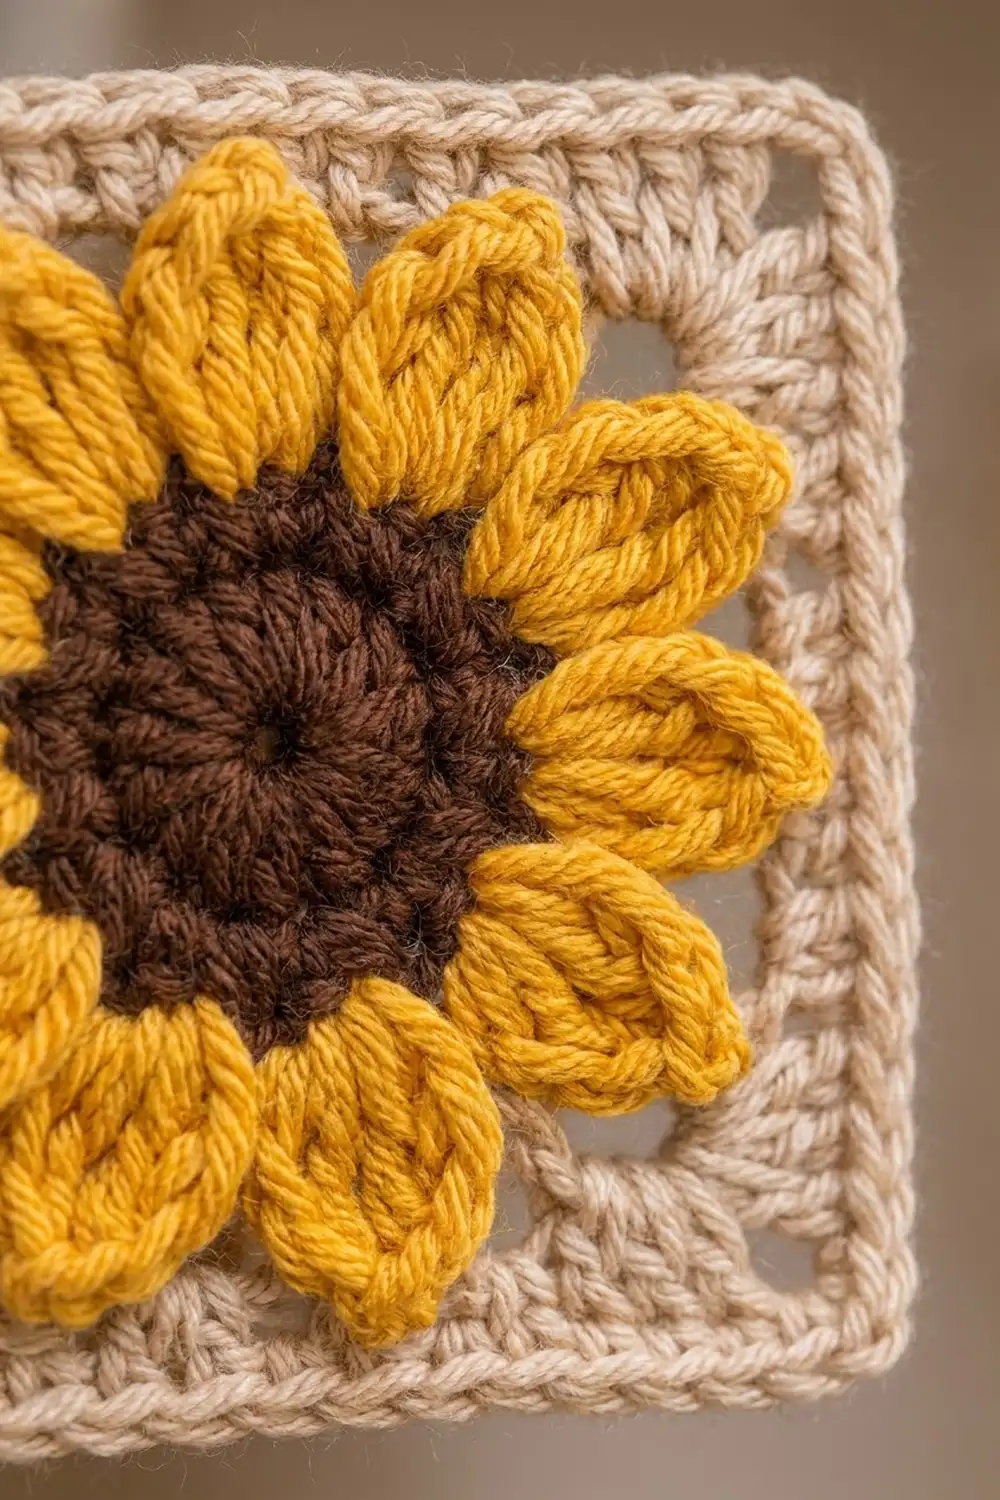
Sunflower Square (Make 3)
Rnd 1 (brown): Make a magic ring. Ch 1 and work 12 sc in the ring. Join with a sl st to the first sc, then pull the ring closed. (12 sts)
Rnd 2 (brown): Ch 1 and work 2 sc in each st around. Join. (24 sts) Fasten off.
Rnd 3 (golden yellow): Join with a sl st in any st. Work a Petal in the next st, then sl st in the next st. Repeat from * to * around, so that the last sl st lands in the joining st. (12 petals, 12 sl sts) Fasten off.
Fan the petals out with your fingertips so they lie flat and overlap slightly at their bases.
Rnd 4 (beige): Join with a sl st in the ch-2 tip of any petal. Ch 4 (counts as the first tr), then work (ch 2, tr) in the same tip to make the first corner. Ch 3, sc in the next petal tip, ch 3, sc in the next petal tip, ch 3, then work (tr, ch 2, tr) in the next petal tip. Repeat from * to * 2 more times. Then ch 3, sc in the next tip, ch 3, sc in the next tip, ch 3, and join to the top of the beginning ch-4.
(8 tr, 8 sc, 4 corner ch-2 sps and 12 side ch-3 sps)
Each side now reads: tr, ch 3, sc, ch 3, sc, ch 3, tr. The corner petals sit under the trebles and the side petals sit under the single crochets. This is what turns the circle into a square.
Rnd 5 (beige): Sl st into the next corner ch-2 sp. Ch 3 (counts as dc), then work (dc, ch 2, 2 dc) in the same sp. Dc in the next tr, 2 dc in the ch-3 sp, dc in the sc, 2 dc in the ch-3 sp, dc in the sc, 2 dc in the ch-3 sp, dc in the next tr, then work (2 dc, ch 2, 2 dc) in the next corner sp. Repeat from * to * 2 more times. Work the side sequence once more and join to the top of the beginning ch-3.
(56 dc: (10 side dc + 4 corner dc) x 4, plus 4 corner ch-2 sps)
The groups of 2 dc over the chain spaces leave small gaps, which give the frame its open, lacy look.
Rnd 6 (beige, trim round): Ch 1. Sc in each dc around, working 3 sc in each corner ch-2 sp. Join.
(56 sc worked 1 per existing st + 12 corner sc = 68 sts)
Per side: 18 sts, counting the center sc of both corners. That is 14 sc from the dc, 2 outer corner sc and 2 corner centers. Check: 4 x 18 − 4 shared corners = 68.
Fasten off, leaving a 6 in (15.2 cm) tail.
Make All Pieces
- Brown: 3 centers (Rnds 1–2)
- Golden yellow: 3 petal rounds (Rnd 3)
- Beige: 3 frames (Rnds 4–6), the border and 2 straps
Layout (RS facing):
[ Sunflower 1 ][ Sunflower 2 ][ Sunflower 3 ]
Weave in all ends except the beige tails. Steam-block each square to 3.6 in (9.1 cm) before you join them.
Joining
Hold Squares 1 and 2 with wrong sides together, so the right sides face out. Join beige with a sl st through both corner center sts.
Sl st through the outer loop of each square, working stitch to stitch: the first st of Square 1 pairs with the first st of Square 2, and so on. Work 18 sl sts in total, ending in the opposite corner centers. This leaves a raised beige ridge on the RS, like a chain line between the flowers. Fasten off. Join Square 3 to the other side of Square 2 the same way.
Tension: Keep your sl sts as loose as your sc. A tight seam will make the strip pucker and bow. If you need to, go up one hook size for the seams only.
Checkpoint: The joined strip should measure 10.8 in x 3.6 in (27.4 cm x 9.1 cm). The seams are worked into existing sts and do not add any new sts.
Border
Border gauge: 5 sc = 1 in (2.5 cm), the same as the squares. Each border round adds 1 st at each end of every side, which adds 0.2 in (0.5 cm) per side length.
Starting counts:
- Long sides: 3 squares x 18 sts = 54 sts. This includes both corner center sts at each seam and the panel corner st at each end.
- Short sides: 1 square x 18 sts = 18 sts, including both panel corner sts.
Rnd 1 (beige): With the RS facing, join in the st after any panel corner. Ch 1. Sc in each st along every side, including both corner sts at each seam, and work 3 sc in each of the 4 panel corner sts. Join.
(Long sides 56 sts each and short sides 20 sts each, counting corner centers. In total: 140 sts worked 1 per existing st + 8 corner sc = 148 sts.)
Rnd 2 (beige): Ch 1. Sc in each st, working 3 sc in each corner center st. Join.
(Long sides 58 sts each and short sides 22 sts each. In total: 148 sts worked 1 per existing st + 8 corner sc = 156 sts.)
Fasten off and weave in the ends.
Why the math works: 58 sts ÷ 5 = 11.6 in (29.5 cm). That is the 10.8 in (27.4 cm) strip plus 0.4 in (1.0 cm) of border at each end. Likewise, 22 sts ÷ 5 = 4.4 in (11.2 cm), which is the 3.6 in (9.1 cm) height plus 0.4 in (1.0 cm) on each edge. Check: 2 x 58 + 2 x 22 − 4 = 156.
Straps (Make 2)
Work in beige. Each strap has three holes: one at the top for hanging, one for the paper towel dowel and one for the towel bar.
Row 1: Ch 9. Sc in the 2nd ch from the hook and in each ch across. (8 sts)
Row 2: Ch 1, turn, and sc in each st across. (8 sts)
Row 3 (hanging hole): Ch 1, turn. Sc 2, ch 4, sk 4, sc 2. (4 sc + 1 ch-4 sp)
Row 4: Ch 1, turn. Sc 2, work 4 sc in the ch-4 sp, sc 2. (8 sts)
Rows 5–43: Ch 1, turn, and sc in each st across. (8 sts)
Row 44 (roll dowel hole): Work as for Row 3.
Row 45: Work as for Row 4. (8 sts)
Rows 46–71: Work as for Row 2.
Row 72 (towel bar hole): Work as for Row 3.
Row 73: Work as for Row 4. (8 sts)
Rows 74–80: Work as for Row 2. Fasten off.
Checkpoint: Each strap should measure 1.6 in x 16 in (4.1 cm x 40.6 cm). Each hole is 0.8 in (2.0 cm) wide, so it grips a 3/4 in (1.9 cm) dowel snugly. The holes sit 0.6 in (1.5 cm), 8.8 in (22.4 cm) and 14.4 in (36.6 cm) from the top of the strap.
Attaching the Straps
Lay the panel RS up and place one strap on each side, with the strap’s long edge against the panel’s short edge. Line up the top border round of the panel with strap Row 6. The 22 sts on the panel’s short side will then match strap Rows 6–27, one st per row.
With beige yarn and a tapestry needle, whipstitch each panel st to the matching row end on the strap. Sew through both loops on the panel side.
The bottom of the panel ends 5.4 in (13.7 cm) below the top of the straps. That leaves 3.4 in (8.6 cm) down to the center of the roll dowel, so a 5 in (12.7 cm) roll has about 0.9 in (2.3 cm) of clearance below the panel.
Final Blocking
- Soak the assembled holder in cool water and gently squeeze out the excess. Do not wring it.
- Roll it in a towel to remove more water.
- Pin the panel to 11.6 in x 4.4 in (29.5 cm x 11.2 cm), keeping the corners square.
- Pin each strap out straight to 16 in (40.6 cm).
- Shape each petal with your fingertips so the tips are evenly spaced around the center.
- Let it dry completely. Slide in the dowels and hang the holder from cup hooks set 13.2 in (33.5 cm) apart, center to center.
Final Quality-Control Checklist
- Each square has 12 petals and 68 sts in Rnd 6.
- Each square measures 3.6 in (9.1 cm).
- The seams are flat ridges with no puckering.
- The border has 156 sts: 58 per long side and 22 per short side.
- The panel measures 11.6 in x 4.4 in (29.5 cm x 11.2 cm).
- Both straps are the same length, with their holes on the same rows.
- The straps are 11.6 in (29.5 cm) apart, which clears an 11 in (27.9 cm) roll.
- All ends are woven in securely.
Troubleshooting
- Petals curl or cup: Your tension is too tight on Rnd 3. Work the petals with a hook 0.5 mm larger, or block them firmly.
- The square stays round: Check that the trebles in Rnd 4 are in the corner petal tips and the single crochets are in the side tips.
- Corners flare: Make sure you worked exactly 3 sc in each corner sp in Rnd 6, then pin the corners firmly while blocking.
- The panel bows: The seam is too tight. Rework it with a larger hook.
- The dowel slides out: Wrap a rubber band around each dowel end, just outside the strap.
- The straps stretch over time: Use 100% cotton, and don’t stretch the straps when you block them.
Care
Take the dowels out first. Hand wash the holder in cool water, reshape the petals while it is damp, and dry it flat.

Final Notes
Every measurement starts from a 3.6 in (9.1 cm) square with 18 sts per side. Three squares make a 10.8 in (27.4 cm) strip, and two border rounds bring the panel to 11.6 in x 4.4 in (29.5 cm x 11.2 cm). Two 16 in (40.6 cm) straps hold the dowels at 8.8 in (22.4 cm) and 14.4 in (36.6 cm) from the top. If you check your gauge at each step, the roll and towel will hang neatly in place.
Happy crocheting!