

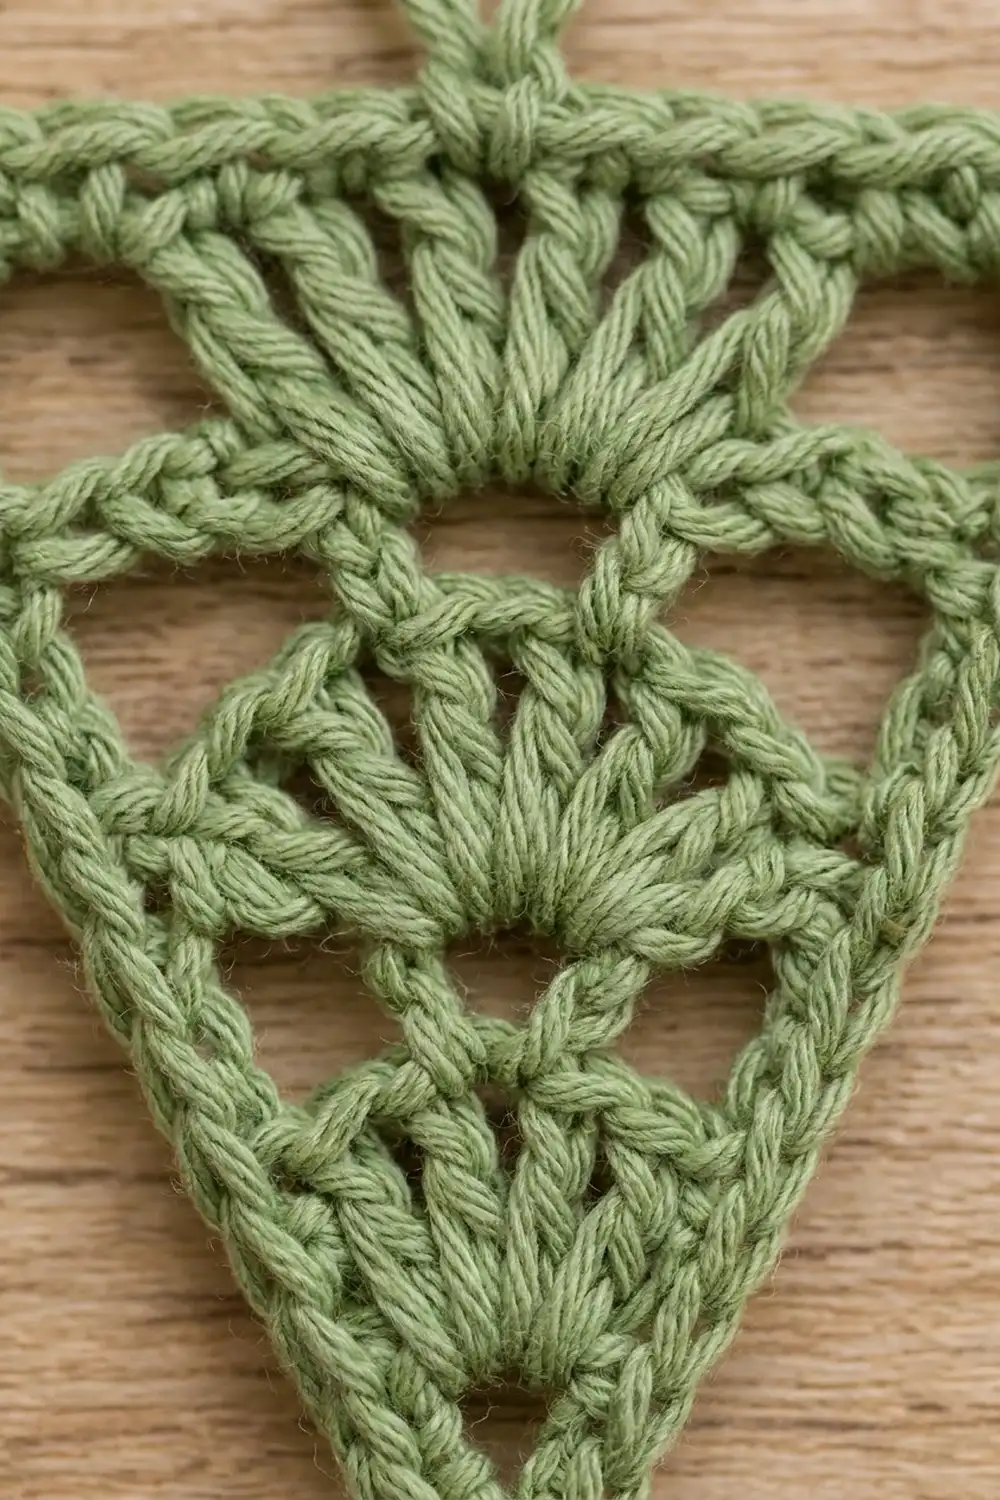
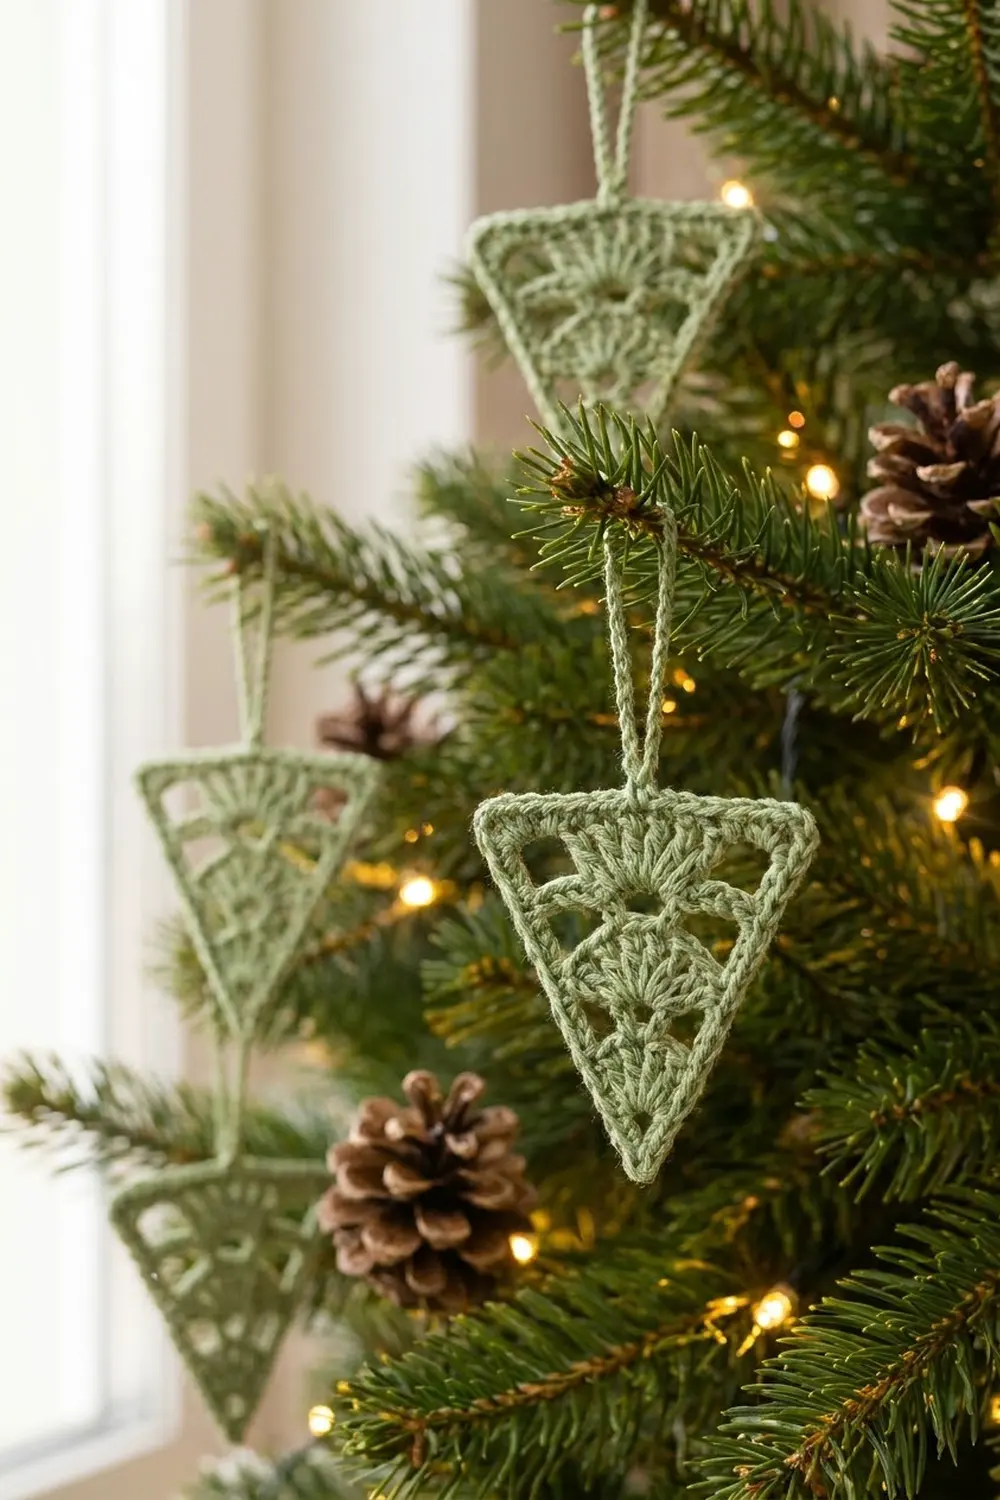
This little ornament is a single triangle with its point facing down. Three tiers of fans fill it and open upward. Each fan sits on a chain arch, which leaves small open windows on both sides. A neat single crochet edge frames the whole shape, and a chain loop at the top center lets it hang from a branch.
The sample uses one soft sage green cotton. With only one color, the stitch texture does the work: tall treble fans, light open arches and a crisp outline that looks like a simple Christmas tree.
The pattern uses US crochet terms. The finished ornament measures about 3.75 in (9.5 cm) across the top edge and 3.75 in (9.5 cm) from the top edge to the point, not counting the hanging loop. The loop adds about 1.25 in (3.2 cm).
The construction is simple. You start at the bottom point with a small ring and work six rows back and forth that widen as the fans grow. Then you add one round of single crochet border and finish with the hanging loop. There is no joining, and the only sewing is weaving in ends.
Finished Size and Construction
- Finished size: 3.75 in (9.5 cm) wide x 3.75 in (9.5 cm) tall, plus a 1.25 in (3.2 cm) loop
- Skill level: Easy to intermediate
- Terminology: US crochet terms
- Yarn weight: DK (light worsted, weight 3) cotton
- Hook: 3.5 mm (US E/4)
- Number of pieces: 1
- Layout: Single triangular motif, point down
- Piece size before border: 3.5 in (8.9 cm) wide x 3.375 in (8.6 cm) tall
- Border depth: 1 round of sc, about 0.125 in (0.3 cm) on each edge
Materials
Choose a smooth, mercerized or soft-twist cotton in DK weight. Cotton shows the fan stitches clearly and holds the triangle shape after blocking. Avoid fuzzy or brushed yarns, which blur the open windows and soften the outline.
- Sage green DK cotton: 10 g (about 23 m) per ornament
One ornament uses about 6 g (14 m). The listed quantity includes extra for checking your gauge, the hanging loop and weaving in ends.
Sage green gives a soft, natural tree look. Deep forest green, cream or metallic-blend cotton also work well, as long as the yarn is the same weight.
Tools:
- 3.5 mm (US E/4) crochet hook
- Tapestry needle
- Scissors
- Rust-proof pins
- Blocking mat or folded towel
- Spray bottle with water
- Optional: light spray starch
Abbreviations (US Terms)
- ch: chain
- sl st: slip stitch
- sc: single crochet
- tr: treble crochet (yarn over twice, insert hook, pull up a loop, [yarn over and pull through 2 loops] 3 times)
- st(s): stitch(es)
- sk: skip
- sp: space
- tch: turning chain
- RS / WS: right side / wrong side
Special stitch (Fan): Work the stated number of tr into the same stitch. This pattern uses a 5-tr fan, a 7-tr fan and a 9-tr fan.
Gauge and Checkpoints
Gauge: 22 sc = 4 in (10.2 cm). One row of tr = 0.875 in (2.2 cm) tall.
Because this is a single small piece, the ornament itself is your test piece. Make one, measure it at each checkpoint, and adjust before making more.
- After Row 1: the fan is about 1.25 in (3.2 cm) across the top and 0.875 in (2.2 cm) tall.
- After Row 3: the piece is about 2.375 in (6.0 cm) wide and 2 in (5.1 cm) tall.
- After Row 5: the piece is about 3.5 in (8.9 cm) wide and 3.125 in (7.9 cm) tall.
- After Row 6: 3.5 in (8.9 cm) wide x 3.375 in (8.6 cm) tall.
- After the border: 3.75 in (9.5 cm) wide x 3.75 in (9.5 cm) tall.
If your piece is too big: Change to a 3.25 mm hook, or wrap the yarn more snugly on your tr so the posts are shorter.
If your piece is too small: Change to a 3.75 mm hook. If only the height is short, pull the first loop of each tr up a little taller.
Pattern
You work the triangle in rows from the bottom point upward. RS rows hold the fans, and WS rows build the arches and the flat top. The ch-4 at the start of a row counts as 1 tr. The ch-1 at the start of an sc row does not count as a stitch.
Before you begin: Mark the RS of Row 1 with a scrap of yarn. All fans should open toward the top of the piece on the RS. Count the center stitch carefully on Rows 2 and 4, because every later fan is built on it.
Row 1 (RS): Bottom Fan
Ch 5, sl st in first ch to form a ring.
Ch 4 (counts as tr), 4 tr in ring. Turn.
Count: 5 tr (one 5-tr fan).
Leave a 6 in (15.2 cm) starting tail. You will use it later to close up the point.
Row 2 (WS): First Arches
Ch 1, sc in first tr, ch 2, sk next tr, sc in next tr (center tr), ch 2, sk next tr, sc in top of tch. Turn.
Count: 3 sc and 2 ch-2 sps.
Row 3 (RS): Middle Fan
Ch 4 (counts as tr), ch 2, sk ch-2 sp, 7 tr in center sc, ch 2, sk ch-2 sp, tr in last sc. Turn.
Count: 9 tr (1 edge tr + 7-tr fan + 1 edge tr) and 2 ch-2 sps.
The ch-2 sps sit on either side of the fan and open up into the first pair of windows.
Row 4 (WS): Long Arches
Ch 1, sc in first tr, ch 5, sk ch-2 sp and next 3 tr, sc in next tr (4th tr of the fan, the center), ch 5, sk next 3 tr and ch-2 sp, sc in top of tch. Turn.
Count: 3 sc and 2 ch-5 sps.
Each ch-5 arch spans 5 stitch widths (2 ch plus 3 tr). That length lets the arch lie flat without pulling the fan closed.
Row 5 (RS): Top Fan
Ch 4 (counts as tr), tr in same sc, ch 3, sk ch-5 sp, 9 tr in center sc, ch 3, sk ch-5 sp, 2 tr in last sc. Turn.
Count: 13 tr (2 edge tr + 9-tr fan + 2 edge tr) and 2 ch-3 sps.
The doubled tr at each edge are the only edge increases in the pattern. They form the top corners of the triangle.
Row 6 (WS): Top Edge
Ch 1, sc in first 2 tr, 3 sc in ch-3 sp, sc in each of next 9 tr, 3 sc in ch-3 sp, sc in next tr, sc in top of tch. Turn.
Count: 19 sc = 13 sc worked 1-per-tr + 6 sc worked into the two ch-3 sps.
This row turns the uneven top of Row 5 into one straight edge. Do not fasten off.
Check: the piece should now measure 3.5 in (8.9 cm) wide x 3.375 in (8.6 cm) tall.
Border
Border gauge: The border uses the same gauge of 22 sc = 4 in (10.2 cm). On the slanted sides, work 5 sc into each tr row end and 2 sc into each sc row end.
Round 1 (RS)
Ch 1, 3 sc in first sc (top corner), sc in next 17 sc, 3 sc in last sc (top corner).
Turn the piece to work down the side along the row ends. Work 5 sc over the Row 5 tr post, 2 sc in the Row 4 row end, 5 sc over the Row 3 tr post, 2 sc in the Row 2 row end and 5 sc over the Row 1 tr post.
Work 3 sc into the ring at the bottom point.
Work up the second side the same way: 5 sc over Row 1, 2 sc in Row 2, 5 sc over Row 3, 2 sc in Row 4 and 5 sc over Row 5. Sl st to first sc. Fasten off.
Counts per side:
- Top edge: 3 + 17 + 3 = 23 sc (both 3-sc corner groups included)
- Each slanted side: 5 + 2 + 5 + 2 + 5 = 19 sc
- Bottom point: 3 sc
- Round total: 23 + 19 + 3 + 19 = 64 sc
Hanging Loop
With the RS facing, join yarn with a sl st in the 12th sc of the top edge (the center of the 23 top stitches). Ch 16, sl st in the same stitch. Fasten off, leaving an 8 in (20.3 cm) tail. Weave the tail back through the loop chains to strengthen them.
Why the Math Works
The top edge starts with the 19 sc from Row 6. The border works 1 sc into each of them, and the 2 corner stitches each take 3 sc instead of 1. That gives 19 worked 1-per-stitch + 4 extra corner sc = 23.
Each side covers 3 tr rows and 2 sc rows. A tr row is 0.875 in (2.2 cm) tall, which along the slant is about the width of 5 sc at this gauge. An sc row is about 0.25 in (0.6 cm), or roughly 2 sc along the slant. So each side gets 19 sc, which fits a side length of about 3.5 in (8.9 cm), and the edge lies flat. The 3 sc at the point and the 3-sc corner groups let the outline turn each corner without cupping.
Final Blocking
- Weave in all ends except the starting tail.
- Thread the starting tail on a tapestry needle and run it through the stitches around the ring. Pull gently to close any gap at the point, then weave the tail in.
- Spray the ornament with water until it is damp but not soaked.
- Lay it RS up on the blocking mat.
- Pin the top edge straight at 3.75 in (9.5 cm) long.
- Pin the bottom point so the height is 3.75 in (9.5 cm).
- Pin both slanted sides straight, with one pin at each tr row end.
- Use your fingertips to spread the stitches of each fan evenly, and ease each window into a smooth rounded shape.
- For a stiffer ornament, spray lightly with starch.
- Let it dry completely, at least 6 hours, before removing the pins.
- Pin the hanging loop into a smooth oval while it dries.
Final Quality-Control Checklist
- Row stitch counts: 5 tr; 3 sc + 2 sps; 9 tr; 3 sc + 2 sps; 13 tr; 19 sc.
- Three fans of 5, 7 and 9 tr, all centered and opening upward.
- Matching open windows on both sides of each upper fan.
- The border round has 64 sc: 23 on top, 19 on each side and 3 at the point.
- The top edge is straight, and the point is sharp and closed.
- The finished size is 3.75 in (9.5 cm) x 3.75 in (9.5 cm).
- The hanging loop is centered and about 1.25 in (3.2 cm) tall.
- All ends are woven in securely and can’t be seen from the RS.
Troubleshooting
The fans look crowded or cup forward. Your tr are too short for the number of stitches. Go up a hook size, or pull the first loop of each tr a little taller.
The arches pull the tops of the fans inward. The ch-5 is too tight. Chain more loosely, or use a hook one size larger for those chains only.
The sides ripple after the border. You worked too many sc into the row ends. Use exactly 5 per tr row end and 2 per sc row end.
The sides pull in or curl. You have too few border stitches, or your tension is tight. Check that each side has 19 sc, and relax your grip.
There is a hole at the bottom point. Pull the starting tail through the ring and tighten it before weaving it in.
The ornament leans to one side. One fan is off-center. Recount to the center stitch on Rows 2 and 4.
The loop twists. Block it pinned flat, or chain more loosely so it relaxes.
Care
Hand wash in cool water with mild soap, press out the water in a towel and reshape the ornament flat to dry. Store it flat or hanging, away from heavy decorations that could crush the fans.
Final Notes
The measurements build step by step. Row 1 makes a fan 1.25 in (3.2 cm) wide. Row 3 brings the piece to 2.375 in (6.0 cm) wide. Row 5 reaches 3.5 in (8.9 cm) wide, and Row 6 flattens the top into 19 sc at 3.5 in (8.9 cm) wide and 3.375 in (8.6 cm) tall. The 64-stitch border brings the triangle to 3.75 in (9.5 cm) x 3.75 in (9.5 cm), and the 16-chain loop adds 1.25 in (3.2 cm) for hanging.
If your numbers match at each checkpoint, every ornament you make will come out the same size. That makes it easy to crochet a matching set for the tree, top a wrapped gift or tuck one into a holiday card.
Happy crocheting!