

This snowflake is a single lace motif with six bell-shaped arms. Each arm opens into a fan of treble crochet stitches and finishes with a row of tiny picots, so the edge looks like a frosted scallop. A small open ring and six soft chain petals form the center.
The ornament is worked in one color, a warm cream or ivory cotton thread. The pale shade gives it the look of a classic heirloom snowflake and stands out well against green branches. It also looks good as a gift tag topper or a window decoration.
This pattern uses US crochet terms. The blocked snowflake measures about 4 in (10.2 cm) from point to point.
The snowflake is worked in the round in six rounds with no turning. Rounds 1–3 build the center and petals. Round 4 adds V-shaped stems, Round 5 builds the fans, and Round 6 is the picot edging. A separate chain loop is added at one tip for hanging.
Finished Size and Construction
- Finished size: 4 in (10.2 cm) point to point, after blocking
- Skill level: Intermediate (treble crochet in thread, working into chain spaces)
- Terminology: US crochet terms
- Yarn weight: Size 10 cotton crochet thread (Lace, weight 0)
- Hook: 1.5 mm steel hook (US steel size 7)
- Number of pieces: 1 (single motif)
- Layout: One six-armed snowflake with a hanging loop at one tip
- Piece size: 4 in (10.2 cm) point to point
- Size before border (after Round 5): 3.5 in (8.9 cm) point to point
- Border depth (Round 6 picot edging): about 0.25 in (0.6 cm) added at each tip
Materials
Thread advice: Use a mercerized cotton crochet thread in size 10. Mercerized cotton has a slight sheen, shows the stitches clearly, and holds its shape well after you stiffen it. Avoid acrylic or fuzzy threads, because they won’t block crisply.
- Cream / ivory (only color): 5 g, about 18 m (20 yd)
This quantity includes a margin for your gauge swatch, the hanging loop, and weaving in ends. A single snowflake uses noticeably less than this.
Tools:
– 1.5 mm steel crochet hook (US steel size 7)
– Fine tapestry needle or small-eye sewing needle
– Small sharp scissors
– Blocking board or foam mat, plus a piece of plastic wrap
– Rustproof pins (at least 18)
– Fabric stiffener, spray starch, or a 1:1 mix of white glue and water
– Ruler or tape measure
Abbreviations (US Terms)
- ch – chain
- sl st – slip stitch
- sc – single crochet
- dc – double crochet
- tr – treble crochet (yarn over twice, insert hook, pull up a loop, [yarn over, pull through 2 loops] 3 times)
- sp – space
- st(s) – stitch(es)
- p – picot
Special stitches:
– Picot (p): Ch 3, sl st in the 3rd ch from the hook.
– Tip picot (tip p): Ch 4, sl st in the 4th ch from the hook.
– V-shell: (2 dc, ch 5, 2 dc) all in the same space.
Gauge and Checkpoints
Thread gauge is personal, so work one test snowflake before making a set. Measure each stage while the piece is lying flat and unstretched. The “after blocking” numbers will be slightly larger.
- After Round 1: the ring measures 0.6 in (1.5 cm) across.
- After Round 2: the petals measure 1.25 in (3.2 cm) across.
- After Round 3: 2 in (5.1 cm) across.
- After Round 4: 2.75 in (7.0 cm) across, measured from shell tip to shell tip.
- After Round 5: 3.5 in (8.9 cm) point to point.
- After Round 6 and blocking: 4 in (10.2 cm) point to point.
If your snowflake is too big: go down to a 1.25 mm hook (US steel size 9), or tighten your chain stitches. Loose chains are the most common reason the piece grows.
If your snowflake is too small: go up to a 1.75 mm hook (US steel size 4). If only the fans look cramped, focus on pulling each treble up to its full height.
If it cups or ruffles: see Troubleshooting before you continue. Small errors grow in every later round.
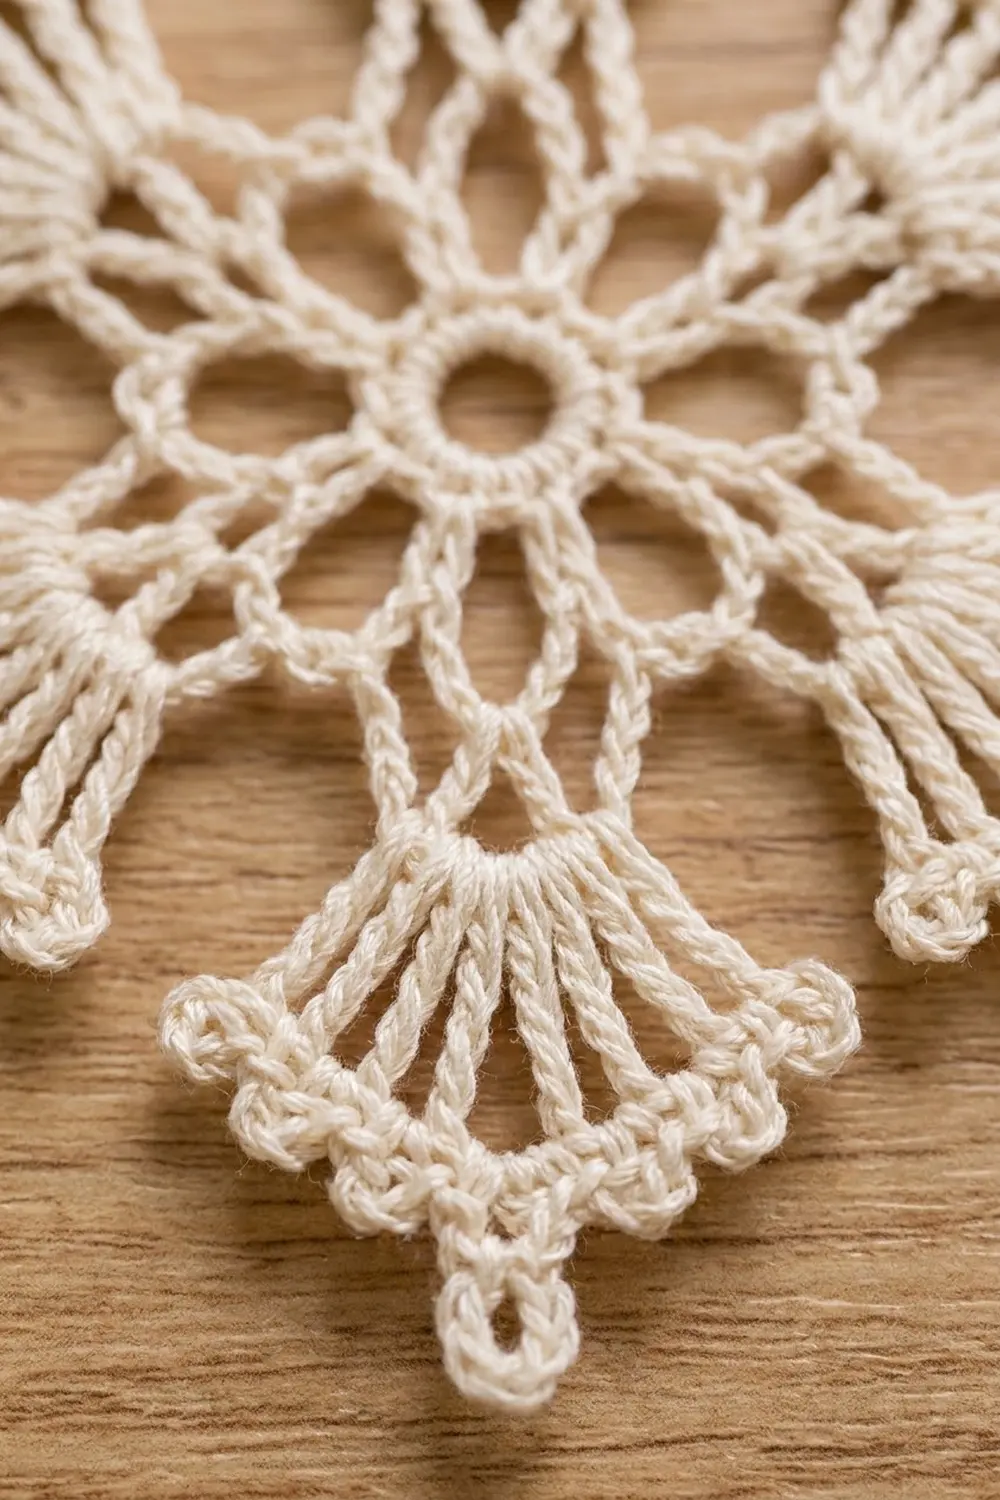
The Snowflake
Round 1 (center ring)
Ch 6 and join with a sl st to the first ch to form a ring.
Ch 3 (counts as the first dc). Work 17 dc into the ring. Join with a sl st to the top of the beginning ch-3.
Stitch count: 18 dc.
The ring should leave a small round hole in the center, about 0.2 in (0.5 cm) wide. Don’t pull the starting tail tight.
Round 2 (petals)
Ch 1. Sc in the same st as the join. Ch 7, skip the next 2 dc, sc in the next dc. Repeat from * 4 more times. Ch 7, skip the last 2 dc, and join with a sl st to the first sc.
Stitch count: 6 sc and 6 ch-7 loops.
These six loops form the soft petals around the center.
Round 3 (outer framework)
Sl st in each of the next 4 ch, so you’re on the center ch of the first ch-7 loop. Ch 1, sc in the same ch.
Ch 8, sc in the 4th (center) ch of the next ch-7 loop. Repeat from * 4 more times. Ch 8 and join with a sl st to the first sc.
Stitch count: 6 sc and 6 ch-8 loops.
Each sc sits at the top of a petal. Each ch-8 loop runs between two petals and marks where an arm will grow.
Round 4 (V-shell stems)
Sl st into the first ch-8 space.
In the same space, work: ch 3 (counts as the first dc), 1 dc, ch 5, 2 dc. This completes the first V-shell. Then ch 3, sc in the next sc, ch 3.
V-shell in the next ch-8 space, ch 3, sc in the next sc, ch 3. Repeat from * 4 more times. Join with a sl st to the top of the beginning ch-3.
Stitch count: 6 V-shells (24 dc and 6 ch-5 spaces), 6 sc, and 12 ch-3 spaces.
The 2-dc legs of each shell become the paired stem lines that run out to each fan.
Round 5 (fans)
Sl st in the next dc, then sl st into the ch-5 space.
Ch 4 (counts as the first tr). Work 8 tr in the same ch-5 space, for 9 tr in the fan.
Ch 4, skip the remaining 2 dc of the shell and the ch-3 space, sc in the next sc. Ch 4, skip the next ch-3 space and 2 dc, then work 9 tr in the next ch-5 space. Repeat from * 4 more times.
Ch 4, sc in the last sc, ch 4, and join with a sl st to the top of the beginning ch-4.
Stitch count: 54 tr (6 fans of 9), 6 sc, and 12 ch-4 spaces.
Each fan should spread open into a bell shape. The ch-4 spaces pull the gaps between the arms inward toward the petal tips. This is what creates the separated, starry outline.
Border: Picot Edging (Round 6)
Border gauge: each fan edge gets 9 sc, with 1 sc worked into each tr. Picots go between the sc. Once blocked, the edging adds about 0.25 in (0.6 cm) at each tip.
Ch 1. Sc in the same st as the join, which is the first tr of Fan 1. Work across the fan as follows:
- p, sc in the next tr (tr 2)
- p, sc in the next tr (tr 3)
- p, sc in the next tr (tr 4)
- p, sc in the next tr (tr 5, the center tr)
- tip p, sc in the next tr (tr 6)
- p, sc in the next tr (tr 7)
- p, sc in the next tr (tr 8)
- p, sc in the next tr (tr 9)
Then ch 4, sl st in the next sc of Round 5, ch 4.
Sc in the first tr of the next fan and repeat the fan sequence above, then ch 4, sl st in the next sc, ch 4. Repeat from * 4 more times. Join with a sl st to the first sc. Fasten off.
Stitch count per arm: 9 sc, 7 small picots, and 1 tip picot. Between arms: ch 4, sl st, ch 4.
Round total: 54 sc, 42 small picots, 6 tip picots, 6 sl sts, and 12 ch-4 spaces.
Why the math works: Because each tr gets exactly 1 sc, the fan’s edge length stays the same and the fan lies flat. The picots sit between stitches (8 per fan), so they add texture without adding width. This is why the scallop doesn’t ruffle. The larger tip picot is centered: there are 4 sc and 3 small picots on each side of it, so every arm is symmetrical. The ch-4 lengths between arms match the ch-4 spaces from Round 5, so the gaps keep their shape and don’t pucker.
Hanging Loop
Join the thread with a sl st in any tip picot. Ch 30, which is about 3 in (7.6 cm) of chain. Sl st in the same tip picot. Fasten off. The finished loop hangs about 1.5 in (3.8 cm) above the arm tip.
Weave in all ends along the stem dc and trebles, where they won’t show. Trim them closely.
Final Blocking
- Wet the snowflake in cool water and gently press out the extra water with a towel. Don’t wring it.
- Apply stiffener. Soak the piece in fabric stiffener or the 1:1 glue-and-water mix. Squeeze out the excess, then open the center hole with a toothpick.
- Prepare the board. Cover your blocking mat with plastic wrap so the snowflake won’t stick to it. If you can, draw or print a circle 4 in (10.2 cm) across with six evenly spaced lines through the center (60° apart).
- Pin the center. Place the center ring over the circle’s center point. Pin through the hole if needed.
- Pin the tips. Pin each tip picot onto one of the six guide lines at 2 in (5.1 cm) from the center.
- Shape the fans. Pin the first and last picot of each fan so the bell flares out evenly. Pull every small picot open with a pin tip.
- Shape the petals and gaps. Nudge the six petals and the ch-4 gaps into matching V-shapes.
- Let it dry fully, usually for 12 to 24 hours. Remove the pins only when the piece feels stiff and dry all the way through.
Final Quality-Control Checklist
- The snowflake measures 4 in (10.2 cm) point to point across all three tip-to-tip lines.
- Each arm has 9 tr in the fan and 9 sc, 7 small picots, and 1 tip picot in the edging.
- The center ring has a clean, open hole.
- All six petals are the same size.
- Every arm stem shows two clear parallel dc legs.
- The piece lies flat with no cupping or ruffling.
- The hanging loop is secure and centered on one tip picot.
- No loose ends or stiffener residue are visible.
Troubleshooting
The center cups after Round 2. Your ch-7 loops are too tight. Work them more loosely, or go up a hook size for that round only.
The fans ruffle in Round 5. Count your treble stitches. Nine is correct. If you have 9 and the fan still ruffles, make the trebles slightly shorter.
The fans curl inward. Your trebles are too short or your ch-4 spaces are too tight. Pull each tr loop up to its full height.
The picots disappear after blocking. Close each picot firmly with its sl st, then pin each one open while the stiffener is still wet.
The arms are uneven. Recount each round against the stated totals. A missing tr in one fan is the most common cause.
The piece is limp after drying. Use a stronger stiffener mix or apply a second coat.
Gaps between arms look baggy. Shorten the ch-4 spaces in Rounds 5 and 6 to ch-3.
Care
Dust gently with a soft brush and store flat in a box between tissue layers. If the snowflake gets wet and softens, re-block it with fresh stiffener.
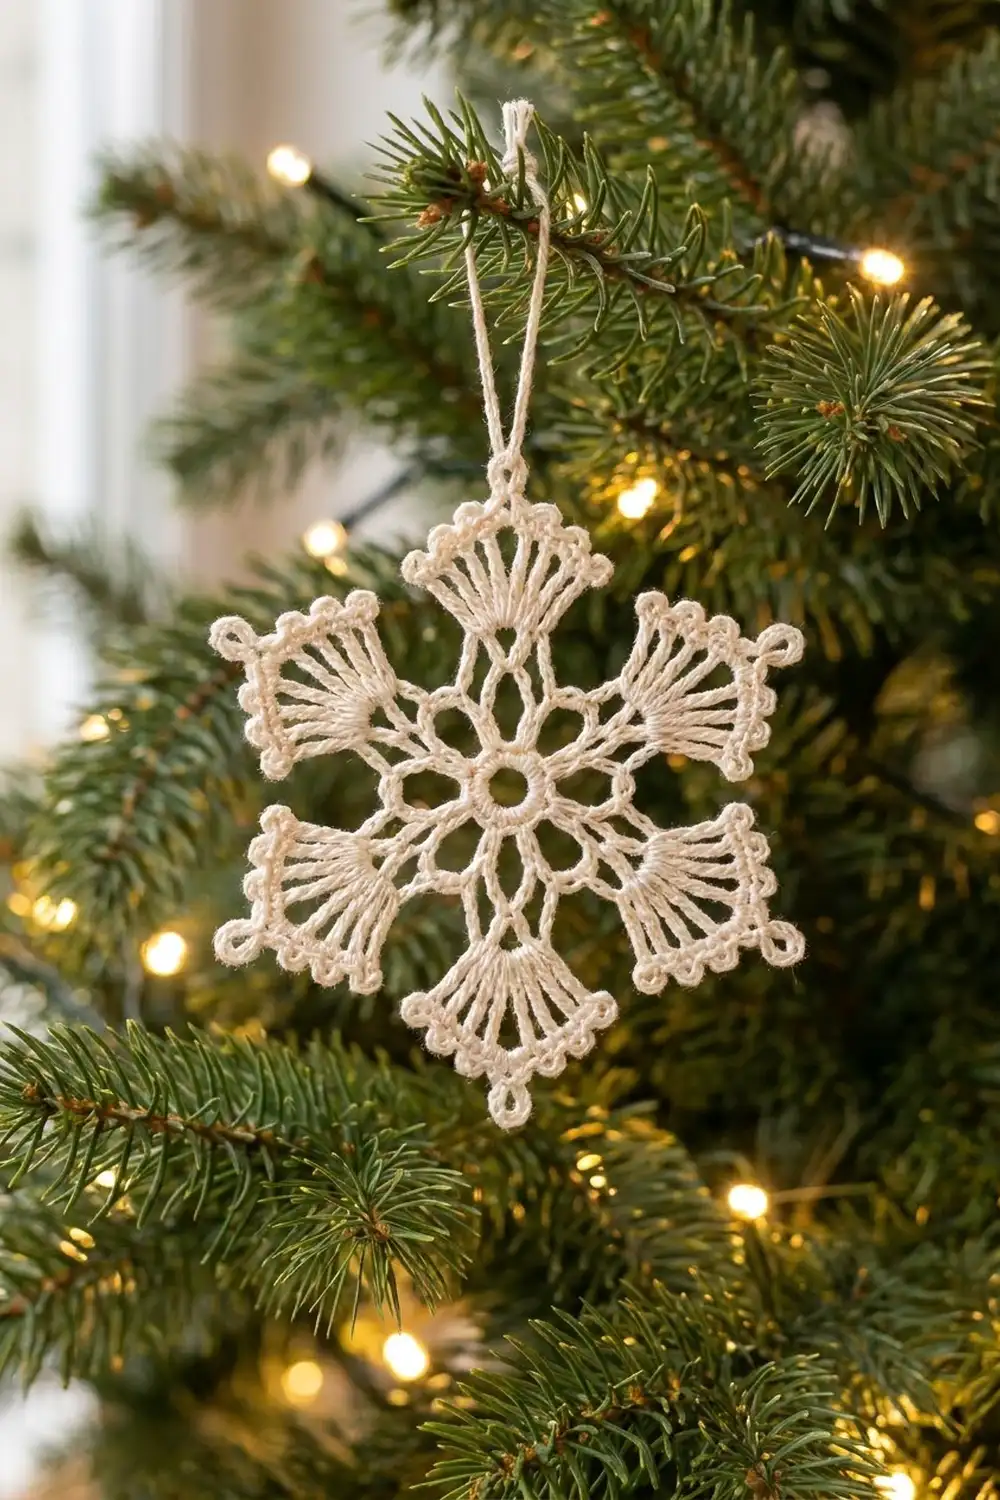
Final Notes
Every stage of this snowflake builds directly on the last. The 0.6 in (1.5 cm) ring grows to 1.25 in (3.2 cm) petals. The framework reaches 2 in (5.1 cm) and the V-shell stems reach 2.75 in (7.0 cm). The fans bring the piece to 3.5 in (8.9 cm), and the picot edging plus blocking finish it at 4 in (10.2 cm) point to point.
Check each of these measurements on your first snowflake. After that, every snowflake you make will match it. Make one for the tree, a handful for gifts, or a whole flurry for the window.
Happy crocheting!