

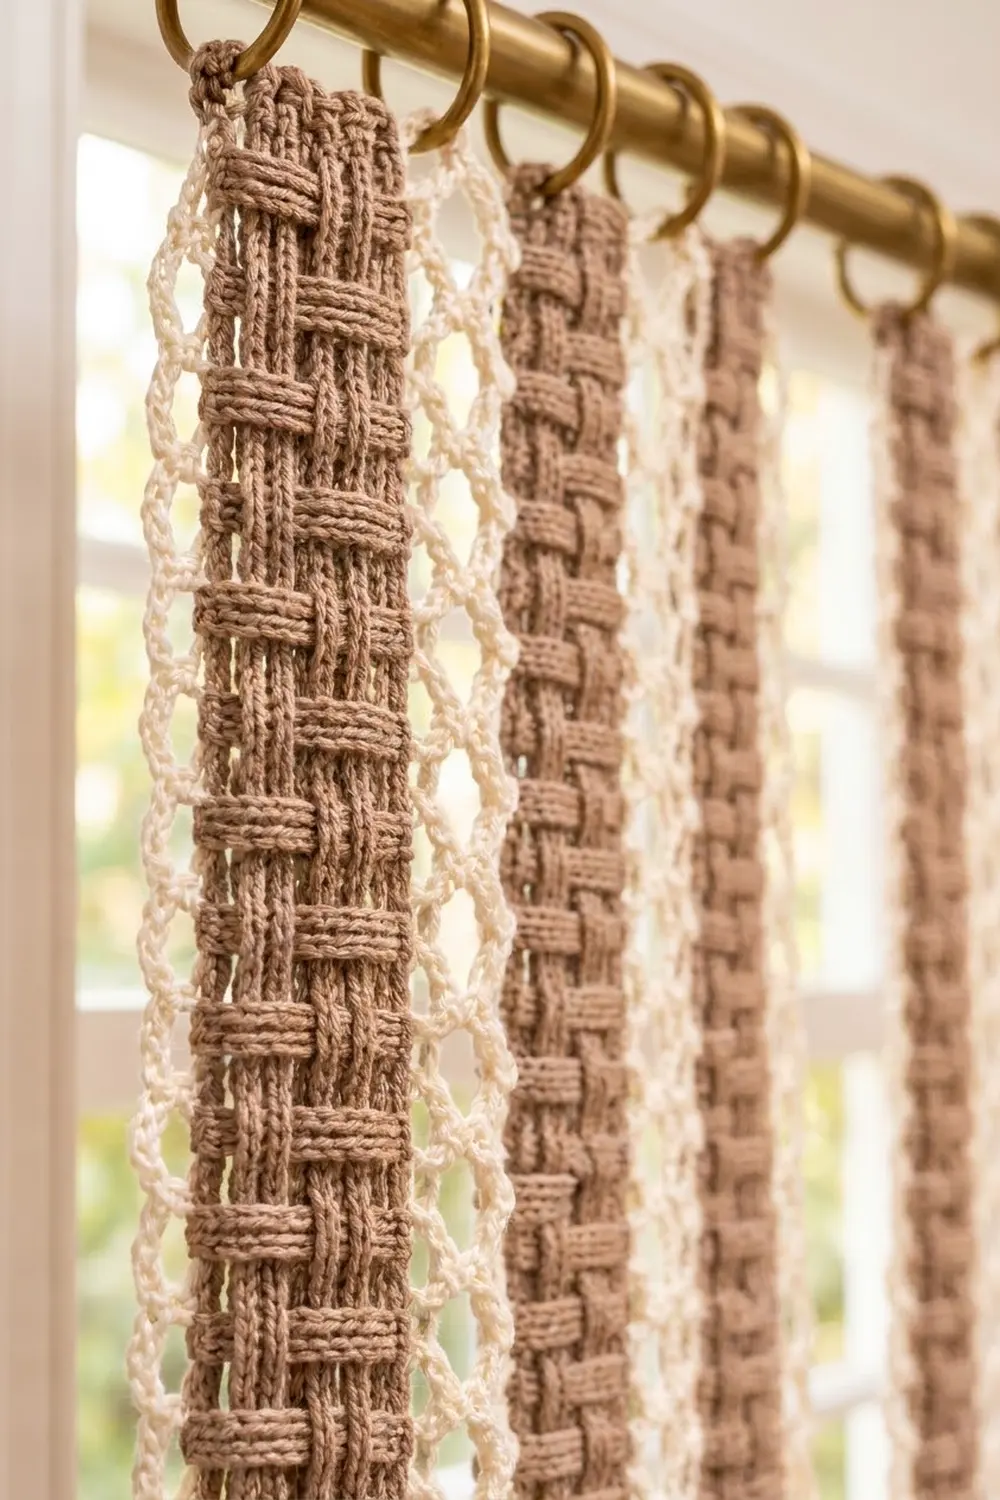
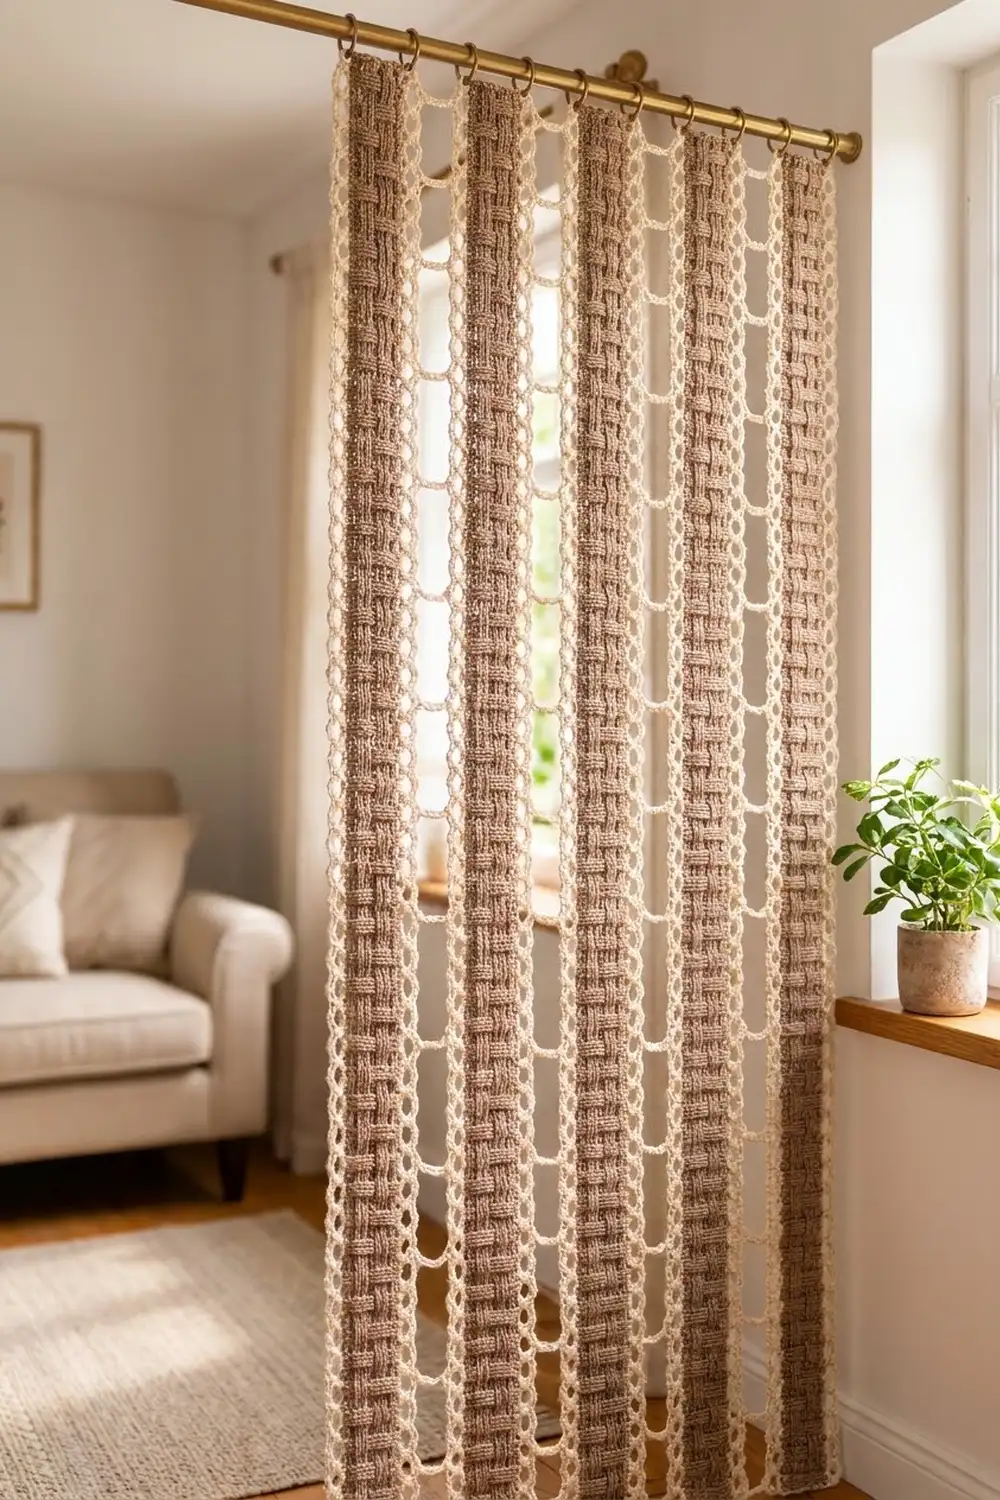
This curtain panel combines two textures. Each taupe strip is worked in a post-stitch basketweave, so it looks like a woven rattan band, with raised vertical ribs alternating with stacked horizontal bars. Cream chain loops edge every strip, and an airy cream ladder connects the strips so light comes through in narrow columns.
The palette is soft and neutral: warm taupe for the strips and natural cream for the edging and joins. The style is boho-farmhouse. It looks substantial on the rod but stays light and open against the window.
The pattern uses US crochet terms. The finished panel measures 35 in (88.9 cm) wide by 81.2 in (206.2 cm) long, including the top border.
Construction is simple. You crochet six long strips in rows from the bottom up and add a two-round cream edging to each one. Then you join the strips side by side with a chain-rung ladder and finish with a short sc band across the top for hanging.
Finished Size and Construction
- Finished size: 35 in (88.9 cm) wide × 81.2 in (206.2 cm) long
- Skill level: Intermediate (post stitches, long-strip tension control)
- Terminology: US
- Yarn weight: Worsted (#4) cotton or cotton blend
- Hook: 5.0 mm (H-8)
- Number of pieces: 6 strips
- Layout: 6 strips side by side in 1 row, with 5 ladder joins
- Strip body (taupe only): 3.5 in (8.9 cm) × 79.2 in (201.2 cm)
- Strip with edging: 5 in (12.7 cm) × 80.7 in (205.0 cm)
- Size before border: 35 in (88.9 cm) × 80.7 in (205.0 cm)
- Border depth: 0.5 in (1.3 cm), top edge only
Materials
Use a smooth worsted-weight cotton or cotton blend. Cotton shows the post-stitch texture clearly and hangs straight without stretching too much. Avoid fuzzy or very slippery yarns, because they blur the basketweave.
The amounts below are based on yarn with about 170 m (186 yd) per 100 g:
- Color A, Taupe: 1,500 g (about 2,550 m / 2,789 yd)
- Color B, Cream: 450 g (about 765 m / 837 yd)
Tools:
– 5.0 mm (H-8) crochet hook
– Tapestry needle
– Locking stitch markers (at least 10)
– Measuring tape
– Blocking pins and a large flat surface, or a spray bottle
– 12 curtain clip rings
All yarn amounts include a margin of about 10% for swatching and differences in tension.
Abbreviations (US Terms)
- ch: chain
- sl st: slip stitch
- sc: single crochet
- dc: double crochet
- fpdc: front post double crochet. Yarn over and insert the hook from front to back to front around the post of the stitch below. Complete as a dc.
- bpdc: back post double crochet. Yarn over and insert the hook from back to front to back around the post of the stitch below. Complete as a dc.
- st(s): stitch(es)
- sp: space
- RS / WS: right side / wrong side
Special stitch – rung: ch 5, then sl st into the matching loop on the opposite strip.
Gauge and Checkpoints
Basketweave gauge: 16 sts and 10 rows = 4 in (10.2 cm) with a 5.0 mm hook.
Border gauge (cream): 20 sc = 4 in (10.2 cm).
Test piece first: Ch 16 and work Rows 1–9 of the strip pattern. The swatch should measure 3.5 in (8.9 cm) wide and 3.6 in (9.1 cm) tall. One 4-row repeat equals 1.6 in (4.1 cm).
Checkpoints for each strip:
– After Row 1: 3.5 in (8.9 cm) wide
– After Row 41 (10 repeats): 16.4 in (41.7 cm) long
– After Row 101 (25 repeats): 40.4 in (102.6 cm) long
– After Row 198: 79.2 in (201.2 cm) long
– After the edging: 5 in (12.7 cm) × 80.7 in (205.0 cm)
Adjusting your gauge:
– Strip too wide or too long: go down one hook size, to 4.5 mm.
– Strip too narrow or too short: go up one hook size, to 5.5 mm.
– Correct width but wrong length: don’t change the stitch count. Add or remove full 4-row repeats instead. Each repeat changes the length by 1.6 in (4.1 cm).
Strip Body (Make 6)
Use Color A (Taupe). The ch-2 at the beginning of each row does not count as a stitch. Each row has 14 sts: 1 edge dc, three 4-st blocks, and 1 edge dc.
Row 1 (RS): Ch 16. Dc in the 3rd ch from the hook and in each ch across. Turn. (14 dc)
Row 2 (WS): Ch 2. Dc in the first st, bpdc around each of the next 4 sts, fpdc around each of the next 4 sts, bpdc around each of the next 4 sts, dc in the last st. Turn. (14 sts)
Row 3 (RS): Ch 2. Dc in the first st, fpdc around each of the next 4 sts, bpdc around each of the next 4 sts, fpdc around each of the next 4 sts, dc in the last st. Turn. (14 sts)
On the RS, Rows 2–3 show a rib block, a bar block, and another rib block. A bpdc worked from the WS sits forward on the RS just like a fpdc does, so both rows build the same raised rib.
Row 4 (WS): Ch 2. Dc in the first st, fpdc around each of the next 4 sts, bpdc around each of the next 4 sts, fpdc around each of the next 4 sts, dc in the last st. Turn. (14 sts)
Row 5 (RS): Ch 2. Dc in the first st, bpdc around each of the next 4 sts, fpdc around each of the next 4 sts, bpdc around each of the next 4 sts, dc in the last st. Turn. (14 sts)
Rows 4–5 reverse the order on the RS (bar, rib, bar), which creates the checkerboard weave.
Rows 6–197: Repeat Rows 2–5 another 48 times. That makes 49 repeats in total, covering 196 rows. (14 sts in every row)
Row 198 (WS): Ch 2. Dc in each st across. (14 dc) Fasten off.
The strip body has 198 rows and measures 3.5 in (8.9 cm) × 79.2 in (201.2 cm).
Tip: Place a marker every 10 repeats so you can count rows easily on such a long strip.
Strip Edging (Make 6)
Use Color B (Cream), with the RS facing. Hold the strip so Row 198 is at the top.
Round 1: Join with a sl st in the first st of Row 198, then ch 1.
1. Top edge: Sc in the same st and in the next 13 sts. (14 sc)
2. First corner: Ch 2.
3. First long side: Work 2 sc into the end of each row, working down the side. (396 sc)
4. Second corner: Ch 2.
5. Bottom edge: Sc in each foundation ch. (14 sc)
6. Third corner: Ch 2.
7. Second long side: Work 2 sc into the end of each row, working up the side. (396 sc)
8. Fourth corner: Ch 2. Sl st to the first sc to close the round.
Round 1 total: 820 sc (14 + 396 + 14 + 396) and 4 corner ch-2 sps.
Round 2: Ch 1. Work the following in order:
1. Top: [sc in the next sc, ch 4, skip the next sc] 7 times. Start the first sc in the same st as the join.
2. Corner: (sc, ch 4) in the corner ch-2 sp.
3. Long side: [sc in the next sc, ch 4, skip the next sc] 198 times.
4. Corner: (sc, ch 4) in the corner sp.
5. Bottom: [sc in the next sc, ch 4, skip the next sc] 7 times.
6. Corner: (sc, ch 4) in the corner sp.
7. Long side: [sc in the next sc, ch 4, skip the next sc] 198 times.
8. Corner: (sc, ch 4) in the corner sp.
9. Sl st to the first sc and fasten off.
Round 2 total: 414 loops (7 + 1 + 198 + 1 + 7 + 1 + 198 + 1). Each long side has 198 loops, not counting the corners. The top edge has 9 loops: 7 top loops plus the 2 corner loops at its ends.
The math works because every bracket uses exactly 2 sc. That means 14 sc make 7 loops and 396 sc make 198 loops, with no leftover stitches.
Checkpoint: The strip now measures 5 in (12.7 cm) × 80.7 in (205.0 cm). Round 1 adds 0.25 in (0.6 cm) on each side and Round 2 adds 0.5 in (1.3 cm), for 0.75 in (1.9 cm) per side.
Make All Pieces
- Color A: 6 strip bodies, each 14 sts × 198 rows
- Color B: 6 edgings, each 820 sc and 414 loops
Lightly steam or spray-block each strip to 5 in (12.7 cm) × 80.7 in (205.0 cm) before joining.
Layout (RS up, bottoms aligned, top edges at the rod):
[S1] | [S2] | [S3] | [S4] | [S5] | [S6]
Each | is one ladder join, 5 in total.
Joining
Each join is a chain-rung ladder worked in Color B, from bottom to top. On each strip, number the long-side loops 1–198 from the bottom up, and don’t count the corner loops. Loop 1 on the right side of the left strip pairs with loop 1 on the left side of the right strip, and so on up to loop 198.
To join Strip A (left) to Strip B (right):
1. Sl st into loop 1 of Strip A. Ch 5, then sl st into loop 1 of Strip B. (Rung 1)
2. Ch 2, then sl st into loop 2 of Strip B. Ch 5, then sl st into loop 2 of Strip A. (Rung 2)
3. Ch 2, then sl st into loop 3 of Strip A. Ch 5, then sl st into loop 3 of Strip B. (Rung 3)
4. Keep alternating like this. Rung 198 ends in loop 198 of Strip A. Fasten off.
Each seam has 198 rungs. The ch-2 traveling chains lie along the edging loops, so the visible result is a stack of open rectangular windows.
Tension advice: Keep the ch-5 rungs loose and even. If they’re tight, the gap shrinks and the strips pucker. Every 20 rungs, lay the panel flat and check that the gap is still 1 in (2.5 cm) wide and that neither strip has crept upward.
Join S1 to S2, then S2 to S3, and so on, for 5 seams.
Size checkpoint: 6 strips × 5 in (12.7 cm) + 5 gaps × 1 in (2.5 cm) = 35 in (88.9 cm) wide, by 80.7 in (205.0 cm) long.
Border
The border is worked across the top edge only. The long outer sides and the bottom keep their loop edging so the strips hang freely.
Border gauge: 20 sc = 4 in (10.2 cm), which is 5 sc per inch (2.5 cm).
Row 1 (RS): Join Color B in the top-left corner loop of S1, then ch 1. Work these 25 sc for each strip:
– 2 sc in the corner loop
– 3 sc in each of the 7 top loops (21 sc)
– 2 sc in the corner loop
That is 2 + 21 + 2 = 25 sc per strip. After each of S1–S5, ch 5 across the gap to the next strip. Turn.
Row 1 total: 150 sc (6 strips × 25) + 25 ch (5 gaps × 5) = 175 sts.
Row 2 (WS): Ch 1. Sc in each sc and in each bridge ch. Turn. (175 sc)
Row 3 (RS): Ch 1. Sc in each sc across. (175 sc) Fasten off.
Why the math works: Each strip is 5 in (12.7 cm) wide, and 25 sc at 5 sc per in fills exactly 5 in. Each gap is 1 in (2.5 cm), and 5 chains at the same gauge fill exactly 1 in. 175 sts ÷ 5 = 35 in (88.9 cm), which matches the joined width, so the band won’t ruffle or pull in. The only stitches added at the seams are the 25 bridge chains shown above. Three sc rows add 0.5 in (1.3 cm) to the length, for a finished length of 81.2 in (206.2 cm).
Final Blocking
- Weave in all ends along the strip edges, not inside the ladder windows.
- Lay the panel flat, RS up, on a large clean surface or a floor with towels.
- Pin the top band straight to 35 in (88.9 cm).
- Pin each strip’s bottom corners to keep the strips parallel, with 1 in (2.5 cm) gaps.
- Mist thoroughly with water, or steam lightly from above without pressing the post stitches flat.
- Ease each ladder rung straight and level.
- Let it dry completely, at least 24 hours.
- Clip 2 rings to the top band of each strip, about 1 in (2.5 cm) in from its edges, for 12 rings total. Hang the panel.
Final Quality-Control Checklist
- [ ] All 6 strips have 198 rows and 14 sts per row.
- [ ] The basketweave alternates rib and bar blocks every 2 rows on all strips.
- [ ] Each edging has 198 loops per long side and 7 loops at the top and bottom.
- [ ] Each seam has 198 rungs and no skipped loops.
- [ ] The gaps measure 1 in (2.5 cm) along their full length.
- [ ] The top band has 175 sc and measures 35 in (88.9 cm).
- [ ] The panel measures 35 in (88.9 cm) × 81.2 in (206.2 cm).
- [ ] All ends are secured and hidden.
Troubleshooting
Strip gets narrower as you go: You’re probably skipping an edge dc. Count to 14 every row for a few repeats.
The weave looks like plain ribbing: You’ve lost track of WS/RS. On WS rows, a block that should show ribs on the RS is worked with bpdc.
Strip curls along its length: Your post stitches are too tight. Go up a hook size for the post stitches only, or block more firmly.
Edging ruffles: Your Round 1 sc are too loose for 2 per row end. Try a hook 0.5 mm smaller for the edging.
Strips are uneven at the bottom: You may have matched the wrong loops. Restart the seam with loop 1 to loop 1, counting with markers every 20 loops.
Top band puckers: Recount Row 1. Each strip should have 25 sc and each gap 5 ch.
Care
Hand wash or machine wash cool on a gentle cycle. Lay flat to dry and reshape it while damp. Don’t hang it wet, because the weight will stretch the strips.
Final Notes
Here is the full measurement chain:
1. A 14-st, 198-row strip body is 3.5 in (8.9 cm) × 79.2 in (201.2 cm).
2. With its edging, each strip is 5 in (12.7 cm) × 80.7 in (205.0 cm).
3. Six strips plus five 1 in (2.5 cm) ladder gaps give a joined width of 35 in (88.9 cm).
4. A 175-sc top band holds that width and brings the length to 81.2 in (206.2 cm).
Check your gauge on the test piece and the rest of the measurements will follow.
Happy crocheting!