

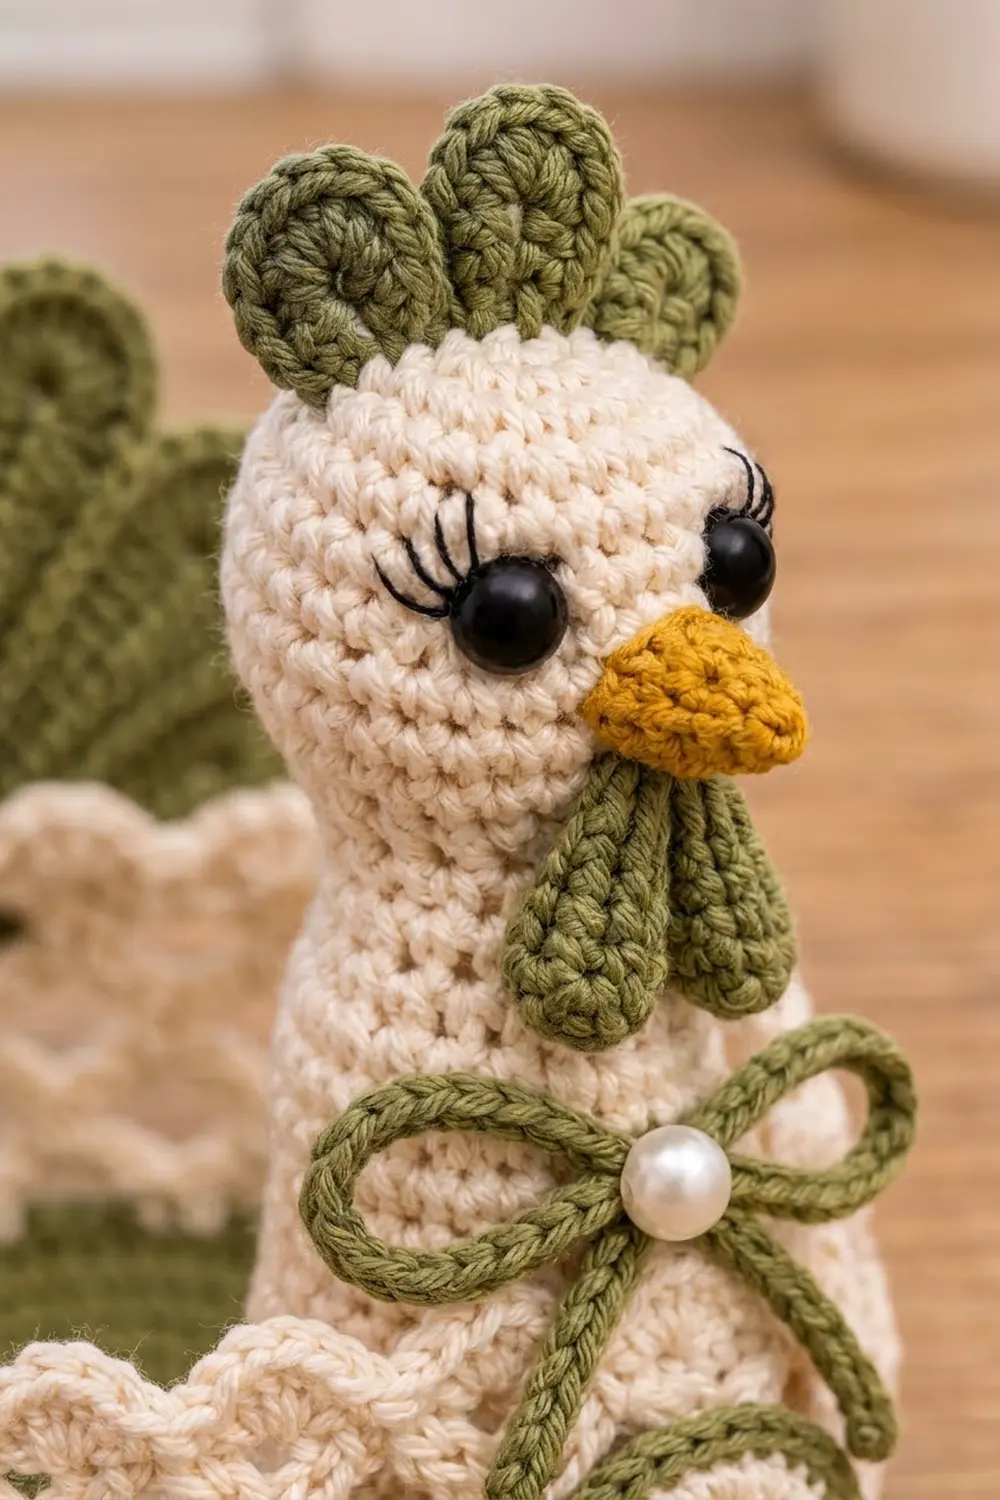
This hen egg basket has a cream diamond-lattice wall, a scalloped top edge, and an olive base. A cream hen’s head rises from one end and a fan of rounded olive feathers stands at the other. Two leaf-sprig medallions, a chain bow, and a pearl bead finish the farmhouse look.
The colors are cream and olive green, with golden yellow for the beak and black for the lashes. It suits Easter tables, spring shelves, and everyday egg storage. Teal works just as well as olive.
This pattern uses US crochet terms. The basket measures 7.75 in (19.7 cm) long and 4.5 in (11.4 cm) wide. The wall is 4 in (10.2 cm) tall, and the hen stands 7.25 in (18.4 cm) to the top of the comb.
You crochet the base and wall as one continuous piece, from the base center to the scalloped edge. The head, feathers, medallions, and trims are made separately and sewn on.
Finished Size and Construction
- Finished size: 7.75 x 4.5 in (19.7 x 11.4 cm) base; 7.25 in (18.4 cm) tall at the head
- Skill level: Intermediate
- Terminology: US
- Yarn weight: DK (light #3) cotton
- Hooks: 3.5 mm (E-4) for the basket, feathers, and medallions; 3.25 mm (D-3) for the head and small parts
- Number of pieces: 15 (basket body, head/neck, beak, comb, wattle, 7 feathers, 2 medallions, bow)
- Layout: head at one end, tail at the other, both medallions on the display side
- Wall height before border: 3.5 in (8.9 cm), 104 sts around
- Border depth: 0.5 in (1.3 cm), which brings the wall to 4 in (10.2 cm)
Materials
Use a smooth combed or mercerized DK cotton. It keeps the lattice open and the feathers crisp.
- Cream: 80 g / 200 m (wall, head and neck, medallion centers)
- Olive green: 60 g / 150 m (base, cord, feathers, comb, wattle, medallion rims, bow, embroidery)
- Golden yellow: 5 g / 12 m (beak)
- Black: 1 m of yarn or embroidery floss (lashes)
All quantities include a margin of about 15 percent.
Tools: 3.5 mm (E-4) and 3.25 mm (D-3) hooks, two 8 mm black safety eyes, one 8 mm pearl bead with sewing thread, fiberfill, tapestry needle, 4 stitch markers, pins, a tape measure, and spray starch.
Abbreviations (US Terms)
- ch – chain
- sl st – slip stitch
- sc – single crochet
- hdc – half double crochet
- dc – double crochet
- inc – 2 sc in the same stitch
- dec – sc 2 together
- BLO – back loop only
- MR – magic ring
- sk – skip
- st(s) – stitch(es)
- rsc – reverse single crochet (crab stitch)
Reverse sc (rsc): Working from left to right, insert the hook into the next stitch to the right. Yarn over and pull up a loop, then yarn over and pull through both loops. This makes the twisted cords.
Gauge and Checkpoints
- Basket gauge (3.5 mm): 20 sc x 22 rounds = 4 in (10.2 cm)
- Head gauge (3.25 mm): 22 sc x 24 rounds = 4 in (10.2 cm)
Make one medallion first as your test piece. After Rnd 6 it should measure 2.25 in (5.7 cm) across, and when finished it should measure 2.75 in (7.0 cm).
Checkpoints:
- Base after Rnd 6: 5.5 x 2.25 in (14.0 x 5.7 cm)
- Base after Rnd 12: 7.75 x 4.5 in (19.7 x 11.4 cm)
- Olive band after Rnd 15: 0.5 in (1.3 cm)
- Wall after Rnd 22: 3.25 in (8.3 cm)
- Wall after Rnd 24: 3.5 in (8.9 cm)
- Head: 1.75 in (4.4 cm) across, with the whole head and neck piece 4.25 in (10.8 cm) long
If your pieces come out too big, go down one hook size. If they’re too small, go up one size.
Basket Body
Use olive and the 3.5 mm hook. Join each round with a sl st to the first sc, and start each round with ch 1 (it doesn’t count as a stitch).
Ch 19.
Rnd 1: 3 sc in 2nd ch from hook, sc in next 16 ch, 3 sc in last ch. Working along the other side of the chain, sc in next 16 ch. (38 sts)
Rnd 2: [2 sc in each of next 3 sts, sc in next 16] twice. (44 sts)
Rnd 3: [(Sc in next st, inc) 3 times, sc in next 16] twice. (50 sts)
Rnds 4–12: [(Sc in next X sts, inc) 3 times, sc in next 16] twice. X is the round number minus 2.
| Round | X | Total sts |
|---|---|---|
| 4 | 2 | 56 |
| 5 | 3 | 62 |
| 6 | 4 | 68 |
| 7 | 5 | 74 |
| 8 | 6 | 80 |
| 9 | 7 | 86 |
| 10 | 8 | 92 |
| 11 | 9 | 98 |
| 12 | 10 | 104 |
Each round adds 3 sts at each curved end. After Rnd 12, each end has 36 sts and each straight side has 16 sts: 36 + 16 + 36 + 16 = 104.
Rnd 13: Working in BLO, sc in each st around. (104 sts) This turns the wall upward and leaves the front loops of Rnd 12 free for the base cord.
Rnds 14–15: Sc in each st around. (104 sts) Fasten off olive.
Lattice Wall
Join cream in any stitch.
Rnd 16: Ch 1, sc in same st, [ch 5, sk 3, sc in next st] 25 times, ch 2, dc in first sc. (26 loops) The ch 2 and dc together make the 26th loop and leave your hook at its center.
Rnds 17–22: [Ch 5, sc in next ch-5 loop] 25 times, ch 2, dc in top of joining dc. (26 loops) Each new loop sits over the center of a loop below, which forms the diamonds.
Rnd 23 (conversion round): Ch 1, 2 sc around the post of the joining dc, [4 sc in next ch-5 loop] 25 times, 2 sc in the ch-2 space of the joining loop, sl st to first sc. Count: 25 x 4 = 100, plus 2 + 2 in the joining loop = 104 sts.
Rnd 24: Ch 1, sc in each st around. (104 sts)
Before you work Rnd 24, check that the round starts where a curved end begins. If it doesn’t, sl st forward to that point and count it as stitch 1. Place markers to divide the round: sts 1–36 are the head end, 37–52 the display side, 53–88 the tail end, and 89–104 the back side. Don’t fasten off.
Head and Neck
Use cream and the 3.25 mm hook. Work in a continuous spiral without joining.
Rnd 1: 6 sc in MR. (6)
Rnd 2: Inc in each st. (12)
Rnd 3: [Sc in next st, inc] 6 times. (18)
Rnd 4: [Sc in next 2 sts, inc] 6 times. (24)
Rnd 5: [Sc in next 3 sts, inc] 6 times. (30)
Rnds 6–11: Sc in each st. (30)
Insert the safety eyes between Rnds 8 and 9, 6 sts apart.
Rnd 12: [Sc in next 3 sts, dec] 6 times. (24)
Rnds 13–22: Sc in each st. (24) Stuff the head firmly.
Rnd 23: [Sc in next 3 sts, inc] 6 times. (30)
Rnd 24: [Sc in next 4 sts, inc] 6 times. (36)
Rnds 25–26: Sc in each st. (36)
Stuff the neck firmly and the flared base lightly. Fasten off with a long tail. Use black to stitch 3 short lashes at the outer top edge of each eye.
Beak, Comb, and Wattle
Beak (golden yellow, 3.25 mm):
Rnd 1: 4 sc in MR. (4)
Rnd 2: [Sc in next st, inc] twice. (6)
Rnd 3: [Sc in next 2 sts, inc] twice. (8)
Rnd 4: Sc in each st. (8) Fasten off, leaving a tail. Don’t stuff it.
Comb (olive, 3.25 mm):
Ch 7.
Row 1: Sc in 2nd ch from hook and in each ch across, turn. (6 sc)
Row 2: [Sl st in next st, 7 dc in next st] 3 times. (3 lobes) Fasten off, leaving a tail.
Wattle (olive, 3.25 mm):
Lobe: Ch 6. Sc in 2nd ch from hook, hdc in next ch, dc in next 2 ch, 5 dc in last ch. Working along the other side of the chain, dc in next 2 ch, hdc in next ch, sc in last ch, then sl st to first sc. (13 sts)
Ch 1 and repeat the lobe once more to make 2 joined drops. Fasten off, leaving a tail.
Tail Feathers (Make 7)
Use olive and the 3.5 mm hook. Ch 11.
Rnd 1: Sc in 2nd ch from hook, hdc in next ch, dc in next 7 ch, 7 dc in last ch. Working along the other side of the chain, dc in next 7 ch, hdc in next ch, sc in last ch, then sl st to first sc. (25 sts)
Rnd 2: Ch 1, sc in first 9 sts, 2 sc in each of next 7 sts, sc in last 9 sts, sl st to first sc. (32 sts) Fasten off.
Each feather measures 2.4 x 1 in (6.1 x 2.5 cm). Rnd 2 makes the raised outline around the rounded tip.
Leaf Medallions (Make 2)
Use cream and the 3.5 mm hook, and join each round.
Rnd 1: 6 sc in MR. (6)
Rnd 2: Inc in each st. (12)
Rnd 3: [Sc in next st, inc] 6 times. (18)
Rnd 4: [Sc in next 2 sts, inc] 6 times. (24)
Rnd 5: [Sc in next 3 sts, inc] 6 times. (30)
Rnd 6: [Sc in next 4 sts, inc] 6 times. (36) Fasten off cream.
Rnd 7: Join olive. [Sc in next 5 sts, inc] 6 times. (42)
Rnd 8: Rsc in each st. (42) Fasten off, leaving a long tail.
Leaf sprig: With olive, backstitch a gently curved stem 1.25 in (3.2 cm) long. Add 3 pairs of lazy daisy leaves along the stem and 1 at the tip, for 7 leaves in total.
Bow
Use olive and the 3.25 mm hook. Ch 70, then sl st in 2nd ch from hook and in each ch across. (69 sl st) The cord is about 10.5 in (26.7 cm) long. Tie it into a bow with two loops and two tails, and sew the pearl bead to the knot.
Make All Pieces
| Piece | Qty | Color |
|---|---|---|
| Basket body | 1 | Olive + cream |
| Head and neck | 1 | Cream |
| Beak | 1 | Golden yellow |
| Comb, wattle, bow | 1 each | Olive |
| Tail feathers | 7 | Olive |
| Medallions | 2 | Cream + olive |
Layout (top view):
              BACK SIDE (16 sts)
         +-------------------------+
 TAIL    |                         |   HEAD
 FAN  )) |       eggs inside       |  (( NECK
 36 sts  |                         |   36 sts
         +-------------------------+
          [MEDALLION]   [MEDALLION]
            DISPLAY SIDE (16 sts)
Joining
Sew the pieces on with matching tails and whipstitch. Keep your stitches snug but not tight, so the lattice stays flat and open.
Tail fan: Fan out the 7 feathers with each one overlapping the next by one third, and line up their straight bases. Sew the bases together. The fan should measure 4.5 in (11.4 cm) across. Sew the bases inside the wall, stitch for stitch, along the center 18 of the 36 tail-end sts on Rnd 24. The fan should rise 2.25 in (5.7 cm) above the rim.
Head and neck: Flatten the 36-st open base into 2 layers of 18 sts. Center it on the head end so that 9 head-end sts stay free on each side. Sew the front layer stitch for stitch over the outside of Rnds 22–24, and sew the back layer to the inside of the same rounds. The head should rise 2.8 in (7.1 cm) above the rim.
Face: Sew the beak between Rnds 9 and 10, centered between the eyes. Sew the wattle just below the beak. Fold the comb along its foundation chain and sew it over Rnds 1–4.
Medallions and bow: Center each medallion on the display side where a curved end meets the straight side, covering Rnds 17–22. Whipstitch around the olive rim. Sew the bow at the base of the neck, just above the medallion nearest the head.
Size checkpoint: The base should still measure 7.75 x 4.5 in (19.7 x 11.4 cm), and the hen should stand 7.25 in (18.4 cm) tall.
Border
Border gauge: 5 sc per inch (2.5 cm), so 104 sts = 20.8 in (52.8 cm). Each scallop uses 4 sts, or 0.8 in (2.0 cm).
Rnd 25 (scallops, cream): [Sc in next st, sk 1, 5 dc in next st, sk 1] 26 times, sl st to first sc. Fasten off.
- Head end: 36 sts = 9 scallops
- Display side: 16 sts = 4 scallops
- Tail end: 36 sts = 9 scallops
- Back side: 16 sts = 4 scallops
Base cord (olive): Turn the basket upside down. Join olive in any free front loop of Rnd 12, then rsc in each free front loop around: 36 + 16 + 36 + 16 = 104 rsc. Join and fasten off.
Why the math works: The base ends with 104 sts, which divides evenly by 4. The lattice has 26 loops of 4 sts, and Rnd 23 brings it back to exactly 104. Each section (36 or 16 sts) also divides by 4, so no scallop crosses a marker. Because no stitches are gained or lost, the wall stays straight.
Final Blocking
- Pack the basket with a towel to hold the oval shape.
- Lightly spray the wall and scallops with water and starch.
- Ease each diamond into shape and straighten the scallops so they sit level.
- Pin the feathers into an even fan against a folded cloth.
- Press the medallions flat under a damp cloth.
- Let everything dry for 12 to 24 hours.
- Remove the towel and check all measurements again.
Final Quality-Control Checklist
- The base lies flat and measures 7.75 x 4.5 in (19.7 x 11.4 cm).
- The wall is 4 in (10.2 cm) tall and stands straight.
- Every lattice round has 26 loops.
- There are 26 scallops, set 9-4-9-4 around.
- The base cord is unbroken.
- The head stands upright and the eyes are level.
- All 7 feathers are evenly fanned.
- The bow and pearl are securely sewn.
Troubleshooting
- Base cups: Go up one hook size.
- Base ruffles: Go down one hook size.
- Wall flares out: Your chains are too loose. Work ch 4 loops and confirm that Rnd 23 still has 104 sts.
- Wall leans in: Loosen your chain stitches.
- Head flops: Add more stuffing and tack the inside of the neck to the wall.
- Scallop count is off: Recount Rnd 24. It must have 104 sts.
Care
Hand wash in cool water and lay flat to dry, reshaping while damp. Re-starch the wall and tail if they soften.

Final Notes
All the numbers come from the 104-st base. It gives 26 lattice loops, a 104-st conversion round, and 26 scallops set 9-4-9-4 around. Check your gauge with a medallion, confirm the base measures 7.75 x 4.5 in (19.7 x 11.4 cm), and everything else will fit.
Happy crocheting!