

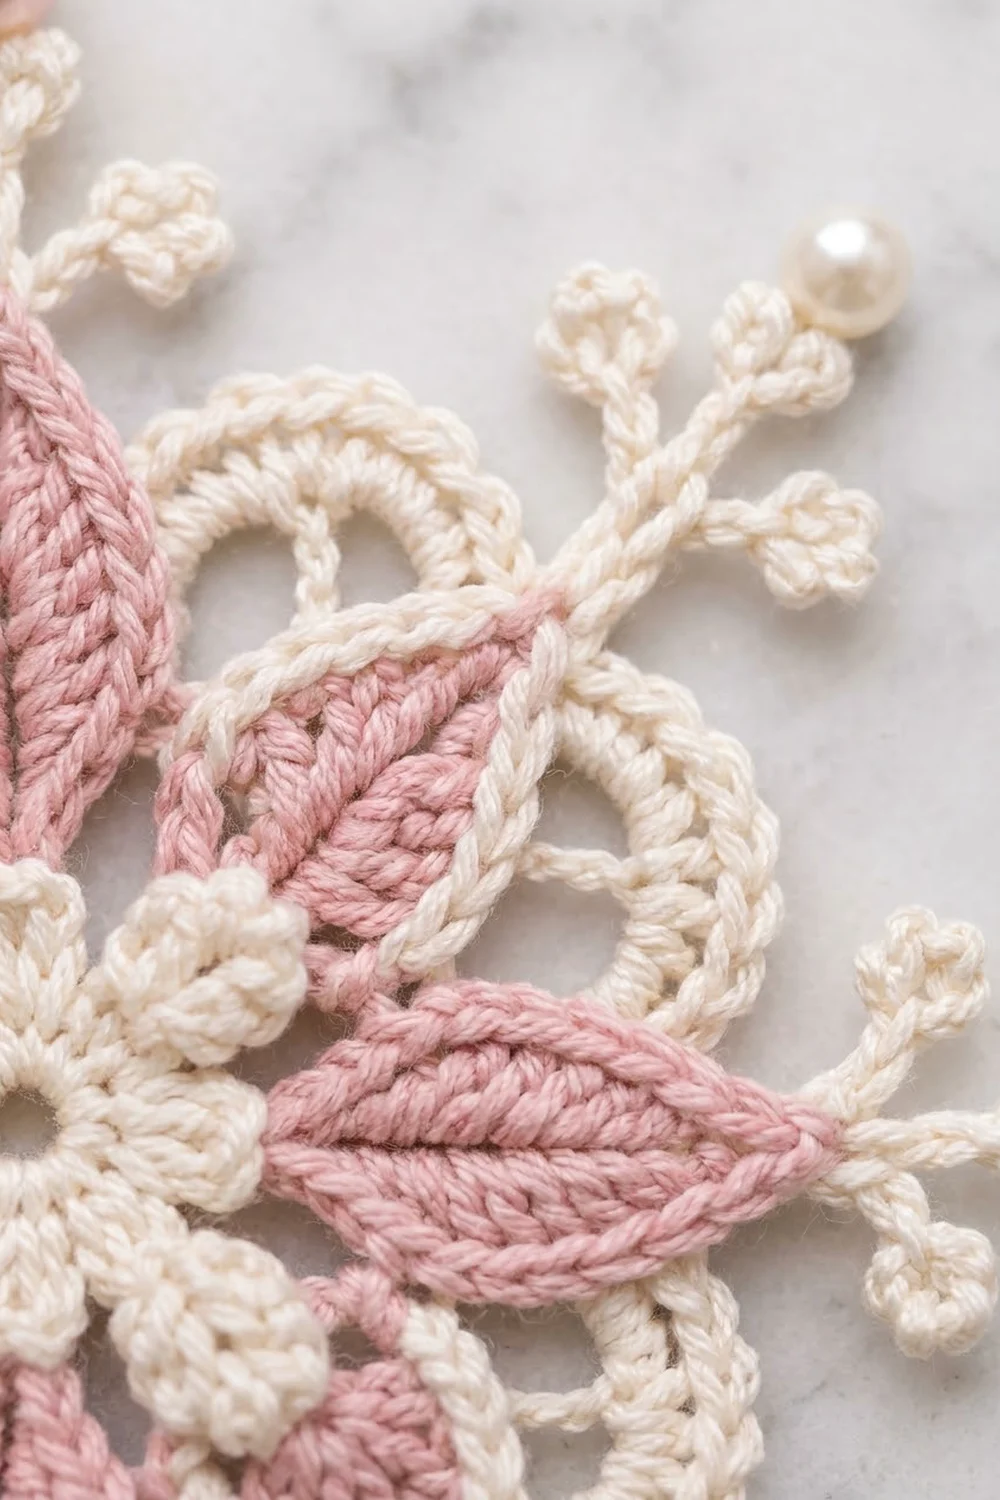
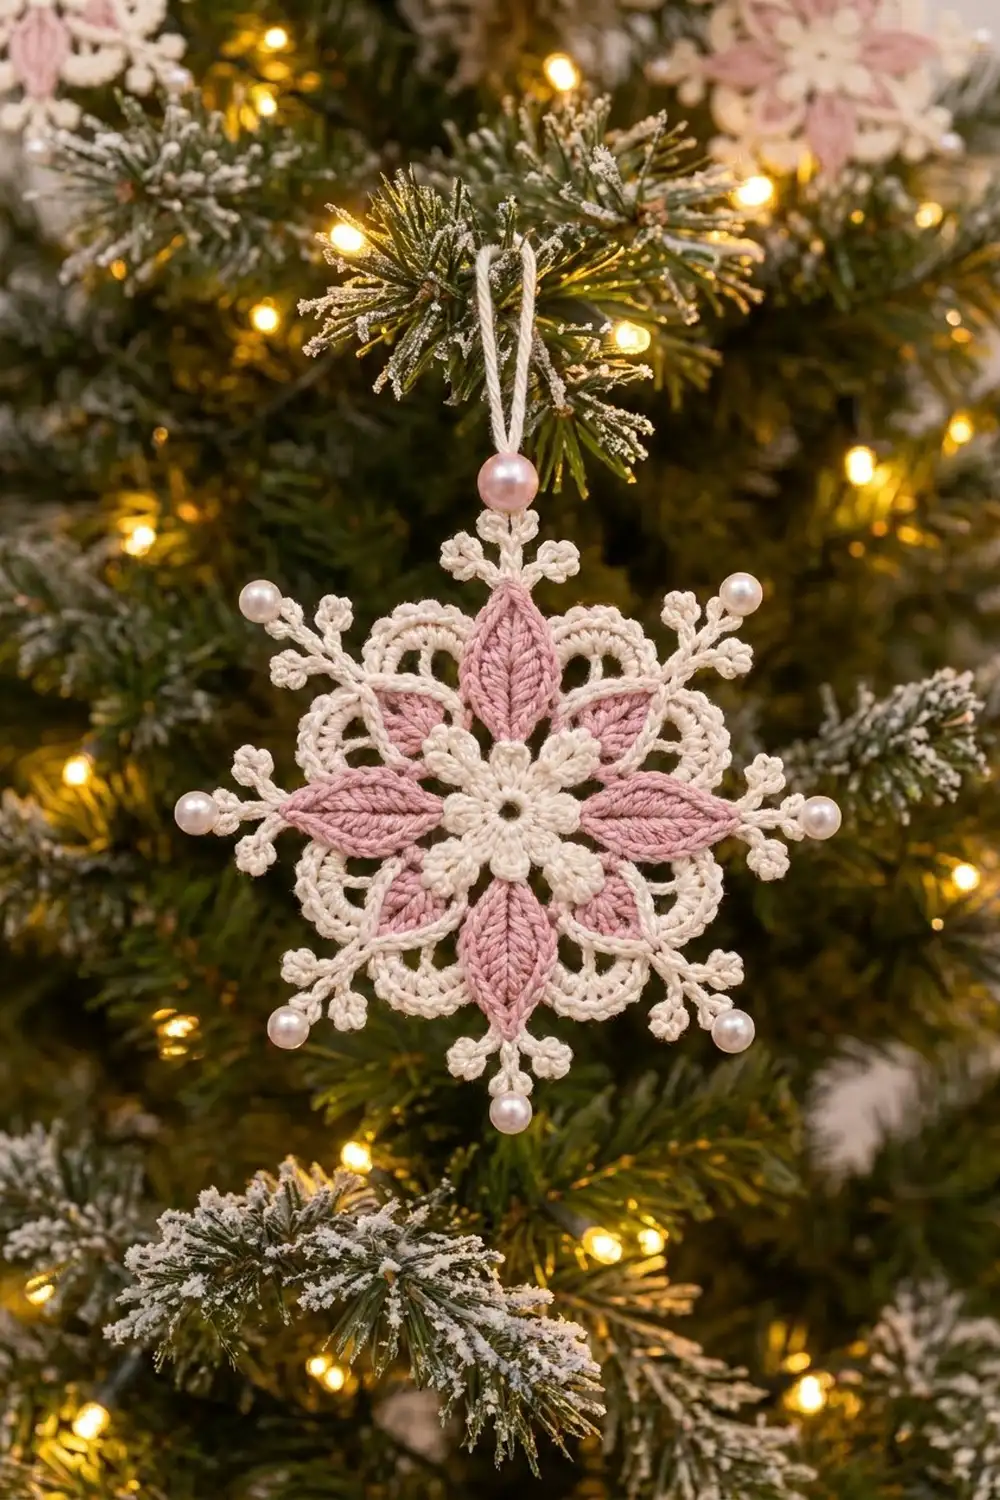
The Frosted Rose Snowflake is a small, lacy ornament in soft cream and dusty pink. A six-petal flower sits at the center. Six pointed pink leaves radiate from it, cream arches with looped edges fill the gaps between them, and branched spikes with pearl tips give the outline its frosty look.
It’s one single piece, worked in the round from the center out. There is nothing to join or sew. You only add beads as you go and weave in a few ends.
The finished ornament measures about 4.5 in (11.4 cm) from spike tip to spike tip, plus a 2 in (5.1 cm) hanging loop. This pattern uses US crochet terms throughout.
Here’s how it’s built. You make the cream flower first. The pink round then adds small back petals and six chain-based leaves with a raised vein down the middle. Two cream rounds build the arches between the leaf tips. The last round makes the looped edge and the six beaded spikes.
Finished Size and Construction
- Finished size: 4.5 in (11.4 cm) tip to tip; hanging loop adds 2 in (5.1 cm)
- Skill level: Intermediate
- Terminology: US crochet terms
- Yarn weight: Size 10 cotton crochet thread
- Hook: 1.75 mm steel hook, plus a 0.6 mm steel hook for the beads
- Number of pieces: 1
- Layout: Single radial motif, 6-fold symmetry
- Piece size before edging (after Rnd 6): about 3.4 in (8.6 cm) across the arches
- Edging depth (Rnd 7 spikes): about 0.75 in (1.9 cm) beyond each leaf tip
Materials
Thread: Use mercerized cotton crochet thread in size 10. The sheen shows off the leaf texture, and cotton holds its shape well after blocking. Avoid fuzzy blends, because they blur the picots.
- Color A, cream: 8 g, about 26 m
- Color B, dusty pink: 4 g, about 13 m
The quantities include a margin of roughly 30% for your gauge swatch and weaving in ends.
Tools and notions:
– 1.75 mm steel crochet hook
– 0.6 mm steel hook, or any hook small enough to fit through the bead holes
– 5 cream pearl beads, 4 mm, with holes large enough for size 10 thread
– 1 pink pearl bead, 5 mm
– Tapestry needle
– Stitch marker
– Blocking board, rust-proof pins, and spray starch or a fabric stiffener
Abbreviations (US Terms)
- ch: chain
- sl st: slip stitch
- sc: single crochet
- hdc: half double crochet
- dc: double crochet
- tr: treble crochet
- sp: space
- st(s): stitch(es)
- rep: repeat
- RS: right side
Special stitches:
- ch-3 picot: Ch 3, sl st in 3rd ch from hook.
- Long twig: Ch 5, ch-3 picot, sl st in each of the 5 ch back to the stem.
- Short twig: Ch 3, ch-3 picot, sl st in each of the 3 ch back to the stem.
- Place bead: Take the loop off the main hook. Put the bead on the 0.6 mm hook, catch the loop and pull it through the bead. Put the loop back on the main hook and ch 1 to lock the bead in place.
- Surface sl st: With the RS facing and the working thread held behind the piece, insert the hook from front to back, yarn over and pull a loop through the fabric and the loop on the hook.
Gauge and Checkpoints
Gauge isn’t critical for an ornament, but it controls how well the arches fit between the leaves. Work Rnds 1–2 first as a test piece and measure before you continue.
- After Rnd 2: The flower measures 1.25 in (3.2 cm) across opposite petal tips.
- Chain gauge: 10 ch = 1 in (2.5 cm), measured relaxed.
- After Rnd 4: 3 in (7.6 cm) from leaf tip to opposite leaf tip.
- After Rnd 6: About 3.4 in (8.6 cm) across the arches.
- After Rnd 7: 4.5 in (11.4 cm) tip to tip.
If your flower is too big: Go down to a 1.5 mm hook. Also check that your chains aren’t loose. Loose chains make the arches sag.
If your flower is too small: Go up to a 2.0 mm hook.
If your chain gauge differs: You can’t fix that by changing the number of stitches, because the counts below are linked. Change the hook instead. Your Rnd 5 chains have to reach from tip to tip with a slight outward curve.
Pattern
Rnd 1: Center Ring (Color A)
Make a magic ring. Ch 1 (does not count as a st), work 12 sc into the ring. Pull the ring closed, leaving a small hole about 0.25 in (0.6 cm) wide. Sl st to the first sc.
Count: 12 sc.
Rnd 2: Flower Petals (Color A)
Ch 1. (Sc, hdc, dc) in the next st, (dc, hdc, sc) in the next st. Rep from * 5 more times. Sl st to the first sc.
Each petal is 6 sts worked over 2 sts of Rnd 1.
Count: 6 petals, 36 sts.
Checkpoint: The flower measures 1.25 in (3.2 cm) across opposite petal tips.
Rnd 3: Back Loops (Color A)
This round sits behind the flower and gives you anchors for the pink round.
Sl st in the gap between the first two petals, going through to the back so the sl st lands on the Rnd 1 stitch between them. Ch 1, sc in that same spot. This sc is your first anchor.
Ch 5. Keeping the chain behind the next petal, sc in the gap between the next two petals, working into the Rnd 1 stitch between them. Rep from * 4 more times. Ch 5 and sl st to the first sc.
Count: 6 anchor sc, 6 ch-5 spaces. Fasten off Color A.
Rnd 4: Back Petals and Leaves (Color B)
Join Color B with a sl st in any anchor sc.
Leaf (worked at each anchor):
1. Ch 10.
2. First side: Working in the back bumps of the chain, sc in the 2nd ch from the hook, hdc in next, dc in next 2, tr in next, dc in next 2, hdc in next, sc in next. That’s 9 sts. Sl st in the anchor sc.
3. Second side: Rotate the work. Working in the free top loops of the same chain, toward the tip: sc in next, hdc in next, dc in next 2, tr in next, dc in next 2, hdc in next, sc in next. That’s another 9 sts.
4. Tip: (Sc, ch 2, sc) in the turning ch at the tip.
5. Vein: Work 9 surface sl sts down the center line of the leaf, between the two halves, ending at the base. Sl st in the anchor sc.
Each leaf has 20 sts (9 + 9 + 2 tip sc) plus a ch-2 tip space.
Back petal: (Sc, hdc, 3 dc, hdc, sc) in the next ch-5 sp. That’s 7 sts.
Round: Leaf at the current anchor, back petal in the next ch-5 sp, sl st in the next anchor sc. Rep from * 5 more times. On the last repeat, finish with a sl st in the first sl st.
Count: 6 leaves (20 sts each) + 6 back petals (7 sts each) = 162 sts, plus 6 ch-2 tip spaces.
The back petals peek out from behind the cream flower, and the leaves sit between the flower petals. Fasten off Color B.
Checkpoint: 3 in (7.6 cm) from leaf tip to opposite leaf tip.
Rnd 5: Arch Chains (Color A)
Join Color A with sc in the ch-2 tip sp of any leaf.
Ch 17, sc in the ch-2 tip sp of the next leaf. Rep from * 4 more times. Ch 17 and sl st to the first sc.
Count: 6 tip sc, 6 ch-17 spaces.
Adjacent leaf tips are about 1.5 in (3.8 cm) apart. At 10 ch per inch, 17 chains give each arch a slight outward curve instead of a tight straight line.
Rnd 6: Arch Fill (Color A)
Ch 1. Sc in the tip sc, then (2 hdc, 15 dc, 2 hdc) in the next ch-17 sp. Rep from * 5 more times. Sl st to the first sc.
This is a conversion round. Each arch holds 17 stitches worked 1 per chain, plus 2 extra stitches that give it a fuller curve, for 19 sts per arch. Each repeat is 1 tip sc + 19 = 20 sts.
Count: 6 × 20 = 120 sts.
Checkpoint: About 3.4 in (8.6 cm) across the arches. The piece should lie flat. A slight ruffle along the arches is fine and blocks out.
Border: Looped Edge and Beaded Spikes
This last round is the “border” of the snowflake. There are no straight sides here. Each “side” is one arch segment between two tip sc.
Border gauge: Each ch-3 loop should stand about 0.13 in (0.3 cm) proud of the dc row. Each spike reaches about 0.75 in (1.9 cm) beyond the leaf tip, including the bead.
Spike (worked into a tip sc):
1. Ch 8, place bead.
2. Working back down the stem: sl st in the next 2 ch. Make 2 long twigs, one to each side, from the same ch.
3. Sl st in the next 3 ch. Make 2 short twigs, one to each side.
4. Sl st in the next 3 ch to reach the base.
5. Sl st in the same tip sc.
The stem uses 2 + 3 + 3 = 8 ch, which matches the 8 ch you made.
Top spike (choose one spike): Use the pink bead instead of a cream one. After you place the bead, ch 20 and sl st in the bead-locking ch to make the hanging loop. Then continue down the stem as written.
Rnd 7
Ch 1, sc in the first tip sc. Work a spike into it.
Then work across the arch: sc in each of the next 2 hdc, sc in the next dc. (Ch 3, skip 1 dc, sc in the next dc) 7 times. Sc in each of the next 2 hdc.
Sc in the next tip sc and work a spike.
Repeat the arch and spike sequence around until all 6 arches and 6 spikes are done. Finish with a sl st in the first sc.
Count per arch segment: 2 sc + 1 sc + 7 sc + 2 sc = 12 sc, plus 7 ch-3 loops.
Count for the round: 6 × 12 = 72 sc and 42 ch-3 loops, plus 6 tip sc with 6 spikes.
Why the math works: Each arch in Rnd 6 has 19 sts: 2 hdc + 15 dc + 2 hdc. In Rnd 7, the 2 hdc on each end take 1 sc each (4 sts). The first dc takes 1 sc. The 7 loop repeats each skip 1 dc and work into the next, using 14 dc. That’s 1 + 14 = 15 dc, matching the 15 dc. Altogether 4 + 15 = 19 sts are used, so no stitches are left over or doubled. The spikes are worked only into the 6 tip sc, so every arch has the same edge.
Fasten off and weave in all ends along the back of the stitches.
Checkpoint: 4.5 in (11.4 cm) tip to tip.
Final Blocking
- Soak the ornament in cool water for 5 minutes. Gently press out the water between towels; don’t wring it.
- Pin the flower center flat on your board. Use a ruler to mark a 4.5 in (11.4 cm) circle around it.
- Pin each leaf tip so opposite tips sit 3 in (7.6 cm) apart. Keep the spacing even at 60 degrees.
- Pin each spike tip just under the bead, on the 4.5 in (11.4 cm) circle.
- Open each twig picot with a pin so the branches angle outward.
- Pin the center ch-3 loop of each arch to round out the scallop.
- Spray with starch or brush on fabric stiffener. Leave it to dry completely, about 6 to 12 hours.
- Unpin it, and fluff the hanging loop.
Final Quality-Control Checklist
- The center hole is closed to about 0.25 in (0.6 cm).
- The flower has 6 even petals of 6 sts each.
- The 6 pink back petals show evenly behind the flower.
- The 6 leaves are the same length, each with a visible raised center vein.
- All 6 arches have 7 ch-3 loops.
- All 6 spikes have 2 long twigs, 2 short twigs and a bead at the tip.
- The pink bead and hanging loop sit on one spike only.
- The piece measures 4.5 in (11.4 cm) tip to tip.
- All ends are woven in and invisible from the RS.
Troubleshooting
The flower cups upward. Rnd 1 is too tight. Try 13 sc or a larger hook, or pull the ring less tightly.
The leaves curl. Your tension on the vein surface sl sts is too tight. Work them more loosely, or use a hook one size up for the vein.
The arches pull the leaf tips inward. Your chains are too tight. Rework Rnd 5 with looser chains, or go up a hook size for that round only.
The arches ruffle. Your chains are loose. Use a smaller hook for Rnds 5–6, or work 14 dc instead of 15 in each arch. If you do, use 6 loop repeats plus one extra sc in the last dc in Rnd 7, so all 18 arch sts are still used.
A bead won’t fit. Use a finer hook to pull the loop through, or choose beads with larger holes.
The spikes flop. Starch them more heavily, and keep the stem sl sts snug.
Care
Hand wash in cool water, then re-block flat and starch if needed. Store the ornament flat in tissue paper so the spikes and picots keep their shape.
Final Notes
Here’s the measurement chain. A 1.25 in (3.2 cm) flower leads to leaf tips 3 in (7.6 cm) apart. Arch chains at 10 ch per inch then give arches about 3.4 in (8.6 cm) across. The beaded spikes finish the snowflake at 4.5 in (11.4 cm). If each checkpoint matches, the next round will fit. Check the flower first, keep your chains relaxed, and block firmly.
Happy crocheting!