

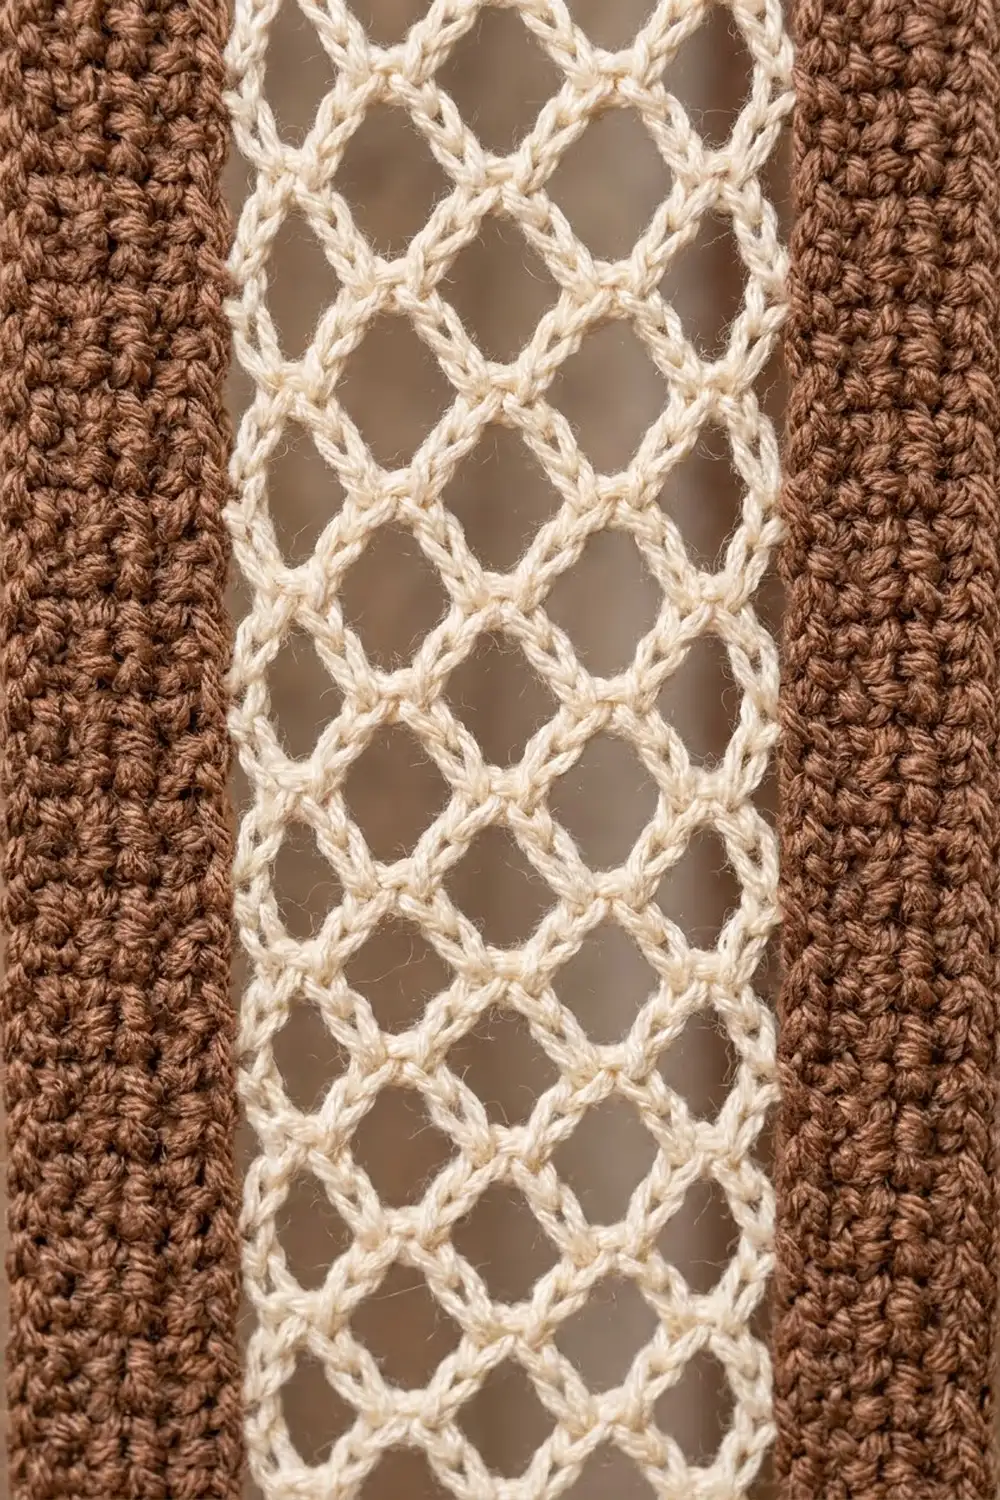
This curtain panel alternates solid brown single crochet strips with airy cream chain lattice. In daylight, the brown bands give the panel structure, and the cream diamonds let soft light through between them. The style is boho farmhouse: clean vertical lines, natural cotton and a handmade texture.
The pattern uses US crochet terms throughout. The finished panel measures about 32.5 in (82.6 cm) wide and 74.5 in (189.2 cm) from the top of the rod loops to the bottom edge. The body of the curtain is 72 in (182.9 cm) long.
For construction, you work seven brown strips lengthwise on a foundation single crochet base. Then you add a hanging tab to the top of each strip. Next, you work the cream lattice directly between neighboring strips, which joins them as you go, so there is no separate seaming. Last, a two-row brown border finishes the sides and the bottom edge.
Every step has a measurement checkpoint, so you can confirm the size as you go rather than at the end.
Finished Size and Construction
- Finished size: 32.5 in (82.6 cm) wide x 74.5 in (189.2 cm) long, including the tabs
- Body before border: 32 in (81.3 cm) x 72 in (182.9 cm)
- Skill level: Intermediate
- Terminology: US
- Yarn weight: DK / light worsted (#3) cotton
- Hook: 4.0 mm (G-6)
- Number of pieces: 7 brown strips plus 6 cream lattice insertions (13 components)
- Layout: 13 vertical columns, alternating brown, lattice, brown
- Brown strip size: 2 in (5.1 cm) x 72 in (182.9 cm)
- Lattice insertion size: 3 in (7.6 cm) x 72 in (182.9 cm)
- Border depth: about 0.25 in (0.6 cm)
- Tab loop drop: 2.25 in (5.7 cm), which fits rods up to 1.25 in (3.2 cm) across
Materials
Use a smooth mercerized or combed cotton in DK weight. Cotton hangs straight, holds the lattice crisp, and stands up to sunlight better than acrylic. Avoid fuzzy yarns, because they blur the diamonds.
- Mocha brown: 600 g, about 1,320 m (12 balls of 50 g / 110 m)
- Cream: 200 g, about 440 m (4 balls of 50 g / 110 m)
Tools:
– 4.0 mm (G-6) crochet hook
– Locking stitch markers (at least 20)
– Tapestry needle
– Measuring tape
– Rust-proof blocking pins
– Blocking mats or a large clean towel
– Spray bottle
The yarn quantities include a margin of about 15% for swatching, tension differences and weaving in ends.
Abbreviations (US Terms)
- ch – chain
- sl st – slip stitch
- sc – single crochet
- fsc – foundation single crochet
- rev sc – reverse single crochet (crab stitch)
- st(s) – stitch(es)
- sk – skip
- sp – space
- RS / WS – right side / wrong side
Foundation single crochet (fsc): Ch 2. Insert hook in the 2nd ch from hook, yarn over and pull up a loop, yarn over and pull through 1 loop (this is the “chain”), yarn over and pull through 2 loops (this is the “sc”). For each following fsc, insert the hook under the 2 loops of the previous stitch’s “chain” and repeat. Fsc gives a stretchy base edge that matches the top edge of the strip.
Gauge and Checkpoints
Gauge: 20 sc and 24 rows = 4 in (10.2 cm) in sc. That works out to 5 sts and 6 rows per inch (2.5 cm).
Test piece first. Before you start full-length strips, make two short test strips of 30 fsc each and work 12 rows on each.
- Checkpoint 1: Each test strip should measure 6 in (15.2 cm) long and 2 in (5.1 cm) wide.
Next, work 10 rows of lattice between the two test strips, following the lattice section below.
- Checkpoint 2: The lattice should measure 3 in (7.6 cm) wide when lightly stretched. Every 2 lattice rows should add 1.2 in (3.0 cm) of height.
If your piece is too big: Change to a 3.75 mm hook. If it is too small: Change to a 4.5 mm hook. Strip length matters more than width, because the lattice anchors are counted along the strip edges. If the lattice is too narrow but the strips are on gauge, add 1 ch to each full arch and to Row 1, and keep the hook size the same.
Brown Strips (Make 7)
Work each strip lengthwise, from the bottom end to the top end.
Row 1: With brown, work 360 fsc. Turn. (360 sts)
- Checkpoint: Lay the foundation flat without stretching it. It should measure 72 in (182.9 cm). Place a marker every 60 sts to make counting easier.
Rows 2–12: Ch 1 (does not count as a st), sc in each st across. Turn. (360 sts in each row)
Fasten off at the end of Row 12.
- Checkpoint: The strip is 2 in (5.1 cm) wide x 72 in (182.9 cm) long. It has 12 rows, and each long edge has 360 sts.
Mark the bottom end of each strip (the end where Row 1 began) with a marker. You will count every edge stitch from this end.
Hanging Tabs (1 per strip)
With the RS facing, join brown at the top short edge of a strip. This edge has 12 row ends.
Row 1: Ch 1. Work 1 sc in each row end across, skipping the 4th and 9th row ends. Turn. (10 sts)
Rows 2–27: Ch 1, sc in each st across. Turn. (10 sts in each row)
Fasten off and leave a 12 in (30.5 cm) tail.
- Checkpoint: The tab is 2 in (5.1 cm) wide x 4.5 in (11.4 cm) long.
Fold the tab toward the WS. Whipstitch the 10 sts of Row 27 to the WS of the strip, directly behind tab Row 1. This makes a loop that drops 2.25 in (5.7 cm). Repeat on all 7 strips.
Lattice Insertions (Make 6, Joined as You Go)
Layout grid. Lay the strips side by side with the RS up and all bottom markers at the same end:
B L B L B L B L B L B L B
B = brown strip and L = lattice insertion. You need 7 brown strips and 6 lattice insertions.
Joining logic. Each lattice row travels across the gap from one strip to the other. It finishes with a sl st into an edge stitch of the strip it reaches, and the next row starts from that same stitch. Row k ends in edge stitch number 3k − 2, counted from the bottom.
As a result, the anchor points rise 3 sts per row and alternate sides. On each side, the anchors are 6 sts (1.2 in / 3.0 cm) apart, offset by 3 sts from the other side. This offset creates the half-diamonds along the brown edges.
Work the first gap between Strip 1 (left) and Strip 2 (right), with the RS facing.
Row 1 (foundation chain): Join cream with a sl st in st 1 of the left strip’s edge. Ch 15, then sl st in st 1 of the right strip’s edge. (15 ch)
Row 2 (B-row, worked right to left): Ch 5. Counting from the right end of Row 1, sc in the 4th ch. Ch 8, sk next 7 ch, sc in next ch. Ch 5, then sl st in st 4 of the left strip. (2 sc, ch 5 + ch 8 + ch 5 = 18 ch)
Row 3 (A-row, worked left to right): Ch 8, sc in the ch-8 arch of the previous row. Ch 8, then sl st in st 7 of the right strip. (1 sc, 16 ch)
Row 4 (B-row, worked right to left): Ch 5, sc in the next ch-8 arch. Ch 8, sc in the next ch-8 arch. Ch 5, then sl st in st 10 of the left strip. (2 sc, 18 ch)
Rows 5–120: Repeat Rows 3 and 4. Odd rows end on the right strip and even rows end on the left strip, and Row k always ends in st 3k − 2.
- Row 119 ends in st 355 of the right strip.
- Row 120 ends in st 358 of the left strip.
Sl st in sts 359 and 360 of the left strip, then fasten off.
Totals per insertion:
– 120 rows
– 61 anchors on the left edge (sts 1, 4, 10, 16 … 358)
– 60 anchors on the right edge (sts 1, 7, 13 … 355)
Each pair of A-row and B-row arches forms one horizontal band of two full diamonds.
- Checkpoint: Every 10 rows of lattice add 6 in (15.2 cm) of height. Measure at Row 40, Row 80 and Row 120. Each time, the top of the lattice should sit exactly level with the edge stitch you just anchored into.
Work the remaining 5 gaps the same way, always counting edge stitches from the bottom.
Tension advice. Keep the chains relaxed and even. Lattice that is too tight pulls the strips together and makes the brown edges ripple. Lattice that is too loose sags into long, narrow diamonds. Check after the first 10 rows: the gap should lie flat at 3 in (7.6 cm) with no rippling.
- Size checkpoint: With all 6 insertions done, the panel is 7 x 2 in + 6 x 3 in = 32 in (81.3 cm) wide x 72 in (182.9 cm) long.
Border
Border gauge: 5 sc per inch (2.5 cm), the same as the strips.
Row 1 (RS): Join brown at the top st (st 360) of the right outer edge of Strip 7.
- Work 1 sc in each st down the right side. (360 sc)
- Ch 1 for the corner.
- Along the bottom, work 10 sc across the 12 row ends of each brown strip, skipping the 4th and 9th row ends. Work 1 sc in each of the 15 ch of each lattice Row 1. (7 x 10 + 6 x 15 = 160 sc)
- Ch 1 for the corner.
- Work 1 sc in each st up the left outer edge of Strip 1. (360 sc)
Total: 880 sc and 2 corner ch-1 sps. Do not turn.
Row 2: Ch 1. Working left to right, rev sc in each sc and work 1 rev sc in each corner ch-1 sp. (880 + 2 = 882 sts) Fasten off.
Why the math works:
– Each side has 360 sc at 5 per inch, which is 72 in (182.9 cm), exactly the strip length.
– The bottom has 160 sc at 5 per inch, which is 32 in (81.3 cm), exactly the panel width.
– Each brown strip contributes 10 sc (2 in), and each lattice contributes 15 sc (3 in).
– No stitches are added at the seams, because the lattice anchors sit inside the strip edges.
The two rows add about 0.25 in (0.6 cm) on each side and along the bottom. The panel ends up 32.5 in (82.6 cm) wide and 72.25 in (183.5 cm) long below the tabs.
Final Blocking
- Weave in all ends along the brown strips. Do not weave them into the lattice chains.
- Lay the panel flat on mats or a towel with the RS up.
- Spray it evenly until it is damp but not dripping.
- Pin the outer corners so the panel measures 32.5 in (82.6 cm) x 72.25 in (183.5 cm).
- Pin each brown strip straight, using a long ruler or a taut string as a guide.
- Gently open each lattice to 3 in (7.6 cm) wide and pin the center diamond points so they line up in a straight vertical row.
- Let the panel dry completely, which takes 24 to 48 hours.
- Unpin it and hang it right away so the cotton relaxes under its own weight.
Final Quality-Control Checklist
- Each brown strip has 360 sts per long edge and 12 rows.
- Each tab has 10 sts and 27 rows, and is sewn into a loop on the WS.
- Each lattice has 120 rows, and the anchors on both edges rise evenly.
- The diamonds form two straight columns in every insertion.
- The bottom border has 160 sc, and each side has 360 sc.
- The bottom edge is straight and level, with no dips at the lattice.
- The panel measures 32.5 in (82.6 cm) x 74.5 in (189.2 cm), including the tabs.
- All ends are secure and hidden in the brown sections.
Troubleshooting
Brown strip curls into a spiral. The fsc base is tighter than the sc rows. Re-block the strip, or redo Row 1 with a 4.5 mm hook.
Lattice ends below or above the top. You probably skipped or double-counted an edge stitch. Check your markers every 60 sts and confirm that Row k ends in st 3k − 2.
Brown edges ripple next to the lattice. The chains are too tight. Relax your tension, or add 1 ch to each arch.
Diamonds look long and droopy. The chains are too loose. Use a 3.75 mm hook for the lattice only.
The panel leans to one side. The strips were laid out with the bottom ends mismatched. Make sure all the bottom markers are at the same end.
A tab twists on the rod. It was sewn off-center. Re-sew it directly behind tab Row 1.
Care
Hand wash in cool water with a mild detergent, and gently press out the water. Never wring it. Dry flat and re-pin the lattice if needed, then hang.

Final Notes
The whole panel follows a single chain of measurements:
- Gauge: 5 sts and 6 rows per inch.
- Each brown strip: 360 sts long and 12 rows wide, so 72 in x 2 in (182.9 cm x 5.1 cm).
- Each lattice: 120 rows anchored every 3 sts, so 3 in x 72 in (7.6 cm x 182.9 cm).
- The joined panel is 32 in (81.3 cm) wide.
- The border counts are 360 / 160 / 360 sc, giving a finished size of 32.5 in x 72.25 in (82.6 cm x 183.5 cm).
- The tabs add a 2.25 in (5.7 cm) loop, for 74.5 in (189.2 cm) from rod to hem.
If you check your size at each step, the finished panel will hang straight and evenly.
Happy crocheting!