

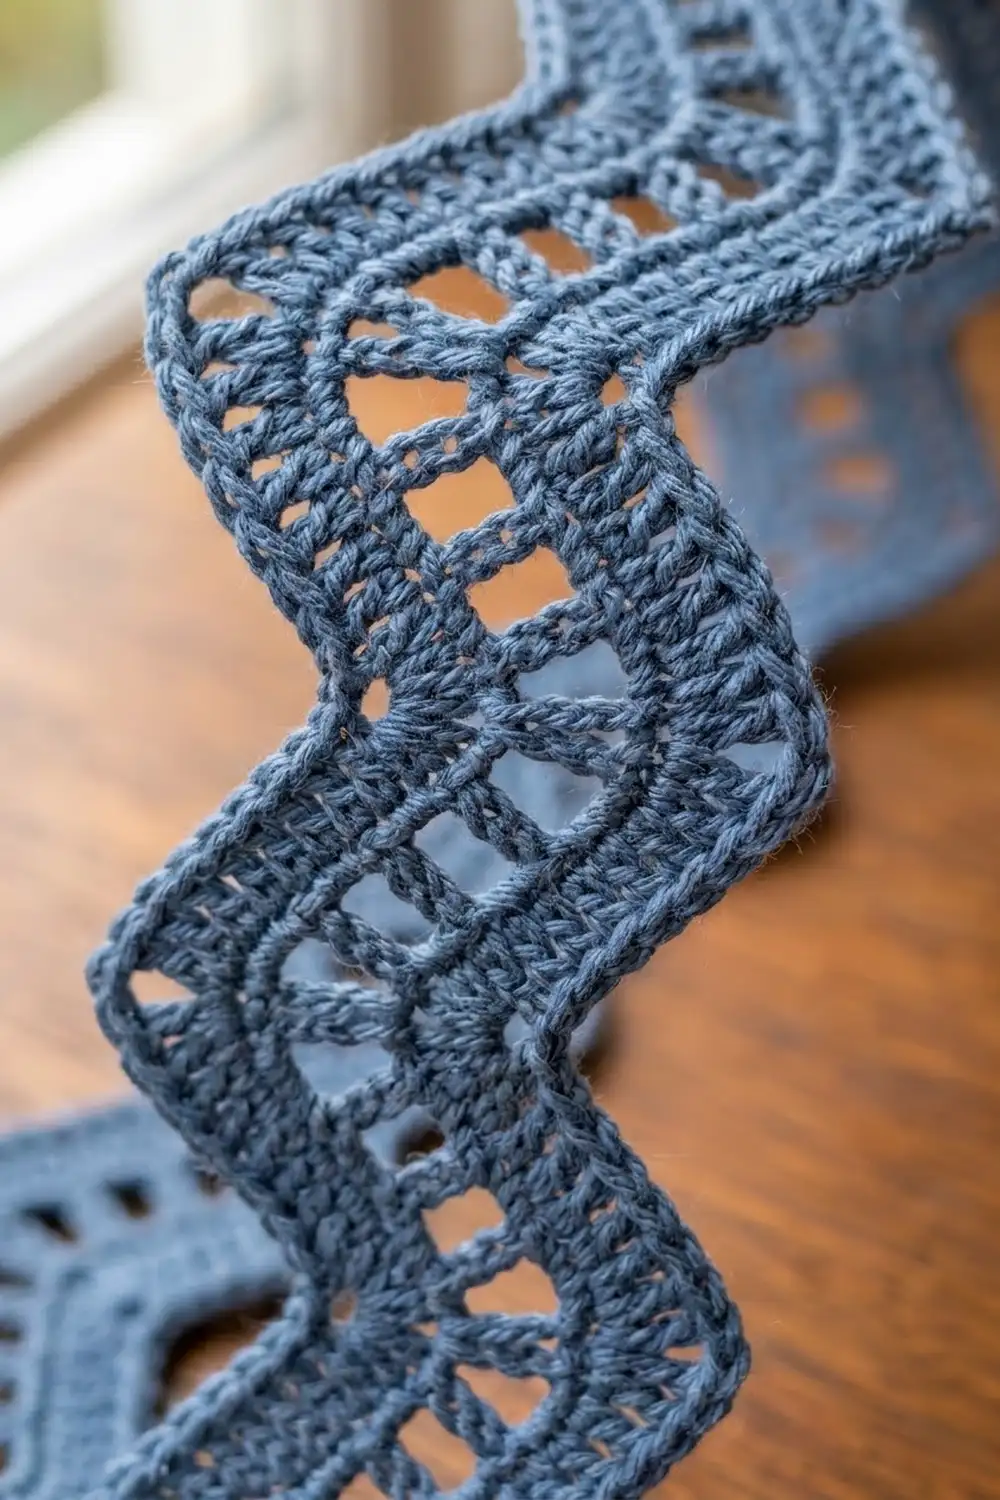
The Denim Drift curtain is a light, airy strip curtain made from six long zigzag lace strips. Each strip bends in a crisp, continuous chevron. It has solid double crochet bands along both edges and down the center, with two lines of small open windows in between.
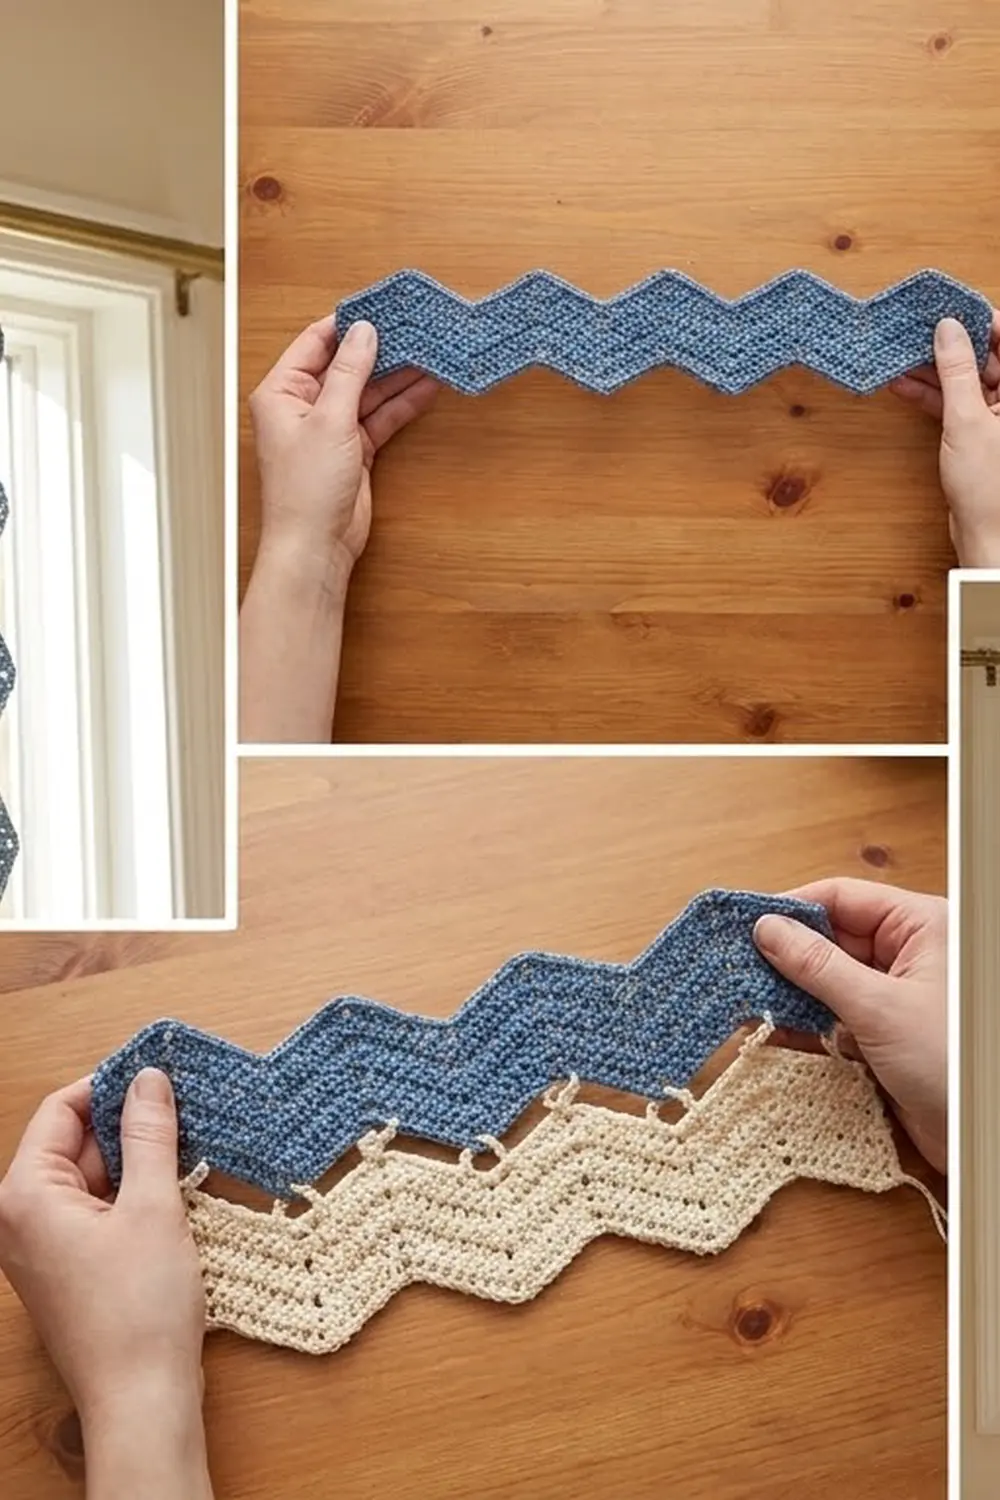
The strips alternate denim blue and cream, so the curtain looks like soft vertical waves when light comes through the window. Short chain bridges link neighboring strips at every peak. They keep the strips evenly spaced without filling in the open gaps between them. The style is relaxed and coastal, and it suits a kitchen window, a doorway, or a closet opening.
This pattern uses US crochet terms. The finished curtain measures 24 3/4 in (62.9 cm) wide and 60 3/4 in (154.3 cm) long to the top of the header, not counting the rod loops.
Construction is simple and repetitive. You crochet each strip lengthwise as a narrow five-row ripple. Then you link the six strips with chain bridges and work a three-row cream header across the top that includes the rod loops. There are no motifs to assemble and no seams to sew.
Finished Size and Construction
- Finished size: 24 3/4 in x 60 3/4 in (62.9 cm x 154.3 cm), plus rod loops
- Skill level: Intermediate
- Terminology: US crochet terms
- Yarn weight: DK / light (#3) cotton
- Hook: US G-6 (4.0 mm)
- Number of pieces: 6 strips (3 blue, 3 cream)
- Layout: 6 strips side by side in 1 row, with 2 1/4 in (5.7 cm) gaps
- Piece size: 2 1/4 in x 60 in (5.7 cm x 152.4 cm) per strip
- Size before border: 24 3/4 in x 60 in (62.9 cm x 152.4 cm)
- Border depth: 3/4 in (1.9 cm) header, plus loops that sit about 1 1/2 in (3.8 cm) above it
Materials
Choose a smooth mercerized or combed cotton in DK weight. Cotton holds the sharp zigzag points, washes well, and hangs straight. Acrylic tends to stretch over a long hanging length. Avoid fuzzy or loosely plied yarns, because they blur the mesh windows.
- Color A, denim blue: 100 g / 210 m (about 230 yd)
- Color B, cream: 150 g / 315 m (about 345 yd)
These quantities include a margin of roughly 15 to 25 percent for a gauge swatch and normal differences in tension. Cream needs more yarn because it is also used for all the bridges and the header.
Tools:
- US G-6 (4.0 mm) hook
- Stitch markers (at least 4)
- Tapestry needle
- Scissors
- Measuring tape
- Blocking mats and rust-proof pins
- Spray bottle
- Curtain rod up to 1 in (2.5 cm) in diameter
Abbreviations (US Terms)
- ch: chain
- sl st: slip stitch
- sc: single crochet
- dc: double crochet
- sk: skip
- st(s): stitch(es)
- sp: space
- RS / WS: right side / wrong side
Special stitch, dc3tog (double crochet 3 together): [Yarn over, insert hook in next st, yarn over and pull up a loop, yarn over and draw through 2 loops] 3 times. Then yarn over and draw through all 4 loops on the hook. A dc3tog counts as 1 st and forms each valley.
Counting rule: In this pattern, every dc, every ch-1 space, and every dc3tog counts as 1 st.
Gauge and Checkpoints
Gauge: In the ripple pattern, one 12-st wave measures 2 1/2 in (6.4 cm) along the strip, and 5 rows measure 2 1/4 in (5.7 cm) across. In plain sc, 10 sts measure 2 1/4 in (5.7 cm).
Make a test strip before you start. Ch 52 and work Rows 1-5 below with 4 waves instead of 24. Each row has 49 sts and 3 full peaks, so repeat from * 2 more times instead of 22. Wet block the test strip, let it dry, and measure it.
- After Row 1: 4 waves measure 10 in (25.4 cm) from end to end.
- After Row 5: The strip is 2 1/4 in (5.7 cm) wide.
If your test strip is too long or too wide, go down one hook size. If it is too short or too narrow, go up one hook size. Length matters most, because every error is multiplied by 24 waves. Being off by just 1/8 in (0.3 cm) per wave adds up to 3 in (7.6 cm) over a full strip.
Strip Pattern
Make 3 strips in Color A and 3 strips in Color B. Each strip has 24 waves: 23 full peaks, 24 valleys, and a half peak at each end.
Foundation: Ch 292.
Row 1 (RS): Dc in 4th ch from hook. The skipped ch count as the first dc, and together they form the starting half peak. Dc in next 4 ch, dc3tog over next 3 ch, dc in next 4 ch, 3 dc in next ch (peak), dc in next 4 ch, dc3tog over next 3 ch, dc in next 4 ch; repeat from * 22 more times, 2 dc in last ch (ending half peak). Turn. (289 sts)*
Count check: The first section has 11 sts, the 23 repeats have 12 sts each (276 sts), and the end has 2 sts. 11 + 276 + 2 = 289.
Row 2 (mesh, WS): Ch 3 (counts as dc), dc in first st, [ch 1, sk next st, dc in next st] twice, dc3tog over next 3 sts, [dc in next st, ch 1, sk next st] twice, (dc, ch 1, dc) in next st (peak), [ch 1, sk next st, dc in next st] twice, dc3tog over next 3 sts, [dc in next st, ch 1, sk next st] twice; repeat from * 22 more times, 2 dc in top of turning ch. Turn. (289 sts)*
The center of each peak is now a ch-1 space, and each valley has a dc on both sides. This creates the two small rectangular windows on each side of every point.
Row 3 (RS): Ch 3 (counts as dc), dc in first st, dc in next 4 sts, dc3tog over next 3 sts, dc in next 4 sts, 3 dc in next ch-1 sp (peak), dc in next 4 sts, dc3tog over next 3 sts, dc in next 4 sts; repeat from * 22 more times, 2 dc in top of turning ch. Turn. (289 sts)*
Work into dc and ch-1 spaces the same way. Each dc3tog should sit centered over the valley of the row below.
Row 4 (mesh, WS): Repeat Row 2. (289 sts)
Row 5 (RS): Repeat Row 3. (289 sts) Fasten off and weave in ends.
Checkpoint: Each strip is 2 1/4 in (5.7 cm) wide and 60 in (152.4 cm) long, measured straight from end to end along the center of the zigzag. Every row stays at 289 sts, because each 12-st repeat uses 12 sts and makes 12 sts. Place a marker every 6 peaks so it is easier to count.
Make All Pieces
- Color A, denim blue: 3 strips
- Color B, cream: 3 strips
Lay the strips RS up, with the foundation edge on the left, Row 5 on the right, and the starting tail at the top. All peaks should line up horizontally across the curtain.
Strip:  1      2      3      4      5      6
Color:  Blue   Cream  Blue   Cream  Blue   Cream
        |~gap~|~gap~|~gap~|~gap~|~gap~|
Joining
Join the strips in Color B with chain bridges. Each bridge connects the Row 5 edge of one strip to the foundation edge of the strip to its right. All six strips are identical and face the same direction, so their zigzag edges stay parallel and the gap stays 2 1/4 in (5.7 cm) all the way down.
Stitch-to-stitch logic: On Row 5, the first full peak center is st 13. Each later peak center is 12 sts further along (st 25, st 37, and so on), up to st 277. On the next strip, the matching point is the free loop of the foundation chain that holds the 3-dc peak group from Row 1. That gives 23 bridges per gap.
Joining Strip 1 to Strip 2:
- With RS facing, join Color B with a sl st in st 13 of Row 5 on Strip 1.
- Ch 10, then sl st in the free loop of the foundation ch at the base of the first full peak on Strip 2.
- Sl st back along the 10 ch, working into the back bump of each ch, to return to Strip 1.
- Sl st loosely in the next 12 sts of Row 5 to reach the next peak center.
- Repeat Steps 2-4 until you have made all 23 bridges. Fasten off.
Repeat for the other four gaps, for 115 bridges in total (5 gaps x 23 bridges).
Tension advice: Keep the traveling sl sts as loose as your dc rows. Tight sl sts pull the strip edge in and make it curl. The bridges should lie flat without sagging or pulling. If they pull, use ch 11 for the rest of that gap, and then use the same length for every gap.
Checkpoint: The joined panel measures 24 3/4 in (62.9 cm) wide: 6 strips x 2 1/4 in plus 5 gaps x 2 1/4 in.
Border: Top Header with Rod Loops
Work the header in Color B across the starting ends of all six strips. Each strip end is 5 row ends wide, and you work 2 sc in each row end.
Border gauge: 10 sc measure 2 1/4 in (5.7 cm), which equals one strip width and also one gap width.
Row 1 (RS): Join Color B at the top right corner of Strip 6. Work 10 sc evenly across the strip end (2 sc in each row end), ch 10; repeat from * 4 more times, then work 10 sc across the end of the last strip. Turn. (110 sts: 6 strips x 10 sc + 5 gaps x 10 ch)*
Row 2: Ch 1 (does not count as a st), sc in each sc and each ch. Turn. (110 sc)
Row 3 (loops): Ch 1. Over each strip section: sc in next 2 sts, ch 14, sk next 6 sts, sc in next 2 sts. Over each gap section: sc in next 10 sts. Fasten off. (74 sc + 6 ch-14 loops)
Count check: The 6 strip sections have 4 sc each (24 sc), and the 5 gap sections have 10 sc each (50 sc), for 74 sc in total. Each section uses exactly 10 sts, so all 110 sts are used.
Why the math works: The header starts with exactly 6 x 10 strip sts plus 5 x 10 gap chains, which are counted separately and shown in full. No hidden stitches are added at the seams. The gap chain matches the 2 1/4 in (5.7 cm) bridge spacing, so the header is exactly as wide as the joined panel. Each loop is centered over its own strip, so every strip hangs straight down.
The header adds 3/4 in (1.9 cm), which brings the curtain to 60 3/4 in (154.3 cm) long.
Final Blocking
- Weave in all ends inside the solid dc bands, not through the mesh windows.
- Soak the curtain in cool water for 15 minutes. Press the water out gently in a towel, without wringing.
- Lay the curtain flat on blocking mats with the header straight across the top.
- Pin the header to 24 3/4 in (62.9 cm).
- Pin each peak and valley along the outer edges of Strips 1 and 6, then do the inner strips. Keep each wave at 2 1/2 in (6.4 cm).
- Open each mesh window with a fingertip so it sits square.
- Let the curtain dry completely before you unpin it. For the best drape, hang it on the rod for a day.
Final Quality-Control Checklist
- Every row of every strip has 289 sts and 23 full peaks.
- Each strip measures 2 1/4 in x 60 in (5.7 cm x 152.4 cm).
- The colors alternate blue, cream, blue, cream, blue, cream.
- The peaks line up straight across the curtain.
- There are 115 bridges, all the same length.
- The header has 110 sts in Rows 1-2 and 6 loops in Row 3.
- The total width is 24 3/4 in (62.9 cm).
Troubleshooting
The zigzag looks rounded instead of pointed: Make sure each 3-dc peak goes into the single center st or ch-1 space, and that each dc3tog sits directly over the valley below.
The stitch count drifted: Remember to count each ch-1 space as a st. If a row is off, check the half peaks at each end, which are easy to miss.
The strip twists or spirals: The foundation chain is too tight. Chain loosely, or use a hook one size larger for the foundation only.
The windows look uneven: Check that you sk exactly 1 st under every ch-1, and that the mesh rows start with the descending sequence.
The bridges pull the strips together: Loosen the traveling sl sts and compare the bridge length with the ch-10 header gap.
The strips hang crooked: Check that each rod loop is centered over its 10-st strip section.
Care
Hand wash, or machine wash on a gentle cool cycle in a mesh laundry bag. Dry flat or on the rod so the zigzag points stay crisp.
Final Notes
The whole curtain comes from a short chain of measurements. One 12-st wave is 2 1/2 in (6.4 cm), so 24 waves make 60 in (152.4 cm), and 5 rows make a strip 2 1/4 in (5.7 cm) wide. Six strips and five equal gaps add up to 24 3/4 in (62.9 cm). The 3/4 in (1.9 cm) header brings the length to 60 3/4 in (154.3 cm). If your test strip matches the gauge, every later checkpoint should match too.
Happy crocheting!