
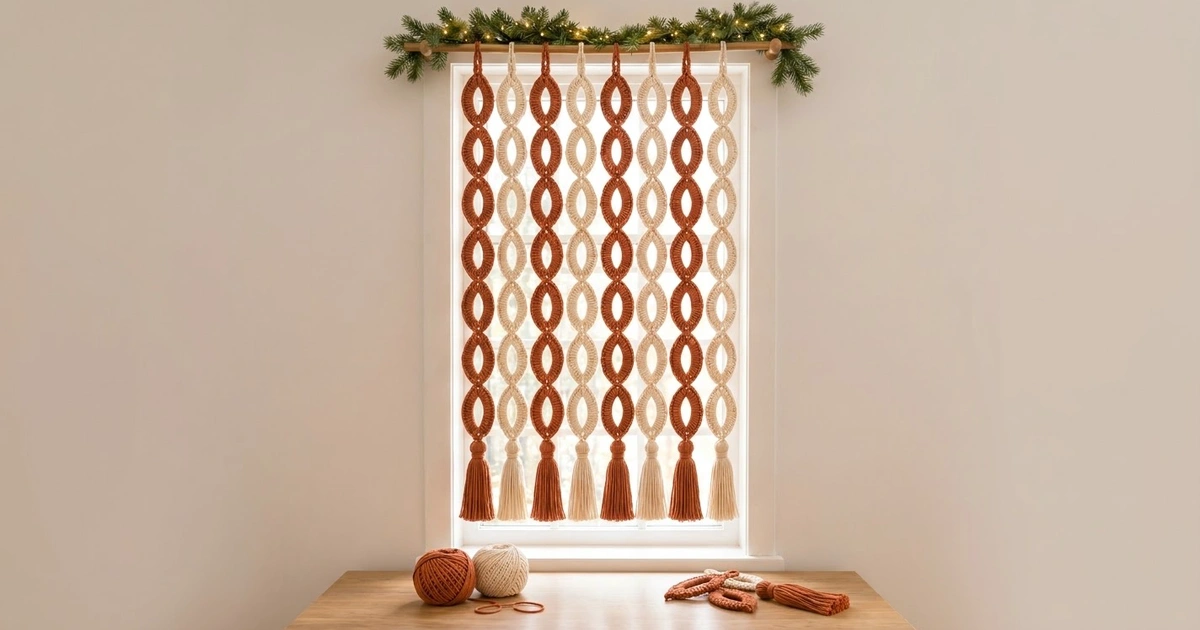
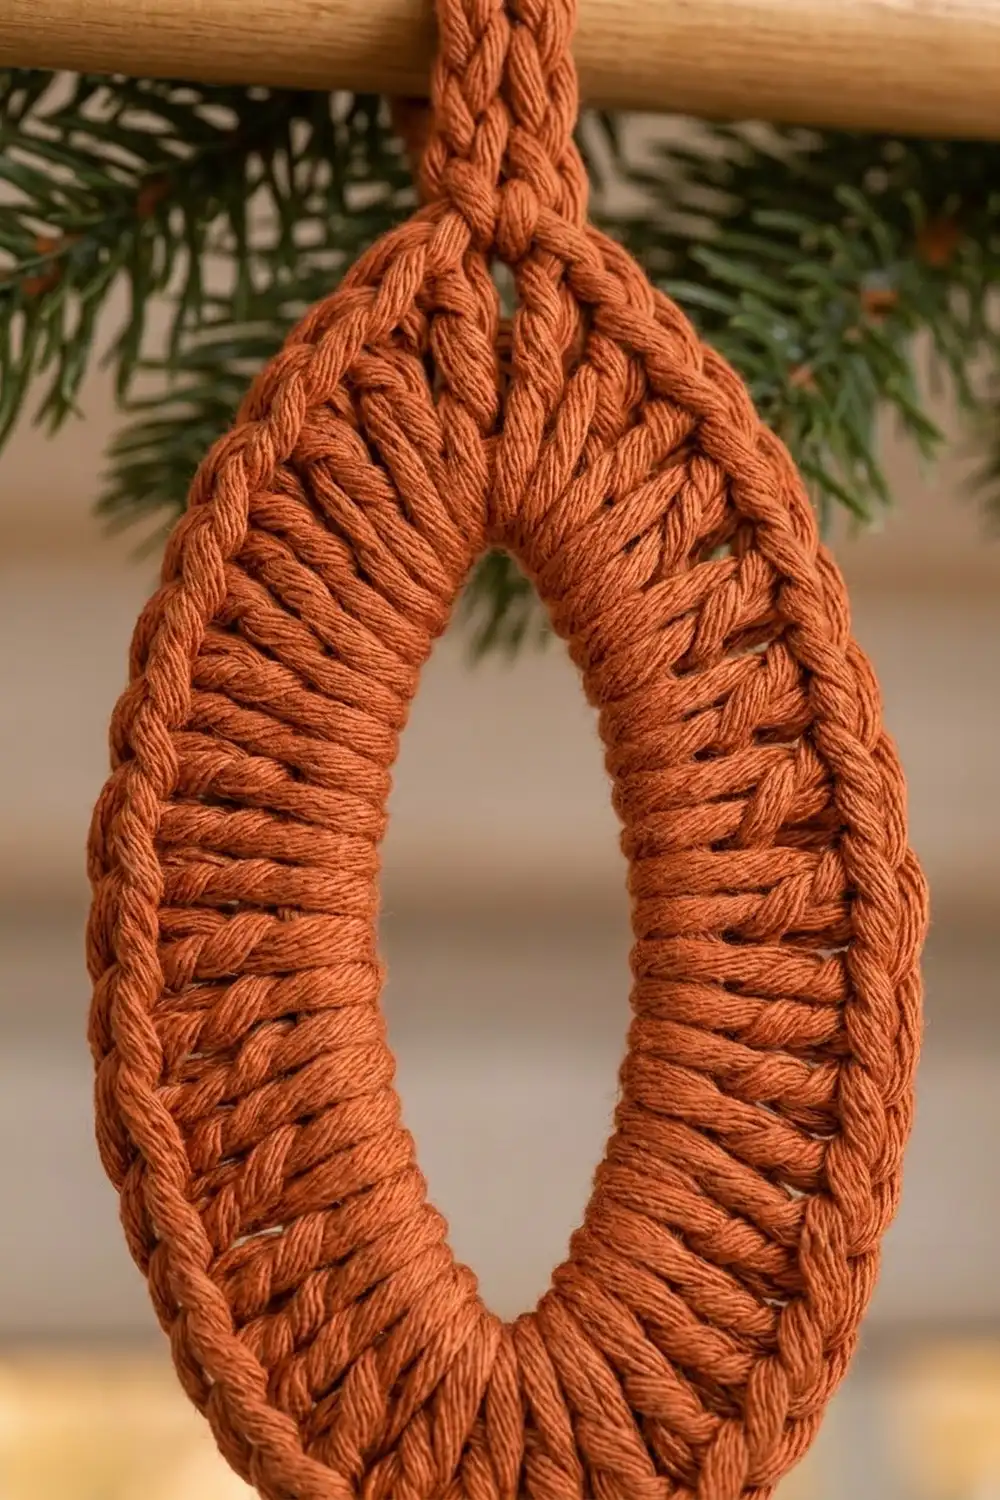
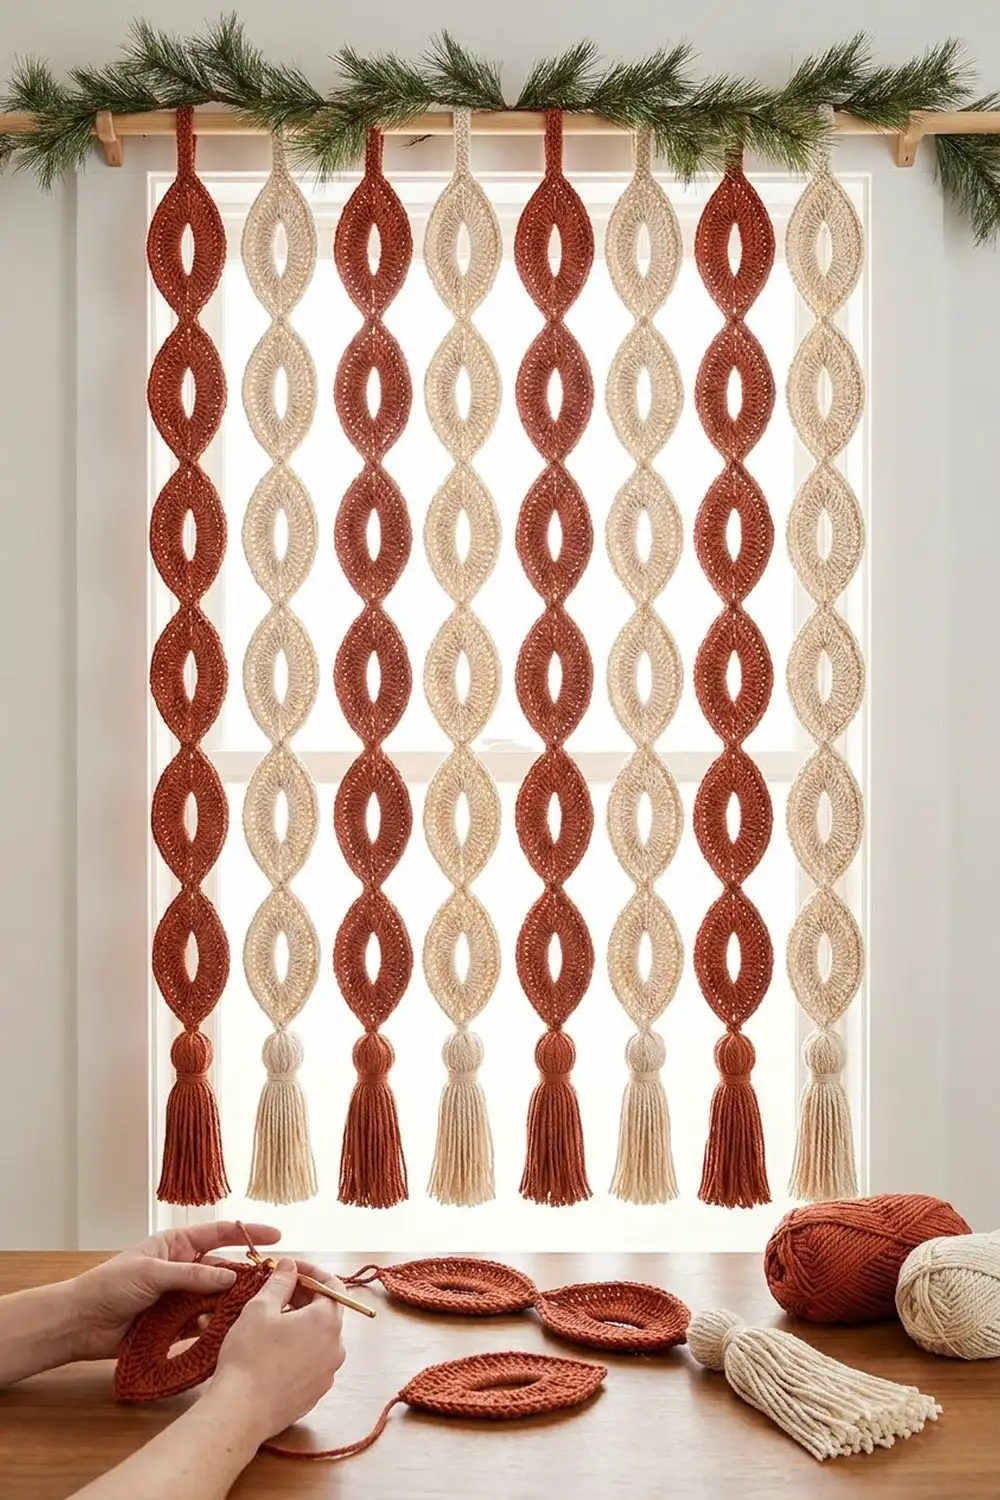
The Ember Links Curtain is a hanging window curtain made of long chains of almond-shaped crochet links. Each link has a pointed oval opening framed by long stitches that fan outward, and a smooth rolled edge finishes the outside. A full tassel hangs from the end of every strand.
This version uses two warm, natural colors: rust (terracotta) and cream. The strands alternate rust, cream, rust, cream across the rod, so the curtain reads as a soft striped screen. It suits a boho or rustic room, and it looks especially cozy in winter light with a garland on the rod.
The pattern uses US crochet terms. Each finished strand measures 3.5 in (8.9 cm) wide and 50 in (127.0 cm) long, including the hanging loop and tassel. Eight strands spaced 4 in (10.2 cm) apart, center to center, fill a span of 31.5 in (80.0 cm).
Construction is simple and repeatable. You work each link in the round around a chain ring. Then a single crochet edging round finishes the link and joins it to the link above, tip to tip. A hanging loop goes on the top link, and a tassel goes on the bottom link.
Finished Size and Construction
- Finished curtain: 31.5 in (80.0 cm) wide x 50 in (127.0 cm) long
- Skill level: Easy-intermediate
- Terminology: US crochet terms
- Yarn weight: Bulky (#5) cotton or cotton-blend cord
- Hook: 6 mm (US J-10)
- Number of pieces: 56 links (28 rust, 28 cream), 8 hanging loops, 8 tassels
- Layout: 8 vertical strands of 7 links each
- Piece size (one finished link): 6 in (15.2 cm) long x 3.5 in (8.9 cm) wide
- Size before border: 5.25 in (13.3 cm) long x 2.75 in (7.0 cm) wide
- Border depth: 3/8 in (1.0 cm), one round of single crochet
Materials
Choose a smooth, firm bulky cotton or cotton-blend cord with about 80 m per 100 g. Cotton holds the pointed shape well and hangs straight. Avoid fuzzy or very stretchy yarn, because the strands will lengthen under their own weight.
- Rust (terracotta): 325 g / 260 m
- Cream (natural): 325 g / 260 m
Quantities include a margin of about 25% for gauge differences, swatching, and full tassels. If you change the number of strands, allow about 32 g / 26 m per color for each additional strand of 7 links, its loop, and its tassel, before the margin.
Tools:
- 6 mm (US J-10) crochet hook
- Yarn needle
- Sharp scissors
- Stitch markers
- A stiff piece of card, 6.5 in (16.5 cm) tall, for tassels
- Blocking mat and rustproof pins
- Curtain rod or wooden dowel, at least 36 in (91.4 cm) long and up to 1.25 in (3.2 cm) thick
Abbreviations (US Terms)
- ch – chain
- sl st – slip stitch
- sc – single crochet
- hdc – half double crochet
- dc – double crochet
- tr – treble crochet
- BLO – back loop only
- sp – space
- st(s) – stitch(es)
- rnd – round
Special stitch – Tip Join: Work sc in the top tip ch-2 sp of the current link, ch 1, sl st in the bottom tip ch-2 sp of the previous link, ch 1, then sc in the same top tip sp of the current link. This replaces the usual (sc, ch 2, sc) at the top tip and keeps the stitch count the same.
Gauge and Checkpoints
Gauge: 11 sc and 12 rows = 4 in (10.2 cm) in rows of sc with a 6 mm hook.
Test one complete link before starting the curtain. Measure it flat, without stretching. Cotton cord relaxes slightly after washing, so measure your test link again after blocking it.
- Foundation ring: laid flat as a narrow oval, about 4 in (10.2 cm) long
- After Rnd 1: 5.25 in (13.3 cm) long x 2.75 in (7.0 cm) wide
- After Rnd 2 (border): 6 in (15.2 cm) long x 3.5 in (8.9 cm) wide
- One strand of 7 joined links: 42 in (106.7 cm) long
If your link is too big, go down one hook size. If it is too small, go up one hook size. If only the length is off, check that your tip stitches are sc, not hdc, and that your foundation chain is loose but even.
Link Pattern
The ring is 24 ch. Think of ch 1 as the top tip and ch 13 as the bottom tip. Ch 2–12 form side A, and ch 14–24 form side B, so each side has 11 ch.
Foundation: Ch 24 loosely, then sl st in the first ch to form a ring. Do not twist the chain.
Rnd 1 (growth round): Ch 1 (does not count as a st).
- Top tip: (sc, ch 2, sc) in the same ch as the joining sl st.
- Side A: hdc in next 2 ch, 2 dc in each of next 2 ch, 2 tr in each of next 3 ch, 2 dc in each of next 2 ch, hdc in next 2 ch. That makes 2 + 4 + 6 + 4 + 2 = 18 sts.
- Bottom tip: (sc, ch 2, sc) in next ch.
- Side B: Repeat Side A for 18 sts.
- Sl st in the first sc to join.
Rnd 1 count: 40 sts (18 per side + 2 sc at each tip) and 2 ch-2 tip sps.
The tr stitches sit at the widest part of each side, and the hdc stitches sit near the tips. This graduated height pulls the opening into a pointed almond shape. Working 2 sts into each of the middle 7 ch makes the long stitches fan outward, which creates the radiating texture.
Fasten off, or leave the yarn attached if you will work the border straight away. Check the size: 5.25 in (13.3 cm) long x 2.75 in (7.0 cm) wide.
Make All Pieces
Work the foundation and Rnd 1 for all 56 links:
- Rust: 28 links (strands 1, 3, 5, 7)
- Cream: 28 links (strands 2, 4, 6, 8)
Each strand uses only one color. The layout, viewed from the front, left to right:
Strand:  1    2    3    4    5    6    7    8
Color:   R    C    R    C    R    C    R    C
Links:   7    7    7    7    7    7    7    7
R = rust, C = cream. Each strand also gets 1 hanging loop at the top and 1 tassel at the bottom in the same color.
Joining
The links join tip to tip during the border round, using the join-as-you-go method. Read this section first, then work the border.
Method: Link 1 of each strand gets a plain border. Links 2–7 use the Tip Join at their top tip. The Tip Join connects the top ch-2 sp of the new link to the bottom ch-2 sp of the link above it.
Stitch-to-stitch logic: A normal tip is (sc, ch 2, sc). The Tip Join is (sc, ch 1, sl st, ch 1, sc). Both versions have 2 sc in the tip sp. The sl st and chains are not counted as sts, so every link keeps 44 border sts.
Tension: Keep the ch 1 before and after the sl st snug but not tight. If they are too tight, the links pucker at the tips. If they are too loose, the strand sags and grows longer. The two tips should meet in a narrow, neat pinch, with no visible gap. Always work the sl st from front to back so all links face the same way.
Size checkpoint: After joining 3 links, the strand should measure 18 in (45.7 cm). After 7 links, it should measure 42 in (106.7 cm).
Border (Edging and Join Round)
Border gauge: 11 sc = 4 in (10.2 cm), worked in BLO along the edge of Rnd 1.
Rnd 2: With the matching color, join with a sl st in the top tip ch-2 sp. Ch 1.
- Top tip: (sc, ch 2, sc) in the top ch-2 sp for link 1, or a Tip Join for links 2–7.
- Side A: sc in BLO of each of next 20 sts. These are 1 tip sc, 18 side sts, and 1 tip sc.
- Bottom tip: (sc, ch 2, sc) in the bottom ch-2 sp.
- Side B: sc in BLO of each of next 20 sts.
- Sl st in the first sc to join. Fasten off and weave in the ends.
Rnd 2 count (trim round): 40 sts worked 1 per existing st + 4 sc added in the tip sps = 44 sc.
Per side: 22 sc. That is 1 tip sc + 20 BLO sc + 1 tip sc. The 2 tip sc on each side are already included in the 22, so 2 sides x 22 = 44, with nothing counted twice.
Why the math works: The 20 BLO sc on each side match the 20 Rnd 1 sts on that side one for one, so the edge lies flat with no ruffling or cupping. The only additions are the 2 sc in each tip sp. They add length at the points, turning the 5.25 in (13.3 cm) core into a 6 in (15.2 cm) link. The single sc round adds 3/8 in (1.0 cm) to each side, turning 2.75 in (7.0 cm) into 3.5 in (8.9 cm). Working in BLO leaves the front loops as a raised ridge that frames the fanned stitches.
Hanging Loop
Rejoin the yarn in the top tip ch-2 sp of link 1. Ch 14, then sl st in the same tip sp to form a loop. Ch 1, work 20 sc over the loop, and sl st in the tip sp. Fasten off.
The loop hangs about 2 in (5.1 cm) above the link and fits a rod up to 1.25 in (3.2 cm) thick.
Tassel
Wrap yarn 30 times around the 6.5 in (16.5 cm) card. Cut along the bottom to get 30 strands, each 13 in (33.0 cm) long. Fold the bundle through the bottom tip ch-2 sp of link 7 so both halves hang evenly.
Cut a 20 in (50.8 cm) wrapping strand. Wrap it tightly around the bundle 8 times, 1/2 in (1.3 cm) below the tip, to form a rounded head. Use the yarn needle to thread the end under the wraps and hide it inside the tassel. Steam the tassel lightly, then trim it to 6 in (15.2 cm) below the link tip.
Final Blocking
- Soak the finished strands in cool water for 10 minutes. Gently press out the water. Do not wring.
- Roll each strand in a towel to remove extra moisture.
- Lay each strand flat on the blocking mat.
- Pin each link to 6 in (15.2 cm) long x 3.5 in (8.9 cm) wide. Pin at both tips and at the widest point on each side.
- Open the almond holes evenly with your fingers so both sides match.
- Check that the strand measures 42 in (106.7 cm) from the top tip to the bottom tip.
- Comb out the tassel and let it dry straight.
- Let everything dry completely. Then hang the strands on the rod, alternating rust and cream, 4 in (10.2 cm) apart center to center.
Final Quality-Control Checklist
- Each link measures 6 in (15.2 cm) x 3.5 in (8.9 cm).
- Rnd 1 has 40 sts and 2 ch-2 sps on every link.
- Rnd 2 has 44 sc, 22 per side, on every link.
- All tips are pointed, and the joins are snug with no gaps.
- Each strand has 7 links and measures 50 in (127.0 cm) overall.
- All hanging loops are the same size.
- All tassels are trimmed to 6 in (15.2 cm).
- The colors alternate R, C, R, C, R, C, R, C from left to right.
- All ends are woven in securely.
Troubleshooting
The link cups or curls: The foundation chain is too tight. Chain more loosely, or use a hook one size larger for the chain only.
The edge ruffles: You added extra sc in Rnd 2. Recount to 20 BLO sc per side.
The opening looks round instead of almond-shaped: Check that the tips use sc and the middle of each side uses tr. The difference in stitch height creates the points.
The strand twists when hung: Check that every Tip Join was worked from the front. Steam the strand and hang it with a light weight until it relaxes.
The strands are different lengths: Measure each strand after blocking, and adjust the tassel trim to even out small differences.
The tassel looks thin: Add 10 more strands before wrapping the head.
Care
Hand wash in cool water with mild soap, then reshape and lay flat to dry. Dust occasionally with a cool hair dryer or a soft brush.
Final Notes
The measurement chain is simple. A gauge of 11 sc = 4 in (10.2 cm) gives a 5.25 in (13.3 cm) link core. The 3/8 in (1.0 cm) border brings each link to 6 in (15.2 cm) x 3.5 in (8.9 cm). Seven joined links make 42 in (106.7 cm). Adding the 2 in (5.1 cm) loop and the 6 in (15.2 cm) tassel gives a 50 in (127.0 cm) strand. Eight strands spaced 4 in (10.2 cm) apart fill 31.5 in (80.0 cm) of window.
Check your first link carefully, and the rest will follow. Happy crocheting!