

This little ice skate is a flat Christmas ornament in one cheerful turquoise. The boot has a rounded toe, a sloped instep, a flared cuff and a neat corded edge. A thin blade with a curled tip sits underneath it.
The laces are not crocheted. You embroider them afterward with the same yarn as five simple X shapes. That keeps the whole skate one calm color and lets the texture do the work. It looks crisp on a tree, tied to a gift or hung in a window.
The pattern uses US crochet terms. The finished ornament measures about 4.2 in (10.7 cm) wide and 4.2 in (10.7 cm) tall, plus a 1 in (2.5 cm) hanging loop.
Here’s how it’s built. You crochet the boot flat in rows of single crochet from the sole up, shaping the toe and instep as you go. Then you add a two-round edging, make the blade and two struts separately and sew them on. Last come the embroidered laces and the hanging loop.
Finished Size and Construction
- Finished size: 4.2 in (10.7 cm) wide x 4.2 in (10.7 cm) tall, not counting the loop; 5.2 in (13.2 cm) tall with the loop
- Skill level: Easy to intermediate
- Terminology: US crochet terms
- Yarn weight: DK (light worsted, #3)
- Hook: 3.5 mm (E-4)
- Number of pieces: 1 ornament made of 4 crocheted parts (boot, blade and 2 struts)
- Layout: One standalone ornament, not joined to any others
- Boot size before the edging: 3.2 in (8.1 cm) wide at the foot x 3.0 in (7.6 cm) tall
- Boot size after the edging: 3.6 in (9.1 cm) wide x 3.4 in (8.6 cm) tall
- Edging depth: About 0.2 in (0.5 cm) on every side
Materials
Use a smooth, tightly plied DK cotton or cotton blend. It shows each stitch clearly and keeps the ornament firm. Fuzzy yarns blur the laces and the blade curl.
- Turquoise DK yarn: 15 g, about 38 m (41.6 yd). This covers the boot, edging, blade, struts, laces and loop.
- 3.5 mm (E-4) crochet hook
- Tapestry needle with a blunt tip
- Scissors
- Stitch markers (2)
- Ruler or tape measure
- Pins, a blocking mat and a spray bottle
The quantities include a margin, so you have spare yarn for a gauge swatch and for longer sewing tails.
Abbreviations (US Terms)
- ch – chain
- sc – single crochet
- sc2tog – single crochet 2 together
- sl st – slip stitch
- st(s) – stitch(es)
- BLO – back loop only
- RS – right side
- WS – wrong side
Special stitch – sc2tog: Insert the hook in the next st and pull up a loop. Insert the hook in the following st and pull up a loop (3 loops on the hook). Yarn over and pull through all 3 loops. This turns 2 sts into 1.
Turning chains: The ch 1 at the start of a row never counts as a stitch.
Gauge and Checkpoints
Gauge: 5 sc and 6 rows = 1 in (2.5 cm) in rows of single crochet.
For a swatch, ch 11 and work 12 rows of 10 sc. It should measure 2 in (5.1 cm) square. Because this is a one-piece ornament, the boot itself is your real test piece. Check it at each of these points:
- After Row 6: the foot is 3.2 in (8.1 cm) wide and 1 in (2.5 cm) tall.
- After Row 12: the ankle is 10 sts, or 2 in (5.1 cm) wide, and the boot is 2 in (5.1 cm) tall.
- After Row 18: the cuff is 12 sts, or 2.4 in (6.1 cm) wide, and the boot is 3.0 in (7.6 cm) tall.
- After the edging: the boot is 3.6 in (9.1 cm) wide x 3.4 in (8.6 cm) tall.
If your boot is too big, switch to a 3.25 mm or 3.0 mm hook. If it is too small, switch to a 3.75 mm hook. Whatever hook you use, keep the fabric firm so the ornament holds its shape.
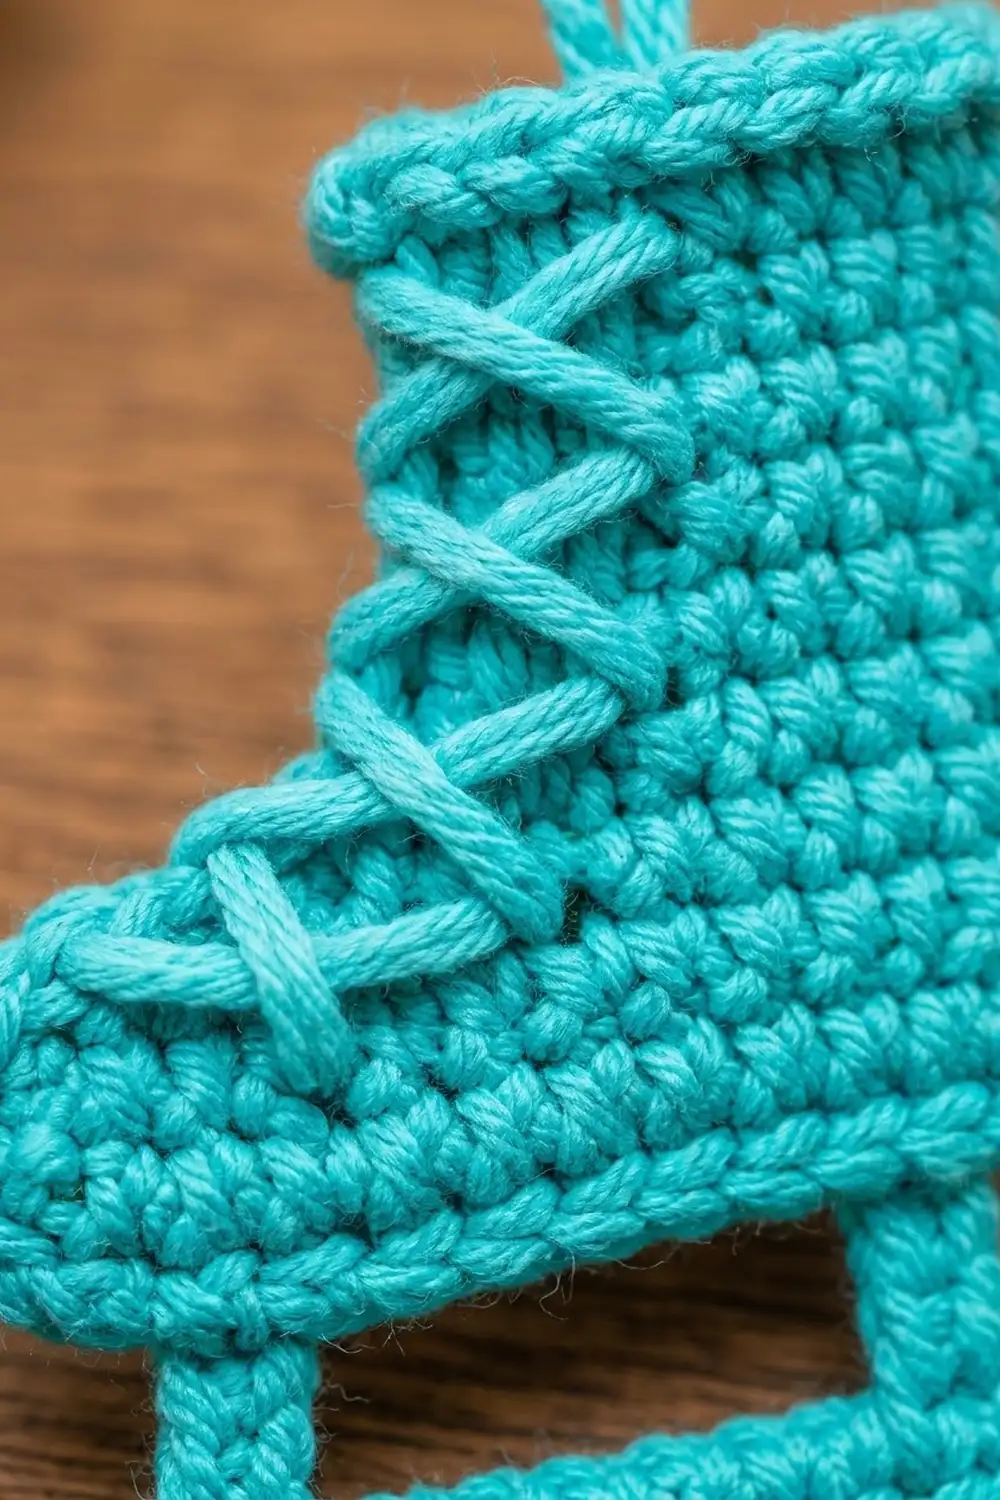
Boot
The boot is worked flat in rows. Odd rows are RS rows: each one starts at the heel end (right) and finishes at the toe end (left). Even rows are WS rows and start at the toe end. All the shaping happens at the toe end, except for the cuff flare in Row 17.
Foundation: Ch 15.
Row 1 (RS): Sc in 2nd ch from hook and in each ch across. Turn. (14 sc)
Row 2: Ch 1, 2 sc in first st (toe end), sc in each of next 13 sts. Turn. (15 sc)
Row 3: Ch 1, sc in each of first 14 sts, 2 sc in last st (toe end). Turn. (16 sc)
Rows 2 and 3 round off the bottom of the toe.
Rows 4–6: Ch 1, sc in each st across. Turn. (16 sc each row)
Checkpoint: 3.2 in (8.1 cm) wide and 1 in (2.5 cm) tall.
Toe Top and Instep Slope
From here you decrease 1 st at the toe end of every row. This rounds the top of the toe and builds the sloped instep where the laces will go.
Row 7 (RS): Ch 1, sc in each of first 14 sts, sc2tog. Turn. (15 sc)
Row 8: Ch 1, sc2tog, sc in each of next 13 sts. Turn. (14 sc)
Row 9: Ch 1, sc in each of first 12 sts, sc2tog. Turn. (13 sc)
Row 10: Ch 1, sc2tog, sc in each of next 11 sts. Turn. (12 sc)
Row 11: Ch 1, sc in each of first 10 sts, sc2tog. Turn. (11 sc)
Row 12: Ch 1, sc2tog, sc in each of next 9 sts. Turn. (10 sc)
Checkpoint: the ankle is 2 in (5.1 cm) wide and the boot is 2 in (5.1 cm) tall. The heel edge should still be perfectly straight.
Ankle
Rows 13–16: Ch 1, sc in each st across. Turn. (10 sc each row)
Cuff
Row 17 (RS): Ch 1. Working in BLO, 2 sc in first st, sc in each of next 8 sts, 2 sc in last st. Turn. (12 sc)
This row leaves its front loops unworked, and they form the raised ridge under the cuff on the RS. The two increases give the cuff its slight flare.
Row 18: Ch 1, sc in each st across. Do not turn and do not fasten off. (12 sc)
Checkpoint: the cuff is 2.4 in (6.1 cm) wide and the boot is 3.0 in (7.6 cm) tall.
Border
The border is two rounds worked around the whole boot. The side counts below do not include the 3 sc worked into each corner. Corners are counted separately.
Border gauge: Same as the body, 5 sc = 1 in (2.5 cm).
Round 1 (RS): Continuing from Row 18, ch 1 and turn the boot so you can work down the heel edge. Then work around the boot in this order:
- Heel side: 15 sc spread evenly across the 18 row ends. Put 1 sc in each row end, but skip every 6th row end.
- Heel-bottom corner: 3 sc in the free loop of the first foundation ch.
- Bottom: Sc in the free loop of each of the next 12 foundation ch.
- Toe-bottom corner: 3 sc in the free loop of the last foundation ch.
- Toe side: 18 sc, 1 in each row end, following the curve of the toe and the instep slope.
- Toe-top corner: 3 sc in the toe-end st of Row 18.
- Top: Sc in each of the next 10 sts.
- Heel-top corner: 3 sc in the heel-end st of Row 18.
Join with a sl st to the first sc. (67 sc: 15 + 3 + 12 + 3 + 18 + 3 + 10 + 3)
Round 2: Ch 1, then sl st loosely in each st around. Join to the first sl st and fasten off. (67 sl st)
Round 2 makes the smooth corded outline.
Why the math works:
- Heel side: 18 rows at 6 rows per inch measure 3 in (7.6 cm). 15 sc at 5 sc per inch also measure 3 in (7.6 cm), so the edge lies flat.
- Toe side: this edge curves and slopes, so it is longer, about 3.6 in (9.1 cm). It needs all 18 sc.
- Bottom and top: every sc goes into exactly 1 existing stitch. The bottom has 14 sts: 2 corner sts plus 12 between them. The top has 12 sts: 2 corner sts plus 10 between them.
Blade
Foundation: Leaving an 8 in (20.3 cm) tail, ch 27.
Row 1: Sc in 2nd ch from hook, then 2 sc in each of next 7 ch (this section becomes the curl). Sc in each of the remaining 18 ch. Fasten off and leave an 8 in (20.3 cm) tail. (33 sc: 1 + 14 + 18)
The doubled stitches make the curl section twist into a spiral on its own. Coil it upward into a round curl about 0.6 in (1.5 cm) across. Use the starting tail to tack it in place with 2 small stitches.
The straight part of the blade measures 3.6 in (9.1 cm). With the curl, the whole blade is about 4.2 in (10.7 cm) long.
Struts (Make 2)
Foundation: Leaving a 6 in (15.2 cm) tail, ch 4.
Row 1: Sc in 2nd ch from hook and in each of next 2 ch. Fasten off and leave a 6 in (15.2 cm) tail. (3 sc)
Each strut is 0.6 in (1.5 cm) long.
Assembly: Blade and Struts
- Lay the boot RS up with the toe pointing left.
- Pin one strut upright 0.8 in (2.0 cm) in from the toe-bottom corner. Pin the other 0.6 in (1.5 cm) in from the heel-bottom corner.
- Use each strut’s top tail to whipstitch it to the bottom edging. Go through both loops of Round 1, and keep the strut vertical.
- Place the blade under the struts with the curl at the toe end, turning up toward the boot. Center it so the straight section sticks out about 0.2 in (0.5 cm) past the edging at each end.
- Use each strut’s lower tail to sew it to the top edge of the blade. Weave in all the tails along the struts.
Laces
- Thread a 24 in (61.0 cm) length of the same yarn onto the tapestry needle.
- The laces follow two parallel lines up the instep slope, from Row 7 to Row 16:
- The front line starts 1 st in from the toe-side edging.
- The back line sits 3 sts farther toward the heel.
- In each row, both lines move 1 st toward the heel so they stay parallel to the slope.
- Bring the needle up on the front line at Row 7 and go down on the back line at Row 9.
- Come up on the back line at Row 7 and go down on the front line at Row 9. That completes the first X.
- Repeat Steps 3 and 4 starting at Rows 9, 11, 13 and 15. That makes 5 X’s in total, and the last one ends just under the cuff ridge.
- Keep the laces snug but not tight, so the fabric doesn’t pucker. Weave in the ends on the WS.
Hanging Loop
- Join the yarn with a sl st in the Round 2 st directly above the 6th of the 10 top sc.
- Ch 14, then sl st into the same st to form a ring.
- Work 20 sc over the ring and sl st into the base.
- Fasten off and weave in the end.
The loop stands about 1 in (2.5 cm) tall.
Final Blocking
- Spray the ornament until it is lightly damp.
- Pin the boot flat to 3.6 in (9.1 cm) wide x 3.4 in (8.6 cm) tall.
- Pin the heel edge straight and ease the toe into a smooth curve.
- Straighten the blade and struts, and pin the curl round.
- Let it dry completely, at least 6 hours.
- For a stiffer ornament, brush on a little fabric stiffener before it dries.
Final Quality-Control Checklist
- The boot measures 3.6 in (9.1 cm) x 3.4 in (8.6 cm).
- Round 1 has 67 sc and Round 2 has 67 sl st.
- The heel edge is straight and the toe is rounded at the top and bottom.
- The cuff ridge is visible on the RS.
- There are 5 even X’s on the laces, with no puckering.
- The struts are vertical, the blade is level and the curl is secure.
- All the tails are hidden.
Troubleshooting
- The heel edge ripples: Rework Round 1 with exactly 15 sc along it.
- The toe edge cups: Check that you worked all 18 sc and didn’t skip any row ends.
- The instep looks stepped: Work the sc2tog more firmly. Round 2 also helps smooth the line.
- The curl unwinds: Add another tacking stitch through the center of the curl.
- The laces pull the fabric: Loosen each pass slightly before you secure the end.
- The ornament is floppy: Go down a hook size or use fabric stiffener.
Care
Hand wash in cool water. Press out the water in a towel, dry flat and re-pin the curl if it loosens.

Final Notes
Here is the measurement chain to check as you work:
- Gauge: 5 sc and 6 rows = 1 in (2.5 cm).
- Foot: 3.2 in (8.1 cm) wide at Row 6.
- Ankle: 2 in (5.1 cm) wide at Row 12.
- Boot: 3.0 in (7.6 cm) tall at Row 18, then 3.6 in (9.1 cm) x 3.4 in (8.6 cm) after the 67-st edging.
- Blade and struts: the 4.2 in (10.7 cm) blade and 0.6 in (1.5 cm) struts bring the ornament to 4.2 in (10.7 cm) square.
If each stage matches, the finished skate will too.
Happy crocheting!