

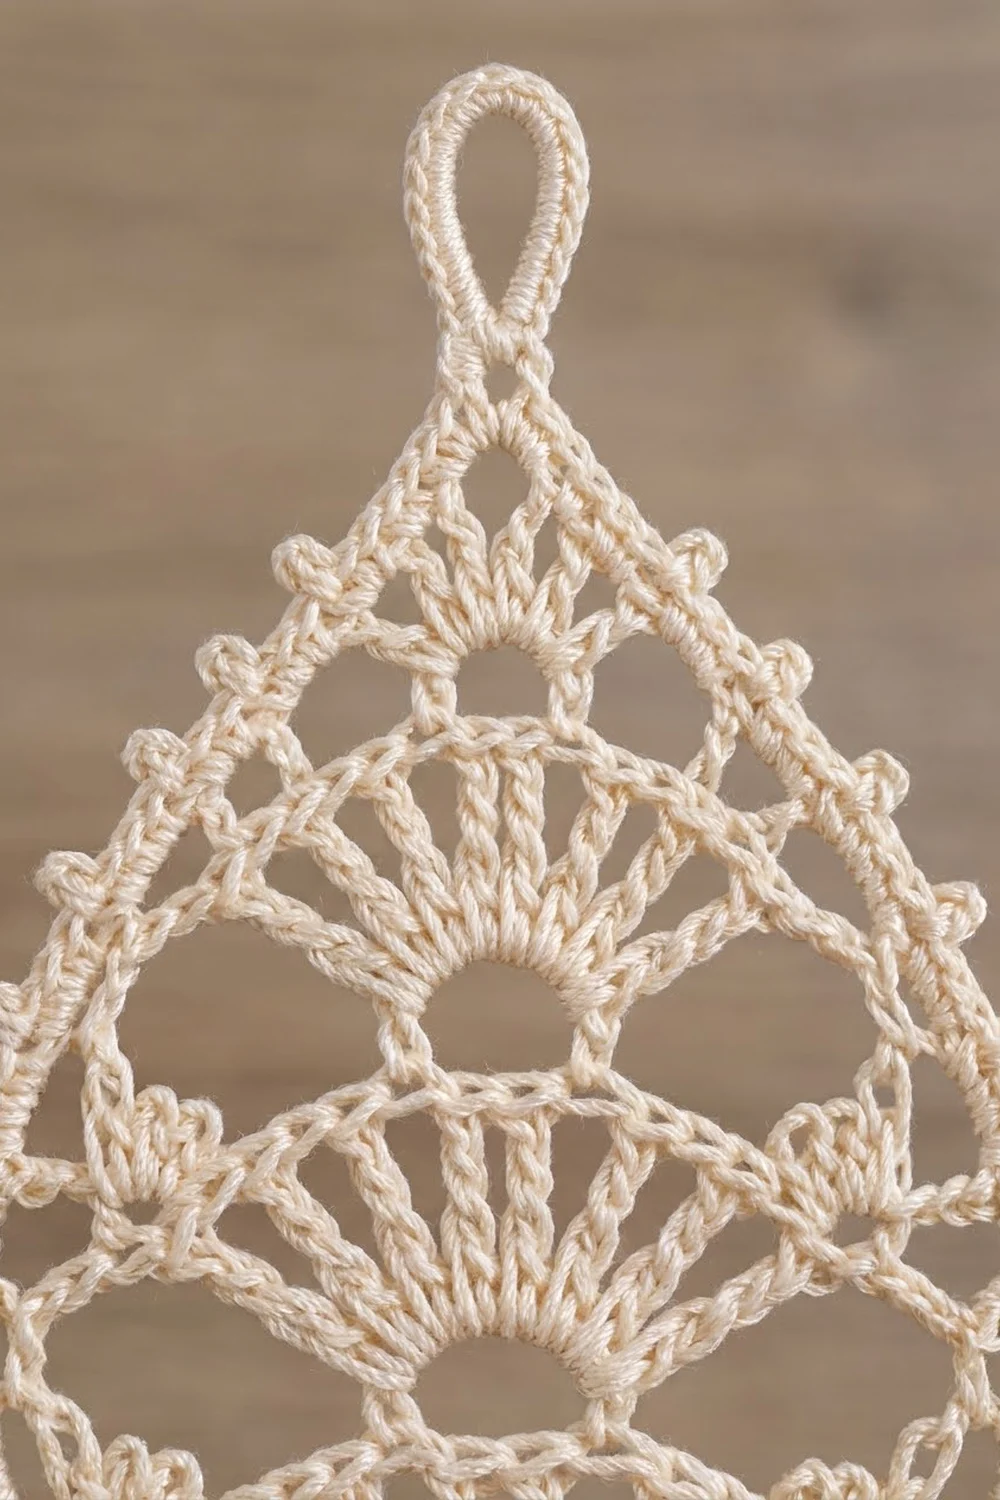
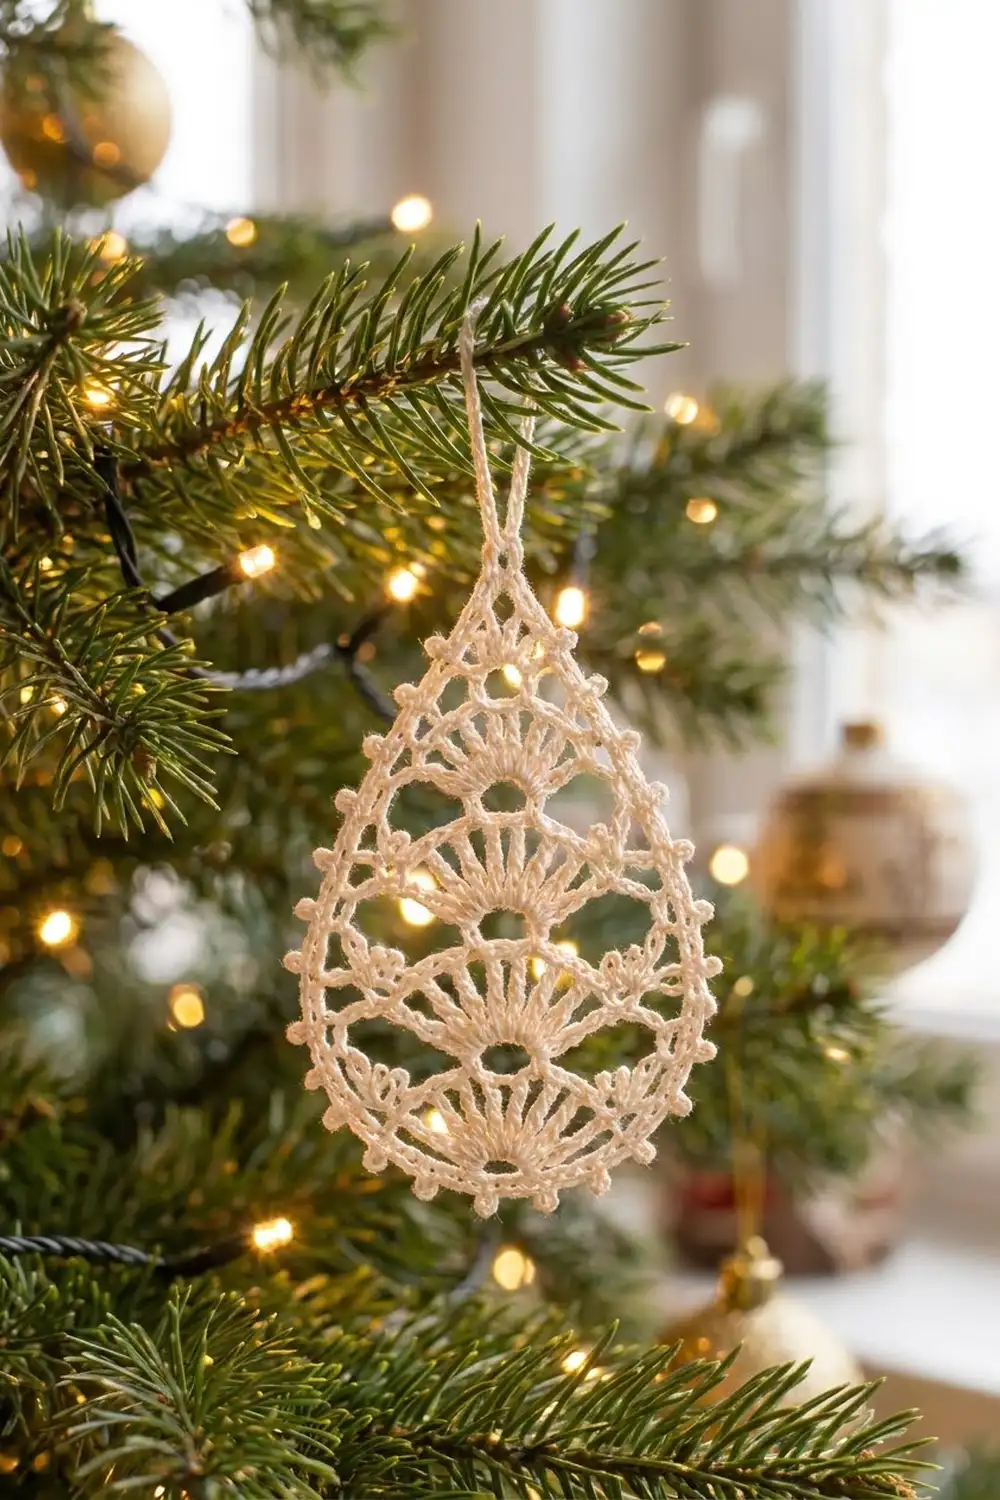
The Frosted Fan Teardrop is a lacy thread ornament. Five fan tiers are stacked inside a picot-trimmed teardrop frame. Each fan grows out of a tiny open ring, so the ornament looks like an icicle or a little stylized tree. It looks especially good with tree lights behind it.
The sample is worked in one color, cream size 10 cotton. One soft neutral keeps the look classic and works with gold, silver, or natural decorations. You could also use white, pale gold, or icy blue without changing anything in the pattern.
This pattern uses US crochet terms. The blocked ornament measures 2.75 in (7.0 cm) wide by 4 in (10.2 cm) tall. The hanging loop adds about 1.25 in (3.2 cm), for a total hanging length of 5.25 in (13.3 cm).
Construction is simple once you see the logic. You work the five fan tiers flat in turned rows, starting with the widest tier at the bottom. To start each new tier, you slip stitch to the center of the arc below and make a small ring there. Then you work one outline border around the whole shape: a chain frame, a single crochet round, and a picot round that also covers the hanging loop.
Finished Size and Construction
- Finished size: 2.75 in (7.0 cm) wide × 4 in (10.2 cm) tall, plus a 1.25 in (3.2 cm) hanging loop
- Skill level: Intermediate (thread lace, working into chain loops)
- Terminology: US crochet terms
- Yarn weight: Size 10 crochet cotton (Lace / weight 0)
- Hook: 1.5 mm (US steel 7)
- Number of pieces: 1
- Layout: Five fan tiers stacked vertically, framed by one outline border
- Piece size before border: 2 in (5.1 cm) wide × 3.25 in (8.3 cm) tall
- Border depth: about 0.375 in (1.0 cm) on each side, including picots
Materials
Yarn: Use mercerized size 10 crochet cotton. It holds crisp stitch definition and takes starch well. Matte or fuzzy threads blur the open rings and fan spokes, so avoid them for this design.
- Cream (one color only): 6 g, about 50 m (55 yd) per ornament
These quantities include a margin of roughly 20% for the gauge swatch, tails, and small tension differences. One ornament actually uses about 5 g.
Tools:
– 1.5 mm (US steel 7) crochet hook
– Fine tapestry needle with a small eye
– Scissors
– Fabric stiffener or heavy spray starch
– Blocking board or foam mat covered in plastic wrap
– Rustproof pins
– Ruler or tape measure
Abbreviations (US Terms)
- ch – chain
- sl st – slip stitch
- sc – single crochet
- dc – double crochet
- sp – space
- lp – loop
- st(s) – stitch(es)
- rep – repeat
Special stitch – Picot: Ch 3, then sl st in the 3rd ch from the hook (the first ch you made). This makes one small round bump.
Turning chains: A ch 3 at the start of a row counts as 1 dc. A ch 4 at the start of a row counts as 1 dc plus ch 1.
Gauge and Checkpoints
This ornament is small, so finish Tier 1 before you commit to the rest. It works as your gauge swatch.
Gauge checkpoint 1: After Tier 1, Row 3, the fan should measure 2 in (5.1 cm) across between the two tip sc and 1 in (2.5 cm) tall from the bottom of the ring to the top of the arc. Lay it flat and press it gently with your fingers before measuring.
Gauge checkpoint 2: After Tier 3, the stacked tiers should measure about 2.25 in (5.7 cm) tall.
Gauge checkpoint 3: After Tier 5 and before the border, the piece should measure 2 in (5.1 cm) wide and 3.25 in (8.3 cm) tall.
If Tier 1 is too big (wider than 2.25 in / 5.7 cm), go down to a 1.25 mm (US steel 10) hook, or tighten your chain loops.
If Tier 1 is too small (narrower than 1.75 in / 4.4 cm), go up to a 1.75 mm (US steel 4) hook.
A difference of up to 0.125 in (0.3 cm) is fine, because starch blocking evens out small variations.
Pattern
Tier 1 (bottom, widest fan)
Foundation: Ch 6, sl st in the first ch to form a ring.
Row 1: Ch 3 (counts as dc), 14 dc in the ring. Turn. (15 dc)
The dc fan out over the top half of the ring, which makes a semicircle. The open center of the ring becomes the small hole at the base of the fan.
Row 2: Ch 4 (counts as dc + ch 1), [dc in next dc, ch 1] 13 times, dc in top of turning ch. Turn. (15 dc, 14 ch-1 sps)
Row 3 (arc row): Ch 1, sc in first dc, [ch 3, sk ch-1 sp, sc in next dc] 14 times, working the last sc in the 3rd ch of the turning ch. Turn. (15 sc, 14 ch-3 lps)
The first and last sc of this row are the Tier 1 tips. You will attach the border to them later.
Check Gauge Checkpoint 1 now.
Tier 2
Row 4 (travel row): Ch 1, sl st in first sc, [sl st in each of next 3 ch, sl st in next sc] 7 times. (29 sl sts; you are now in sc #8, the center sc of the arc)
Row 5: Ch 6, sl st in the same center sc to form a small loop. Ch 3 (counts as dc), 12 dc in the ch-6 loop. Turn. (13 dc)
This new ring sits on top of the center of Tier 1’s arc. That placement gives the stacked look shown in the finished piece.
Row 6: Ch 4 (counts as dc + ch 1), [dc in next dc, ch 1] 11 times, dc in top of turning ch. Turn. (13 dc, 12 ch-1 sps)
Row 7 (arc row): Ch 1, sc in first dc, [ch 3, sk ch-1 sp, sc in next dc] 12 times. Turn. (13 sc, 12 ch-3 lps)
Tier 2 is about 1.75 in (4.4 cm) wide. Its first and last sc are the Tier 2 tips.
Tier 3
Row 8 (travel row): Ch 1, sl st in first sc, [sl st in each of next 3 ch, sl st in next sc] 5 times. (21 sl sts; you are in sc #6, the center)
Row 9: Ch 5, sl st in the same sc to form a loop. Ch 3 (counts as dc), 10 dc in the ch-5 loop. Turn. (11 dc)
Row 10: Ch 4 (counts as dc + ch 1), [dc in next dc, ch 1] 9 times, dc in top of turning ch. Turn. (11 dc, 10 ch-1 sps)
Row 11 (arc row): Ch 1, sc in first dc, [ch 3, sk ch-1 sp, sc in next dc] 10 times. Turn. (11 sc, 10 ch-3 lps)
Tier 3 is about 1.5 in (3.8 cm) wide. Check Gauge Checkpoint 2 now.
Tier 4
Row 12 (travel row): Ch 1, sl st in first sc, [sl st in each of next 3 ch, sl st in next sc] 4 times. (17 sl sts; you are in sc #5, the center)
Row 13: Ch 5, sl st in the same sc to form a loop. Ch 3 (counts as dc), 8 dc in the ch-5 loop. Turn. (9 dc)
Row 14: Ch 4 (counts as dc + ch 1), [dc in next dc, ch 1] 7 times, dc in top of turning ch. Turn. (9 dc, 8 ch-1 sps)
Row 15 (arc row): Ch 1, sc in first dc, [ch 3, sk ch-1 sp, sc in next dc] 8 times. Turn. (9 sc, 8 ch-3 lps)
Tier 4 is about 1.25 in (3.2 cm) wide.
Tier 5 (top fan)
Row 16 (travel row): Ch 1, sl st in first sc, [sl st in each of next 3 ch, sl st in next sc] 4 times. (17 sl sts; you are in sc #5, the center)
Row 17: Ch 4, sl st in the same sc to form a small loop. Ch 3 (counts as dc), 6 dc in the ch-4 loop. (7 dc)
Fasten off. Leave a 4 in (10.2 cm) tail to weave in later.
Tier 5 is a small solid fan about 0.75 in (1.9 cm) wide. Its turning ch and last dc are the Tier 5 tips.
Check Gauge Checkpoint 3 now. Weave in the starting tail before you begin the border.
Border
The border has three rounds. Round 1 is a chain frame that gives the teardrop its outline. Round 2 fills the frame with single crochet. Round 3 adds the picots.
Border gauge: Each ch-sp in Round 1 gets (number of chains + 2) sc in Round 2. The 2 extra sc per space let the curved edge lie flat without cupping. When the border is done, it should add about 0.375 in (1.0 cm) on each side.
Starting point: With the right side facing, hold the piece with Tier 1 at the bottom. Join the thread with a sc around the ring at the bottom center of Tier 1, between the base of the first and last dc of Row 1. This is the bottom center sc.
Round 1 (chain frame)
Right side, working upward:
– Ch 12, sc in Tier 1 right tip
– Ch 8, sc in Tier 2 right tip
– Ch 7, sc in Tier 3 right tip
– Ch 6, sc in Tier 4 right tip
– Ch 6, sc in Tier 5 right tip (top of last dc)
– Ch 5
Top: Ch 30, sl st in the 30th ch from the hook (the first of these 30 ch) to form the hanging loop.
Left side, working downward:
– Ch 5, sc in Tier 5 left tip (top of turning ch)
– Ch 6, sc in Tier 4 left tip
– Ch 6, sc in Tier 3 left tip
– Ch 7, sc in Tier 2 left tip
– Ch 8, sc in Tier 1 left tip
– Ch 12, sl st in the bottom center sc
Count per side: 44 ch (12 + 8 + 7 + 6 + 6 + 5) and 5 tip sc.
Round total: 1 bottom sc + 2 × (44 ch + 5 sc) + 30 loop ch = 129 sts
The top ch-5 on each side meets the base of the loop. This makes the pointed top of the teardrop.
Round 2 (single crochet fill)
Ch 1, sc in the bottom center sc.
Right side: 14 sc in the ch-12 sp, sc in tip; 10 sc in the ch-8 sp, sc in tip; 9 sc in the ch-7 sp, sc in tip; 8 sc in the ch-6 sp, sc in tip; 8 sc in the ch-6 sp, sc in tip; 6 sc in the ch-5 sp.
Loop: 40 sc in the ch-30 hanging loop.
Left side: 6 sc in the ch-5 sp, sc in tip; 8 sc in the ch-6 sp, sc in tip; 8 sc in the ch-6 sp, sc in tip; 9 sc in the ch-7 sp, sc in tip; 10 sc in the ch-8 sp, sc in tip; 14 sc in the ch-12 sp.
Sl st in the first sc.
Per side: 55 sc in spaces (14 + 10 + 9 + 8 + 8 + 6) + 5 tip sc = 60 sc
Round total: 1 + 60 + 40 + 60 = 161 sc
Round 3 (picot edge)
Ch 1, sc in the first sc, picot.
Right side: [sc in next 2 sc, picot, sc in next 2 sc] 15 times. (60 sc, 15 picots)
Loop: sc in each of the next 40 sc, with no picots so the loop stays smooth.
Left side: [sc in next 2 sc, picot, sc in next 2 sc] 15 times. (60 sc, 15 picots)
Sl st in the first sc. Fasten off and weave in the ends.
Round total: 161 sc and 31 picots.
Why the math works: Each side of Round 2 has exactly 60 sc. The picot repeat uses 4 sc, so 15 repeats fit exactly with nothing left over (60 ÷ 4 = 15). The single bottom center sc gets its own picot, which places a picot at the lowest point of the teardrop. The 40-sc loop is not part of either side’s count, so the repeat stays even. The tip sc were counted only once, in Round 2’s per-side total, and Round 3 works 1 sc into each Round 2 sc, so no stitches are added twice.
Final Blocking
- Soak the ornament in fabric stiffener, or in a mix of equal parts white glue and water. Squeeze out the extra gently. Don’t wring it.
- Lay it right side up on the plastic-covered blocking board.
- Pin the bottom center picot and the base of the hanging loop first. Pull them apart until the body measures 4 in (10.2 cm) tall.
- Pin the two Tier 1 tips so the widest point measures 2.75 in (7.0 cm) across.
- Pin each picot outward in a smooth teardrop curve, working from the bottom upward on both sides at the same time.
- Open each tier’s center ring with the tip of a pin. Fan out the dc spokes so the gaps are even.
- Lay the hanging loop flat or hang it over a pin.
- Let it dry completely, usually overnight. Then remove the pins and check the measurements again.
Final Quality-Control Checklist
- Body measures 2.75 in (7.0 cm) × 4 in (10.2 cm), and the loop is about 1.25 in (3.2 cm)
- Five tiers with 15, 13, 11, 9, and 7 dc from bottom to top
- Each tier’s ring sits on the center sc of the arc below it
- Round 1 has 129 sts, Round 2 has 161 sc, and Round 3 has 31 picots
- The left and right sides mirror each other
- The point at the top is centered under the loop
- All tails are woven in and hidden inside the solid stitches
- The ornament hangs straight without twisting
Troubleshooting
The fans ruffle or cup: Your dc are too tight for the number of stitches in the ring. Loosen your tension or go up one hook size.
A new tier sits off-center: Count the sl sts in the travel row again. You should finish in the center sc: #8, #7, #6, or #5.
The border pulls the sides inward: Make the frame chains a bit looser, or add 1 ch to each frame space. Then add 1 sc to the matching Round 2 space, and keep each side’s count divisible by 4.
The border ripples: Your frame chains are too loose. Work them more firmly, or use 1 fewer sc in the ch-12 spaces. Again, keep each side divisible by 4.
The ornament leans when hanging: Block it again and check that the top point is centered and both sides have the same number of picots.
The rings close up: Stretch them open with a pin while the stiffener is still wet.
Care
Dust gently with a soft brush and store the ornament flat in tissue paper. If it softens over time, rinse it in cool water and block it again with fresh stiffener.
Final Notes
The measurement chain goes like this:
- Tier 1 sets your gauge at 2 in (5.1 cm) wide and 1 in (2.5 cm) tall.
- The five stacked tiers reach 3.25 in (8.3 cm) tall.
- The three-round border adds about 0.375 in (1.0 cm) on each side, for a finished body of 2.75 in (7.0 cm) × 4 in (10.2 cm).
- The hanging loop brings the total to 5.25 in (13.3 cm).
If each checkpoint matches, the finished ornament will too. Make one for every branch, or give a few as handmade gifts.
Happy crocheting!