

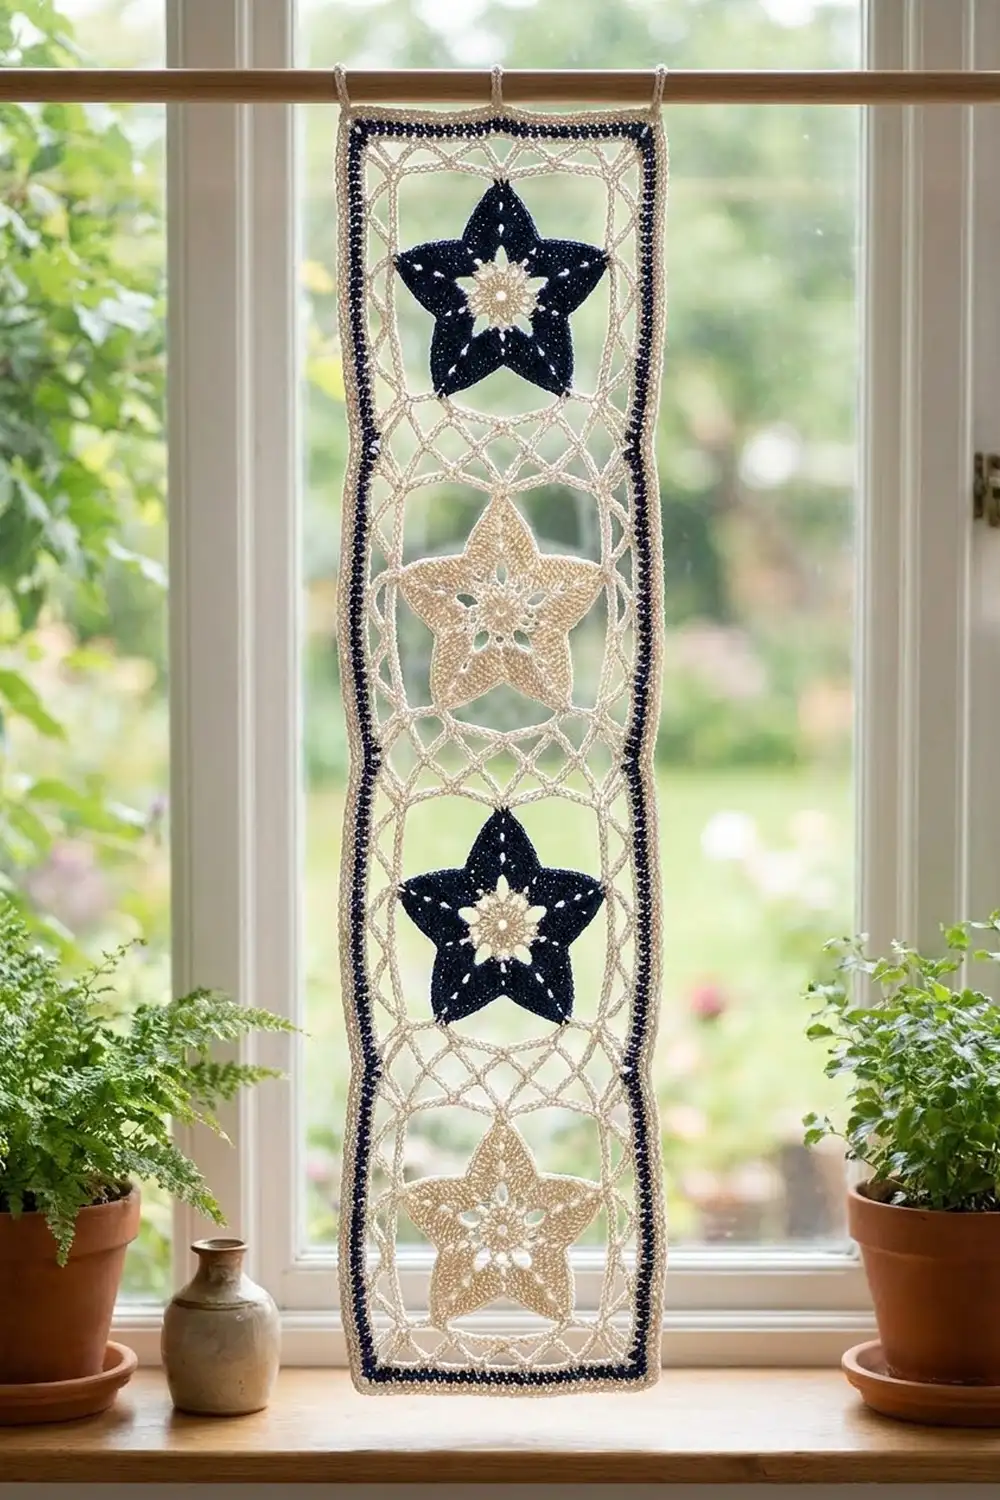
The Starlit Lattice strip is a slim lace panel with four five-point stars, each one floating in an airy cream chain mesh. Two navy stars alternate with two cream stars. The navy ones stand out clearly against the mesh, while the cream ones blend in and look almost like a watermark.
This design uses smooth sport-weight cotton, which gives the lace clean lines and crisp star points. The style is calm and classic, a bit nautical and a bit vintage. It works as a table runner for a narrow shelf, a wall hanging, a window accent, or a bookmark-style display strip. The pattern is written in US crochet terms.
The finished strip measures 6.3 in × 22.8 in (16.0 cm × 57.9 cm) after blocking.
Construction is simple and modular. You make four star blocks. Each one starts with a star, then cream mesh rounds turn the star into a square. You join the blocks in a single column with a flat slip-stitch seam and finish with a two-round picot border.
Finished Size and Construction
- Finished size: 6.3 in × 22.8 in (16.0 cm × 57.9 cm)
- Skill level: Easy-intermediate
- Terminology: US crochet terms
- Yarn weight: Sport (#2) mercerized or smooth cotton
- Hook: 3.0 mm
- Number of pieces: 4 star blocks
- Layout: 1 block wide × 4 blocks long
- Block size: 5.5 in × 5.5 in (14.0 cm × 14.0 cm), 35 sts per side
- Size before border: 5.5 in × 22 in (14.0 cm × 55.9 cm)
- Border depth: 0.4 in (1.0 cm) on each side
Materials
Yarn: Use a smooth sport-weight cotton, about 150 m per 50 g. Mercerized cotton shows the star points and mesh clearly. Avoid fuzzy or brushed yarns, because they blur the open lattice.
- Cream (Color B): 60 g, about 180 m
- Navy (Color A): 10 g, about 30 m
These quantities include a safety margin of about 20% for your gauge swatch, small tension differences, and weaving in ends.
Tools:
– 3.0 mm crochet hook
– Tapestry needle
– Stitch markers (at least 4)
– Scissors
– Rust-proof pins and a blocking mat
– Spray bottle
– Measuring tape or ruler
Abbreviations (US Terms)
- ch – chain
- sl st – slip stitch
- sc – single crochet
- hdc – half double crochet
- dc – double crochet
- tr – treble crochet
- sp – space
- st(s) – stitch(es)
- RS – right side
- BLO – back loop only
Special stitch – picot: Ch 3, then sl st in the front loop and left vertical bar of the sc just made.
Star point: Ch 8. Starting in the 3rd ch from the hook, work sc, hdc, hdc, dc, dc, tr in the next 6 ch. The 2 skipped chains form the tip ch-2 sp. The point grows taller toward the ring, which gives a sharp tip and a wide base.
Gauge and Checkpoints
Make one complete block before you start the others. That block is your gauge swatch.
Target gauge: One block after Round 6 measures 5.5 in (14.0 cm) per side, with 35 sc per side, lightly pressed flat. That works out to about 6.4 sc per inch.
Checkpoints:
– After Round 1, the ring is about 1 in (2.5 cm) across, with a center hole about 0.4 in (1.0 cm) wide.
– After Round 2, the star measures about 3.25 in (8.3 cm) from tip to opposite base.
– After Round 3, the mesh is about 4 in (10.2 cm) across.
– After Round 4, it is about 4.75 in (12.1 cm) across.
– After Round 5, it is about 5.25 in (13.3 cm) across.
– After Round 6, it is 5.5 in (14.0 cm) square.
If your block is too big (over 5.75 in / 14.6 cm), change to a 2.75 mm hook. If it is too small (under 5.25 in / 13.3 cm), change to a 3.25 mm hook.
Check the chain loops too. If they pull the star points into cups, your chains are too tight. If they droop and ruffle, your chains are too loose. Aim for loops that lie flat without strain.
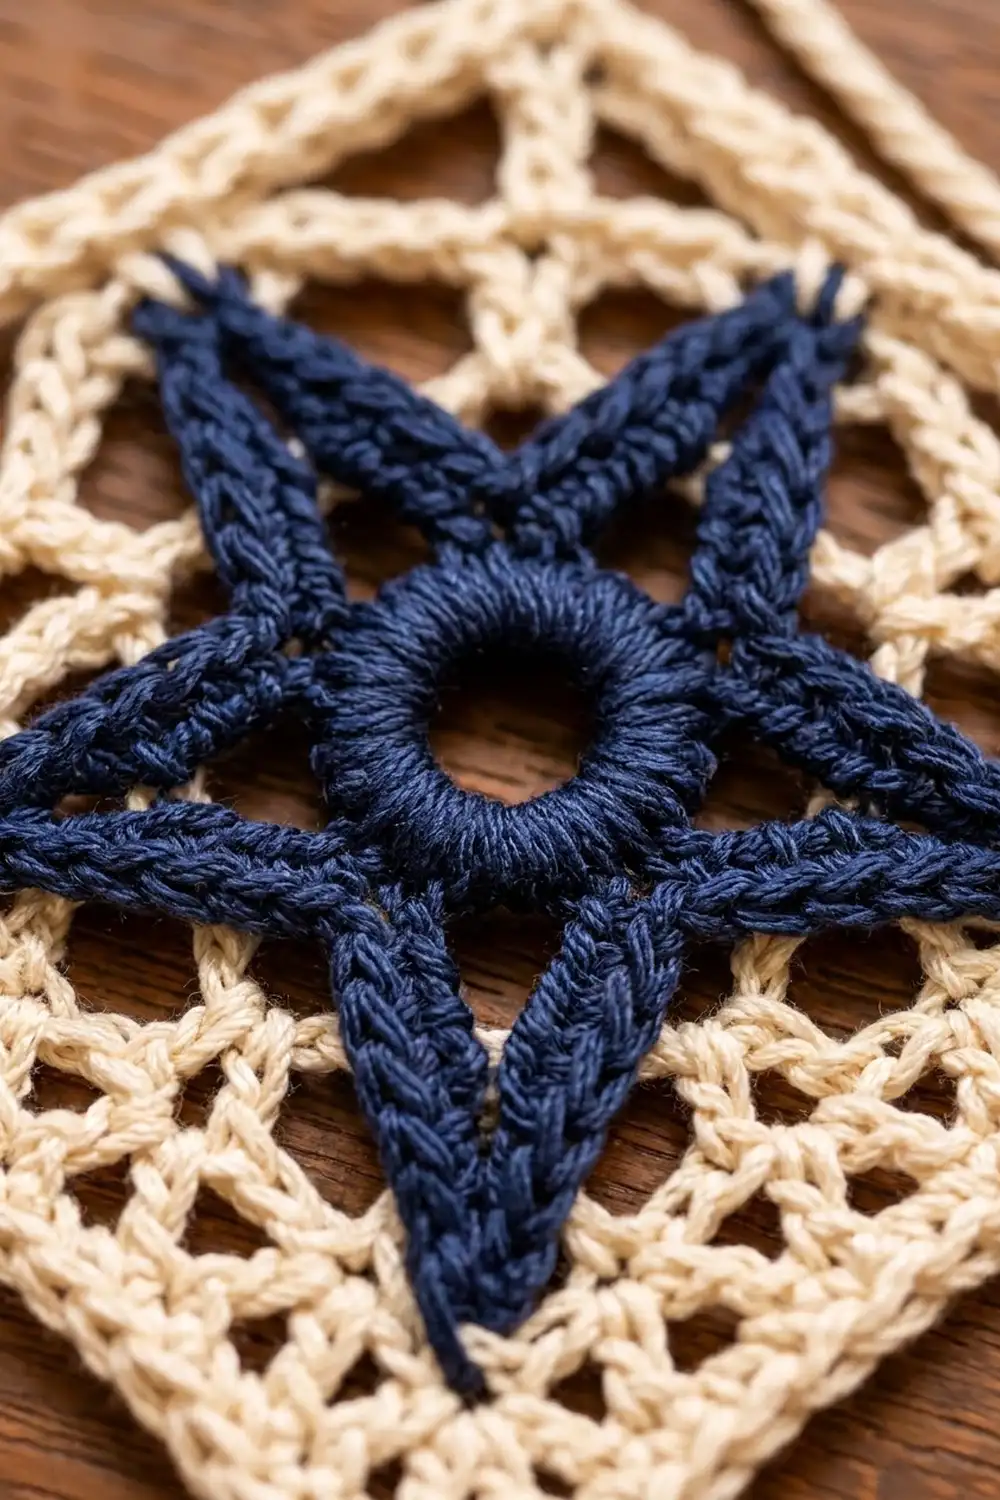
Star Block (Make 4)
Make 2 blocks with a navy star (Block A) and 2 blocks with a cream star (Block B). Rounds 3–6 are worked in cream on every block. For Block B, you can carry on without changing color, but fastening off after Round 2 keeps the stars identical.
Star
Foundation: With the star color, ch 6 and sl st to the first ch to form a ring.
Round 1: Ch 1, work 15 sc into the ring. Join with a sl st to the first sc. (15 sc)
This solid band frames the open center hole.
Round 2 (points): Work a star point (see Special Stitch). Skip the next 2 sc of Round 1 and sl st in the following sc. Repeat from * 4 more times. Work the last sl st into the joining sc of Round 1. (5 points; each point = 6 sts plus a tip ch-2 sp; 5 sl sts anchor the points)
Each repeat uses 3 sc of Round 1, so 5 repeats use all 15 sc exactly. Fasten off and weave in the center tail. Nudge each point straight with your fingers.
Mesh Frame (Cream)
Round 3: Join cream with a sl st in the tip ch-2 sp of any point. Ch 1, sc in the same sp. Ch 9, sc in the tip ch-2 sp of the next point. Repeat from * 3 more times, then ch 9 and join to the first sc. (5 sc + 5 ch-9 loops = 50 sts)
These loops connect the five tips and build the first open spaces around the star.
Round 4: Sl st into the first ch-9 loop. Ch 1. In each ch-9 loop work (sc, ch 5) 4 times. Join to the first sc. (20 sc + 20 ch-5 loops)
Number the loops 1 to 20 in your mind. Loops 1, 6, 11 and 16 will become the corners. Place a marker in each of them.
Round 5 (squaring round): Sl st to the center of loop 1. Ch 1, work (sc, ch 3, sc) in loop 1 for the first corner. [Ch 5, sc in the next loop] 4 times, ch 5, then work (sc, ch 3, sc) in the next marked loop. Repeat from * twice more. Then [ch 5, sc in the next loop] 4 times, ch 5, and join to the first sc. (24 sc, 20 ch-5 loops, 4 corner ch-3 sps; each side has 5 ch-5 loops between corners)
Round 6 (solid edge): Ch 1. Work 3 sc in each corner ch-3 sp, with the middle sc of the three as the corner stitch. Work 1 sc in each sc, and 5 sc in each ch-5 loop. Join to the first sc.
Per-side count, including both corner sts: corner st (1) + last sc of corner group (1) + sc on Round 5 corner sc (1) + 5 loops × 5 sc (25) + 4 sc on the side sc (4) + sc on the next Round 5 corner sc (1) + first sc of the next corner group (1) + corner st (1) = 35 sts.
Round total: 12 corner-group sc + 24 sc + 100 loop sc = 136 sts. As a cross-check, 4 sides × 35 − 4 shared corners = 136.
Fasten off, leaving a 6 in (15.2 cm) tail, and weave it in. Lightly pin and steam this first block to 5.5 in (14.0 cm) square and confirm your gauge.
Make All Pieces
- Block A: 2 blocks with a navy star and cream mesh
- Block B: 2 blocks with a cream star and cream mesh
Layout (RS up, the top of the strip is Row 1):
Row 1:  [ A ]  navy star
Row 2:  [ B ]  cream star
Row 3:  [ A ]  navy star
Row 4:  [ B ]  cream star
Turn each block so one star point aims straight up. All four stars will then point the same way.
Joining
Method: Flat slip-stitch join through the back loops.
Lay Block A (Row 1) and Block B (Row 2) side by side, both RS up, with the two edges to be joined touching. Join cream with a sl st through the BLO of both corner sts.
Work 1 sl st through the BLO of each matching pair of sts. Go stitch for stitch, from corner st to corner st, for 35 sl sts in total. Fasten off.
The seam adds no height, because it only links existing stitches. Each block keeps its 35 sts per side. Join Row 2 to Row 3 and Row 3 to Row 4 the same way, for 3 seams in total.
Tension: Keep the slip stitches as loose as the Round 6 sc. A tight seam puckers the strip and pulls the edge inward at each join. If it puckers, go up one hook size just for the seams.
Checkpoint: After joining 2 blocks, the strip is 5.5 in × 11 in (14.0 cm × 27.9 cm). With all 4 blocks joined, it is 5.5 in × 22 in (14.0 cm × 55.9 cm).
Border
Border gauge: Each border round adds about 0.2 in (0.5 cm) per side, so the two rounds add 0.4 in (1.0 cm) per side.
Starting counts:
– Long sides: 4 blocks × 35 sts = 140 sts. This includes the 2 outer corner sts. The two corner sts that meet at each seam are both counted, with nothing added.
– Short sides: 1 block × 35 sts = 35 sts, including the 2 outer corner sts.
– Distinct sts around: 2 × 140 + 2 × 35 − 4 shared corners = 346 sts.
Border Round 1: With RS facing, join cream in the st after any outer corner. Ch 1. Work sc in each st around, and 3 sc in each of the 4 outer corner sts. Where two blocks meet, work 1 sc in each of the two seam corner sts. Join to the first sc.
- Long side: 142 sts, including both new corner sts
- Short side: 37 sts, including both new corner sts
- Round total: 346 + (4 × 2) = 354 sts
Border Round 2 (picot edge): Ch 1. In each corner st work (sc, picot, sc). Between corners, work sc in the next 2 sts, sc in the next st, picot, sc in the next 2 sts. Join to the first sc and fasten off.
- Long sides: 140 sts between corners = 28 repeats, giving 140 sc and 28 picots
- Short sides: 35 sts between corners = 7 repeats, giving 35 sc and 7 picots
- Round total: 354 + 4 = 358 sc and 2 × 28 + 2 × 7 + 4 = 74 picots
Why the math works: Each block has 35 sts per side, and 35 is a multiple of 5. Every side of the strip is a whole number of blocks, so every side between corners is also a multiple of 5. The 5-stitch picot repeat therefore fits exactly, with a picot centered in each repeat and no partial repeats at the corners.
Final Blocking
- Weave in all remaining ends along the solid sc edges, not through the mesh.
- Soak the strip in cool water for 10 minutes. Press out the water gently; do not wring.
- Roll it in a towel to remove extra moisture.
- Lay it flat on the blocking mat, RS up.
- Pin the four outer corners to a rectangle of 6.3 in × 22.8 in (16.0 cm × 57.9 cm).
- Pin along both long edges every 1 in (2.5 cm), then pin the picots out evenly.
- Pin each star tip so the points stay sharp and straight. Open the center rings with a pin tip.
- Ease each mesh loop into a smooth arch so the diamond spaces look the same in all four blocks.
- Let it dry completely, usually for 12–24 hours.
Final Quality-Control Checklist
- Each block’s Round 6 has 136 sts, with 35 per side.
- The four stars alternate navy, cream, navy, cream from top to bottom.
- All star points aim the same direction.
- The seams are flat, with 35 sl sts each and no puckering.
- Border Round 1 has 354 sts, and Round 2 has 358 sc and 74 picots.
- The picots are evenly spaced, with one at each corner.
- The blocked size is 6.3 in × 22.8 in (16.0 cm × 57.9 cm), within 0.25 in (0.6 cm).
- All ends are hidden in solid stitches.
Troubleshooting
Star points curl or twist: The tr at the base is too tight. Loosen your tension on Round 2, or block the points flat with a pin through each tip.
Points are uneven lengths: Recount the 8 chains in each point. One chain more or less shows clearly.
Round 3 cups the star: The ch-9 loops are too short for your tension. Work ch 10 instead, but keep 5 sc + 5 loops.
Mesh ruffles: The chains are too loose. Use a smaller hook for Rounds 3–5 only.
Block is not square: Check that the corners sit in loops 1, 6, 11 and 16, with exactly 5 ch-5 loops per side in Round 5.
Side count is off: Recount Round 6 against the breakdown (1+1+1+25+4+1+1+1 = 35).
Border picots don’t land evenly: Recheck the Round 1 side counts: 140 or 35 sts between corners.
Care
Hand wash in cool water with mild soap and dry flat, re-pinning the star points if needed. Cotton holds its shape well and can be steamed lightly between washes.
Final Notes
The whole design depends on one measurement chain:
– Star: 3.25 in (8.3 cm) across
– Block: 35 sts and 5.5 in (14.0 cm) per side
– Joined strip: 140 × 35 sts and 5.5 in × 22 in (14.0 cm × 55.9 cm)
– Bordered and blocked: 6.3 in × 22.8 in (16.0 cm × 57.9 cm)
Get the first block right and every later number follows. The navy stars will shine, the cream stars will glow quietly, and the lattice will tie them together.
Happy crocheting!