

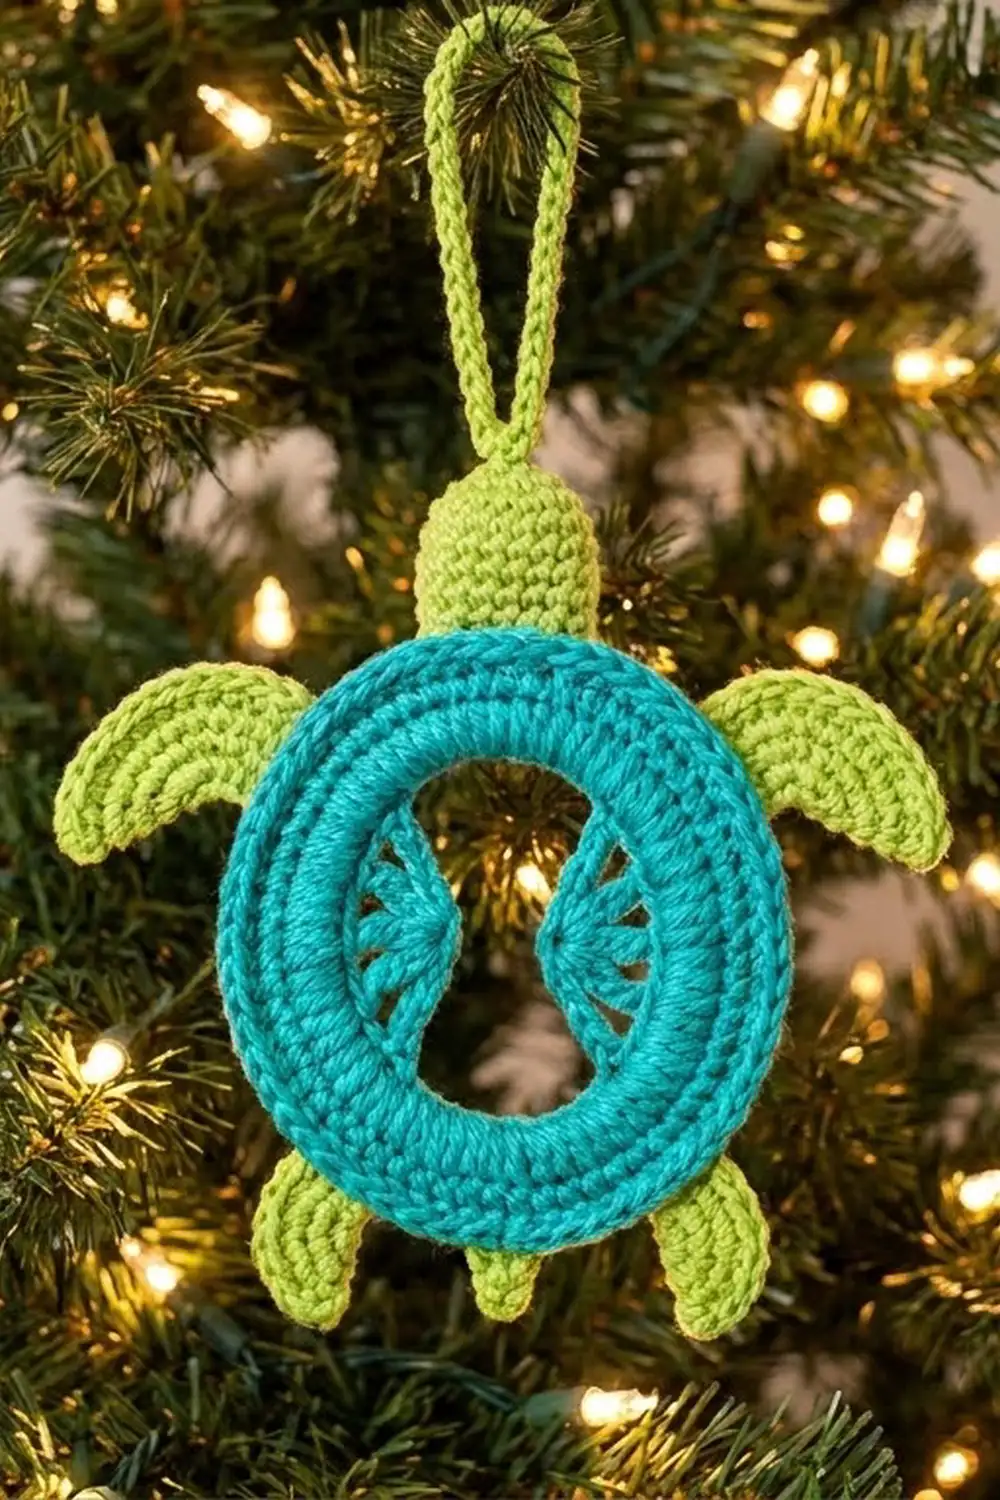
This little sea turtle is all outline. Instead of a solid shell, the body is an open teal oval with two fans of treble stitches reaching inward from the top and bottom. Through the open middle you can see the tree branches and lights behind it.
The flippers and head are open lime-green loops. Each one is a chain covered with single crochet, so it looks like a small coil of rope. Teal and lime are a cheerful, beachy pair, which makes this a good ornament for a coastal-themed tree, a gift topper, or a hanging decoration all year.
The pattern uses US crochet terms. The finished turtle measures about 5 in (12.7 cm) wide across the front flippers and 4.75 in (12.1 cm) tall from the head to the rear flippers, not counting the hanger. The shell oval alone is 3.5 in (8.9 cm) tall and 2.75 in (7.0 cm) wide.
Construction is simple. You chain a ring, work two rounds of single crochet into it, and then add the two fan clusters on the inner edge. Finally, you attach five lime loops and a hanger directly to the outer round. The whole ornament is one piece, with no sewing.
Finished Size and Construction
- Finished size: about 5 in (12.7 cm) wide x 4.75 in (12.1 cm) tall, plus hanger
- Skill level: Easy to Intermediate (you need to be comfortable with clusters)
- Terminology: US crochet terms
- Yarn weight: Sport weight (#2) mercerized cotton
- Hook: 3.0 mm (US C/2–D/3)
- Number of pieces: 1
- Layout: Single motif. Oval shell with head at the top and two flippers on each side
- Piece size (shell oval): 3.5 in (8.9 cm) tall x 2.75 in (7.0 cm) wide
- Size before border (Rnd 2 complete, blocked): same oval, 3.5 x 2.75 in (8.9 x 7.0 cm)
- Border depth (lime loops): front flippers project about 1.1 in (2.8 cm), the head about 0.75 in (1.9 cm), and the rear flippers about 0.9 in (2.3 cm)
Materials
Choose a smooth, tightly plied mercerized cotton. It shows the stitch texture clearly and holds its shape after stiffening. Acrylic will work, but it relaxes more and the oval may sag on the tree.
- Color A – Teal/Turquoise (shell): 6 g, about 19 m (21 yd)
- Color B – Lime Green (head, flippers, hanger): 4 g, about 12 m (13 yd)
Tools:
- 3.0 mm crochet hook
- Tapestry needle
- 4 locking stitch markers
- Scissors
- Fabric stiffener, or a starch and water mix
- Pins and a foam blocking board
- Paper oval template, 3.5 x 2.75 in (8.9 x 7.0 cm)
The quantities include a margin of about 25% for swatching, tails, and small tension differences.
Abbreviations (US Terms)
- ch – chain
- sl st – slip stitch
- sc – single crochet
- tr – treble crochet
- st(s) – stitch(es)
- Rnd – round
- 2 sc in next – increase (2 sc in the same st)
Special stitch – Fan Cluster (FC): *Yo twice, insert hook in next free loop, yo and pull up a loop, [yo, draw through 2 loops] twice; rep from * 5 more times (7 loops on hook). Yo and draw through all 7 loops, then ch 1 tightly to close. This makes 6 tr legs joined at one top point.
Gauge and Checkpoints
Gauge: 24 sc x 26 rows = 4 in (10.2 cm), or 6 sc per 1 in (2.5 cm). The chain gauge is also 6 ch per 1 in (2.5 cm).
Because the ornament is one small piece, the turtle itself is your gauge swatch. Make one, measure it at each checkpoint below, and adjust before you make a batch for gifts.
- Checkpoint 1 (foundation): Ch 48 laid flat and unstretched should measure about 8 in (20.3 cm).
- Checkpoint 2 (after Rnd 2): The outer edge measures about 10 in (25.4 cm) around. Lay a tape measure along the edge to check.
- Checkpoint 3 (after blocking): The shell oval is 3.5 x 2.75 in (8.9 x 7.0 cm). The inner opening is about 2.7 x 2 in (6.9 x 5.1 cm).
If your piece is too big: go down to a 2.75 mm hook, or tighten your chains. Loose chains are the usual cause.
If your piece is too small: go up to a 3.25 mm hook. Do not add stitches, because every placement in the pattern depends on the 48/60 counts.
Shell Ring (Color A)
Foundation: With Color A, ch 48. Check that the chain is not twisted, then join with a sl st in the first ch to form a ring.
Rnd 1: Ch 1. Working into the back bump of each ch, sc in each ch around. Join with a sl st to the first sc. (48 sc)
This leaves the two top loops of every foundation chain free along the inner edge. You will work the fans into these loops later.
Rnd 2 (growth round): Ch 1, sc in each of the next 3 sts, 2 sc in next st; rep from * 11 more times. Join with a sl st to the first sc. (60 sc)*
That is 48 sts worked once plus 12 increases, for 60 sc. The increases let the outer edge lie flat around the larger perimeter. Fasten off and weave in the ends.
Mark the outer round. Number the Rnd 2 stitches 1 to 60, starting with the first sc after the join. The top center of the turtle falls between st 60 and st 1. The bottom center falls between st 30 and st 31.
Place markers in sts 1 and 60 (top) and sts 30 and 31 (bottom). The mirror of any stitch k is stitch 61 – k.
Inner Fans (Color A)
The foundation chain also has 48 numbered stitches, matching Rnd 1. Its top center falls between ch 48 and ch 1, and its bottom center between ch 24 and ch 25.
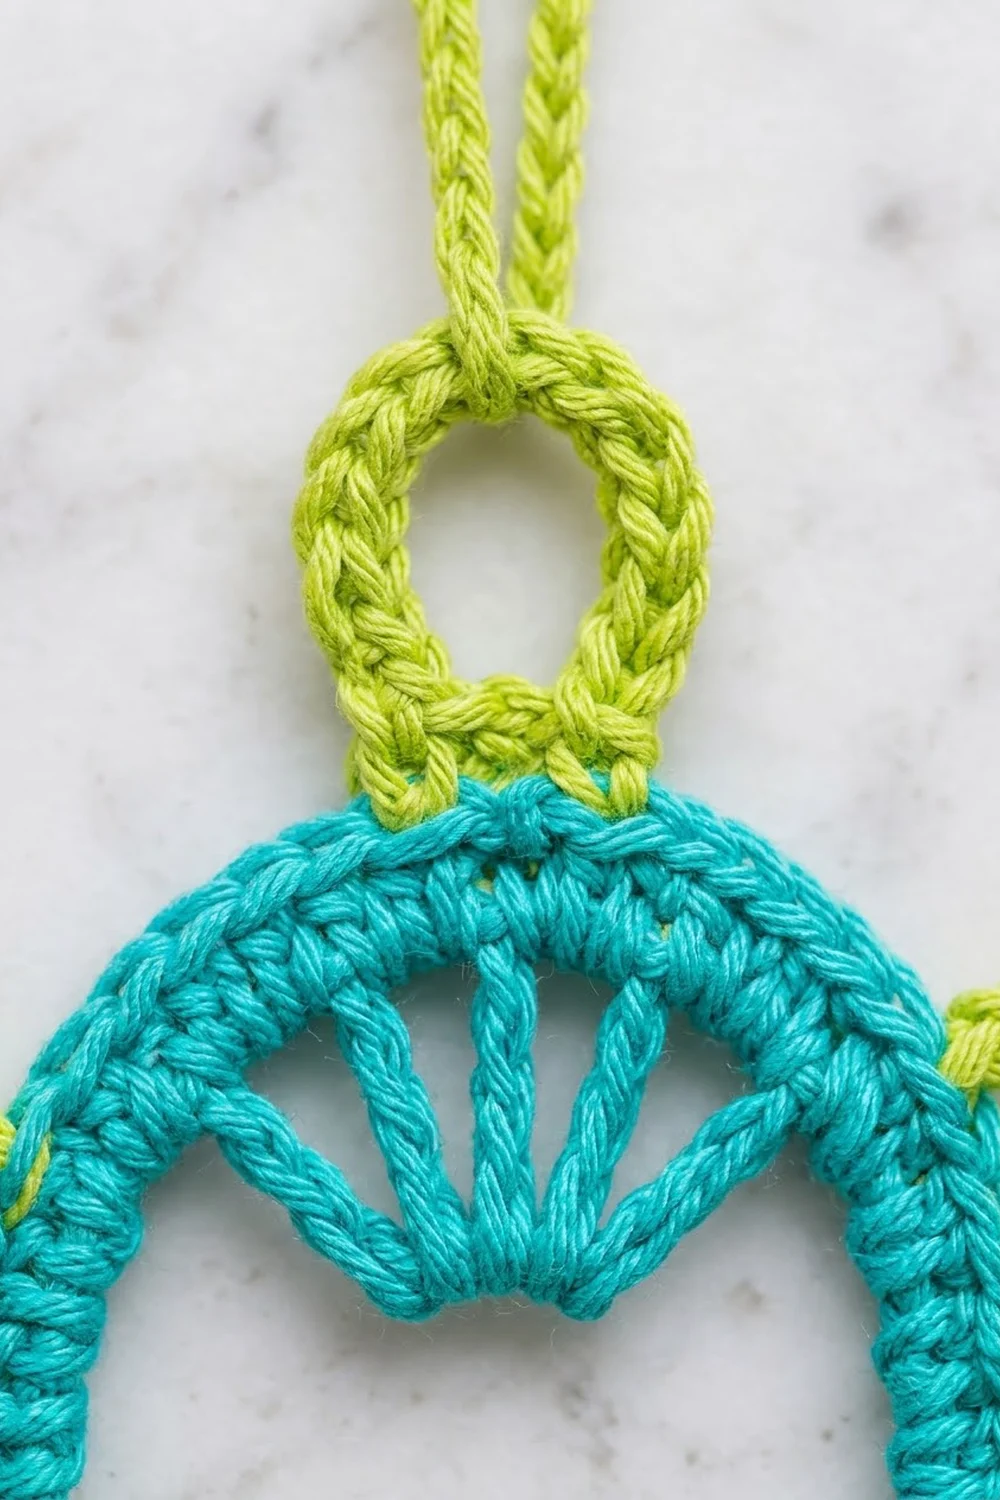
Top fan: With the right side facing, join Color A with a sl st in the free loops of ch 45. Work 1 FC across the free loops of ch 46, 47, 48, 1, 2, and 3, with one leg in each. Fasten off, leaving a 4 in (10.2 cm) tail.
The six tr legs spread across 1 in (2.5 cm) of the rim and meet at a point about 0.5 in (1.3 cm) inside the opening. The closing ch 1 makes the small bar at the tip.
Bottom fan: Join Color A with a sl st in the free loops of ch 21. Work 1 FC across ch 22, 23, 24, 25, 26, and 27. Fasten off.
Each fan uses 6 foundation chains, centered exactly on its axis. That leaves 18 free chains on each side between the fans, so the opening is symmetrical.
Securing the tips: Thread each tail onto the needle. Run it back down the middle tr leg, then weave it into the back of the rim. Keep the tail snug so the tip stays pointed and the legs stay straight, but don’t pull so hard that the rim puckers.
Border: Lime Loop Edging (Color B)
The lime loops act as this ornament’s border. They are all worked into the outer Rnd 2 stitches.
Border gauge: Each loop is a chain with sc worked back along it, at 6 ch per 1 in (2.5 cm). A loop made from ch 14 is about 2.3 in (5.8 cm) long when straightened. When it is anchored, it forms a teardrop that projects about 1.1 in (2.8 cm).
Every loop follows the same pattern:
- Join Color B with a sl st in the starting stitch.
- Chain the stated number.
- Skip the stated stitches and sl st in the ending stitch.
- Without turning, sc in each ch back along the chain toward the start.
- Sl st in the starting stitch again and fasten off.
Head loop: Join in st 58, ch 10, skip sts 59, 60, 1, and 2, then sl st in st 3. Sc in each of the 10 ch, then sl st in st 58. (10 sc)
The head is centered on the gap between st 60 and st 1, and its anchor points are mirrors of each other (58 ↔ 3).
Right front flipper: Join in st 8, ch 14, skip sts 9–11, then sl st in st 12. Sc in each of the 14 ch, then sl st in st 8. (14 sc)
Right rear flipper: Join in st 20, ch 12, skip sts 21–23, then sl st in st 24. Sc in each of the 12 ch, then sl st in st 20. (12 sc)
Left rear flipper: Join in st 41, ch 12, skip sts 40–38, then sl st in st 37. Sc in each of the 12 ch, then sl st in st 41. (12 sc)
Left front flipper: Join in st 53, ch 14, skip sts 52–50, then sl st in st 49. Sc in each of the 14 ch, then sl st in st 53. (14 sc)
Hanger: Join Color B with a sl st in the 5th sc of the head loop. Ch 40, then sl st in the 6th sc of the head loop. Fasten off. The doubled loop hangs about 3.25 in (8.3 cm) above the head.
Per side:
- Right side (sts 1–30): front flipper centered on st 10 (60° from the top) and rear flipper centered on st 22 (132°).
- Left side (sts 31–60): front flipper centered on st 51 and rear flipper centered on st 39, which are the exact mirrors (61 – 10 = 51 and 61 – 22 = 39).
Why the math works: Rnd 2 has 60 stitches, so each stitch covers 6° of the oval. Each flipper skips 3 stitches (18°), and the head skips 4 (24°), so every loop sits centered on its own axis.
The front flippers use 2 more chains than the rear ones. That makes them larger, as on a real turtle. Because each loop’s sc count equals its chain count, the rope is one stitch thick all the way around and the loops stay open.
Final Blocking
- Weave in all remaining ends along the back of the rim, in the matching color.
- Mix the fabric stiffener according to the bottle, or use 1 part starch to 1 part water.
- Soak the ornament fully, then press out the excess in a towel. Don’t wring it.
- Lay the paper oval template under clear plastic wrap on the foam board.
- Pin the outer rim along the template so the shell is 3.5 in (8.9 cm) tall and 2.75 in (7.0 cm) wide. Use about 12 pins, spaced evenly.
- Straighten each fan so its tip points straight toward the center, and pin the tip.
- Shape each lime loop into an open teardrop. Angle the front flippers up and out, and the rear flippers down and out. Pin each loop at its tip and at its widest point.
- Lay the hanger straight up from the head.
- Let it dry for 24 hours, then remove the pins.
Final Quality-Control Checklist
- Rnd 1 has 48 sc, and Rnd 2 has 60 sc.
- Each fan has 6 tr legs worked into 6 consecutive foundation chains.
- The fans line up with each other on the vertical center line.
- The head loop has 10 sc, the front flippers 14 sc each, and the rear flippers 12 sc each.
- The left and right flippers sit at matching heights.
- The shell measures 3.5 x 2.75 in (8.9 x 7.0 cm).
- The overall size is about 5 x 4.75 in (12.7 x 12.1 cm).
- No ends show on the front.
- The ornament hangs straight from the hanger without tilting.
Troubleshooting
The ring is twisted. You joined the foundation with a twist. Frog back and rejoin. A twist cannot be fixed later.
The oval ruffles. Your Rnd 2 increases are too loose, or your hook is too large. Rework Rnd 2 with a smaller hook.
The oval cups or curls inward. Rnd 2 is too tight. Rework it a little looser, or use a hook one size larger for that round only.
A fan tip drifts to one side. One tr leg was pulled shorter than the others. Re-tension the tail, then pin the tip on center while blocking.
The flipper loops collapse. You worked the sc into the loop space instead of into each chain. Rework, putting 1 sc in each chain.
The ornament hangs crooked. The hanger is off-center. Move it so it sits between the 5th and 6th sc of the head loop.
Care
Spot clean only with a damp cloth. Store the ornament flat in tissue so the stiffened loops keep their shape. If it gets crushed, re-stiffen and re-block it.
Final Notes
The measurement chain is short and easy to check. A ch-48 ring that measures 8 in (20.3 cm) grows to 60 sc around a 10 in (25.4 cm) outer edge. That edge blocks to a 3.5 x 2.75 in (8.9 x 7.0 cm) shell. The two 6-leg fans and five mirrored lime loops then bring the turtle to about 5 x 4.75 in (12.7 x 12.1 cm). If your measurements match at each stage, every turtle you make will be the same size.
Happy crocheting!