

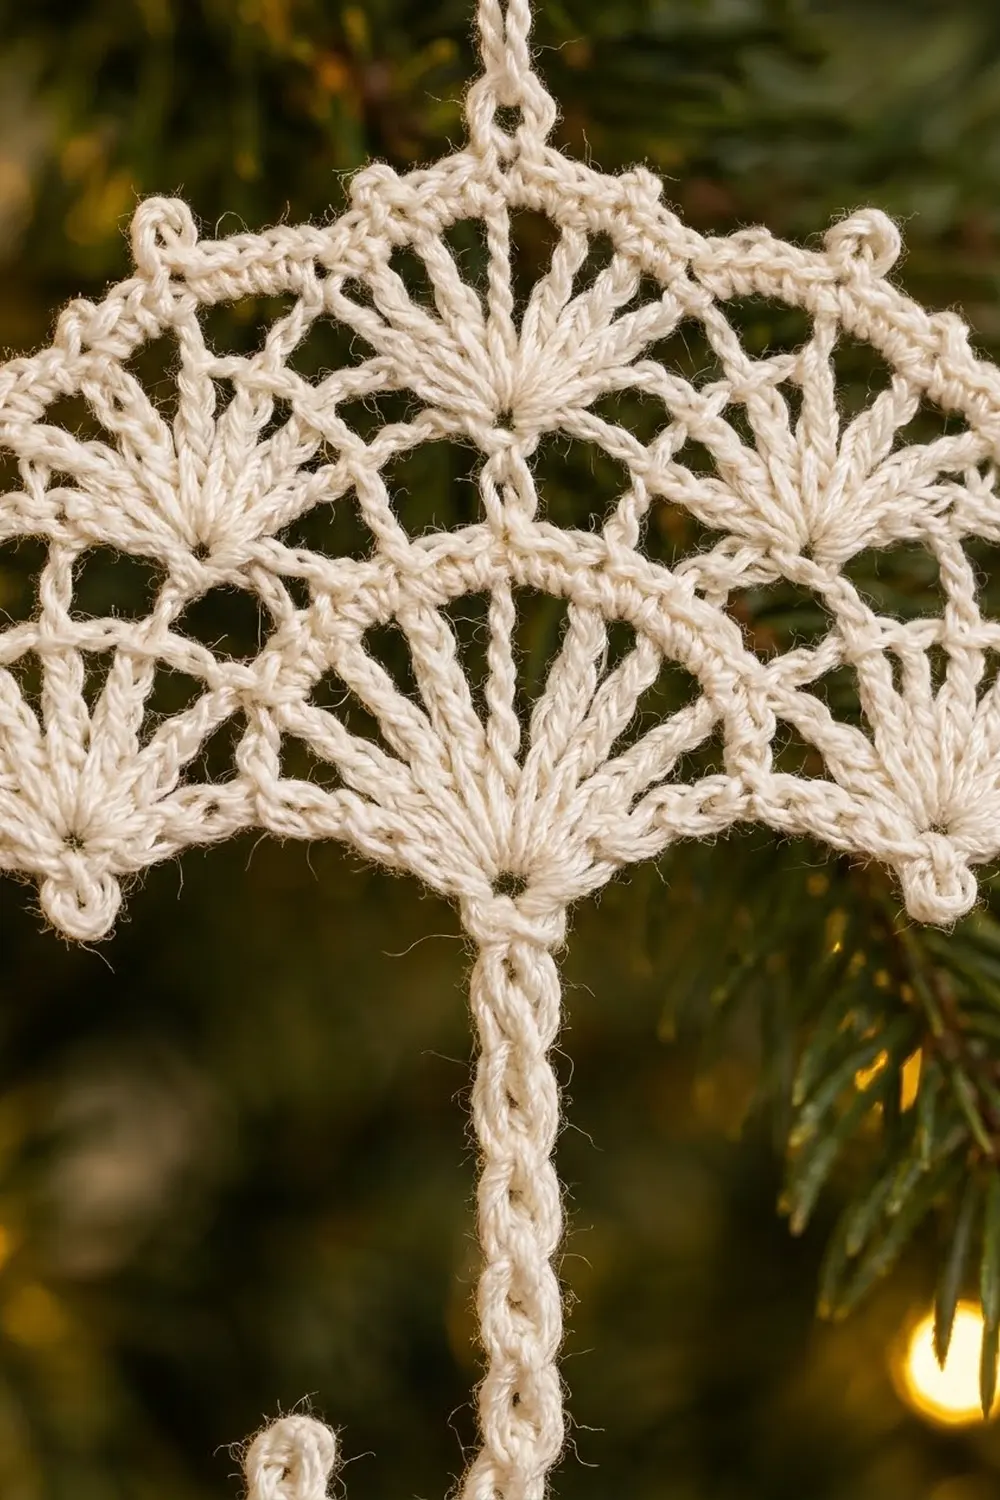
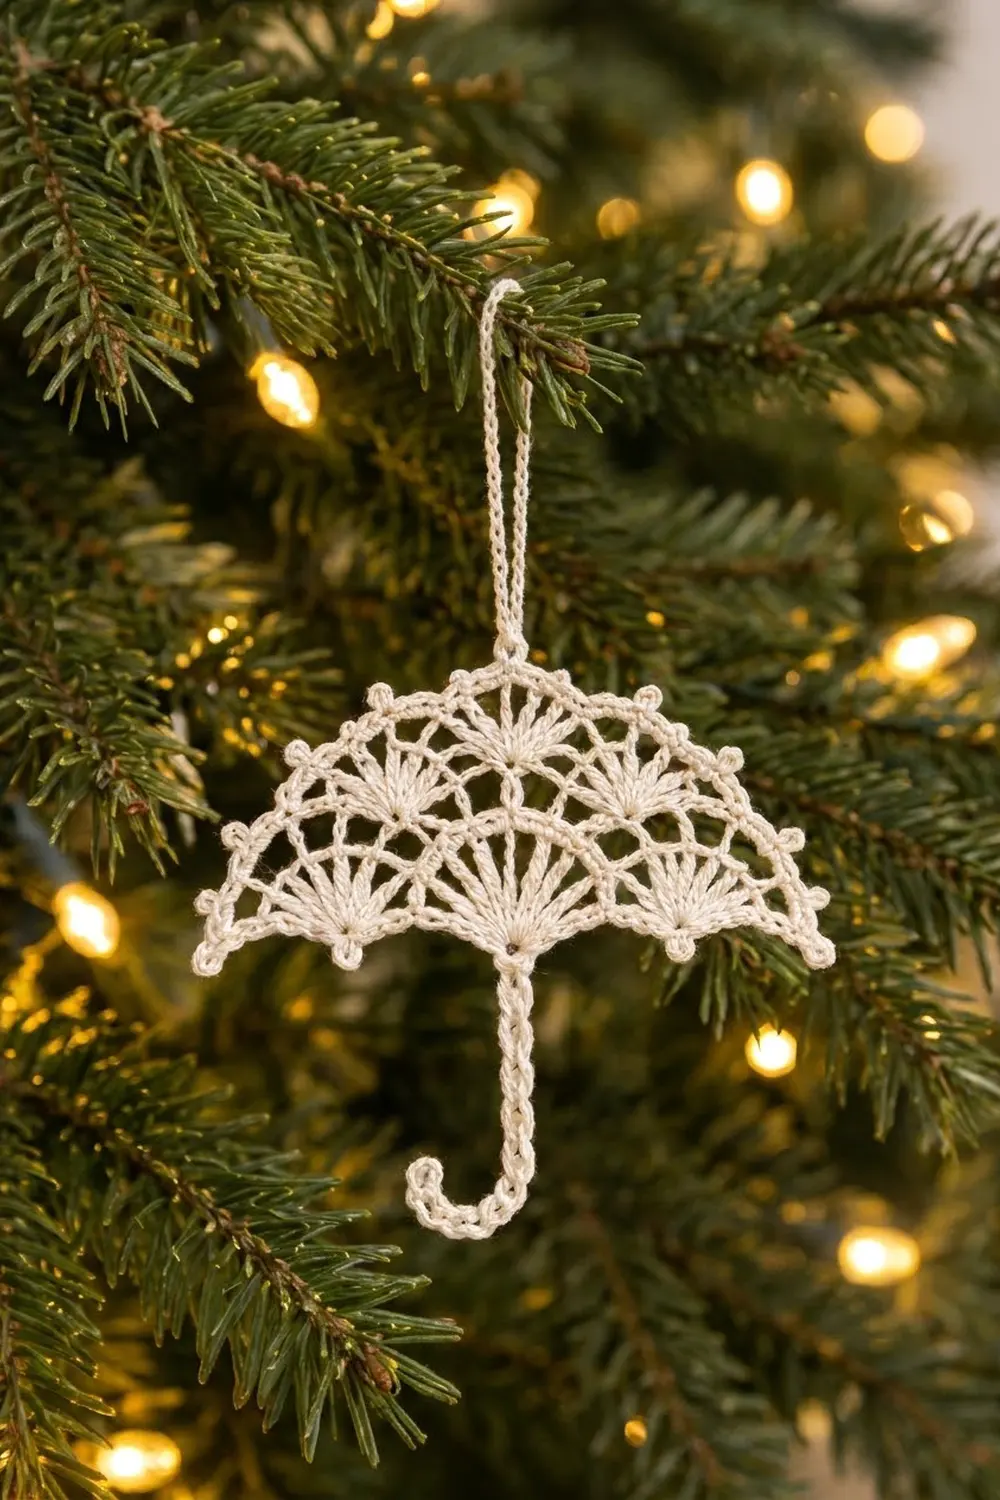
This little lace umbrella makes a delicate, heirloom-style ornament for a tree, a gift tag or a window charm. The canopy is open and airy, with shell fans spreading out from the handle like the ribs of a real umbrella. Small picots trim the domed top edge, and a row of soft chain scallops finishes the lower edge.
The sample is worked in cream cotton thread, which gives it the look of an old doily. White, ecru or pale gold thread all look lovely too, and a starched finish keeps the shape crisp on the branch.
This pattern uses US crochet terms. The finished ornament measures about 4 in (10.2 cm) wide across the canopy and 4.5 in (11.4 cm) tall from the top of the canopy to the bottom of the handle. The hanging loop adds about 1.5 in (3.8 cm) more.
The construction is simple. The canopy is worked flat as a half-circle in 6 turned rows, starting at the bottom center. Next, the straight handle is worked from the starting ring. A picot edging and a scalloped lower edge make up the border, and a chain loop is added at the top. Blocking with starch gives the handle its J-curl.
Finished Size and Construction
- Finished size: 4 in (10.2 cm) wide x 4.5 in (11.4 cm) tall, plus a 1.5 in (3.8 cm) hanging loop
- Skill level: Intermediate (thread crochet)
- Terminology: US crochet terms
- Yarn weight: Size 10 cotton crochet thread (lace weight)
- Hook: 1.5 mm steel hook
- Number of pieces: 1 (handle and loop are worked onto the canopy)
- Layout: Single half-circle canopy with a handle hanging from the bottom center
- Piece size (canopy only): 4 in (10.2 cm) wide x 2.25 in (5.7 cm) tall
- Size before border: 3.75 in (9.5 cm) wide x 1.875 in (4.8 cm) tall
- Border depth: 0.125 in (0.3 cm) along the top edge plus picots; 0.25 in (0.6 cm) of scallops along the lower edge
Materials
Thread: Use a mercerized size 10 cotton thread. It holds starch well and shows the stitch detail clearly. Avoid fuzzy or acrylic threads, because they will not keep the curled handle or the crisp picots.
- Cream / ivory: 6 g, about 31 m
This quantity includes a comfortable margin for a gauge swatch and weaving in ends. One 50 g ball makes about 8 ornaments.
Tools:
- 1.5 mm steel crochet hook
- Fine tapestry needle
- Small sharp scissors
- Fabric stiffener or spray starch
- Blocking board or a piece of foam covered with plastic wrap
- Rustproof pins
- A pencil or wooden dowel about 0.4 in (1.0 cm) thick, for curling the handle
Abbreviations (US Terms)
- ch – chain
- sl st – slip stitch
- sc – single crochet
- dc – double crochet
- sk – skip
- sp(s) – space(s)
- st(s) – stitch(es)
- RS – right side
Special stitch:
- Picot: ch 3, sl st into the 3rd ch from the hook.
Gauge and Checkpoints
Gauge is not critical for an ornament, but checking it ensures the handle and canopy stay in proportion.
Gauge: 10 ch = 1 in (2.5 cm) with size 10 thread and a 1.5 mm hook.
Treat the canopy as your test piece. Work Rows 1–2 and measure before continuing.
Checkpoints (measured flat and lightly pressed):
- After Row 2: 1.25 in (3.2 cm) wide x 0.6 in (1.5 cm) tall
- After Row 4: 2.5 in (6.4 cm) wide x 1.25 in (3.2 cm) tall
- After Row 6: 3.75 in (9.5 cm) wide x 1.875 in (4.8 cm) tall
- After the border: 4 in (10.2 cm) wide x 2.25 in (5.7 cm) tall
If your piece is too big, change to a 1.25 mm hook or work your chains more snugly. If it is too small, change to a 1.75 mm hook. A difference of 0.25 in (0.6 cm) at Row 6 is fine, because blocking can correct it.
Canopy
The canopy is worked in turned rows. Each row gets wider so the piece grows into a half-circle. The ring sits at the bottom center, and the fans open upward toward the dome.
Ring: Ch 5, sl st into the first ch to form a ring.
Row 1 (RS): Ch 3 (counts as dc), work 8 dc into the ring. Stitches should cover only the top half of the ring, leaving the lower half empty for the handle. Turn. (9 dc)
This first small fan becomes the center rib of the umbrella.
Row 2: Ch 3 (counts as dc), 2 dc in each of the next 7 dc, dc in the top of the turning ch. Turn. (16 dc)
Row 3: Ch 1, sc in the first dc, ch 5, sk 2 dc, sc in the next dc; repeat from * 4 more times. The last sc lands in the top of the turning ch. Turn. (6 sc, 5 ch-5 loops)*
The sc stitches sit in sts 1, 4, 7, 10, 13 and 16, which gives 5 even gaps of 3 stitches.
Row 4 (small fan row): Ch 3 (counts as dc), 2 dc in the first sc to make a half fan. Ch 2, sc in the next ch-5 loop, ch 2, 5 dc in the next sc; repeat from * 3 more times. Ch 2, sc in the last ch-5 loop, ch 2, 3 dc in the last sc to make a half fan. Turn. (26 dc: 2 half fans of 3 dc + 4 full fans of 5 dc; 5 sc; 10 ch-2 sps)*
Row 5 (mesh row): Ch 1, sc in the first dc. Ch 5, sc in the next sc, ch 5, sc in the center (3rd) dc of the next 5-dc fan; repeat from * 3 more times. Ch 5, sc in the next sc, ch 5, sc in the top of the turning ch. Turn. (11 sc, 10 ch-5 loops)*
This row doubles the number of anchor points from 6 to 11, which keeps the half-circle flat as it widens.
Row 6 (large fan row): Ch 3 (counts as dc), 3 dc in the first sc to make a half fan. Ch 1, sc in the next loop, ch 3, sc in the next loop, ch 1, 9 dc in the next sc; repeat from * 3 more times. Ch 1, sc in the next loop, ch 3, sc in the next loop, ch 1, 4 dc in the last sc to make a half fan. Turn. (44 dc: 2 half fans of 4 dc + 4 full fans of 9 dc; 10 sc; 5 ch-3 sps; 10 ch-1 sps)*
Each repeat uses 2 loops: 5 repeats x 2 loops = 10 loops. Do not fasten off.
Checkpoint: 3.75 in (9.5 cm) wide x 1.875 in (4.8 cm) tall.
Handle
The handle is worked now, before the border, so the lower scallops can pass neatly behind it.
- With the RS facing, join the thread with a sl st at the center of the empty lower half of the ring. Keep the working thread from the canopy aside on a stitch marker.
- Ch 27.
- Sc in the 2nd ch from the hook and in each of the next 25 ch. (26 sc)
- Sl st into the ring at the joining point. Fasten off and weave in the end through the handle stitches.
Checkpoint: The straight handle measures about 2.7 in (6.9 cm). After curling, it hangs about 2.25 in (5.7 cm) below the canopy.
Border
Border gauge: One border row sc stitch is roughly the width of one dc. That is why the sc counts below match the dc counts in Row 6 one-for-one, and the edging lies flat without ruffling or cupping.
Pick up the live loop from Row 6.
Border Row A (picot top edge): Ch 1, (sc, picot, sc) in the first dc, sc in the next 3 dc. *Sk the ch-1 sp and sc, (sc, picot, sc) in the ch-3 sp, sk the sc and ch-1 sp, sc in the next 4 dc, (sc, picot, sc) in the next dc (the 5th, center dc of the fan), sc in the next 4 dc; repeat from * 3 more times. Sk the ch-1 sp and sc, (sc, picot, sc) in the last ch-3 sp, sk the sc and ch-1 sp, sc in the next 3 dc, (sc, picot, sc) in the top of the turning ch. Do not turn.
Counts for Border Row A:
- Each half fan: 4 sc worked 1-per-dc + 1 extra sc at the corner = 5 sc, 1 picot
- Each full fan: 9 sc worked 1-per-dc + 1 extra sc at the center = 10 sc, 1 picot
- Each ch-3 sp: 2 sc, 1 picot
- Total: (2 x 5) + (4 x 10) + (5 x 2) = 60 sc, 11 picots
The 6th picot sits in the center ch-3 sp, at the very top of the dome. This is where the hanging loop will go.
Border Row B (scalloped lower edge): You are now at the left corner. Work down the straight edge toward the ring, putting your stitches into the row ends.
- First side: Ch 4, sc in the end of Row 5, picot, ch 4, sc in the end of Row 3, picot, ch 4, sc around the end post of Row 1, picot, ch 3, sc in the ring directly behind the handle join.
- Second side: Ch 3, sc around the end post of Row 1, picot, ch 4, sc in the end of Row 3, picot, ch 4, sc in the end of Row 5, picot, ch 4, sl st in the first sc of Border Row A.
Fasten off.
Counts for Border Row B:
- Each side: 3 ch-4 scallops + 1 ch-3 scallop, with 3 picots
- Total: 8 scallops, 6 picots, 7 sc
Why the math works: The sc rows (Rows 1, 3 and 5) are shorter than the dc rows. Anchoring to the odd rows spaces the scallops evenly, at about 0.5 in (1.3 cm) apart. Using ch 3 on the scallops next to the ring keeps the center tight, so the handle hangs straight.
Hanging loop: Join the thread with a sl st in the center picot (the 6th of 11), ch 30, and sl st in the same picot. Fasten off and weave in the ends.
Checkpoint: The hanging loop stands about 1.5 in (3.8 cm) tall. The canopy measures 4 in (10.2 cm) x 2.25 in (5.7 cm).
Final Blocking
- Weave in all the remaining ends. Trim them close only after the piece has been stiffened.
- Soak the ornament in fabric stiffener, or in a mix of 1 part white glue to 1 part water. Gently squeeze out the extra liquid.
- Lay the ornament RS up on a covered blocking board.
- Pin the 2 lower corners 4 in (10.2 cm) apart, with the straight edge level.
- Pin the top-center picot 2 in (5.1 cm) above the center of the straight edge. Then pin each remaining top picot so the dome forms an even curve.
- Pin each lower scallop point so the scallops hang evenly.
- Open each fan with a pin so the dc stitches spread like ribs.
- Pin the handle straight down from the center. Wrap the lowest 0.75 in (1.9 cm) around the pencil or dowel to form the J-curl, and pin it in place.
- Leave it to dry completely for 12–24 hours. Then unpin it and snip any fuzz.
Final Quality-Control Checklist
- [ ] Row 6 has 44 dc, 10 sc and 5 ch-3 sps.
- [ ] Border Row A has 60 sc and 11 picots.
- [ ] Border Row B has 8 scallops and 6 picots.
- [ ] The canopy measures 4 in (10.2 cm) wide x 2.25 in (5.7 cm) tall.
- [ ] The handle has 26 sc and hangs straight from the ring center.
- [ ] The J-curl faces the same way as you see it from the front.
- [ ] The hanging loop sits at the exact center top.
- [ ] The ornament hangs level, with no tilt.
- [ ] All ends are secured and trimmed.
Troubleshooting
Canopy cups into a bowl: The chain loops are too tight. Loosen your ch-5s in Rows 3 and 5, or go up a hook size for those rows only.
Canopy ruffles: The fans are too loose. Check that each full fan has exactly 5 dc (Row 4) or 9 dc (Row 6).
Ornament hangs tilted: The hanging loop is off-center. Count the picots again and move the loop to the 6th one.
Handle twists: Make sure the sc go into the back bump or the same loop of every chain. If it still twists, re-wet it and block it straight.
J-curl relaxes over time: Add another coat of stiffener and dry it on the dowel again.
Lower edge puckers: Your scallop chains are too short for your tension. Work ch 5 instead of ch 4.
Care
Dust the ornament gently with a soft brush and store it flat in tissue paper. If it gets soiled, hand-wash it in cool water, then re-stiffen and re-block it.
Final Notes
The measurement chain is short and easy to check. Rows 1–2 measure 1.25 in (3.2 cm) wide. The canopy grows to 3.75 in (9.5 cm) by Row 6, and the border brings it to 4 in (10.2 cm) wide and 2.25 in (5.7 cm) tall. The 26-sc handle adds about 2.25 in (5.7 cm) after curling, for a total height of 4.5 in (11.4 cm), plus a 1.5 in (3.8 cm) hanging loop. If you check each stage, your umbrella will hang straight and graceful on the tree.
Happy crocheting!