

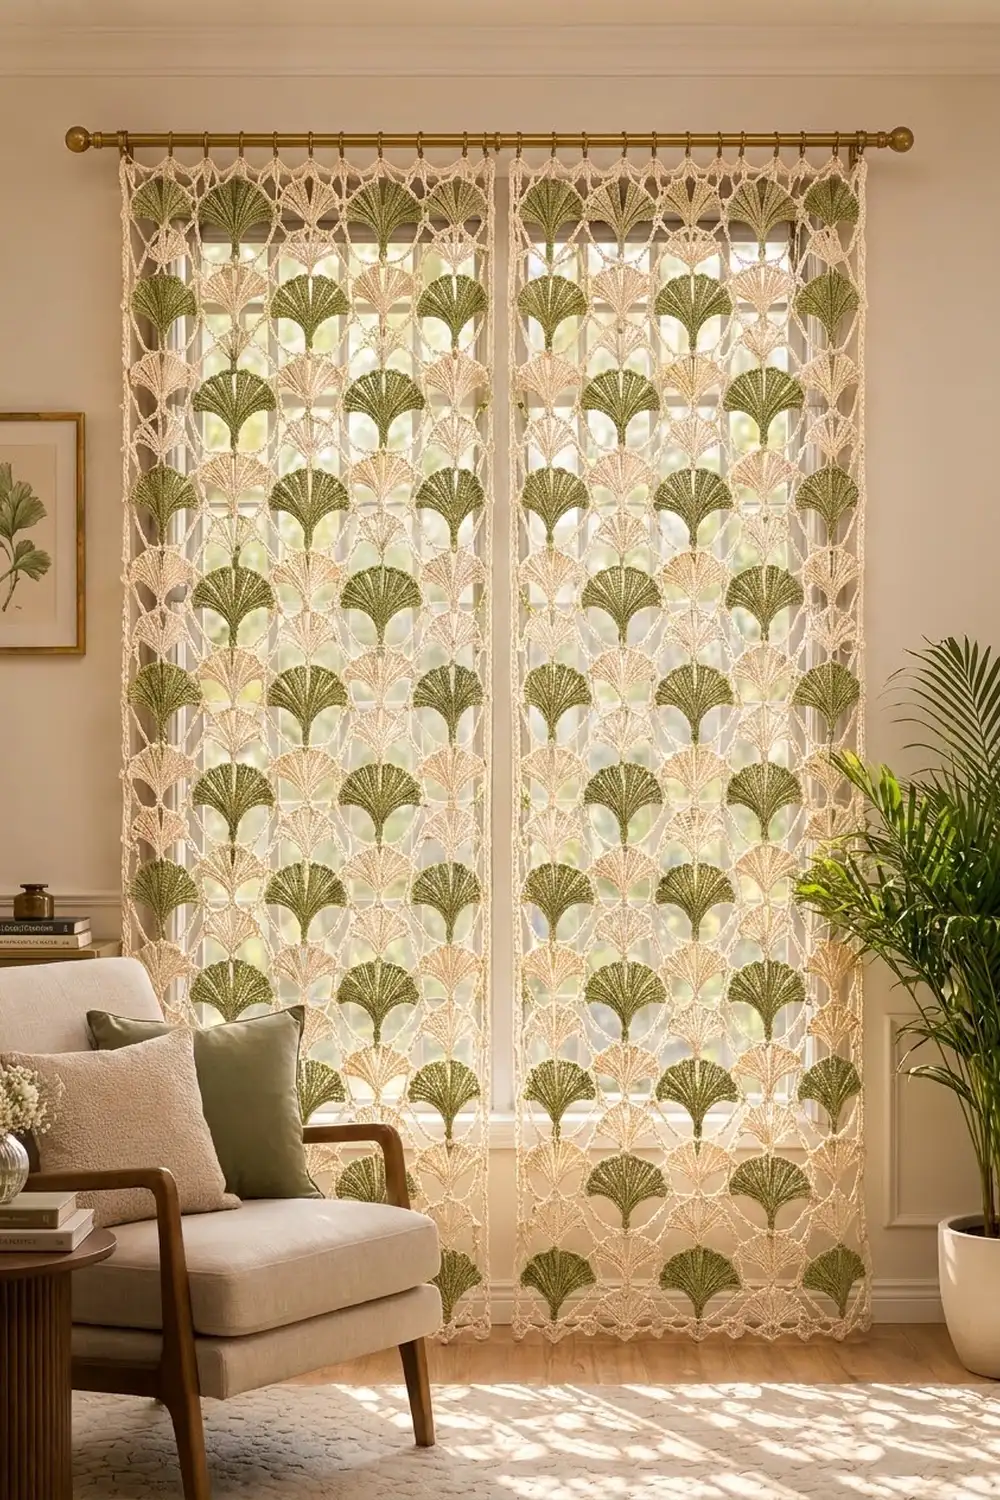
This curtain fills a window with falling ginkgo leaves. Fan-shaped leaves in soft sage green and warm cream hang inside a cream lace net. Small flower nodes hold every crossing in place, and light comes through the open diamonds.
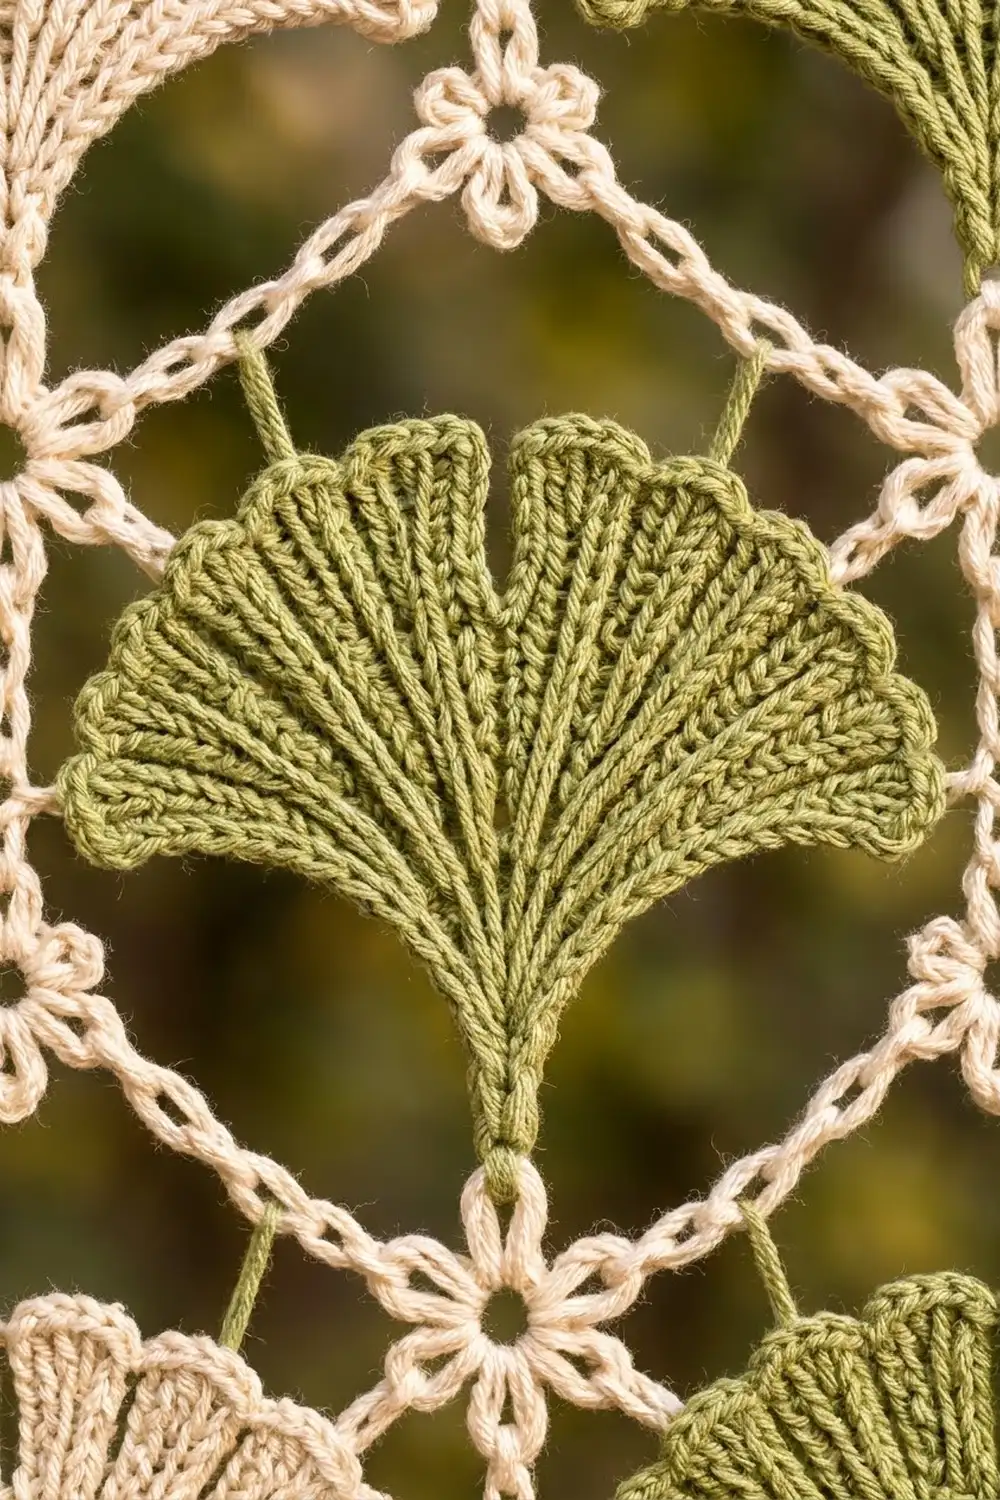
Each leaf is a half-round fan. It has ridged spokes that radiate from the base, a fine picot edge, a small notch at the top center and a slim corded stem. The leaves alternate colors, so the finished panel reads as a gentle sage-and-cream checker.
This pattern uses US crochet terms. One finished panel measures about 28.5 in x 76.5 in (72.4 cm x 194.3 cm), plus the rod loops. The photo shows a matching pair, so make two panels for one window.
The construction is straightforward. First you crochet all the leaves. Then you work a short header and build the net row by row from the top down, joining each leaf at four points as you go. The border straightens the sides and bottom, and rod loops finish the top.
Finished Size and Construction
- Finished size (one panel): 28.5 in x 76.5 in (72.4 cm x 194.3 cm)
- Skill level: Intermediate
- Terminology: US
- Yarn weight: Fingering (#1 super fine) mercerized cotton
- Hook: 2.5 mm
- Pieces per panel: 277 leaves (139 green, 138 cream), joined into one net as you work it (join-as-you-go)
- Layout: Diamond lattice of 38 net rows; leaf rows alternate between 7 and 8 leaves
- Leaf size: 3 in (7.6 cm) wide x 3.5 in (8.9 cm) tall, stem included
- Net cell: 3.5 in (8.9 cm) wide x 4 in (10.2 cm) tall
- Size before border: 28 in x 76.5 in (71.1 cm x 194.3 cm), header included
- Border depth: 0.25 in (0.6 cm) on each long side
Materials
Choose a smooth, mercerized cotton in fingering weight, about 170 m per 50 g. It gives crisp spokes, holds picots well and hangs without stretching much. Avoid fuzzy yarns, which blur the lace.
Per panel:
- Cream: 250 g / 850 m (138 leaves plus the whole net and border)
- Sage green: 200 g / 680 m (139 leaves)
For the pair: cream 500 g / 1700 m, sage green 400 g / 1360 m.
Tools:
- 2.5 mm crochet hook
- Tapestry needle
- Stitch markers
- Rust-proof pins, blocking mats, spray bottle
- Tape measure
- Curtain rod up to 1.25 in (3.2 cm) across
All quantities include a margin for swatching and tails.
Abbreviations (US Terms)
- ch chain
- sl st slip stitch
- sc single crochet
- dc double crochet
- tr treble crochet
- BLO back loop only
- sp space
- picot ch 3, sl st in 3rd ch from hook
Flower node (FN): Sc in the stitch or chain named in the instructions. Then work 4 petals around that sc:
- Join petal: ch 2, sl st in the leaf point named in the instructions, ch 2, sl st in the FN sc.
- Plain petal: ch 4, sl st in the FN sc.
Use a join petal wherever a leaf point meets the node and a plain petal everywhere else. One node can hold up to 4 leaves: the stem tip of the leaf above, the notch of the leaf below, and one tip from each leaf to the left and right.
Gauge and Checkpoints
Gauge: 12 ch = 2 in (5.1 cm), and 6 sc = 1 in (2.5 cm).
Test one leaf first. Checkpoints:
- After Round 2: fan is 1.75 in (4.4 cm) wide.
- After Round 3: fan is 2.75 in (7.0 cm) wide.
- Finished leaf: 3 in (7.6 cm) wide and 3.5 in (8.9 cm) tall with the stem.
Then test the net. Ch 44 and work 43 sc. Hang 2 loops of ch 29 from sc 1, 22 and 43. Each loop should block to about 5.25 in (13.3 cm) along its curve.
If your leaf is too big, go down 0.25 mm. If it is too small, go up 0.25 mm. Keep the net chains relaxed. Tight chains make the cells shorter than 4 in (10.2 cm) and pucker the leaves.
Ginkgo Leaf (make 277 per panel)
Leave a 6 in (15.2 cm) tail at the start and at the end.
Stem: Ch 13. Sl st in 2nd ch from hook and in each of next 11 ch. (12 sl st; the stem is 2 in / 5.1 cm long.) The first ch is the stem tip.
Ring: Ch 4, sl st in first of these 4 ch to form a ring.
Round 1: Ch 3 (counts as dc), 8 dc in ring, working only on the side opposite the stem. Turn. (9 dc, a half circle)
Round 2: Ch 3 (counts as dc), dc in same st, 2 dc in each of next 8 dc. Turn. (18 dc)
Round 3 (spokes and notch): Working in BLO, ch 4 (counts as tr), tr in each of next 8 dc, ch 2, tr in each of next 9 dc. Turn. (18 tr, 1 ch-2 sp)
The BLO spokes create the ridged vein lines. The ch-2 opens the notch between the two lobes.
Round 4 (picot edge):
- First lobe: Ch 1, sc in first tr, picot, *sc in each of next 2 tr, picot; repeat from * 3 more times. (9 sc, 5 picots)
- Notch: Sl st in ch-2 sp. This sl st is the notch point.
- Second lobe: *Picot, sc in each of next 2 tr; repeat from * 3 more times, sc in top of ch-4, picot. (9 sc, 5 picots)
Round 4 total: 18 sc, 10 picots, 1 sl st. Fasten off and weave in the ends.
The first and last picots are the tip points. Each leaf joins the net at 4 points: the notch, both tips and the stem tip.
Make All Pieces
Per panel: 139 sage green leaves and 138 cream leaves (277 total). For the pair: 278 green and 276 cream.
Each leaf row is named by the level of the node at its top, from level 0 at the header down to level 36. Even levels hold 7 leaves. Odd levels hold 8, shifted half a cell sideways. Repeat this 4-level layout down the panel (G = green, C = cream):
Level 0, 4, 8 ... 36:    G   C   G   C   G   C   G
Level 1, 5, 9 ... 33:  C   G   C   G   C   G   C   G
Level 2, 6, 10 ... 34:   C   G   C   G   C   G   C
Level 3, 7, 11 ... 35: G   C   G   C   G   C   G   C
Count check: 10 rows of 4G + 3C, 9 rows of 3G + 4C and 18 rows of 4G + 4C give 139 green and 138 cream.
Header
With cream, ch 170.
Header Row 1: Sc in 2nd ch from hook and in each ch across. Turn. (169 sc)
Header Row 2: Ch 1, sc in each sc across. Turn. (169 sc, about 28 in / 71.1 cm wide)
The anchor stitches are sc 1, 22, 43, 64, 85, 106, 127, 148 and 169. They sit exactly 21 sts (3.5 in / 8.9 cm) apart. Mark them.
Joining: The Lace Net
Work the net in cream from the top down. Every loop is ch 29, and its center is the 15th ch. Each row adds one level of nodes, 2 in (5.1 cm) deep, so one full cell spans 2 rows.
Net Row 1 (level 0 nodes): FN in sc 1, *ch 29, skip 20 sc, FN in next sc; repeat from * 7 more times. (8 loops, 9 nodes)
Header nodes get only 1 petal each. On the 7 inner header nodes, make it a join petal to the notch of a level 0 leaf. On the 2 corner nodes, make it a plain petal.
Net Row 2 (B-row): Turn. Ch 38. The first 24 ch form the right side strand, and the 24th ch is the side junction. The last 14 ch reach over to the first loop. FN in center of last loop of previous row, *ch 29, FN in center of next loop; repeat from * 6 more times. Ch 15. (7 loops, 8 nodes)
Net Row 3 (A-row): Turn. FN in 2nd ch from hook (left edge node), *ch 29, FN in center of next loop; repeat from * 6 more times, ch 29, FN in side junction of previous row. (8 loops, 9 nodes)
Rows 4–38: Repeat Rows 2 and 3, ending with a Row 2 repeat. (38 rows total)
Joining at each FN: Lay the leaves out ahead of you following the grid. Each node joins:
- the notch of the leaf hanging below it
- the tips of the leaves beside it
- the stem tip of the leaf above it
So each row joins the notches of one new leaf row, the tips of the row before and the stems of the row before that. Every leaf ends up held at 4 points.
Tension: Keep the ch-29 loops relaxed and even. Don’t pull the join petals tight; the ch 2 on each side lets the leaf sit flat.
Size checkpoint: After Row 4, the net measures 8 in (20.3 cm) below the header. After Row 10, it measures 20 in (50.8 cm). The width stays at 28 in (71.1 cm).
Border
The border gauge matches the net: 6 sc = 1 in (2.5 cm), and each side strand is 24 ch = 4 in (10.2 cm).
Bottom hem: Don’t fasten off after Row 38. Turn. FN in 2nd ch from hook (left corner), *ch 20, FN in center of next loop; repeat from * 6 more times, ch 20, FN in last side junction. (8 spans, 9 nodes)
The 7 inner hem nodes join the stems of the level 36 leaves. All other petals on the hem are plain.
Right side: Without turning, work 24 sc over each of the 19 side strands, up to the header. (456 sc) Fasten off.
Left side, Step 1: Join cream in header sc 1. *Ch 24, sl st in next left edge node; repeat from * 18 more times. (19 bridges)
Left side, Step 2: Turn. Work 24 sc over each bridge, back up to the header. (456 sc) Sl st in header sc 1. Fasten off.
Rod loops: Join cream in the first free loop of the foundation ch at the top. *(Sl st, ch 30, sl st) in same ch, sl st in each of next 21 ch; repeat from * 7 more times, (sl st, ch 30, sl st) in last ch. (9 loops, each 5 in / 12.7 cm around)
Why the math works: 38 rows x 2 in = 76 in (193.0 cm). On each long side, 19 strands x 24 sc = 456 sc, which is also 76 in at 6 sc per inch, so both sides match. Along the bottom, each span of ch 20 plus 1 node is 21 sts = 3.5 in (8.9 cm). That matches the 21-stitch spacing of the header anchors.
Final Blocking
- Weave in all ends securely, through solid stitches.
- Lay the panel flat on mats, right side up, one section at a time.
- Pin the header straight at 28 in (71.1 cm).
- Pin both long sides straight, checking 4 in (10.2 cm) per side strand.
- Pin each flower node so the cells measure 3.5 in x 4 in (8.9 cm x 10.2 cm).
- Open each leaf fan and pin the tips. Pin the picots too if you want them crisp.
- Spray until damp but not soaked. Let it dry fully before moving to the next section.
- Hang the panel for one day before taking final measurements.
Final Quality-Control Checklist
- 277 leaves, with colors matching the grid
- Every leaf joined at the notch, both tips and the stem tip
- 38 net rows: 9 nodes on each A-row, 8 on each B-row
- 456 sc on each long side
- 9 rod loops, evenly spaced
- Panel measures 28.5 in x 76.5 in (72.4 cm x 194.3 cm)
- No loose tails or twisted loops
Troubleshooting
Leaves cup or ruffle: Round 3 is too loose or too tight. Change hook size for the leaves only.
Notch disappears: Check that Round 3 has a full ch 2, and that Round 4 has a sl st in it, not a sc.
Panel is shorter than expected: Your net chains are too tight. Relax them, or go up 0.25 mm for the net.
Side edge waves: Recount the 24 sc per strand. Extra stitches make the edge flare.
Leaf twists in its cell: Undo the stem join and make sure you joined at the stem tip, not the side of the stem.
Lost your place: Count nodes. A-rows have 9, B-rows have 8.
Care
Hand wash in cool water with mild soap, roll in a towel and dry flat, pinned to size. Steam lightly if the picots relax.
Final Notes
The measurements build on each other in a short chain. A 3 in (7.6 cm) leaf fits a 3.5 in x 4 in (8.9 cm x 10.2 cm) cell. Each net row adds 2 in (5.1 cm), so 38 rows give 76 in (193.0 cm). Twenty-one stitches make 3.5 in (8.9 cm), so 8 cells give 28 in (71.1 cm) across. The border adds 0.25 in (0.6 cm) per side, for a finished panel of 28.5 in x 76.5 in (72.4 cm x 194.3 cm).
Make two panels, hang them and enjoy the leaves.
Happy crocheting!