

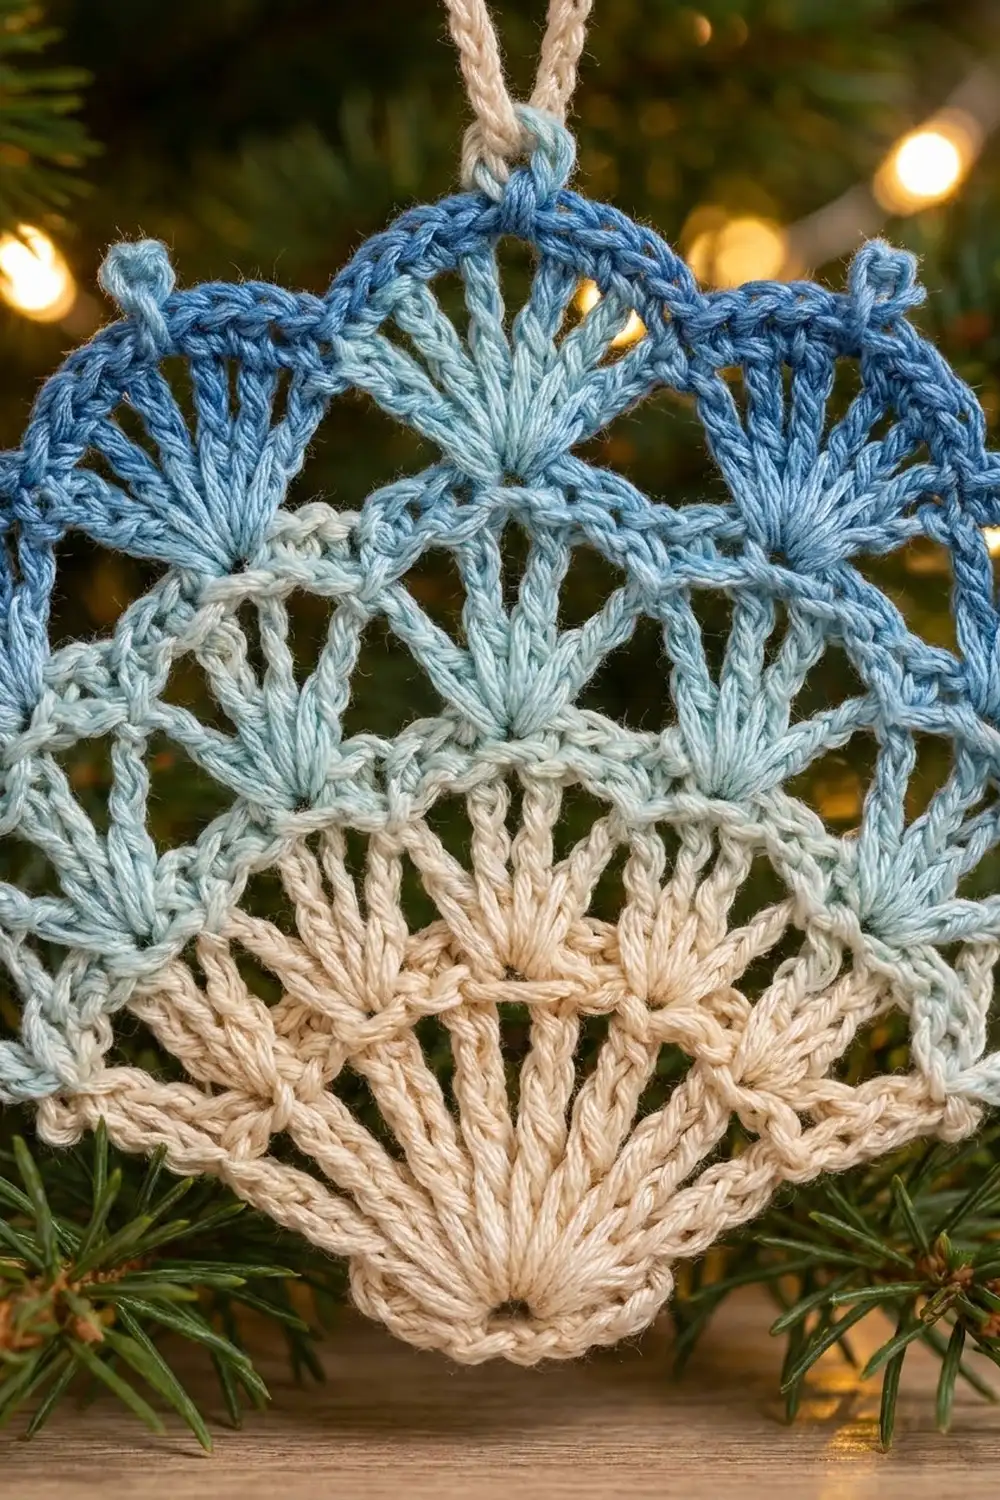
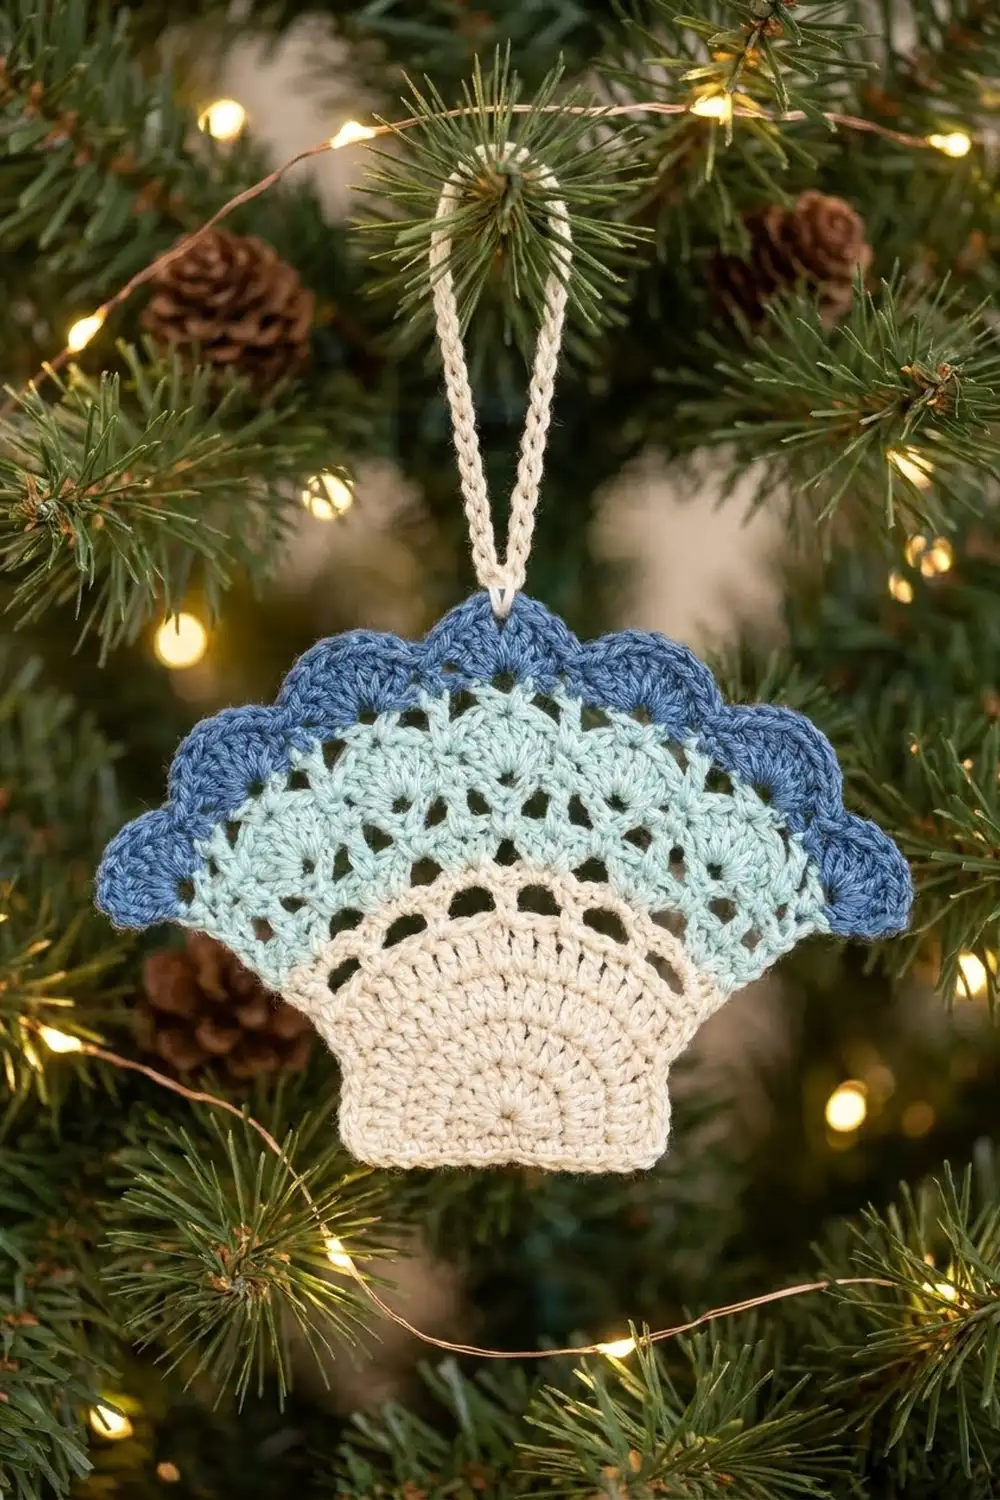
The Tidewater Shell Fan is a small, lacy ornament shaped like a scallop shell. It starts from a tight point and opens into a wide, scalloped edge. Small picots sit at the outer tips and between the scallops, and a slim cream loop at the top center lets it hang from a tree branch, a window latch, or a gift.
The colors move from warm cream at the base, through pale aqua in the middle, to medium denim blue at the top. Together they look like sand fading into shallow water and then deeper sea. The style is light and airy. It suits a coastal Christmas tree, but it also works as a year-round hanging decoration.
This pattern uses US crochet terms. The finished ornament measures about 4.5 in (11.4 cm) wide and 3.25 in (8.3 cm) tall, not counting the hanging loop. The loop adds about 1.5 in (3.8 cm).
The ornament is one piece, worked flat in 7 turned rows from a magic ring. Rows 1–3 build the cream fan base, Rows 4–5 add the aqua shell-and-lattice tier, Row 6 makes the blue scallops, and Row 7 is a single crochet and picot border. A chain loop goes on last.
Finished Size and Construction
- Finished size: 4.5 in (11.4 cm) wide x 3.25 in (8.3 cm) tall, plus a 1.5 in (3.8 cm) loop
- Skill level: Easy-intermediate
- Terminology: US crochet terms
- Yarn weight: Sport weight (#2) mercerized cotton
- Hook: 2.75 mm (US C/2)
- Number of pieces: 1
- Layout: Single fan motif, worked flat in rows from a point
- Piece size: 4.5 in (11.4 cm) x 3.25 in (8.3 cm)
- Size before border (after Row 6): 4.25 in (10.8 cm) x 3.125 in (7.9 cm)
- Border depth: about 0.125 in (0.3 cm), not counting picots
Materials
Choose a smooth, mercerized cotton or cotton blend. Its crisp stitch definition keeps the shells and arches clear, and it blocks flat. Avoid fuzzy or very stretchy yarns, because the lace will lose its shape.
- Color A, Cream: 4 g (11 m)
- Color B, Pale Aqua: 4 g (11 m)
- Color C, Medium Denim Blue: 5 g (14 m)
These quantities include a margin for a test swatch and weaving in ends. A gradient yarn that shades from cream to blue can replace the three colors. If you use one, skip the color changes and work straight through.
Tools:
- 2.75 mm (US C/2) crochet hook
- Tapestry needle
- Scissors
- Rust-proof pins and a foam blocking mat
- Spray bottle with water
- Optional: fabric stiffener or a light spray starch
- Ruler or tape measure
Abbreviations (US Terms)
- ch – chain
- sl st – slip stitch
- sc – single crochet
- dc – double crochet
- sp – space
- st(s) – stitch(es)
- MR – magic ring
- RS / WS – right side / wrong side
Special stitches:
- V-stitch (V): (dc, ch 1, dc) in the same stitch or space.
- Picot: Ch 3, sl st in the 3rd ch from the hook.
- Shell: The number of dc given in the instructions, all worked into the same stitch or space.
Gauge and Checkpoints
Gauge matters because each tier sits on the one below it. Work Rows 1–2 as a test before going further. After light steaming or pinning, it should measure:
- After Row 1: 1.25 in (3.2 cm) across the flat bottom edge, 0.625 in (1.6 cm) tall
- After Row 2: 2 in (5.1 cm) wide, 1 in (2.5 cm) tall
Check again at each stage, measuring width tip to tip across the widest point and height from the base point to the top center:
- After Row 3: 2.75 in (7.0 cm) wide, 1.5 in (3.8 cm) tall
- After Row 5: 3.75 in (9.5 cm) wide, 2.5 in (6.4 cm) tall
- After Row 6: 4.25 in (10.8 cm) wide, 3.125 in (7.9 cm) tall
- After Row 7: 4.5 in (11.4 cm) wide, 3.25 in (8.3 cm) tall
If your piece is too big, go down to a 2.5 mm hook, or tighten the chain arches. If it is too small, go up to a 3.0 mm hook. A small size difference is fine for an ornament. Just keep the stitch counts exact so the fan stays symmetrical.
Pattern
Color Changes and Ends
You fasten off at the end of Row 3 and Row 5. Leave a 4 in (10.2 cm) tail each time. When you join a new color, also leave a 4 in (10.2 cm) tail and hold it along the top of the row so you can work the first few stitches over it. This saves weaving later and keeps the color change neat. Every row is turned, so the RS and WS alternate. Both sides look almost the same in this lace, so pick the neater side as the RS before blocking.
Row 1 (Color A, Cream)
With A, make a MR. Ch 3 (counts as dc), work 10 dc into the ring. Pull the ring tight so the stitches form a half circle. Do not join. (11 dc)
Row 2 (Color A)
Ch 4 (counts as dc + ch 1), turn. Dc in next dc, ch 1 9 times, then dc in the top of the turning ch-3. (11 dc, 10 ch-1 sps)
These dc rays make the ribbed spokes at the base of the shell.
Row 3 (Color A)
Ch 1, turn. Sc in the first dc. Ch 5, skip (ch-1 sp, dc, ch-1 sp), sc in the next dc 5 times. The last sc goes into the 3rd ch of the turning ch-4. (6 sc, 5 ch-5 loops)
Fasten off A.
Checkpoint: 2.75 in (7.0 cm) wide, 1.5 in (3.8 cm) tall. Five even arches should sit across the top.
Row 4 (Color B, Pale Aqua)
Turn the piece so you work back across, just as if you had turned at the end of a row. Join B with a sl st in the first ch-5 loop. Ch 3 (counts as dc), 4 dc in the same loop. (First shell: 5 dc)
Ch 2, 5 dc in the next ch-5 loop 4 times. (5 shells = 25 dc, 4 ch-2 sps)
Work the dc around the whole chain loop, not into individual chains. This lets the shells fan out evenly.
Row 5 (Color B)
Ch 1, turn. Sc in the first dc. Ch 3, sc in the center (3rd) dc of the same shell.
Ch 3, V-stitch in the next ch-2 sp, ch 3, sc in the center dc of the next shell 4 times.
Ch 3, sc in the top of the turning ch-3. (7 sc, 4 V-stitches, 10 ch-3 sps)
Fasten off B.
The V-stitches make the small spiked fans between the aqua shells. The ch-3 sps make the open lattice.
Checkpoint: 3.75 in (9.5 cm) wide, 2.5 in (6.4 cm) tall.
Row 6 (Color C, Medium Denim Blue)
Turn the piece. Join C with a sl st in the first sc. Ch 3 (counts as dc), 2 dc in the same sc. (Half shell: 3 dc)
Skip the ch-3 sp, sc in the next sc.
Skip the ch-3 sp, 9 dc in the ch-1 sp of the next V-stitch, skip the ch-3 sp, sc in the next sc 4 times.
Skip the last ch-3 sp, 3 dc in the last sc. (Half shell: 3 dc)
Row count: 3 + 1 + (4 x 10) + 3 = 47 sts (42 dc, 5 sc)
Do not fasten off.
You now have 4 full scallops with a half-shell flare at each outer tip. The 5 sc sit in the valleys between them. The skipped ch-3 sps stay open beneath the scallops and show the aqua lattice through the blue.
Checkpoint: 4.25 in (10.8 cm) wide, 3.125 in (7.9 cm) tall.
Border
Border Gauge
The border is a single row of sc in C. It is about 0.125 in (0.3 cm) deep, and each sc is about the width of one dc from Row 6. This means the border sits flat without ruffling or pulling in. For counting, treat the top edge as 11 segments: 2 half shells (3 sts each), 4 full shells (9 sts each), and 5 valley sc.
Row 7 (Color C): Single Crochet and Picot Border
Ch 1, turn.
First half shell (3 dc → 4 sc): (Sc, picot, sc) in the first dc, then sc in each of the next 2 dc.
Valley 1: Sc in the next sc, picot.
Full shells and valleys: Sc in each of the next 9 dc, sc in the next sc, picot 4 times. Skip the picot at the center valley (the 2nd repeat). Leave that sc plain, because the hanging loop goes there.
Last half shell (3 dc → 4 sc): Sc in each of the next 2 dc, then (sc, picot, sc) in the top of the turning ch-3.
Row count: 47 sts worked 1-per-stitch + 2 extra sc at the tips = 49 sc, plus 6 picots (2 at the tips, 4 in the valleys).
Fasten off C.
Why the Math Works
Every stitch of Row 6 gets exactly one sc, so the edge length stays matched to the fabric below. The only extra stitches are the 2 sc that wrap each outer tip around its picot, which turns the tip corner without cupping. Each full shell keeps 9 sc, so all 4 scallops come out identical. The 2 half shells keep 4 sc each, so the two sides mirror each other.
Hanging Loop (Color A)
Join A with a sl st in the plain center valley sc. Ch 20, then sl st in the same sc to close the loop. Fasten off. The loop measures about 1.5 in (3.8 cm) when hanging.
Weave in all ends along stitches of the same color.
Final Blocking
- Spray the ornament until it is damp, or dip it in water and press it between towels.
- Lay it RS up on the blocking mat.
- Pin the base point first, then the two outer picot tips. Keep the tips 4.5 in (11.4 cm) apart.
- Pin the center valley 3.25 in (8.3 cm) above the base point.
- Pin each of the 4 scallop peaks so they curve evenly. Pin the 4 valley picots so they point outward.
- Open each ch-5 arch and ch-3 lattice space with a pin tip so the lace looks even.
- If you want a firmer ornament, apply a light coat of fabric stiffener or starch.
- Let it dry completely before unpinning, usually 6–12 hours.
Final Quality-Control Checklist
- Base ring is pulled fully closed, with no hole at the point.
- Row 2 has 11 evenly spaced dc spokes.
- Row 3 has 5 matching ch-5 arches.
- Row 4 has 5 aqua shells of 5 dc each.
- Row 5 has 4 V-stitches centered between the shells.
- Row 6 has 4 blue 9-dc scallops plus 2 half shells.
- Row 7 has 49 sc and 6 picots, with a plain sc at the center valley.
- Hanging loop sits at the exact top center.
- Finished size is 4.5 in (11.4 cm) x 3.25 in (8.3 cm).
- All ends are woven in securely and cannot be seen from the RS.
Troubleshooting
- Fan curls into a cone: Row 1 or Row 2 is too tight. Loosen your dc, or check you have 11 dc in Row 1.
- Fan ruffles: The ch-5 or ch-3 sps are too long or loose. Chain more firmly, or go down a hook size.
- Scallops are uneven: Count 9 dc in each shell, and check that each shell sits in a V-stitch’s ch-1 sp.
- One side is longer: Check that each half shell has 3 dc and that Row 5 starts and ends with a sc in the edge stitches.
- Picots flop: Make the picot chains snug, and pin them outward when blocking.
- Loop is off-center: Count the valleys again. The loop belongs at the 3rd of 5.
- Color tails show through the lace: Weave them along the solid dc posts, not across the open spaces.
Care
Hand wash in cool water with mild soap, press out the water in a towel, and reshape it flat to dry. Store it flat or hanging, away from heavy items that could crush the shells.
Final Notes
The measurement chain is simple: 11 dc spokes give 5 arches, 5 arches hold 5 aqua shells, and those shells anchor 4 V-stitches. The V-stitches carry 4 blue scallops between 2 half shells. Row 6 measures 4.25 in (10.8 cm) x 3.125 in (7.9 cm), and the 49-sc picot border brings the ornament to 4.5 in (11.4 cm) x 3.25 in (8.3 cm). Check each checkpoint as you go and your shell will come out symmetrical every time. Make one for each branch, or tie one onto a gift as a keepsake.
Happy crocheting!