

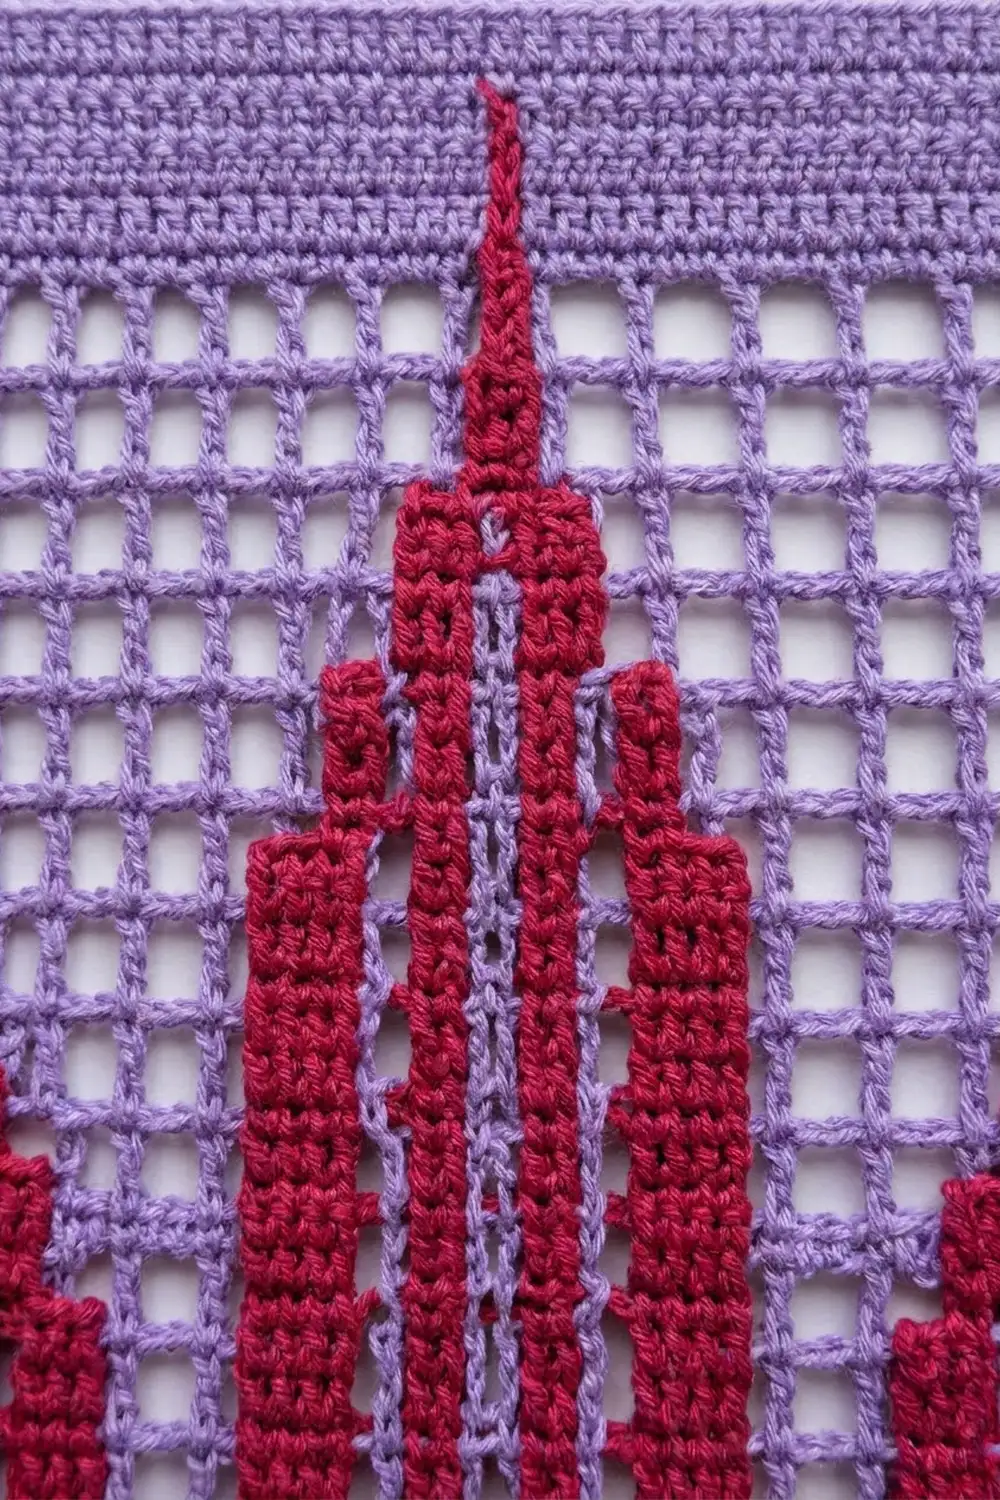
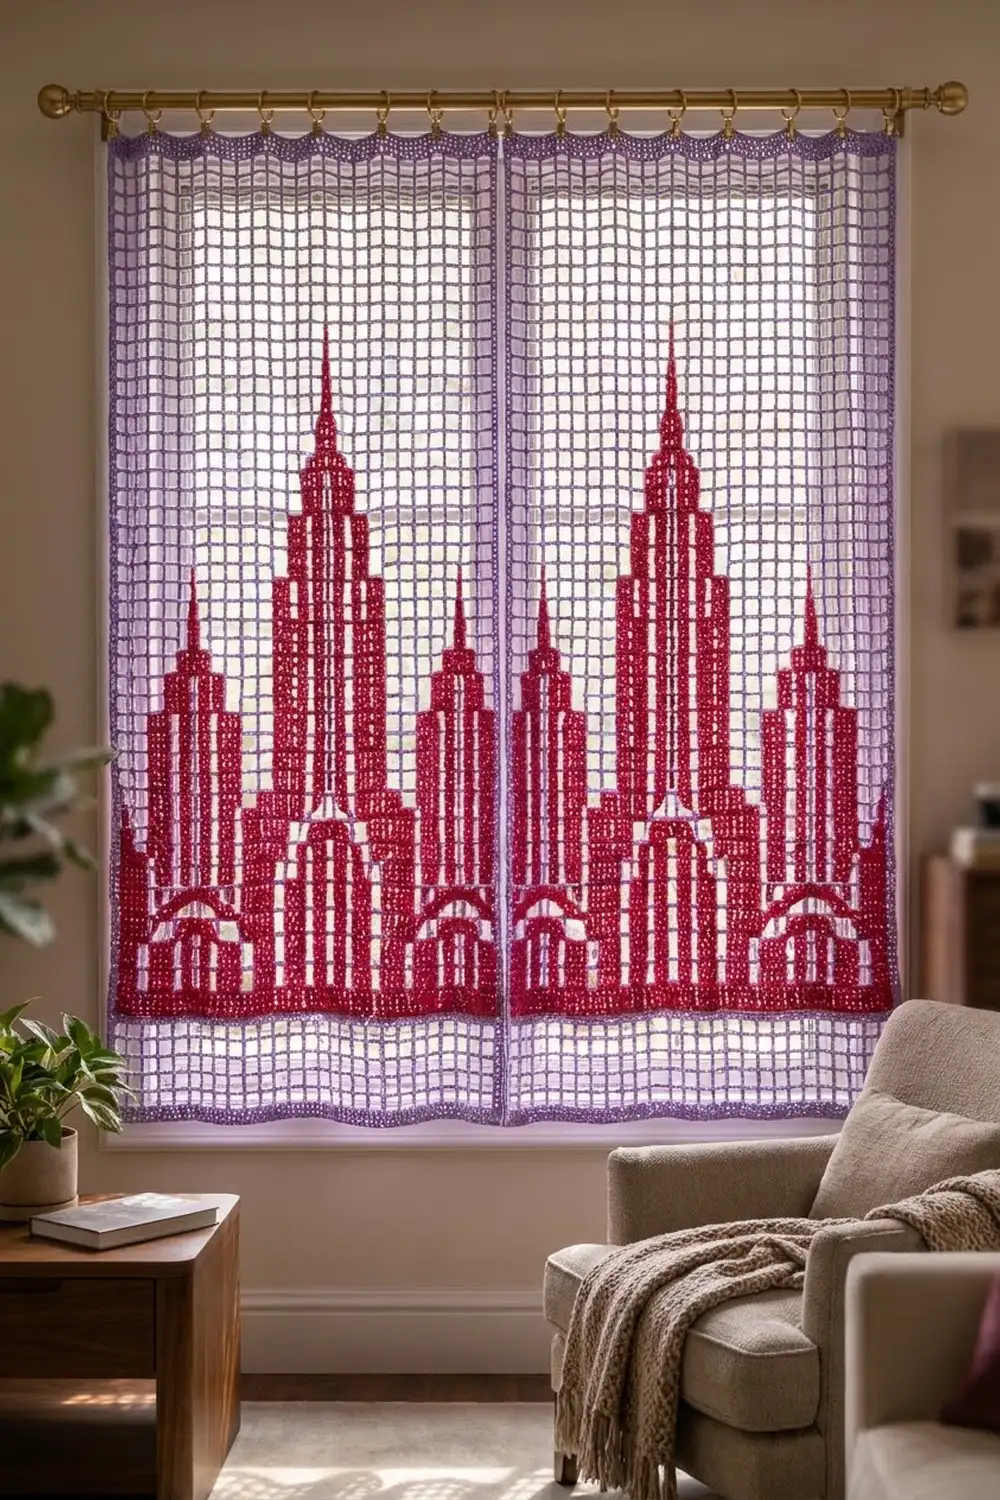
This filet curtain turns a window into an Art Deco skyline. Raspberry-red skyscrapers rise from a solid red base band against an open lavender mesh, so light comes through the sky and the towers read as crisp silhouettes.
The curtain is made from two identical panels. Each panel shows one tall, stepped central tower with a spire, two shorter flanking towers, narrow vertical window slots, and pointed, stepped arches at the tower bases. The palette is two colors: lavender for the mesh and raspberry red for the buildings.
This pattern uses US crochet terms. The finished curtain measures 37 x 41 in (94.0 x 104.1 cm) after the border.
Construction is simple. You work each panel from the bottom up in filet crochet, using bobbins for the colorwork. Then you join the two panels with a slip stitch seam and add three rounds of single crochet border.
Finished Size and Construction
- Finished size: 37 x 41 in (94.0 x 104.1 cm)
- Skill level: Intermediate (filet crochet plus bobbin colorwork)
- Terminology: US
- Yarn weight: Fine (#2) sport-weight mercerized cotton
- Hook: 2.75 mm (C/2)
- Number of pieces: 2 identical panels
- Layout: 2 panels side by side (2 across x 1 tall)
- Piece size: 18 x 40 in (45.7 x 101.6 cm), 45 squares x 100 rows
- Size before border: 36 x 40 in (91.4 x 101.6 cm)
- Border depth: 0.5 in (1.3 cm) on each side
Materials
Use a smooth, mercerized cotton or cotton blend in sport weight. Mercerized cotton gives crisp square holes and blocks that keep their shape well. Avoid fuzzy yarns, because they blur the mesh.
- Color A, Lavender (mesh, seam, border): about 300 g / 930 m
- Color B, Raspberry Red (towers, base band): about 250 g / 775 m
These quantities include a margin of roughly 15% for gauge swatches and small differences in tension.
Tools:
– 2.75 mm (C/2) crochet hook
– 6–8 yarn bobbins
– Tapestry needle
– Stitch markers
– Blocking mats, rust-proof pins, and a spray bottle
– Measuring tape
– 13 curtain clip rings for hanging
Abbreviations (US Terms)
- ch – chain
- sc – single crochet
- dc – double crochet
- sl st – slip stitch
- sk – skip
- sp – space
- st(s) – stitch(es)
- RS / WS – right side / wrong side
Special filet terms:
- Block (solid square): dc in each of the next 2 sts (or 2 dc in the ch-2 sp), dc in the next dc. This makes 3 sts.
- Mesh (open square): ch 2, sk the next 2 sts (or the ch-2 sp), dc in the next dc. This also makes 3 sts.
- Square ownership: Each square owns its 2 inner sts plus its closing dc. Work all 3 in that square’s color.
Every row is 1 starting st plus 45 squares x 3 sts, which comes to 136 sts.
Gauge and Checkpoints
Gauge: 10 squares and 10 rows = 4 x 4 in (10.2 x 10.2 cm) in filet mesh.
Swatch first by working 13 squares x 13 rows. Measure the center 10 x 10 squares.
Make one full panel before you start the second. Then compare the panel to the checkpoints below.
- After Row 4 (base band): width 18 in (45.7 cm), depth 1.6 in (4.1 cm).
- After Row 50: height 20 in (50.8 cm).
- After Row 100: panel measures 18 x 40 in (45.7 x 101.6 cm).
If the panel is too big: go down to a 2.5 mm hook, or shorten your ch-2 spaces by pulling them snug.
If it is too small: go up to a 3.0 mm hook.
Row height matters as much as width. If the squares come out taller than they are wide, pull up less on each dc.
Panel (Make 2)
Setup and Color Method
The columns are numbered 1 to 45, and column 23 is the center. The whole design is symmetrical around column 23, so you read the column numbers the same way on RS and WS rows.
Wind red bobbins for the 3 towers. Wind lavender bobbins for each mesh section that sits between towers. At each color change, finish the last dc of the old square, drop that color to the WS, and pick up the new color.
Inside a tower, window slots and arches are mesh squares worked in red, so each opening is framed in red. Squares outside the towers are lavender.
Foundation: With B, ch 138.
Row 1 (RS): Dc in 4th ch from hook (the skipped ch counts as dc), then dc in each ch across. Turn. (136 sts = 45 blocks)
Rows 2–4: Ch 3 (counts as dc), then work a block over every square. Turn. (136 sts = 45 blocks)
These first 4 rows form the solid red base band.
From Row 5 on: Start each row with ch 3 in A, which counts as the first dc. Each row is all mesh except for the red tower squares listed below. In each row, check the tower ranges first and then the openings.
Central Tower (red blocks)
- Tier 1: Rows 5–44, columns 13–33 (21 squares)
- Tier 2: Rows 45–58, columns 15–31 (17 squares)
- Tier 3: Rows 59–68, columns 18–28 (11 squares)
- Tier 4: Rows 69–76, columns 20–26 (7 squares)
- Tier 5: Rows 77–82, columns 22–24 (3 squares)
- Spire: Rows 83–88, column 23 (1 square)
Openings in the central tower (red mesh):
- Grand arch:
- Rows 5–16, columns 19–27, except column 23, which stays a block and forms a center pillar
- Rows 17–18, columns 20–26
- Row 19, columns 22–24
- Side slots: Rows 5–40, columns 15 and 31
- Upper slots: Rows 22–40, columns 19, 23, and 27
- Tier 2 slots: Rows 47–56, columns 17, 20, 23, 26, and 29
- Tier 3 slots: Rows 61–66, columns 20, 23, and 26
- Tier 4 slot: Rows 71–74, column 23
Flanking Towers (red blocks)
Left tower:
- Rows 5–38, columns 2–10
- Rows 39–48, columns 3–9
- Rows 49–54, columns 5–7
- Spire: Rows 55–59, column 6
The right tower is the mirror image, at columns 36–44, 37–43, 39–41, and spire column 40. Each right column equals 46 minus the left column.
Openings in each flanking tower (red mesh): Left tower columns are listed. The right tower uses the mirrored columns.
- Arch:
- Rows 5–10, columns 4–8
- Rows 11–12, columns 5–7
- Row 13, column 6
- Slots:
- Rows 16–36, columns 4, 6, and 8
- Rows 41–46, column 6
Sky
Rows 89–100: All mesh in A. Do not turn at the end of Row 100. (136 sts = 45 mesh) Fasten off.
Stitch Count Check
Every row has 136 sts, and blocks plus mesh always add up to 45.
- Row 5: 19 blocks + 26 mesh. That is 4 blocks in each flanking tower and 11 in the central tower.
- Row 50: 18 blocks + 27 mesh. That is 3 + 3 in the flanking towers, and 12 in central tier 2 (17 squares minus 5 slots).
- Row 88: 1 block + 44 mesh.
Weave in all tails along the backs of same-colored blocks. That way, they don’t show through the mesh.
Make All Pieces
- Panels: 2 total
- Per panel: about 130 g / 403 m of A and 125 g / 388 m of B.
- Seam and border: about 40 g of A, bringing A to about 300 g in total.
Layout grid (front view):
+-----------+-----------+
|  Panel 1  |  Panel 2  |
+-----------+-----------+
Both panels face the same way, with the base bands at the bottom.
Joining
Method: Slip stitch seam in A, worked on the WS.
- Place the panels RS together, with the base bands aligned at the bottom.
- Line up the row-ends: Row 1 to Row 1, and so on to Row 100 to Row 100. Pin every 10 rows.
- Join A at the bottom corner. Inserting the hook through the edge post of both panels, work 2 sl st per row-end, for 200 sl st.
- Fasten off.
Stitch logic: The seam matches one row-end to one row-end and adds no stitches to the top or bottom edges.
Tension: Keep the sl sts loose, about the same height as a dc row is wide. A tight seam puckers the mesh. If it pulls, rip it out and redo it with a hook one size larger.
Checkpoint: The joined piece measures 36 x 40 in (91.4 x 101.6 cm) when laid flat.
Border
Border gauge: 7.5 sc = 1 in (2.5 cm). This matches the fabric along both edge directions.
- Top and bottom edges: each panel gives 136 sts over 18 in (45.7 cm), or 7.5 per inch.
- Side edges: each dc row-end is 0.4 in (1.0 cm) tall. Three sc fill that same 0.4 in, so the side edge also works at 7.5 per inch.
Round 1 (RS): With A, join in the top right corner.
- Top edge: sc in each st across both panels, for 2 x 136 = 272 sc. Ch 2 at the corner.
- Side edge: 3 sc in each row-end, 100 x 3 = 300 sc. Ch 2 at the corner.
- Bottom edge: sc in each foundation ch across both panels, for 272 sc. Ch 2 at the corner.
- Other side: 300 sc. Ch 2, then sl st to the first sc.
Total: 1,144 sc + 4 ch-2 corner sp. The seam adds nothing to this count.
Round 2: Ch 1. Sc in each sc, and work (sc, ch 2, sc) in each corner sp.
- Top and bottom edges: 274 sc each
- Sides: 302 sc each
- Total: 1,152 sc
Round 3: Repeat Round 2.
- Top and bottom edges: 276 sc each
- Sides: 304 sc each
- Total: 1,160 sc
Fasten off.
Why the math works: In each round, every corner adds 1 sc to each of its 2 neighboring sides, so every side grows by exactly 2 per round. Because the stitch density matches the fabric at 7.5 sts per inch, the border lies flat without ruffling or cupping.
The 3 rounds add 0.5 in (1.3 cm) on every side. That brings the curtain to 37 x 41 in (94.0 x 104.1 cm).
Final Blocking
- Soak the curtain in cool water for 15 minutes. Press out the water; don’t wring.
- Roll it in a towel to remove most of the moisture.
- Lay it flat on blocking mats, RS up.
- Pin the outer corners to 37 x 41 in (94.0 x 104.1 cm).
- Pin along the edges every 2 in (5.1 cm), keeping the lines straight.
- Nudge the squares into true squares, and the spires and slots into straight verticals.
- Check that the seam runs straight.
- Let it dry completely, at least 24 hours, before unpinning.
Final Quality-Control Checklist
- [ ] Each panel measured 18 x 40 in (45.7 x 101.6 cm) before joining.
- [ ] Every row has 136 sts.
- [ ] The central spire ends at Row 88, and the side spires end at Row 59 on both sides.
- [ ] The left and right towers mirror each other around column 23.
- [ ] The seam has 200 sl sts, with rows aligned.
- [ ] Border Round 3 has 1,160 sc.
- [ ] The curtain measures 37 x 41 in (94.0 x 104.1 cm).
- [ ] No tails show through the mesh.
Troubleshooting
- Squares lean or slant: You are working into the wrong st. Always place the closing dc into the dc of the row below.
- Tower edges are jagged: You worked the closing dc in the wrong color. Remember that the closing dc belongs to its square.
- Red shows inside lavender mesh: A strand was carried across instead of using a bobbin. Use separate bobbins.
- Panel too short: Your rows are short. Pull up on each dc a little more, and re-check against the gauge.
- Border ruffles: Count your stitches and make sure you worked exactly 3 sc per row-end. If it still ruffles, use a hook one size smaller for the border.
- Border cups: Your tension is too tight. Go up a hook size for the border only.
Care
Hand wash in cool water with mild soap, then lay flat or re-block to dry. Hang out of harsh direct sunlight to slow fading of the red.
Final Notes
Check your measurements at each stage:
- Swatch: 10 squares = 4 in (10.2 cm).
- Panels: 45 squares x 100 rows = 18 x 40 in (45.7 x 101.6 cm).
- Joined: 2 panels = 36 x 40 in (91.4 x 101.6 cm).
- Bordered: 3 rounds of sc add 0.5 in (1.3 cm) per side, for a final size of 37 x 41 in (94.0 x 104.1 cm).
To hang the curtain, clip 13 rings evenly along the top border, about every 3 in (7.6 cm).
Happy crocheting!