

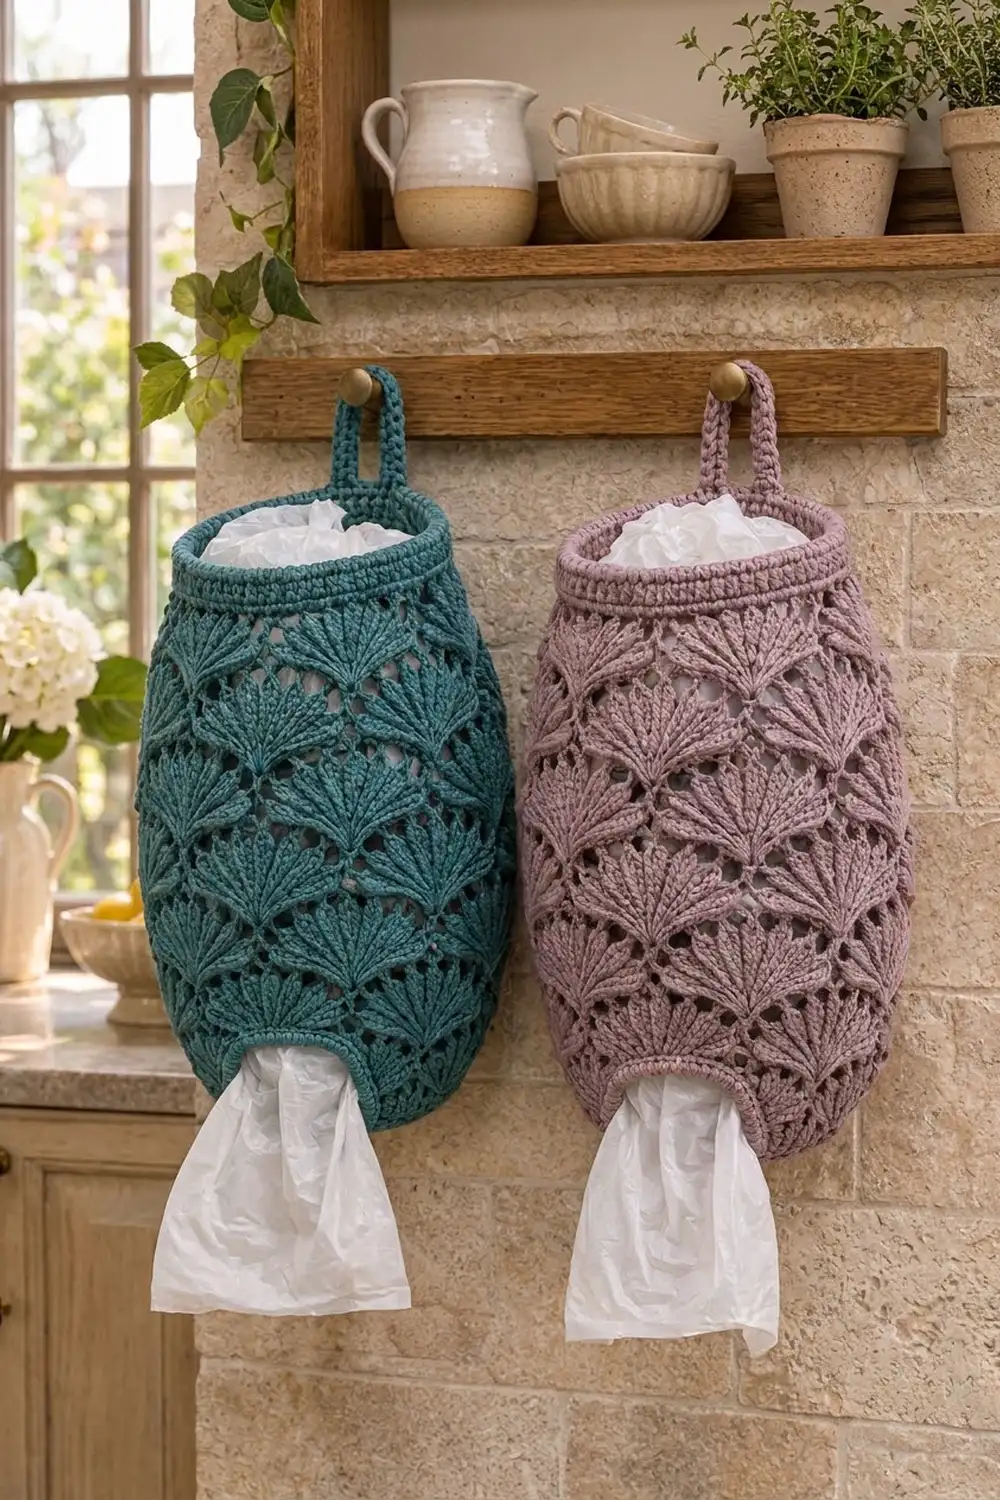
Plastic bags find their way into every kitchen drawer. This holder gives them one tidy home. Stuff bags in through the top, then pull them out one at a time through the oval opening near the base.
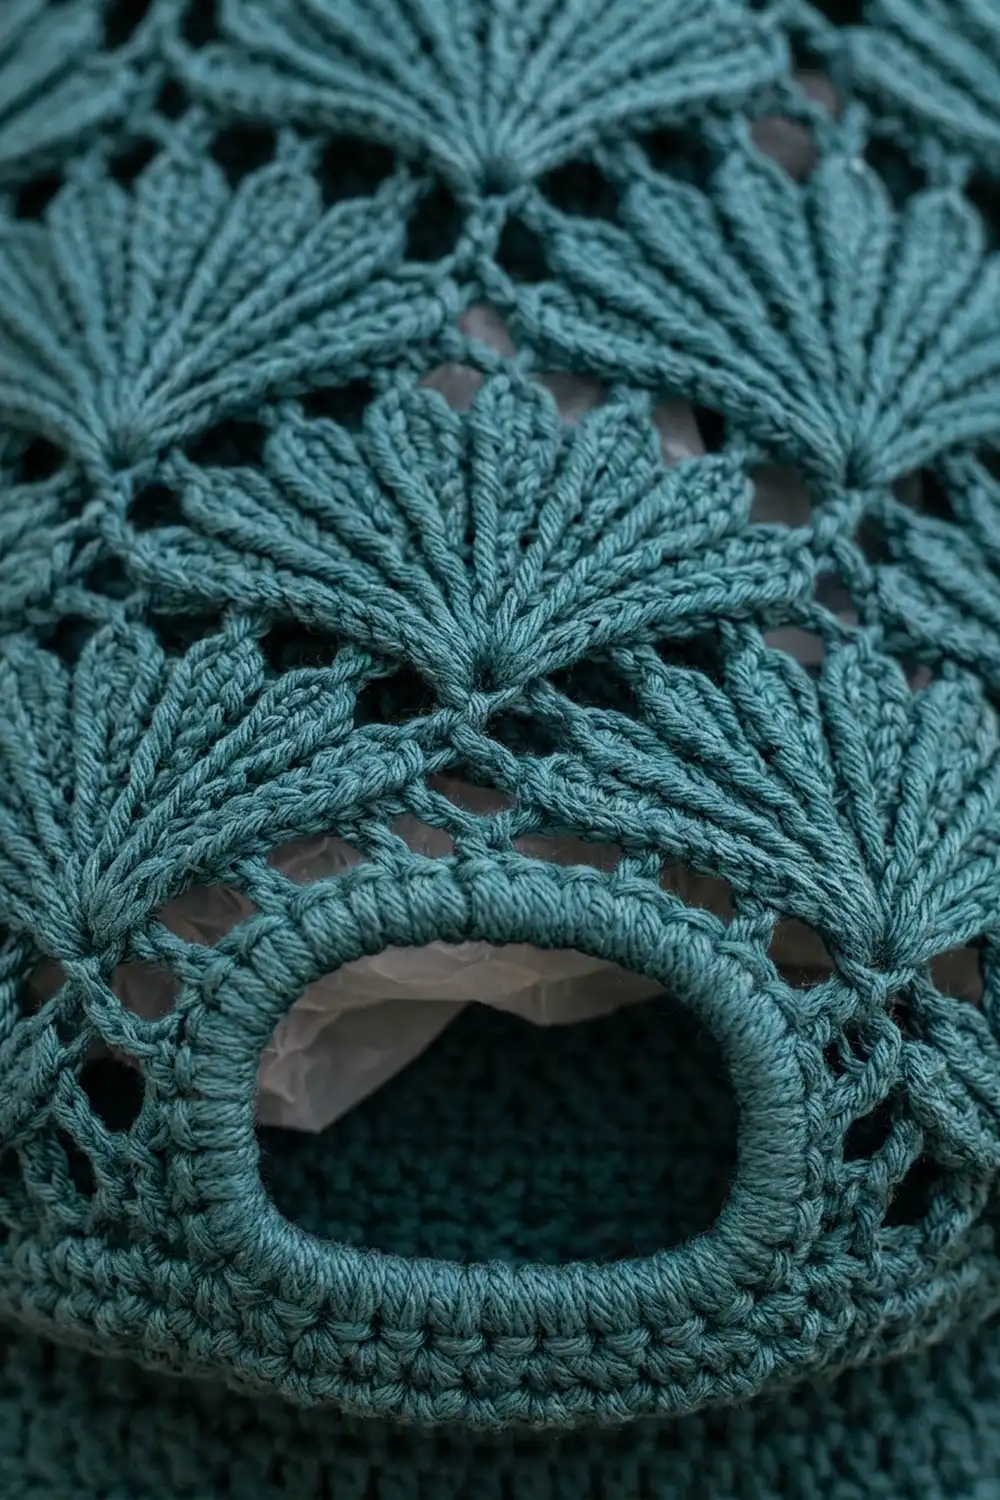
The design is worked in a single smooth cotton yarn. The sample is deep teal, and dusty mauve looks just as good. The body is covered in offset seashell fans: dense sprays of double crochet with open arches between them, stacked brick-style. A solid single-crochet band at the top pulls in a little to give a rounded rim, and a short strap loop hangs it from a hook or peg.
The pattern uses US crochet terms. The finished holder measures about 9.6 in (24.4 cm) wide when flattened and 14 in (35.6 cm) tall, not counting the loop. With the loop it is about 17 in (43.2 cm) tall overall.
You make it in one piece from the bottom up. You crochet an oval base, turn up the wall, work a few rows flat to form the dispensing opening, close the round again, and then work ten tiers of fans. A decrease round shapes the top band, and you finish with an edging around the opening and a strap loop for hanging.
Finished Size and Construction
- Finished size: 9.6 in (24.4 cm) wide flat x 14 in (35.6 cm) tall; 17 in (43.2 cm) with loop
- Skill level: Intermediate
- Terminology: US
- Yarn weight: Worsted (#4) cotton or cotton blend
- Hook: 5 mm (H-8)
- Number of pieces: 1 (loop worked directly onto the holder)
- Layout: Single tube with oval base, front dispensing opening, back hanging loop
- Base size: 7.25 in (18.4 cm) x 4 in (10.2 cm)
- Size before edging and loop: 9.6 in (24.4 cm) x 14 in (35.6 cm)
- Border depth: top band 1.5 in (3.8 cm); opening edging about 0.25 in (0.6 cm)
Materials
Choose a smooth, firm cotton or cotton blend. Cotton keeps the fans crisp and holds the shape when the holder is full. Avoid fuzzy or very stretchy yarns, because the fans will lose definition.
- Teal (main sample): about 180 g, roughly 340 m (372 yd)
- Alternate colorway: the same amount in dusty mauve, or any single color
Tools:
- 5 mm (H-8) crochet hook
- 6 locking stitch markers
- Tapestry needle
- Scissors
- Measuring tape
- Spray bottle, pins, and a rolled towel for blocking
Quantities include a margin of about 15% for your gauge swatch and small tension differences.
Abbreviations (US Terms)
- ch – chain
- sl st – slip stitch
- sc – single crochet
- dc – double crochet
- sc2tog – single crochet 2 together
- BLO – back loop only
- st(s) – stitch(es)
- sp(s) – space(s)
- sk – skip
- rep – repeat
- RS / WS – right side / wrong side
Special stitch – Fan: work 11 dc into the same stitch. The 11 posts sit side by side and spread into a feathered seashell shape.
Gauge and Checkpoints
Gauge: 15 dc and 8 rounds = 4 in (10.2 cm). In sc, 15 sts and 16 rows = 4 in (10.2 cm). In the fan pattern, one 12-stitch repeat = 3.2 in (8.1 cm) wide, and one tier (2 rounds) = 1 in (2.5 cm) tall.
Test by working the oval base (Rnds 1–4) first. It doubles as your swatch and tells you almost everything.
Checkpoints:
- After Rnd 1: 4.25 in (10.8 cm) x 1 in (2.5 cm)
- After Rnd 4: 7.25 in (18.4 cm) x 4 in (10.2 cm); circumference 19.2 in (48.8 cm)
- After Rnd 14: wall 2.5 in (6.4 cm) tall above the base edge
- After Rnd 34: 12.5 in (31.8 cm) tall
- After Rnd 40: 14 in (35.6 cm) tall; top opening about 8.5 in (21.6 cm) wide flat
If your base is too big, switch to a hook 0.5 mm smaller. If it is too small, go up 0.5 mm. Do not change stitch counts; the fan pattern needs exactly 72 stitches.
Pattern
Oval Base
Ch 16.
Rnd 1: Dc in 3rd ch from hook (the skipped 2 ch do not count), dc in next 12 ch, 6 dc in last ch. Working along the opposite side of the foundation ch, dc in next 12 ch, 5 dc in the same ch as the first dc. Join with sl st to the first dc. (36 sts)
There are 12 sts along each straight side and 6 sts around each end. One end is split across the join: 1 st at the start of the round, 5 at the end.
Rnd 2: Ch 2 (does not count here or in later rounds), 2 dc in first st, dc in next 12 sts, 2 dc in each of next 6 sts, dc in next 12 sts, 2 dc in each of last 5 sts. Join. (48 sts)
Rnd 3: Ch 2, dc in first st, 2 dc in next st, dc in next 12 sts, (dc in next st, 2 dc in next st) 6 times, dc in next 12 sts, (dc in next st, 2 dc in next st) 5 times. Join. (60 sts)
Rnd 4: Ch 2, dc in next 2 sts, 2 dc in next st, dc in next 12 sts, (dc in next 2 sts, 2 dc in next st) 6 times, dc in next 12 sts, (dc in next 2 sts, 2 dc in next st) 5 times. Join. (72 sts)
Each end now holds 24 sts and each straight side holds 12: 24 + 24 + 12 + 12 = 72. The base measures 7.25 in (18.4 cm) x 4 in (10.2 cm).
Lower Wall
Rnd 5: Ch 1, sc in BLO of each st around. Join. (72 sc)
The unworked front loops make a crisp ridge, so the wall turns up sharply from the base.
Rnd 6: Ch 1, sc in each st around. Join. (72 sc)
Counting the first stitch of the round as st 1, place markers in st 3 and st 18. Sts 3–18 (16 sts) are the bottom of the dispensing opening. They sit over the 12 straight-side sts plus 2 curve sts on each side. Fasten off.
Dispensing Opening
Row 7 (RS): Join yarn in st 19. Ch 1, sc in the same st and in each st through st 72, then sc in st 1 and st 2. Turn. (56 sc)
Rows 8–12: Ch 1, sc in each st across. Turn. (56 sc)
Row 12 is a WS row and ends back at st 19. The gap measures 4.25 in (10.8 cm) wide x 1.5 in (3.8 cm) tall.
Rnd 13: Turn to RS. Ch 1, sc in each of 56 sts, ch 16, join with sl st to first sc. (56 sc + 16 ch = 72 sts)
Rnd 14: Ch 1, sc in each sc and in each ch. Join. (72 sc)
Checkpoint: the wall is 2.5 in (6.4 cm) tall above the base ridge.
Fan Lace Body
The body has 10 tiers, and each tier is a Fan round followed by a Link round. Every Link round moves the next fans over by half a repeat, which creates the brick layout.
Rnd 15 (Fan): Ch 1, sc in first st, sk 5 sts, Fan in next st, sk 5 sts, sc in next st; rep from * 5 more times, omitting the final sc on the last rep. Join to first sc. (6 fans + 6 sc = 72 sts)*
Rnd 16 (Link): Sl st in each of next 6 dc (you are now in the center dc of the first fan). Ch 1, sc in the same st, ch 5, dc in next sc, ch 5, sc in 6th (center) dc of next fan; rep from * around, omitting the final sc on the last rep. Join to first sc. (6 sc + 6 dc + 12 ch-5 sps = 72 sts)*
Rnd 17 (Fan): Ch 1, sc in first sc, sk 5 ch, Fan in next dc, sk 5 ch, sc in next sc; rep from * 5 more times, omitting the final sc on the last rep. Join. (72 sts)*
Each new fan sits on a dc, centered between two fans below. Each sc sits on the tip of a fan below.
Rnd 18 (Link): Work as Rnd 16. (72 sts)
Rnds 19–34: Rep Rnds 17–18 eight more times. (72 sts each round)
You now have 10 fan tiers. Checkpoint: the holder is 12.5 in (31.8 cm) tall and 9.6 in (24.4 cm) wide flat.
Top Band
Rnd 35 (conversion): Ch 1, sc in first sc, 5 sc in ch-5 sp, sc in next dc, 5 sc in next ch-5 sp, sc in next sc; rep from * around, omitting the final sc on the last rep. Join. (12 sts worked 1-per-st + 60 sc in 12 spaces = 72 sc)*
Rnd 36 (decrease): Ch 1, sc in next 7 sts, sc2tog; rep from * 8 times. Join. (64 sc)*
Rnds 37–40: Ch 1, sc in each st. Join. (64 sc)
Fasten off and weave in. The band is 1.5 in (3.8 cm) deep. The top opening flattens to about 8.5 in (21.6 cm).
Border
The holder has two finishing edges: the opening edging and the hanging loop. The top band was already worked in the main pattern.
Border gauge: 15 sc = 4 in (10.2 cm), and one sc per sc row-end. Sc rows are about as tall as one sc is wide (0.25 in / 0.6 cm), so 1 sc per row-end lies flat.
Opening Edging
Rnd 1: With RS facing, join yarn at the right-hand bottom corner of the opening. Ch 1, then sc in each of the 16 free sts of Rnd 6 along the bottom edge, 6 sc along the left side (1 per row-end of Rows 7–12), 16 sc in the underside of the 16 ch of Rnd 13 along the top edge, and 6 sc along the right side. Join. (16 + 6 + 16 + 6 = 44 sc)
Rnd 2: Sl st loosely in each sc. Join and fasten off. (44 sl st)
Why the math works: the long edges get exactly 16 sts because there are 16 sts below and 16 ch above. The sides get one sc per row, which matches row height to stitch width. Nothing is added at the corners, so the opening stays firm and won’t ruffle. The finished opening is about 3.75 in (9.5 cm) x 1 in (2.5 cm).
Hanging Loop
Lay the holder flat with the opening centered on the front. Mark the 4 center sts of Rnd 40 on the back.
Row 1: Join yarn in the first marked st, ch 1, sc in the same st and next 3 sts. Turn. (4 sc)
Rows 2–28: Ch 1, sc in each st. Turn. (4 sc)
The strap is 7 in (17.8 cm) long. Fold the end down to the inside of the band, 1 in (2.5 cm) below the rim, directly behind Row 1. Whipstitch all 4 sts in place. This makes a loop about 3 in (7.6 cm) tall.
Final Blocking
- Weave in all ends along solid sc rounds, not through the fans.
- Mist the holder evenly with water until it is damp.
- Stuff it firmly with a rolled towel so it takes a slight barrel shape.
- Ease each fan open with your fingers so the 11 posts spread evenly.
- Pin the opening edging flat and straight.
- Check that the holder is 9.6 in (24.4 cm) wide flat and 14 in (35.6 cm) tall.
- Let it dry completely before removing the towel.
Final Quality-Control Checklist
- Base is 7.25 in (18.4 cm) x 4 in (10.2 cm) and lies flat
- Base ridge from Rnd 5 is visible all the way around
- Opening is centered on a long side and 16 sts wide
- All 10 tiers have 6 fans, each with 11 dc
- Fans are offset brick-style, with no fans stacked directly above each other
- Top band has 64 sc and curves in slightly
- Loop is at back center, opposite the opening
- Total height is 14 in (35.6 cm), or 17 in (43.2 cm) with loop
Troubleshooting
Base cups or ripples: Cupping means your tension is too tight on the ends. Ruffling means it is too loose. Check that each end has exactly 6 increases per round.
Fans are stacked, not offset: You missed a Link round, or you started a Fan round in the wrong place. Fans must go into dc, never into sc.
Stitch count drifts in lace: Count 5 skipped ch on each side of every fan, and confirm the round totals 72.
Opening gapes or sags: Keep the 16-ch bridge in Rnd 13 snug and work Rnd 2 of the edging firmly.
Holder too wide at top: Work an extra decrease round, (sc in next 6, sc2tog) 8 times, for 56 sc.
Loop stretches: Use 4 sts as written and whipstitch the strap through both layers.
Care
Hand wash in cool water and lay flat to dry, reshaping over a towel. Cotton can be machine washed on a gentle cycle inside a mesh bag.
Final Notes
The measurement chain is simple. The 72-stitch base measures 7.25 in (18.4 cm) x 4 in (10.2 cm). That gives a 19.2 in (48.8 cm) tube, which is 9.6 in (24.4 cm) wide flat. The opening section brings the wall to 2.5 in (6.4 cm), and ten 1 in (2.5 cm) fan tiers bring it to 12.5 in (31.8 cm). The band finishes at 14 in (35.6 cm), and the loop adds 3 in (7.6 cm) for 17 in (43.2 cm) overall. If the base matches gauge, everything above it will too.
Happy crocheting!