
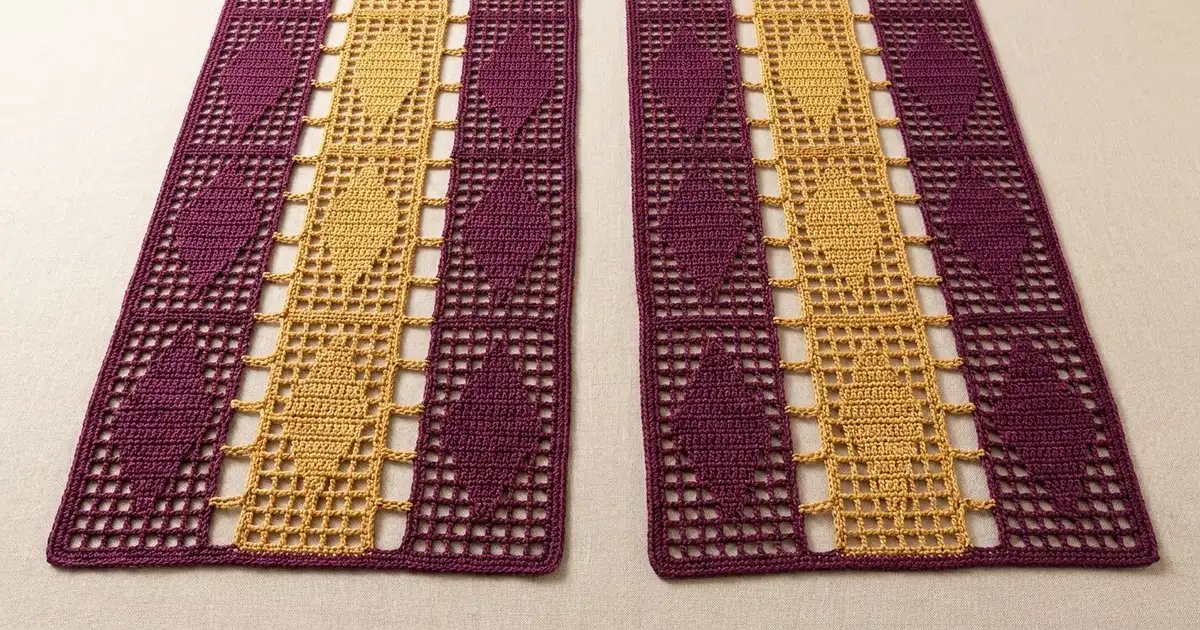
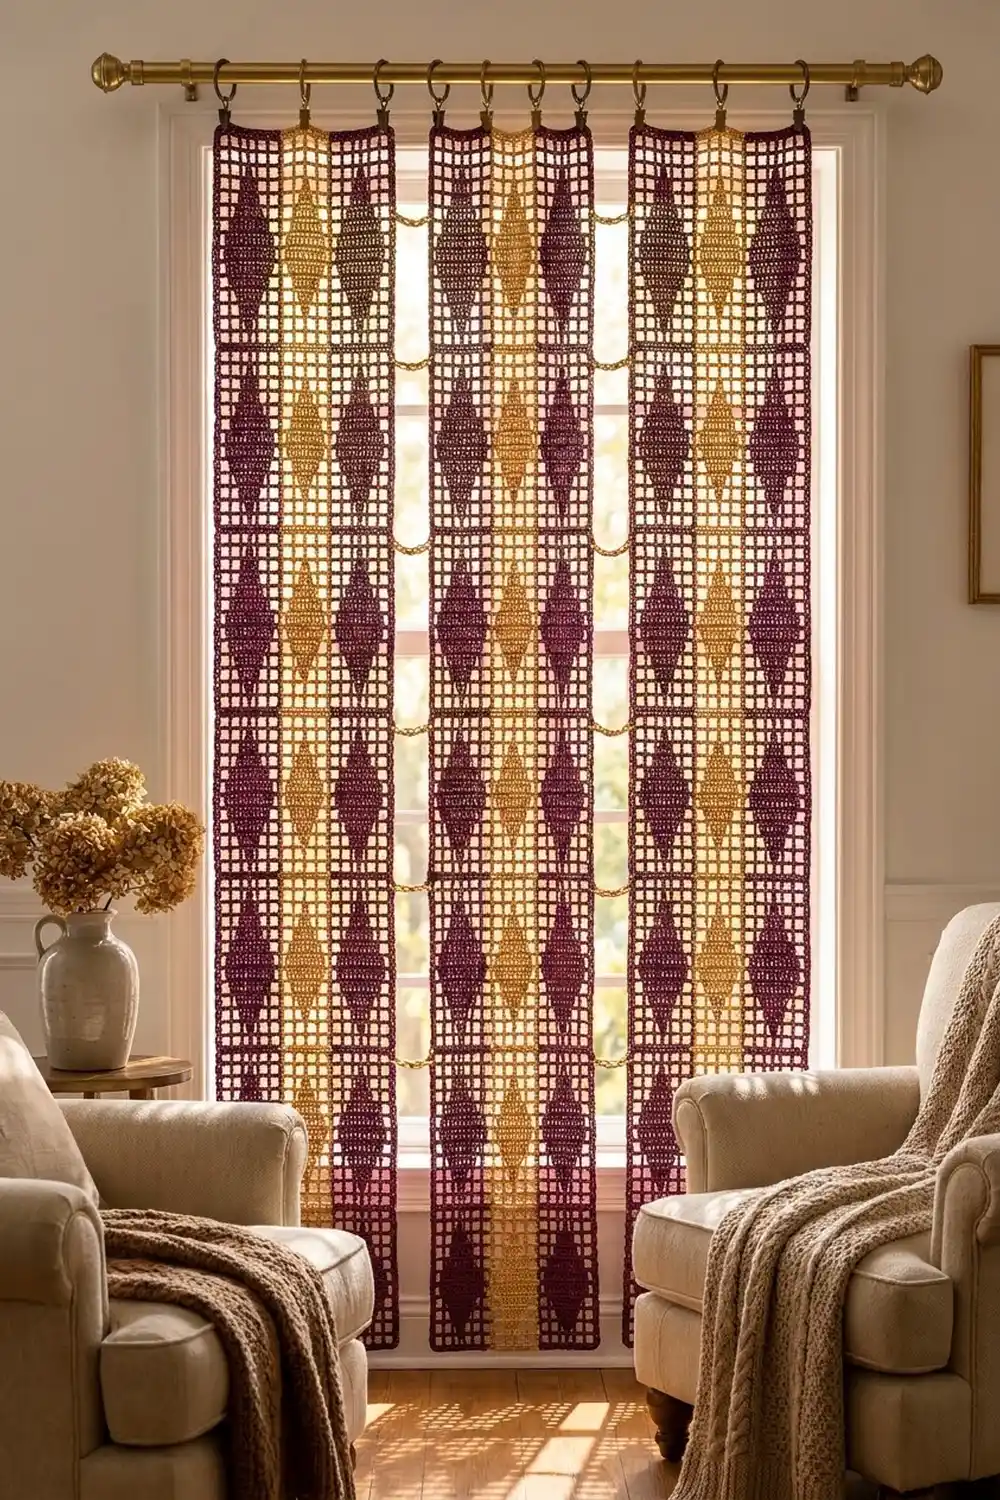
This curtain pair is built from long filet crochet strips in deep plum and mustard gold. Each strip shows a column of tall, solid diamonds set into crisp square mesh. When the panel hangs in a window, the light comes through the open squares and the diamonds stay solid, which gives a quiet harlequin effect.
Each panel is three strips wide: plum, gold, plum. Short doubled-chain ladder bars join the strips and leave a narrow open channel between them, so the curtain looks light and airy. A two-round plum border neatens the outer edge of each panel.
The pattern uses US crochet terms. Each finished panel measures 19.4 in wide x 74.4 in long (49.3 cm x 189.0 cm) after blocking. The pattern covers two panels, so you make six strips in total.
Here is the construction. First, crochet each strip flat in rows of filet mesh. Next, give every strip a single crochet edging. Edge the plum strips first, then edge each gold strip and join it to its two plum neighbors with ladder bars as you go. Finally, add the border around each joined panel.
Finished Size and Construction
- Finished panel size: 19.4 in x 74.4 in (49.3 cm x 189.0 cm)
- Skill level: Intermediate
- Terminology: US crochet terms
- Yarn weight: DK (#3), mercerized cotton
- Hook: 4.0 mm (G-6)
- Number of pieces: 6 strips (2 panels of 3 strips)
- Layout per panel: 3 strips side by side (plum, gold, plum), 1 strip tall
- Strip size before edging: 5.4 in x 73.2 in (13.7 cm x 185.9 cm)
- Strip size after edging: 5.8 in x 73.6 in (14.7 cm x 186.9 cm)
- Ladder gap between strips: 0.6 in (1.5 cm)
- Panel size before border: 18.6 in x 73.6 in (47.2 cm x 186.9 cm)
- Border depth: 0.4 in (1.0 cm) on each edge
Materials
Use a smooth mercerized cotton or cotton blend in DK weight. Cotton makes crisp, square filet mesh and hangs straight without stretching much. The quantities below assume balls of about 50 g / 125 yd (114 m).
- Plum (Color A): 600 g, about 1,372 m (1,500 yd), for 4 strips plus both borders
- Mustard gold (Color B): 300 g, about 686 m (750 yd), for 2 strips, their edgings, and all ladder bars
Both quantities include a margin of about 15% for gauge swatches and differences between dye lots. Buy each color from a single dye lot.
Tools:
- 4.0 mm (G-6) crochet hook
- Tapestry needle
- Locking stitch markers (at least 10)
- Measuring tape
- Blocking pins and a long blocking surface (or a clean floor and towels)
- 18 clip-style curtain rings (9 per panel, 3 per strip)
Abbreviations (US Terms)
- ch – chain
- sl st – slip stitch
- sc – single crochet
- dc – double crochet
- sk – skip
- sp – space
- st(s) – stitch(es)
- RS – right side
Special stitches:
- Open mesh (M): ch 2, sk 2 sts (or the ch-2 sp), dc in next dc.
- Block (B): over an open mesh, 2 dc in ch-2 sp, dc in next dc. Over a block, dc in next 3 dc.
- Ladder bar: ch 3, sl st in the matching sc on the neighboring strip, ch 3, sl st in the sc you just worked on the current strip. This makes one doubled chain bar.
Gauge and Checkpoints
Filet gauge: 5 meshes and 5 rows = 3 in (7.6 cm), so 1 mesh = 0.6 in (1.5 cm) square.
Before you start the full set, make a test swatch. Ch 26 and work Row 1 as in the strip pattern below; it gives 7 meshes. Work 7 rows of open mesh in total. Measure the center 5 meshes and the center 5 rows. Both should measure 3 in (7.6 cm).
- Too big: Change to a 3.75 mm hook.
- Too small: Change to a 4.5 mm hook.
- Width correct but rows too tall: Pull up less on each dc so the meshes come out square.
Checkpoints:
- After Row 17 (two open rows plus one diamond repeat): 5.4 in wide x 10.2 in tall (13.7 cm x 25.9 cm).
- Finished strip: 5.4 in x 73.2 in (13.7 cm x 185.9 cm).
- Edged strip: 5.8 in x 73.6 in (14.7 cm x 186.9 cm).
- Joined panel: 18.6 in (47.2 cm) wide before the border.
Each diamond is 7 meshes wide and 13 rows tall, so it measures 4.2 in x 7.8 in (10.7 cm x 19.8 cm). The full repeat of 15 rows is 9 in (22.9 cm).
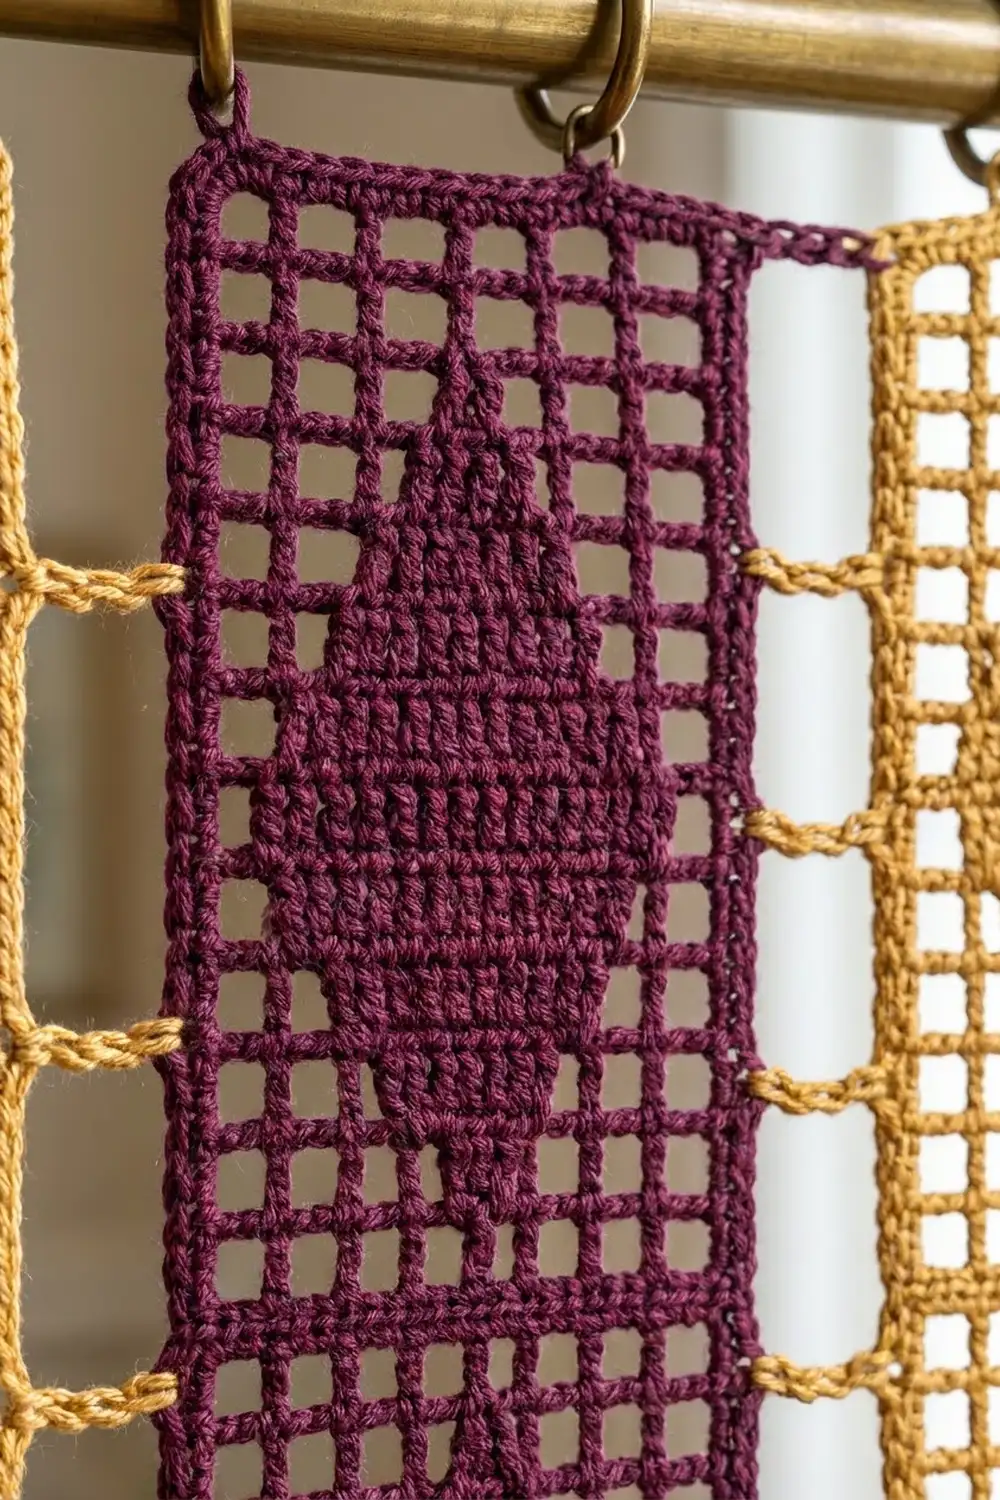
Filet Strip (Make 4 in Plum, 2 in Gold)
Every row has 9 meshes and 28 sts: 10 dc + 9 ch-2 sps, or the equivalent in blocks, counting the turning chain as a dc. The first and last mesh of every row are always open.
Foundation: Ch 32.
Row 1 (RS): Dc in 8th ch from hook. The 7 skipped chains count as the first dc, ch 2, and the first skipped base stitches. *Ch 2, sk 2 ch, dc in next ch; rep from * 7 more times. Turn. (9 M; 28 sts)
Row 2: Ch 5 (counts as dc + ch 2), sk ch-2 sp, dc in next dc. *Ch 2, dc in next dc; rep from * across, working the last dc in the 3rd ch of the turning ch. Turn. (9 M; 28 sts)
Diamond Repeat (Rows 3–17)
For every row, start with ch 5 (counts as dc + ch 2) for the first open mesh. Finish each row in the 3rd ch of the previous row’s turning chain. The counts below read across the row as M (open meshes) and B (blocks).
- Row 3: 4 M, 1 B, 4 M (28 sts)
- Row 4: 4 M, 1 B, 4 M (28 sts)
- Row 5: 3 M, 3 B, 3 M (28 sts)
- Row 6: 3 M, 3 B, 3 M (28 sts)
- Row 7: 2 M, 5 B, 2 M (28 sts)
- Row 8: 2 M, 5 B, 2 M (28 sts)
- Row 9: 1 M, 7 B, 1 M (28 sts), the widest point of the diamond
- Row 10: 2 M, 5 B, 2 M (28 sts)
- Row 11: 2 M, 5 B, 2 M (28 sts)
- Row 12: 3 M, 3 B, 3 M (28 sts)
- Row 13: 3 M, 3 B, 3 M (28 sts)
- Row 14: 4 M, 1 B, 4 M (28 sts)
- Row 15: 4 M, 1 B, 4 M (28 sts)
- Rows 16–17: 9 M (28 sts)
Rows 18–122: Repeat Rows 3–17 seven more times. That gives 8 diamonds in total. Row 122 is the second open row of the last repeat. Do not turn. Fasten off.
The strip has 122 rows: 2 opening rows + (8 x 15) repeat rows. It ends with two open rows at both the top and the bottom.
Make All Pieces
- Plum: 4 strips
- Gold: 2 strips
Layout (each panel, foundation edge at the bottom):
Panel 1:  [Plum] | [Gold] | [Plum]
Panel 2:  [Plum] | [Gold] | [Plum]
Block every strip lightly to 5.4 in x 73.2 in (13.7 cm x 185.9 cm) before you add the edging. This makes the row ends easier to match.
Strip Edging and Ladder Joining
Plum Strip Edging (all 4 plum strips)
With RS facing and the last row at the top, join plum in the first st of Row 122.
Edging round: Ch 1. Work 28 sc across the top, 1 sc in each st. Ch 1 for the corner. Work 3 sc around each row end down the long side: 122 x 3 = 366 sc. Ch 1. Work 28 sc across the foundation edge, 1 sc in the base of each st. Ch 1. Work 366 sc up the second long side. Ch 1. Sl st to the first sc and fasten off.
Count: 788 sc (28 + 366 + 28 + 366) and 4 ch-1 corner sps. The corners are chain spaces, not stitches, so each per-side count is a pure sc count.
Gold Strip Edging with Joins
Lay one panel out flat with RS up: plum, gold, plum. All three foundation edges should be at the bottom and all row ends lined up.
On each plum strip, find the center sc of the 3-sc group on each odd row end along the long edge that faces the gold strip. Those are rows 1, 3, 5, and so on up to 121, so there are 61 join points per seam. Mark every tenth one so you can check your alignment as you go.
With gold, join in the first st of Row 122 and ch 1. Work 28 sc across the top, then ch 1 at the corner.
Left side (joins to the left plum strip): Work down the side with 3 sc around each row end. On every odd row end, work the ladder bar right after the center sc of that group. That means ch 3, sl st in the marked center sc on the plum strip at the same row, ch 3, and sl st back into the gold sc you just made. Then finish the group. (366 sc, 61 ladder bars)
Ch 1. Work 28 sc across the foundation edge, then ch 1.
Right side (joins to the right plum strip): Work up the side in the same way, with a ladder bar after the center sc of every odd row end. Ch 1 and sl st to the first sc. Fasten off. (366 sc, 61 ladder bars)
Stitch-to-stitch logic: Each ladder bar links row r on the gold strip to row r on the plum strip. Because all three strips have 122 rows, the bars stay perfectly horizontal and the seams cannot slip out of line. The bars are made of chains and slip stitches, so they add no sc to any side.
Tension: Keep the ch-3 bars relaxed and even. If the bars are tight, the panel puckers. If they are loose, the gap sags in the middle. Each finished bar should span about 0.6 in (1.5 cm).
Size checkpoint: The joined panel should measure 18.6 in (47.2 cm) wide. That is 3 x 5.8 in for the strips + 2 x 0.6 in for the gaps (3 x 14.7 cm + 2 x 1.5 cm).
Repeat for the second panel.
Border
Border gauge: The border sc are worked into the edging sc at 1 sc per sc, so the border follows the edging exactly. Two rounds add 0.4 in (1.0 cm) to every edge.
Rnd 1: With RS facing, join plum in the first top sc of the left plum strip and ch 1.
- Top: Sc in the same st and in each of the next 27 sc. Ch 5, skipping the two inner corner sps and the gap. Sc in each of 28 sc on the gold strip. Ch 5. Sc in each of 28 sc on the right plum strip.
- Corner: Ch 2, skipping the corner ch-1 sp.
- Long side: Sc in each of the 366 sc.
- Corner: Ch 2.
- Bottom: Work as for the top.
- Corner: Ch 2.
- Second long side: Sc in each of the 366 sc.
- Finish: Ch 2 and sl st to the first sc.
Rnd 1 counts:
- Top: 84 sc (3 strips x 28)
- Each long side: 366 sc (1 strip x 366)
- Bottom: 84 sc
- Total: 900 sc, plus 4 ch-2 corners and 4 ch-5 bridges
Rnd 2 (trim round): Ch 1. Sc in each sc. Work 5 sc in each ch-5 bridge. Work (sc, ch 2, sc) in each ch-2 corner sp. Sl st to the first sc and fasten off.
Rnd 2 counts:
- Top: 84 + 10 bridge sc + 2 corner sc = 96 sc
- Each long side: 366 + 2 corner sc = 368 sc
- Bottom: 96 sc
- Total: 928 sc
Why the math works: Each side of Rnd 1 equals the number of strips along that side multiplied by one strip’s per-side count: 3 x 28 = 84 across the top and 1 x 366 down the side. No stitches go into the seams. The gaps are bridged only with chains. Rnd 2 is a conversion round, so its counts show the stitches worked 1 per existing stitch plus the clearly listed extras. The difference between rounds is 28 sc (8 corner sc + 20 bridge sc), which matches the 928 – 900 change exactly.
Final Blocking
- Soak each panel in cool water with a little wool wash for 15 minutes.
- Press out the water gently in towels. Do not wring.
- Lay the panel flat on towels or blocking mats. Because the panels are long, you may need to block on a clean floor.
- Pin the outer corners first to 19.4 in x 74.4 in (49.3 cm x 189.0 cm).
- Pin each strip edge straight. Check that each ladder gap measures 0.6 in (1.5 cm).
- Square up the filet meshes with your fingertips, especially around the diamond points.
- Let the panel dry completely, then unpin it.
Final Quality-Control Checklist
- Each strip has 122 rows and 8 diamonds.
- Every row has 9 meshes, with open meshes along both long edges.
- The diamonds are centered, and the widest row has 7 blocks.
- Each seam has 61 ladder bars, all horizontal.
- Rnd 2 of the border has 928 sc, with 96 sc on each short side and 368 sc on each long side.
- Each blocked panel measures 19.4 in x 74.4 in (49.3 cm x 189.0 cm).
- All ends are woven securely into solid blocks or edging.
- Each panel has 9 clip rings, spaced evenly along the top edge with 3 per strip.
Troubleshooting
- The meshes are rectangles instead of squares: Your dc height doesn’t match your chain length. Pull the dc loops up a little higher or lower.
- The diamonds are off-center: Count meshes from the right edge on every row.
- The strip is shorter than the others: Count the rows. Every strip must have exactly 122 rows, or the ladder bars won’t line up.
- The edging waves: Work 3 sc per row end, not 4. If it still waves, go down one hook size for the edging only.
- The ladder bars sag or pucker: Redo those bars with more even tension so they match the 0.6 in (1.5 cm) gap.
- The border corners curl: Make sure Rnd 2 has a full (sc, ch 2, sc) at each corner.
Care
Hand wash in cool water and lay flat to dry, then reshape to the blocked size. Keep the curtains out of harsh direct sun for long periods to protect the plum dye.
Final Notes
The measurement chain is what keeps the curtains accurate. A mesh measures 0.6 in (1.5 cm). Nine meshes make a 5.4 in (13.7 cm) strip, and 122 rows make it 73.2 in (185.9 cm) long. The edging brings each strip to 5.8 in x 73.6 in (14.7 cm x 186.9 cm). Three strips with two 0.6 in (1.5 cm) gaps make an 18.6 in (47.2 cm) panel. The border brings each panel to 19.4 in x 74.4 in (49.3 cm x 189.0 cm). Check your gauge early and count the rows on every strip, and both panels will hang straight and even.
Happy crocheting!