

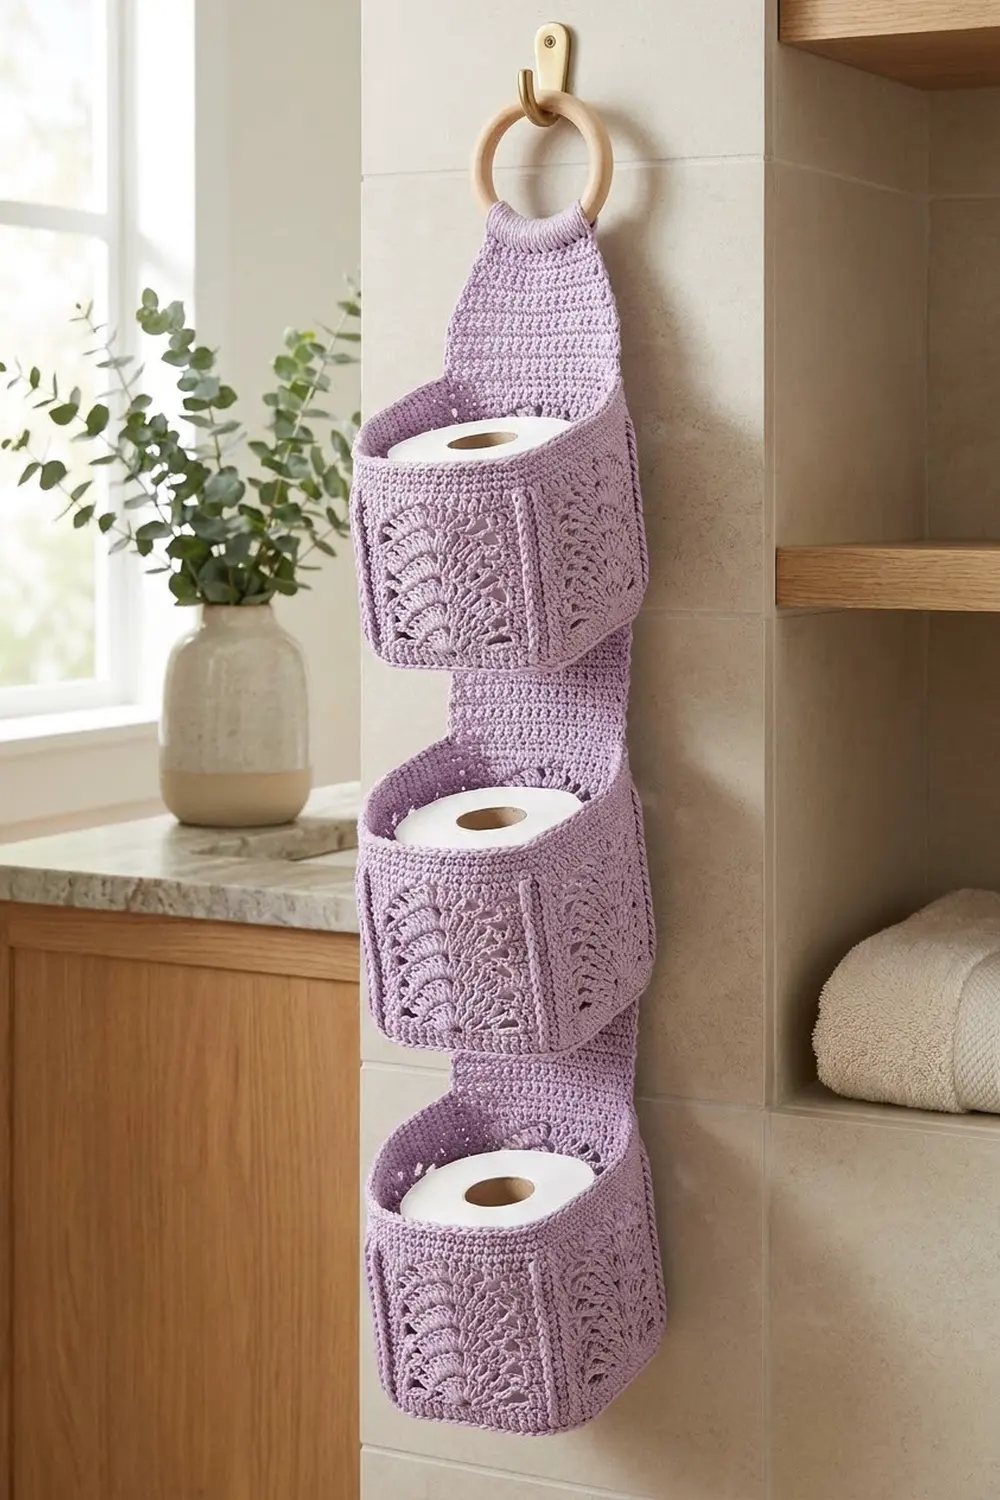
The Lavender Lattice holder is a hanging organizer with three stacked hexagonal baskets. Each basket holds one standard toilet roll. The baskets are sewn to a solid back strap, and the strap narrows at the top to a tab that wraps around a wooden ring.
The whole piece uses one soft lavender yarn. Each basket face has an open fan motif, and a raised ridge runs up every corner, so the baskets keep a crisp six-sided shape. The solid strap and the firm single crochet rims balance the lacy sides, so it looks neat on a bathroom wall.
This pattern uses US crochet terms. The finished holder is about 7 in (17.8 cm) wide at the basket corners and sticks out about 6 in (15.2 cm) from the wall. It hangs about 20.75 in (52.7 cm) long below the ring.
Construction: each basket starts with a flat hexagonal base worked in rounds. The sides are worked straight up from the base in fan and arch rounds. The back strap is worked flat in rows. You sew the baskets onto the strap, then finish each basket rim with a round of reverse single crochet.
Finished Size and Construction
- Finished size: 7 in (17.8 cm) wide × about 20.75 in (52.7 cm) long below the ring
- Skill level: Intermediate
- Terminology: US
- Yarn weight: Worsted (#4), cotton or cotton blend
- Hook: 4.5 mm (US 7)
- Number of pieces: 4 (3 baskets + 1 back strap)
- Layout: baskets in one vertical column, with a 2 in (5.1 cm) gap between baskets
- Basket size: 6 in (15.2 cm) flat-to-flat, 7 in (17.8 cm) corner-to-corner, 4 in (10.2 cm) tall
- Basket height before border: 3.75 in (9.5 cm)
- Border depth: 0.25 in (0.6 cm)
Materials
Yarn: use a smooth worsted-weight cotton or cotton blend. Cotton holds the hexagon shape and stands up to bathroom humidity. Avoid fuzzy yarns, because they blur the lace.
- Lavender: 220 g, about 420 m (460 yd)
The quantity includes a margin of about 20% for your swatch and tension differences.
Tools:
– 4.5 mm (US 7) crochet hook
– 1 wooden ring, 2.75 in (7.0 cm) diameter
– 6 locking stitch markers
– Tapestry needle
– Scissors
– Rustproof pins and a blocking mat
Abbreviations (US Terms)
- ch – chain
- sl st – slip stitch
- sc – single crochet
- hdc – half double crochet
- dc – double crochet
- sc2tog – single crochet 2 together
- BLO – back loop only
- sp – space
- st(s) – stitch(es)
Special stitches
– fpdc (front post double crochet): yarn over, insert the hook from front to back to front around the post of the stitch below, then complete a dc. This makes the raised corner ridges.
– reverse sc (crab stitch): working from left to right, insert the hook into the next stitch to the right and complete a sc. This makes the corded rim.
Gauge and Checkpoints
Gauge: 16 sc × 18 rows = 4 in (10.2 cm) in sc worked in rows.
Make one complete basket before you start the others. Check your size at each stage:
- After Rnd 7 (42 sts): the base measures about 3 in (7.6 cm) flat-to-flat.
- After Rnd 14 (84 sts): the base measures about 6 in (15.2 cm) flat-to-flat and 7 in (17.8 cm) corner-to-corner.
- After Rnd 23: the sides measure 3.75 in (9.5 cm) tall from the fold ridge.
- After Row 72 of the strap: the strap measures 16 in (40.6 cm) long and 3.5 in (8.9 cm) wide.
If your piece is too big, use a hook 0.5 mm smaller. If it is too small, use a hook 0.5 mm larger. A standard roll is about 4.5 in (11.4 cm) across, so the base must be at least 5.5 in (14.0 cm) flat-to-flat for the roll to drop in.
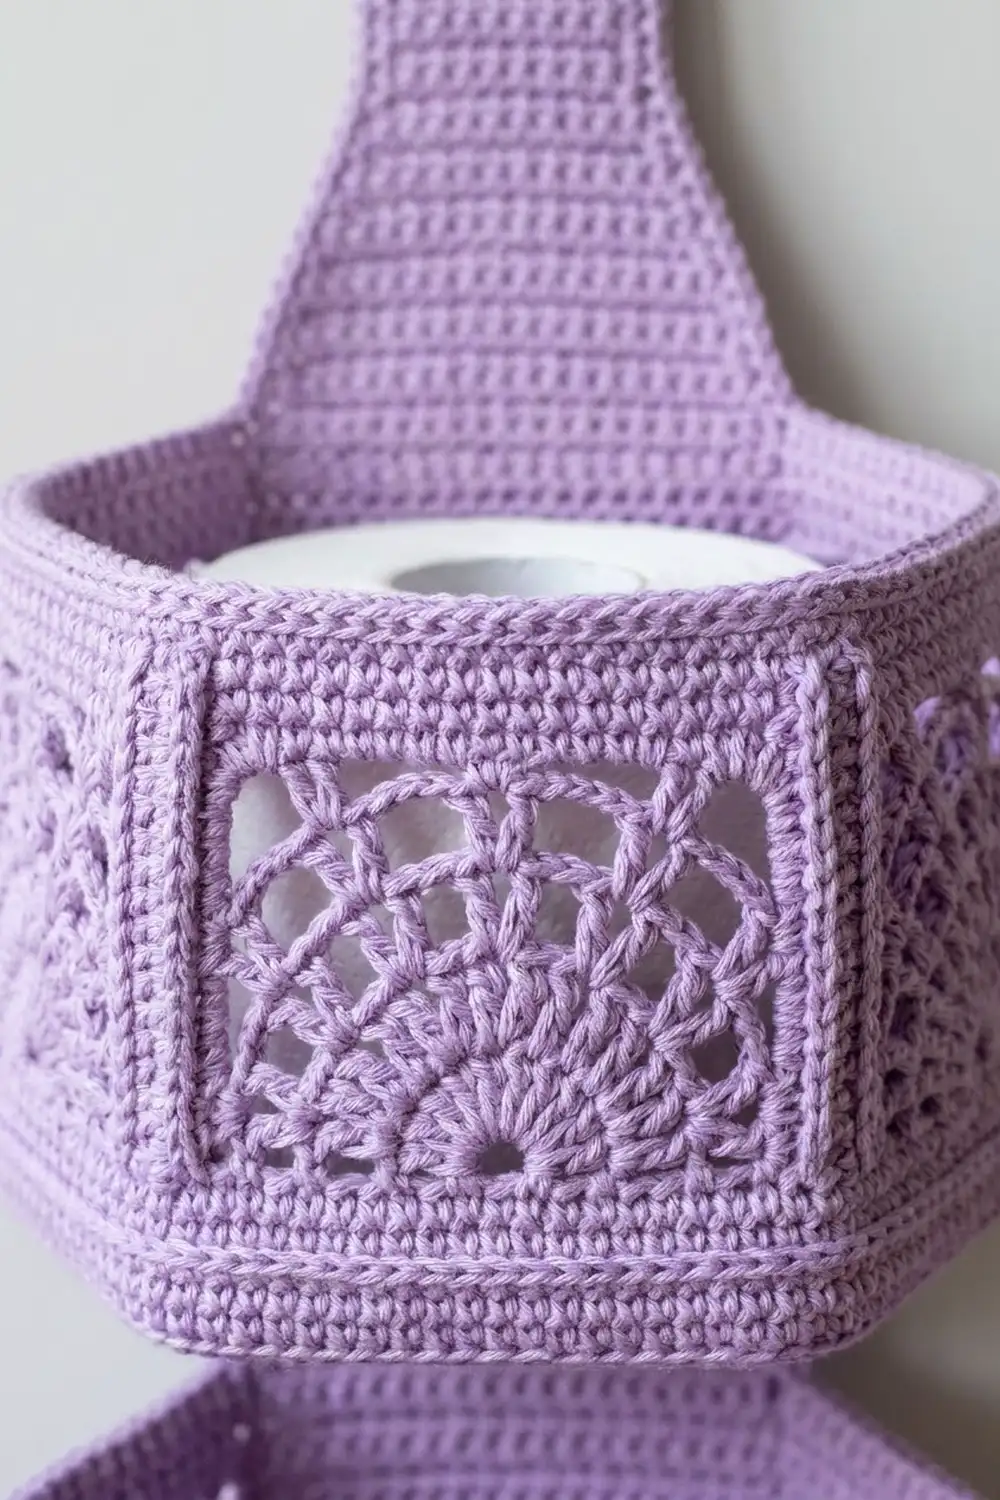
Hexagon Basket (Make 3)
Base
The base is worked in joined rounds. Stack the increases directly above the increases of the round before, so you get six straight sides.
Rnd 1: Make a magic ring, ch 1, 6 sc in the ring, then sl st to the first sc. (6 sts)
Rnd 2: Ch 1, 2 sc in each st around, then sl st to the first sc. (12 sts)
Rnd 3: Ch 1, (sc in next st, 2 sc in next st) 6 times, then sl st to the first sc. (18 sts)
Rnds 4–14: Ch 1, (sc in each of next [round number − 2] sts, 2 sc in next st) 6 times, then sl st to the first sc. Each round has 6 sts more than the last, so Rnd n has 6 × n sts.
- Rnd 4: (sc in next 2, 2 sc in next) 6 times (24 sts)
- Rnd 7: (sc in next 5, 2 sc in next) 6 times (42 sts) – checkpoint
- Rnd 10: (sc in next 8, 2 sc in next) 6 times (60 sts)
- Rnd 14: (sc in next 12, 2 sc in next) 6 times (84 sts)
After Rnd 14 each side has 14 sts, and that count includes the increase stitches at the corners. Lay the base flat and check it.
Sides
Rnd 15 (fold ridge): Ch 1, sc in BLO of each st around, then sl st to the first sc. (84 sts) Place a marker in the 14th, 28th, 42nd, 56th, 70th and 84th sts. These are the corner sts, and they sit directly above the base increases.
Rnd 16: Ch 1, sc in each st around, then sl st to the first sc. (84 sts) Move the markers up as you go. To finish the round, sl st in each of the next 13 sts so the hook sits at the first marked corner st.
Rnd 17 (fan round): Ch 3 in the corner st (counts as dc). Then:
ch 3, skip 3 sts, sc in next st, skip 2 sts, 7 dc in next st, skip 2 sts, sc in next st, ch 3, skip 3 sts, *dc in next corner st, ch 3, skip 3 sts, sc in next st, skip 2 sts, 7 dc in next st, skip 2 sts, sc in next st, ch 3, skip 3 sts; repeat from * 4 more times, then sl st to the top of the beginning ch-3.
Each face uses exactly 14 sts (1 + 3 + 1 + 2 + 1 + 2 + 1 + 3). The fan sits on the 7th st of the face, at its center. Count: 6 corner dc, 6 fans of 7 dc, 12 sc and 12 ch-3 sps.
Rnd 18 (spoke round): Ch 3 (counts as the first corner st). Then for each face:
ch 3, dc in the first dc of the fan, (ch 1, dc in next dc) 6 times, ch 3, then fpdc around the next corner dc. On the last face, end with ch 3 and sl st to the top of the beginning ch-3 instead of the fpdc.
Count per face: 1 corner st, 7 dc, 6 ch-1 sps and 2 ch-3 sps.
Rnd 19 (arch round): Ch 3 (counts as the first corner st). Then for each face:
ch 3, skip the ch-3 sp, sc in the first ch-1 sp, (ch 3, sc in next ch-1 sp) 5 times, ch 3, then fpdc around the next corner st. Join as in Rnd 18.
Count per face: 6 sc and 5 ch-3 arches between them.
Rnd 20 (top arch round): Ch 3 (counts as the first corner st). Then for each face:
ch 4, sc in the first arch, (ch 3, sc in next arch) 4 times, ch 4, then fpdc around the next corner st. Join as before.
Count per face: 5 sc, 4 ch-3 sps and 2 ch-4 sps.
Rnd 21 (conversion round): Ch 3 (counts as the first corner st). Then for each face:
2 hdc in the ch-4 sp, sc in next sc, (hdc in next ch-3 sp, sc in next sc) 4 times, 2 hdc in the ch-4 sp, then fpdc around the next corner st. Join as before.
Count per face: 2 + 1 + 8 + 2 = 13 sts, plus the 1 corner st, for 14. Round total: 6 corner sts + (6 × 13) = 84 sts.
Rnds 22–23: Ch 1, sc in each st around, then sl st to the first sc. (84 sts, 14 per side)
Fasten off, leaving a 36 in (91.4 cm) tail for sewing. Checkpoint: the sides measure 3.75 in (9.5 cm) tall.
Back Strap
Row 1: Ch 15, sc in the 2nd ch from the hook and in each ch across. (14 sts)
Rows 2–72: Ch 1, turn, sc in each st across. (14 sts) Checkpoint: 16 in (40.6 cm) long.
Taper:
– Row 73: Ch 1, turn, sc across. (14 sts)
– Row 74: Ch 1, turn, sc2tog, sc in next 10, sc2tog. (12 sts)
– Rows 75–76: Ch 1, turn, sc across. (12 sts)
– Row 77: Ch 1, turn, sc2tog, sc in next 8, sc2tog. (10 sts)
– Rows 78–79: Ch 1, turn, sc across. (10 sts)
– Row 80: Ch 1, turn, sc2tog, sc in next 6, sc2tog. (8 sts)
– Rows 81–82: Ch 1, turn, sc across. (8 sts)
– Row 83: Ch 1, turn, sc2tog, sc in next 4, sc2tog. (6 sts)
– Row 84: Ch 1, turn, sc across. (6 sts)
The taper is 12 rows, about 2.7 in (6.9 cm) tall.
Tab, Rows 85–102: Ch 1, turn, sc across. (6 sts) The tab is 4 in (10.2 cm) long and 1.5 in (3.8 cm) wide.
Fasten off, leaving a 12 in (30.5 cm) tail.
Make All Pieces
- Baskets: 3, each about 50 g (95 m)
- Back strap: 1, about 30 g (57 m)
Layout (front view, top to bottom):
        [ Tab around ring ]   Rows 85–102
        [   Taper 14→6    ]   Rows 73–84
        [    Basket 3     ]   Rows 55–72
        [      gap        ]   Rows 46–54
        [    Basket 2     ]   Rows 28–45
        [      gap        ]   Rows 19–27
        [    Basket 1     ]   Rows 1–18
Each basket covers 18 strap rows: 17 rows for the body and 1 row for the rim. Each gap is 9 rows, which is 2 in (5.1 cm).
Joining
Method: whipstitch with the basket tail through both layers.
- Choose one face of the basket as the back face. Line up its fold ridge (Rnd 15) with the strap row where that basket starts: Row 1, Row 28 or Row 55.
- Bottom edge: sew the 14 front loops left from Rnd 15 to the 14 sts of the strap row, one to one.
- Sides: sew each corner fpdc column to the row-ends along the strap edge, one stitch per strap row, for 17 rows.
- Top edge: sew the 14 sts of Rnd 23 to the 14 sts of the strap row 16 rows above the starting row: Row 17, Row 44 or Row 71.
The basket face and the strap are both 14 sts wide, so no easing is needed. Keep your whipstitches snug but not tight, because pulling too hard makes the strap pucker behind the lace.
Ring: fold the tab through the ring to the back. Sew Row 102 across the back of Row 85.
Size checkpoint: the assembled holder measures 7 in (17.8 cm) wide and about 20.75 in (52.7 cm) from the bottom of the ring to the bottom of Basket 1.
Border (Basket Rims)
Border gauge: reverse sc worked 1 per st matches the sc gauge of 4 sts per 1 in (2.5 cm).
Rnd 24: Join the yarn at any corner st of the basket. Ch 1, reverse sc in each st around, then sl st to the first st. (84 sts: 14 per side × 6 sides) Fasten off. On the back face, the rim rolls over the top seam and hides it.
Why the math works: Rnds 21–23 bring every face back to 14 sts. Working exactly 1 rim stitch per stitch keeps each side at 14 sts, or 3.5 in (8.9 cm), so the rim lies flat without flaring or pulling in. Repeat for all 3 baskets.
Final Blocking
- Weave in all ends on the inside of the baskets.
- Mist the whole piece lightly with water.
- Stuff each basket with a toilet roll wrapped in a plastic bag.
- Pinch each corner ridge so it stands straight.
- Lay the strap flat and pin it to 3.5 in (8.9 cm) wide.
- Let the piece dry completely, then remove the rolls.
Final Quality-Control Checklist
- Each base measures 6 in (15.2 cm) flat-to-flat.
- Each rim has 84 sts, 14 per side.
- The six corner ridges run straight up from the base corners.
- Each fan sits at the center of its face.
- The strap is 14 sts wide, and the baskets sit 9 rows apart.
- The tab is sewn securely and the ring turns freely.
Troubleshooting
- The base cups or ruffles: make sure you have exactly 6 increases per round. Change your hook size if the base still won’t lie flat.
- The corners twist: stack each increase directly above the one below, and keep the round joins at the same corner.
- The fan is off-center: start Rnd 17 exactly on a marked corner st.
- The baskets sag: sew the top edge to the strap firmly, and use a cotton yarn.
- The rim flares: go down 0.5 mm in hook size for Rnd 24 only.
Care
Hand wash in cool water and reshape while damp. Lay flat to dry.
Final Notes
The measurements build on each other:
- Gauge of 16 sc = 4 in (10.2 cm).
- That gives 14 sts per side, or 3.5 in (8.9 cm).
- The base measures 6 in (15.2 cm) flat-to-flat.
- The fan, arch and conversion rounds bring each face back to 14 sts.
- Each face sews one to one onto the 14-st strap.
- The rim adds 0.25 in (0.6 cm), for 4 in (10.2 cm) tall baskets.
- The finished holder hangs about 20.75 in (52.7 cm) long.
If you check each stage, the final piece will hang straight. Happy crocheting!