

The Ember Plume curtain is a lace panel made from rows of pointed peacock-feather motifs. Each feather has a burgundy “eye,” orange and burgundy arcs fanning above it, and orange rays running down to a sharp tip. A burgundy chain-loop outline frames each one. When the motifs are joined, the gaps between them become open diamond windows that let the light through.
Only two colors are used: deep burgundy (Color A) and bright orange (Color B). The style is airy and warm, and the panel looks good with a window behind it. The pattern uses US crochet terms throughout.
One panel measures 32 in (81.3 cm) wide by about 80.5 in (204.5 cm) long, including the heading. Make two panels for a pair, as shown.
Construction is simple to follow. Each motif is worked in the round from the eye outward, with short fan rows across the top half. The motifs are joined as you go on their final round. A three-row heading levels the top edge and adds hanging loops. The sides and bottom keep the natural pointed edge of the motifs.
Finished Size and Construction
- Finished panel size: 32 in x 80.5 in (81.3 cm x 204.5 cm), plus 1 in (2.5 cm) hanging loops
- Skill level: Intermediate
- Terminology: US
- Yarn weight: Fingering-weight mercerized cotton (size 3 thread)
- Hook: 2.25 mm (B-1)
- Number of pieces: 80 motifs per panel (160 for a pair)
- Layout: 8 columns x 10 rows per panel
- Motif size: 4 in x 8 in (10.2 cm x 20.3 cm), tip to tip
- Size before border: 32 in x 80 in (81.3 cm x 203.2 cm)
- Border depth: Top heading only, 0.5 in (1.3 cm); the sides and bottom are not bordered
Materials
Use a smooth mercerized cotton, about 170 m per 50 g. It gives crisp stitch definition and hangs well. Avoid fuzzy or very stretchy yarns, because the long chains will sag.
Per panel:
– Color A, burgundy: 250 g (850 m)
– Color B, orange: 200 g (680 m)
For a pair of panels:
– Color A: 500 g (1,700 m)
– Color B: 400 g (1,360 m)
Tools:
– 2.25 mm (B-1) hook
– Tapestry needle
– Scissors
– Rustproof pins
– Blocking mats or a carpet covered with a sheet
– Spray bottle
– Optional light spray starch
– 18 curtain rings (9 per panel)
All quantities include a margin of about 10–15% for gauge swatches, joins and weaving in ends.
Abbreviations (US Terms)
- ch – chain
- sl st – slip stitch
- sc – single crochet
- hdc – half double crochet
- dc – double crochet
- tr – treble crochet
- sk – skip
- sp – space
- st(s) – stitch(es)
- RS – right side
Special technique, tip ring: Ch 3, then sl st in the 3rd ch from the hook. This makes a tiny closed ring that serves as a sharp point.
Special technique, join loop: In place of “ch 5,” work ch 2, sl st in the matching loop of the neighboring motif, ch 2. In place of a point “ch 7,” work ch 3, sl st in the neighbor’s point loop, ch 3.
Gauge and Checkpoints
Make one complete motif before starting the panel, and check it at each stage:
- After Rnd 2: disc 1.4 in (3.6 cm) across
- After Row 5: fan 3.2 in (8.1 cm) wide
- After Row 6: tip ring about 3 in (7.6 cm) below the disc center
- After Rnd 8, lightly pinned: 4 in x 8 in (10.2 cm x 20.3 cm)
- Heading gauge: 7 sc = 1 in (2.5 cm), so 28 sc = 4 in (10.2 cm)
If your motif is too big, go down 0.25 mm. If it is too small, go up 0.25 mm. Long chains matter most. If the ray and outline chains look loose and droopy, tighten your chain tension before you change the hook.
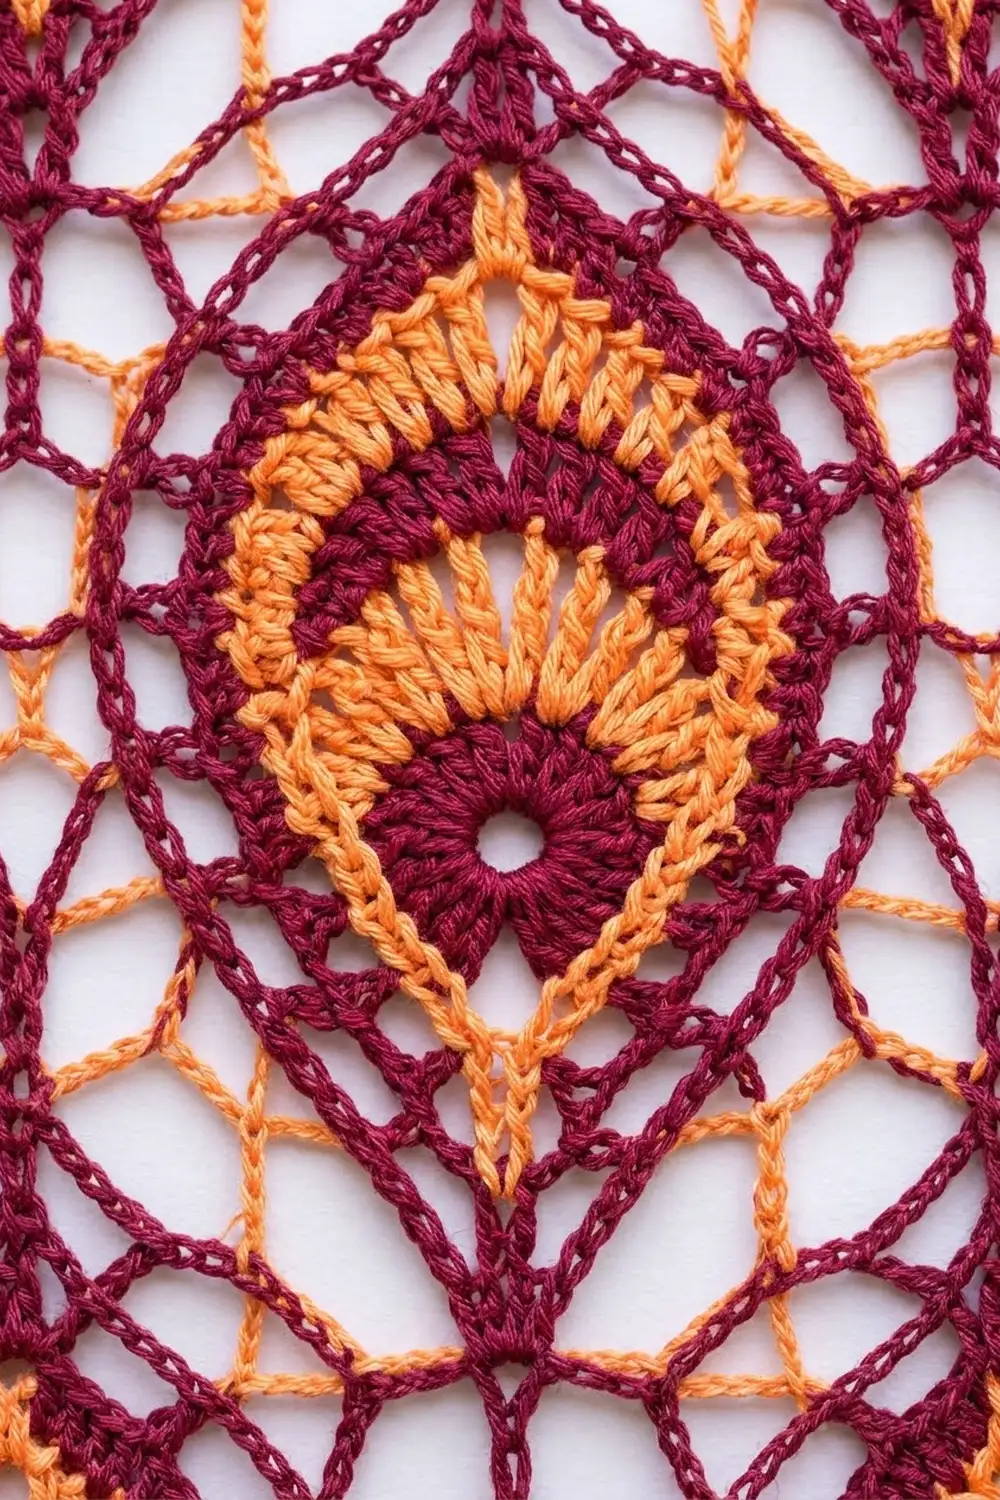
Motif (Make 80 per Panel)
Every fan row is worked with the RS facing. Do not turn, and fasten off at the end of each row.
Rnd 1 (A): Make a magic ring. Ch 3 (counts as dc), work 11 dc in the ring, and sl st to the top of the ch-3. You now have 12 dc. Pull the ring partly closed so a small hole stays in the center.
Rnd 2 (A): Ch 3 (counts as dc), dc in the same st, then work 2 dc in each st around. Sl st to the top of the ch-3. You now have 24 dc. Fasten off.
Number the Rnd 2 sts 1–24, with the beginning ch-3 as st 1. Sts 1–13 are the top half, and sts 14–24 are the bottom half.
Row 3 (B): Join B in st 1. Ch 3 (counts as dc), dc in the same st, then work 2 dc in each of sts 2–13. You now have 26 dc. Fasten off.
Row 4 (A): Join A in the first st of Row 3. Ch 2 (does not count), hdc in the first st, [hdc in next st, 2 hdc in next st] 12 times, hdc in the last st. You now have 38 hdc (1 + 36 + 1). Fasten off.
Row 5 (B): Join B in the first hdc. Ch 4 (counts as tr), [tr in next st, 2 tr in next st] 18 times, tr in the last st. You now have 56 tr (1 + 54 + 1). Fasten off.
This gives three half-arcs above the eye: orange, burgundy, orange.
Row 6 (B), bottom rays:
1. Sl st B into st 15 of Rnd 2 and ch 20.
2. Make a tip ring.
3. Ch 20, sl st in st 19.
4. Ch 20, sl st in the tip ring.
5. Ch 20, sl st in st 23. Fasten off.
You now have four 20-ch strands. Two of them lie side by side to form the doubled center spine, and the outer two make the V.
Rnd 7 (A), outline:
1. Join A with a sc in the tip ring. Ch 22, sc in st 14 of Rnd 2.
2. Ch 3, sc in the last dc of Row 3. Ch 3, sc in the last hdc of Row 4. Ch 3, sc in the last tr of Row 5 (st 56).
3. [Ch 5, sk 4 sts, sc in next st] 5 times. This ends in st 31.
4. Top spike: Ch 20, make a tip ring, ch 20, sk 4 sts, sc in st 26.
5. [Ch 5, sk 4 sts, sc in next st] 5 times. This ends in st 1, the beginning ch-4.
6. Ch 3, sc in the first hdc of Row 4. Ch 3, sc in the top of the beginning ch-3 of Row 3. Ch 3, sc in st 24 of Rnd 2.
7. Ch 22, sl st in the first sc.
Rnd 7 total: 19 sc and 19 spaces. That breaks down as 2 ch-22 sps, 6 ch-3 sps, 10 ch-5 sps and 1 spike.
Rnd 8 (A), lace edge:
1. Ch 1. In the same sc, work sc, ch 7, sc. This ch-7 is the bottom point loop.
2. [Ch 5, sc in the ch-22 sp] 4 times, spacing the sc evenly along the chain.
3. [Ch 5, sc in the next ch-3 sp] 3 times.
4. [Ch 5, sc in the next ch-5 sp] 3 times.
5. [Ch 7, sc in the next ch-5 sp] 2 times.
6. Ch 9, sc in the up-strand of the spike.
7. Ch 5. In the top tip ring, work sc, ch 7, sc. This ch-7 is the top point loop.
8. Ch 5, sc in the down-strand of the spike.
9. Ch 9, sc in the next ch-5 sp.
10. [Ch 7, sc in the next ch-5 sp] 2 times.
11. [Ch 5, sc in the next ch-5 sp] 2 times.
12. [Ch 5, sc in the next ch-3 sp] 3 times.
13. [Ch 5, sc in the ch-22 sp] 4 times.
14. Ch 5, sl st in the first sc. Fasten off.
Rnd 8 total: 30 loops. That is 2 point ch-7 loops plus 14 loops on each side. Each side has 11 ch-5 loops, 2 shoulder ch-7 loops and 1 ch-9 loop.
Side join loops: On each side, count loops upward from the bottom point loop. The 6th and 7th loops sit level with the widest part of the fan.
Make All Pieces
- Per panel: 80 motifs. Each motif uses about 9 m of A and 7 m of B.
- For a pair: 160 motifs.
Only the first motif is made separately. Every other motif is joined on Rnd 8 as you work it.
Layout per panel, with motifs pointing up and down:
Row 1:  M  M  M  M  M  M  M  M
Row 2:  M  M  M  M  M  M  M  M
Row 3:  M  M  M  M  M  M  M  M
Row 4:  M  M  M  M  M  M  M  M
Row 5:  M  M  M  M  M  M  M  M
Row 6:  M  M  M  M  M  M  M  M
Row 7:  M  M  M  M  M  M  M  M
Row 8:  M  M  M  M  M  M  M  M
Row 9:  M  M  M  M  M  M  M  M
Row 10: M  M  M  M  M  M  M  M
Joining
Method: Join as you go on Rnd 8. Work across Row 1 of the layout from right to left, then work each following row the same way.
Side joins: When you reach the 6th and 7th loops on the side facing a finished neighbor, replace each ch 5 with a join loop. Match the loops level to level: the 6th loop joins the neighbor’s 6th loop, and the 7th joins the 7th. That gives 2 joins per side seam.
Point joins: From Row 2 onward, work the top point ch-7 as a join loop into the bottom point loop of the motif above. That gives 1 join per vertical seam.
Stitch logic: A join loop is still 5 (or 7) chains long because the sl st replaces the center chain. As a result, the loops stay the same length, and the motifs touch without stretching or bunching.
Tension: Keep each sl st snug but not tight. A tight join pulls the motifs out of their oval shape and shrinks the diamond windows.
Size checkpoint: After two full rows, the joined piece should measure 32 in x 16 in (81.3 cm x 40.6 cm). After all 10 rows, it should measure 32 in x 80 in (81.3 cm x 203.2 cm).
Border (Top Heading)
The heading is worked along the top edge only. The sides and bottom keep their natural points.
Border gauge: 7 sc = 1 in (2.5 cm). Each motif is 4 in (10.2 cm) wide, so each motif needs 28 heading sts.
Row 1 (A):
1. Ch 13 (this is a tail chain). Sc in the top point loop of the top-right motif.
2. [Ch 27, sc in the top point loop of the next motif] 7 times.
3. Ch 15.
The count is 13 + 8 + (7 x 27) + 14 = 224 sts, plus 1 turning ch.
Row 2 (A):
1. Sc in the 2nd ch from the hook and in each of the next 13 ch (14 sc).
2. Sc in the sc.
3. [Sc in each of the next 27 ch, sc in the sc] 7 times.
4. Sc in each of the 13 tail ch.
You now have 224 sc (14 + 1 + 196 + 13).
Row 3 (A):
1. Ch 1, turn.
2. Sc in the first sc, ch 8.
3. [Sc in each of the next 28 sc, ch 8] 7 times.
4. Sc in each of the next 27 sc, ch 8, sl st in the last sc. Fasten off.
You now have 224 sc and 9 ch-8 hanging loops, spaced 4 in (10.2 cm) apart.
Corner ties: At each end, join A at the underside of the heading corner. Ch 10, sl st in the outer ch-9 loop of the corner motif, and fasten off.
Why the math works: The panel is 8 motifs wide, and 8 x 28 = 224. The 13-ch and 14-ch tails stand in for the half-motif widths outside the outer tips. Each 27-ch bridge plus one sc spans exactly one 4 in (10.2 cm) column pitch. As a result, the heading measures 224 ÷ 7 = 32 in (81.3 cm), the same width as the motif body.
Final Blocking
- Weave in all ends along the chains, splitting the plies.
- Lay the panel flat on mats or on a sheet over carpet.
- Pin the heading straight first, to 32 in (81.3 cm).
- Pin every motif tip and every side join so that the columns run straight at a 4 in (10.2 cm) pitch.
- Spray until the panel is damp, not soaked.
- If you like, apply a light starch to the long chains.
- Let it dry completely, then unpin.
Final Quality-Control Checklist
- Every motif has 12, 24, 26, 38 and 56 sts in Rnds 1–2 and Rows 3–5.
- Every Rnd 8 has 30 loops.
- Each side seam has 2 joins, and each vertical seam has 1.
- The panel measures 32 in x 80 in (81.3 cm x 203.2 cm) before the heading.
- The heading has 224 sc and 9 loops.
- All ends are secure, and no chains are twisted.
Troubleshooting
- The fan cups: The tension in Row 5 is too tight. Loosen up, or go up a hook size for that row only.
- The fan ruffles: Recount the increase repeats. Row 4 should have 12 and Row 5 should have 18.
- The rays sag: Shorten each ray to 18 ch, and keep the chains even.
- The motif is lopsided: Check that the spike started from st 31 and ended in st 26.
- The heading is wavy: Your sc gauge is off. Rework Row 2 with a different hook to reach 7 sc per inch.
- Columns drift: A side join was made into the wrong loop. Count from the bottom point loop again.
Care
Hand wash cool and lay flat to dry, pinning back into shape. Do not tumble dry.

Final Notes
The measurement chain:
– The 1.4 in (3.6 cm) eye becomes a 3.2 in (8.1 cm) fan.
– The fan, rays and outline make a 4 in x 8 in (10.2 cm x 20.3 cm) motif.
– 8 x 10 motifs make a 32 in x 80 in (81.3 cm x 203.2 cm) panel.
– The 224-st heading keeps the panel 32 in (81.3 cm) wide and brings the length to 80.5 in (204.5 cm).
Check each stage, and the finished panel will hang straight.
Happy crocheting!