

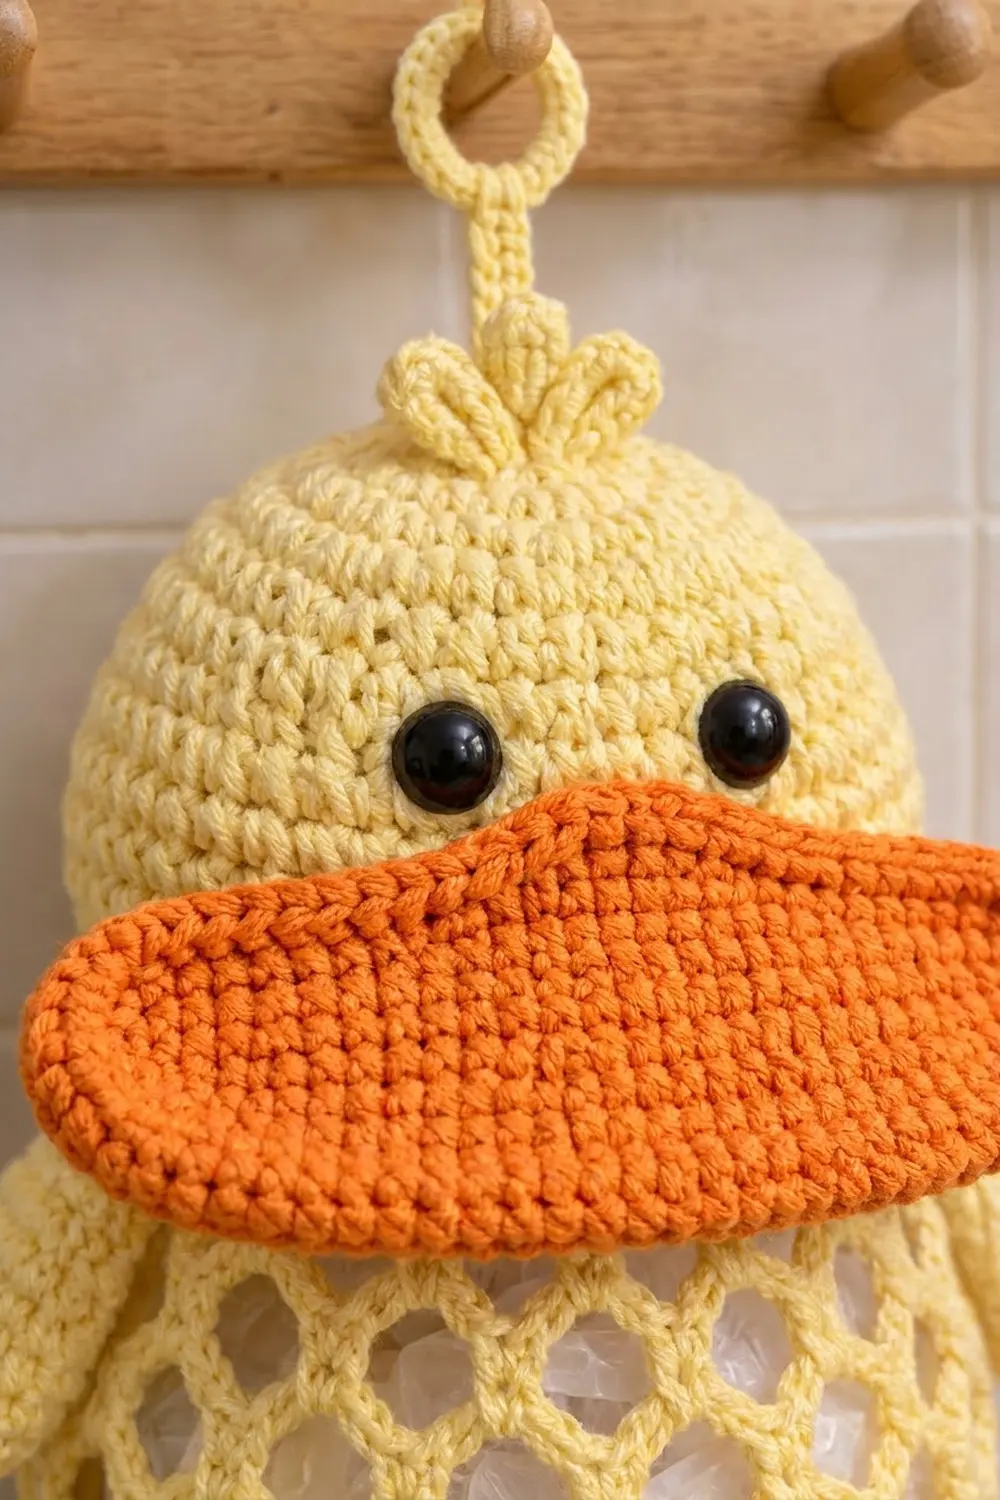
This cheerful duck keeps plastic grocery bags tidy and easy to grab. You stuff bags in through the top of the head, which lifts like a lid. To take one out, you pull it from the small cuff at the bottom.
The look is soft and simple: a pale butter-yellow body, a bright orange beak and feet, and shiny black eyes. The open diamond mesh shows how full the holder is, and the solid head and beak give it a friendly, toy-like face.
The pattern uses US crochet terms. When filled, the holder is about 8 in (20.3 cm) wide at the belly. It is about 15.25 in (38.7 cm) tall from the top of the head to the bottom of the cuff, or about 19 in (48.3 cm) including the hanging ring.
You work the head from the top down as a dome, and the body from the top rim down in rounds of mesh. The beak, wings, feet, tuft and hanging ring are made separately and sewn on. Finally, you sew the head to the body along the back only, so the front can lift open.
Finished Size and Construction
- Finished size: 8 in (20.3 cm) wide when filled; 15.25 in (38.7 cm) from head to cuff; 19 in (48.3 cm) including the hanger
- Skill level: Easy-intermediate
- Terminology: US crochet terms
- Yarn weight: Medium / worsted (#4) cotton or cotton blend
- Hook: 5.0 mm (H-8)
- Number of pieces: 9 parts that make one finished duck: head, body, beak, 2 wings, 2 feet, tuft and hanging ring
- Layout: One assembled item (no motif grid)
- Piece size: Head rim is 18 in (45.7 cm) around; beak is 7.5 in x 2.5 in (19.1 cm x 6.4 cm)
- Size before border: Head plus body is about 14 in (35.6 cm) tall before the cuff
- Border depth: The bottom cuff adds about 1.25 in (3.2 cm)
Materials
Choose a smooth cotton or cotton blend. It holds its shape, shows the mesh clearly and survives frequent washing. Avoid fuzzy yarns, which blur the diamond pattern.
- Butter yellow: 150 g, about 255 m (279 yd)
- Bright orange: 50 g, about 85 m (93 yd)
- 5.0 mm (H-8) crochet hook
- Two 12 mm black safety eyes
- A small handful of fiberfill (for the wings)
- Stitch markers
- Tapestry needle and scissors
- Optional: a 5 in (12.7 cm) circle of plastic canvas to stiffen the top of the head
These quantities include a margin of about 25% for your gauge swatch and sewing tails.
Abbreviations (US Terms)
- ch: chain
- sl st: slip stitch
- sc: single crochet
- hdc: half double crochet
- dc: double crochet
- inc: 2 sc in the same stitch
- sc2tog: single crochet 2 together
- BLO: back loop only
- sk: skip
- st(s): stitch(es)
Special stitch (toe shell): (hdc, dc, ch 2, sl st in 2nd ch from hook, dc, hdc) all in the same stitch.
Gauge and Checkpoints
Gauge: 16 sc x 18 rounds = 4 in (10.2 cm) in solid single crochet.
Make the head first and use it as your test piece. Check these measurements as you go:
- After Head Round 12 (72 sts): the flat circle is about 5.5 in (14.0 cm) across.
- After Head Round 22: the rim is 18 in (45.7 cm) around, and the dome is about 4 in (10.2 cm) deep.
- After Body Round 4: the solid rim is 18 in (45.7 cm) around and about 0.9 in (2.3 cm) deep. It must match the head rim exactly.
- After Body Round 17: the body hangs about 10 in (25.4 cm) long without stretching.
- After the cuff: the opening is about 4.5 in (11.4 cm) around.
If your circle is too big, go down to a 4.5 mm hook. If it is too small, go up to a 5.5 mm hook. The mesh is forgiving. The head and body rim, however, must both have 72 stitches and the same circumference so the lid sits flush.
Head (Lid)
With yellow, work in continuous spiral rounds. Mark the first stitch of each round.
- Round 1: 6 sc in a magic ring. (6)
- Round 2: inc in each st. (12)
- Round 3: (sc 1, inc) 6 times. (18)
- Round 4: (sc 2, inc) 6 times. (24)
- Round 5: (sc 3, inc) 6 times. (30)
- Round 6: (sc 4, inc) 6 times. (36)
- Round 7: (sc 5, inc) 6 times. (42)
- Round 8: (sc 6, inc) 6 times. (48)
- Round 9: (sc 7, inc) 6 times. (54)
- Round 10: (sc 8, inc) 6 times. (60)
- Round 11: (sc 9, inc) 6 times. (66)
- Round 12: (sc 10, inc) 6 times. (72)
Checkpoint: the circle measures 5.5 in (14.0 cm) across.
- Rounds 13–22: sc in each st. (72 each round)
Sl st into the next st. Don’t fasten off. The lid edge in the Border section continues from here.
Eyes: Choose one side as the front. Insert the safety eyes between Rounds 14 and 15, with 9 sts between them, and lock the backs.
Body
With yellow, ch 72. Join with a sl st to the first ch, taking care not to twist the chain.
- Round 1: ch 1, sc in each ch, sl st to the first sc. (72)
- Rounds 2–4: ch 1, sc in each st, sl st to the first sc. (72 each round)
Mesh rounds: Every mesh round has 18 sc and 18 chain loops. Only the chain length changes, which shapes the belly.
- Round 5: ch 1, sc in the first st, ch 5, sk 3, sc in the next st; repeat from * 16 more times, then ch 5, sk 3 and sl st to the first sc. (18 sc and 18 ch-5 loops; 18 x 4 = 72 sts used)
- Round 6: sl st in the next 3 ch, ch 1, sc in the same loop, ch 5, sc in the next loop; repeat from * around, ending with ch 5 and a sl st to the first sc. (18 loops)
Work each remaining round like Round 6. To start each round, sl st to the center of the first loop: 3 sl sts after ch-5, ch-6 or ch-7 loops, and 2 sl sts after ch-4 loops. Use these chain lengths:
- Rounds 7–8: ch 6. (18 loops)
- Rounds 9–12: ch 7, the widest part. (18 loops)
- Rounds 13–14: ch 6. (18 loops)
- Round 15: ch 5. (18 loops)
- Round 16: ch 4. (18 loops)
- Round 17: ch 3. (18 loops)
Checkpoint: after Round 12, the belly stretches comfortably to about 24 in (61.0 cm) around. After Round 17, the body is about 10 in (25.4 cm) long. Keep the yarn attached for the cuff.
Beak
With orange, ch 21.
- Round 1: sc in the 2nd ch from hook, sc in the next 18 ch, 3 sc in the last ch. Rotate and work along the other side of the chain: sc in the next 18 ch, then 2 sc in the last ch (the first ch). (42)
- Round 2: inc in the next st, sc 18, inc in each of the next 3 sts, sc 18, inc in each of the last 2 sts. (48)
- Round 3: (inc, sc 1), sc 18, (inc, sc 1) 3 times, sc 18, (inc, sc 1) 2 times. (54)
- Round 4: (inc, sc 2), sc 18, (inc, sc 2) 3 times, sc 18, (inc, sc 2) 2 times. (60)
- Round 5: (inc, sc 3), sc 18, (inc, sc 3) 3 times, sc 18, (inc, sc 3) 2 times. (66)
- Round 6: sc in BLO of each st. (66) This turns the edge up into a rim.
- Round 7: sc in each st, then sl st into the next st. (66)
Each curved end gets 3 increases per round, 6 per round in total, which keeps the oval flat. Fasten off, leaving a 16 in (40.6 cm) tail. The beak measures 7.5 in x 2.5 in (19.1 cm x 6.4 cm).
Wings (Make 2)
With yellow:
- Round 1: 6 sc in a magic ring. (6)
- Round 2: (sc 1, inc) 3 times. (9)
- Round 3: (sc 2, inc) 3 times. (12)
- Rounds 4–8: sc in each st. (12 each round)
- Round 9: (sc 2, sc2tog) 3 times. (9)
- Rounds 10–11: sc in each st. (9 each round)
Stuff lightly. Flatten the opening and sl st it closed through both layers. Each wing is about 2.75 in (7.0 cm) long and 1.5 in (3.8 cm) wide.
Feet (Make 2)
With orange, ch 6. Work in rows. Start each row with ch 1 and turn; the ch 1 doesn’t count as a stitch.
- Row 1: sc in the 2nd ch from hook and in each ch across. (5)
- Row 2: inc, sc 3, inc. (7)
- Row 3: sc across. (7)
- Row 4: inc, sc 5, inc. (9)
- Row 5: sc across. (9)
- Row 6: inc, sc 7, inc. (11)
- Row 7: sc across. (11)
- Row 8: inc, sc 9, inc. (13)
- Row 9 (toes): sc in the first st, sk 1, toe shell in the next st, sk 1, sc in the next st; repeat from * 2 more times. (3 toes; 1 + 3 x 4 = 13 sts used)
Fasten off, leaving a 12 in (30.5 cm) tail. Each foot is about 3.25 in (8.3 cm) wide and 2.5 in (6.4 cm) long.
Tuft and Hanging Ring
Tuft (yellow): Ch 7 and sl st to the first ch to make loop 1. Ch 7 and sl st into that same ch to make loop 2, then repeat once more for loop 3. Work 9 sc into each loop and sl st to the base. (27 sc) Fasten off, leaving a tail.
Hanging ring (yellow): Ch 14 and join it into a ring. Ch 1, work 22 sc into the ring, then sl st to the first sc.
Stem: Ch 9. Sc in the 2nd ch from hook and in each ch back toward the ring (8 sc), sl st to the ring and fasten off. The ring is 1.75 in (4.4 cm) across and the stem is 2 in (5.1 cm) long, for a total of 3.75 in (9.5 cm).
Assembly
- Beak: Center the beak below the eyes across Head Rounds 17–18. Sew only the middle 16 sts of one long edge to the head so the beak sticks out like a shelf.
- Tuft and ring: Sew the tuft over the magic ring at the top of the head. Using a separate 12 in (30.5 cm) length of yarn, sew the free end of the stem through the center of the tuft.
- Hinge: Line up the last round of the head with the foundation edge of the body, stitch for stitch (72 to 72). Whipstitch only the 24 back sts, centered opposite the beak. The 48 front sts stay open as the lid (24 + 48 = 72).
- Wings: Sew one wing to each side of the body over Rounds 2–7, with the tips pointing down and out.
- Feet: Sew the 5-stitch ankle edge of each foot to an sc junction on Round 15, one on each side of the cuff, with the toes pointing down.
Border: Lid Edge and Dispenser Cuff
Work the border at the same gauge as the rest of the duck: 16 sc x 18 rounds = 4 in (10.2 cm).
Lid edge (continue from Head Round 22):
- Round 23: sl st loosely in each st around. (72: 48 across the front opening and 24 along the hinged back)
This firms the edge so the lid closes neatly, without changing the 18 in (45.7 cm) circumference. Fasten off.
Dispenser cuff (continue from Body Round 17):
- Cuff Round 1 (conversion): sl st into the first ch-3 loop, ch 1, then work 2 sc in each ch-3 loop around, skipping the sc of Round 17. (18 loops x 2 sc = 36 sc + 0 extra = 36)
- Cuff Round 2: (sc 1, sc2tog) 12 times. (24)
- Cuff Round 3: (sc 2, sc2tog) 6 times. (18)
- Cuff Round 4: sc in BLO of each st. (18) This forms a ridge.
- Cuff Rounds 5–6: sc in each st. (18 each round)
- Cuff Round 7: sl st loosely in each st. (18)
Why the math works: Each of the 18 loops takes 2 sc, so the solid band starts at 36 sts. Removing 12 sts and then 6 sts leaves 18. At 4 sts per inch, 18 sts gives a 4.5 in (11.4 cm) opening. That is snug enough to hold the bags in but still lets you pull one out easily. The six sc rounds add about 1.25 in (3.2 cm), bringing the height from 14 in (35.6 cm) to 15.25 in (38.7 cm).
Final Blocking
- Weave in all ends securely, because cotton tends to slip.
- Lightly mist the beak and feet. Pin them flat on a foam mat, with the beak at 7.5 in x 2.5 in (19.1 cm x 6.4 cm) and each foot 3.25 in (8.3 cm) wide.
- Hover a steamer over the head without touching it. Shape the dome over a small bowl about 5.75 in (14.6 cm) across.
- Stuff the body with plastic bags and hang it up so the mesh dries in even diamonds.
- Let everything dry completely before use.
Final Quality-Control Checklist
- Head and body rim each have 72 sts and measure 18 in (45.7 cm) around.
- Every mesh round has 18 loops.
- The cuff ends with 18 sts and a 4.5 in (11.4 cm) opening.
- The beak has 66 sts, and its rim stands up evenly.
- The lid is hinged on the 24 back sts and lifts freely at the front.
- The eyes are level and 9 sts apart.
- The wings and feet match each other and sit at the same height.
- The hanging ring is sewn firmly enough to hold a full load.
Troubleshooting
- Mesh slants or spirals: Start every round at the center of the first loop before the first sc.
- Lid is bigger than the rim: Recount Head Round 22. If both pieces have 72 sts, remake the head with a hook one size smaller.
- Beak cups too much: Work Round 6 through both loops instead of BLO.
- Beak ends look pointed: Check that the increases sit on the curved ends.
- Bags fall out of the bottom: Add one more cuff round of (sc 1, sc2tog), which brings it to 12 sts.
- Ring stretches: Sew the stem deeper into the head, or add a second round of sc around the ring.
Care
Machine wash cold on a gentle cycle inside a laundry bag, or hand wash. Reshape it, then let it dry while hanging and stuffed with bags so the mesh stays open.

Final Notes
The measurement chain is simple. A 72-stitch head and a 72-stitch rim both measure 18 in (45.7 cm) around. Thirteen mesh rounds of 18 loops make the body 10 in (25.4 cm) long. The cuff decreases from 36 sts to 18 sts, leaving a 4.5 in (11.4 cm) opening. The finished duck measures 15.25 in (38.7 cm) from head to cuff, or 19 in (48.3 cm) with its ring. Check each number as you go, and your duck will hang straight and let bags out smoothly.
Happy crocheting!