

This hanging holder stores three spare rolls in a tall stack of tulip pockets. A long cream backing panel narrows at the top into a tab that wraps around a wooden ring, so it hangs from a door hook, towel hook, or wall knob.
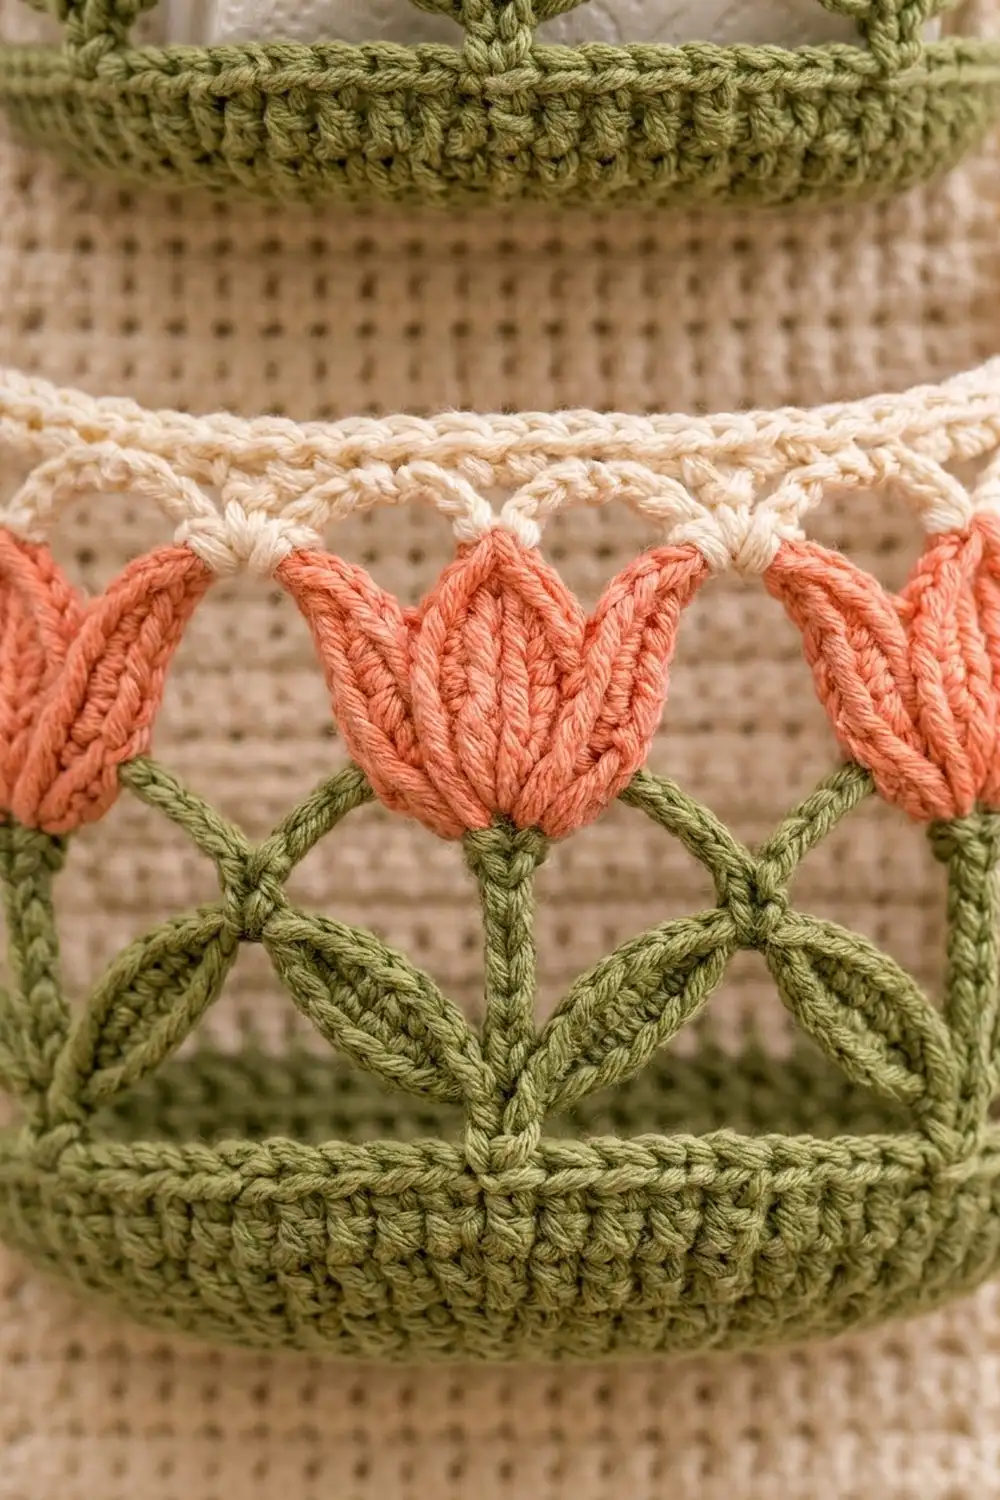
Each pocket has a sage-green base, a row of coral tulips on green stems with pointed leaves, a band of open cream arches above the flowers, and a solid cream rim. The colors are soft coral, sage green, and warm cream. Together they give a fresh spring look that suits a bathroom.
The pattern uses US crochet terms. The finished holder is 5.5 in (14.0 cm) wide and hangs about 25 in (63.5 cm) from the bottom edge to the fold of the ring tab, not counting the ring.
You make four pieces. The backing is worked flat in half double crochet rows. Each pocket starts as a flat green rectangle, then the walls are worked in joined rounds, including the tulip band. The pockets are sewn onto the backing stitch to stitch. A two-round border finishes the backing, and the tab is folded around the ring.
Finished Size and Construction
- Finished size: 5.5 in (14.0 cm) wide x about 25 in (63.5 cm) hanging length
- Skill level: Intermediate
- Terminology: US crochet terms
- Yarn weight: Worsted (#4) cotton
- Hook: 5.0 mm (US H-8)
- Number of pieces: 4 (1 backing panel, 3 pockets)
- Layout: 3 pockets stacked vertically on 1 backing panel
- Pocket size: base 4.5 x 3.1 in (11.4 x 7.9 cm); wall height 3 1/3 in (8.5 cm); circumference 15 in (38.1 cm)
- Backing size before border: 5 in (12.7 cm) wide; 18 in (45.7 cm) body + 4 2/3 in (11.9 cm) taper + 4 in (10.2 cm) tab
- Border depth: 0.25 in (0.6 cm) on each edge
Materials
Use a smooth worsted-weight cotton or cotton blend. Cotton holds its shape and stands up to bathroom humidity better than acrylic. The amounts below assume about 170 m per 100 g.
- Cream (Color A): 110 g, about 187 m (205 yd) — backing, border, and pocket tops
- Sage green (Color B): 55 g, about 94 m (103 yd) — pocket bases, stems, and leaves
- Coral (Color C): 35 g, about 60 m (66 yd) — tulips
Quantities include a margin of about 15 percent for your gauge swatch and weaving in ends.
Tools:
– 5.0 mm (US H-8) crochet hook
– Wooden ring, 3 in (7.6 cm) across
– Tapestry needle
– Stitch markers (at least 6)
– Scissors
– Measuring tape
– Blocking pins and a foam mat
Abbreviations (US Terms)
- ch – chain
- sl st – slip stitch
- sc – single crochet
- hdc – half double crochet
- hdc2tog – half double crochet 2 together
- dc – double crochet
- tr – treble crochet
- BLO – back loop only
- st(s) – stitch(es)
- sp – space
- rev sc – reverse single crochet (crab stitch)
Special stitches:
- Leaf / dc3cl (dc 3-cluster): (Yo, insert hook in st, yo and pull up a loop, yo and pull through 2 loops) 3 times in the same st, yo and pull through all 4 loops on hook.
- Fan: (Leaf, ch 1, tr, ch 1, Leaf) in the same st. The tr is the upright stem. The two Leaves lean out to each side.
- tr3cl (tr 3-cluster): (Yo twice, insert hook in st, yo and pull up a loop, [yo and pull through 2 loops] twice) 3 times in the same st, yo and pull through all 4 loops on hook.
- Tulip: (dc3cl, ch 1, tr3cl, ch 1, dc3cl) in the same st. The taller center petal gives the tulip its pointed top.
Gauge and Checkpoints
- Hdc gauge (backing): 16 hdc and 12 rows = 4 in (10.2 cm)
- Sc gauge (pockets): 16 sc and 18 rows = 4 in (10.2 cm)
Make one pocket first and use it as your gauge test. Measure at these points:
- Pocket base after Row 14: 4.5 x 3.1 in (11.4 x 7.9 cm)
- Pocket after Rnd 3: 15 in (38.1 cm) around; front wall 4.5 in (11.4 cm)
- Finished pocket wall: 3 1/3 in (8.5 cm) tall, which equals 10 backing rows
- Backing after Row 1: 5 in (12.7 cm) wide
- Backing after Row 54: 18 in (45.7 cm) long
If your pieces come out too big, go down a half or full hook size. If they come out too small, go up a size. Width matters most, because a roll needs the 4.5 in (11.4 cm) front wall.
Backing Panel
Make 1 with Color A.
Row 1: Ch 22, hdc in 3rd ch from hook and in each ch across. (20 hdc)
Rows 2–54: Ch 1 (does not count as a st), turn, hdc in each st across. (20 hdc)
Checkpoint: 5 x 18 in (12.7 x 45.7 cm).
Taper
Row 55: Ch 1, turn, hdc2tog, hdc in next 16 sts, hdc2tog. (18 hdc)
Row 56: Ch 1, turn, hdc in each st across. (18 hdc)
Rows 57–68: Repeat Rows 55–56 six more times. The odd rows each lose 2 sts: Row 57 = 16, Row 59 = 14, Row 61 = 12, Row 63 = 10, Row 65 = 8, Row 67 = 6. Each even row matches the row before it.
Checkpoint: the taper is 4 2/3 in (11.9 cm) tall, and the top is 6 sts, 1.5 in (3.8 cm) wide.
Tab
Rows 69–80: Ch 1, turn, hdc in each st across. (6 hdc)
Checkpoint: tab is 4 in (10.2 cm) long. Fasten off and weave in ends.
Make 3. The base is worked in rows, then the walls are worked in joined rounds without turning. Keep the right side facing out.
Base (Color B)
Row 1: Ch 19, sc in 2nd ch from hook and in each ch across. (18 sc)
Rows 2–14: Ch 1, turn, sc in each st across. (18 sc)
Checkpoint: 4.5 x 3.1 in (11.4 x 7.9 cm). Do not fasten off.
Walls
Rnd 1 (Color B): Ch 1, rotate to work along the edges. Work 12 sc evenly along the 14 row ends (skip 2 row ends, spaced evenly). Then work 18 sc in the free loops of the foundation ch, 12 sc evenly along the other 14 row ends, and 18 sc across Row 14. Join with sl st to first sc. (60 sc: 12 + 18 + 12 + 18)
Mark the 18 sc worked across Row 14. This is the back wall that gets sewn to the backing. The 18 sc along the foundation ch become the front wall. No extra corner sts are added, so the corners stay softly rounded.
Rnd 2 (Color B): Ch 1, sc in BLO of each st around, join. (60 sc)
The unworked front loops form a ridge, and the walls start to rise.
Rnd 3 (Color B): Ch 1, sc in each st around, join. (60 sc)
Rnd 4 (Color B) – stems and leaves: Ch 1, sc in first st, skip 2 sts, Fan in next st, skip 2 sts. Sc in next st, skip 2 sts, Fan in next st, skip 2 sts 9 times. Join with sl st to first sc. Fasten off. (10 sc and 10 Fans = 10 repeats of 6 sts)
Leaves from neighboring Fans lean toward each other over each sc. This creates the pointed, linked leaf pattern between the stems.
Rnd 5 (Color C) – tulips: Join Color C with sl st in top of any stem tr. Ch 2 (does not count), Tulip in same st, ch 3. Tulip in top of next stem tr, ch 3 9 times. Join with sl st to top of first dc3cl. Fasten off. (10 Tulips = 30 petals and 20 ch-1 sps, plus 10 ch-3 sps)
Rnd 6 (Color A) – arches: Join Color A with sl st in any ch-3 sp. Ch 1. Sc in ch-3 sp, ch 3, sc in first ch-1 sp of next Tulip, ch 3, sc in second ch-1 sp of same Tulip, ch 3 10 times. Join with sl st to first sc. (30 sc, 30 ch-3 arches)
The tip of each center petal rises into an arch. Each sc between arches forms a small cream knot.
Rnd 7 (Color A) – conversion round: Ch 1, 2 sc in each ch-3 arch around, join. (30 arches x 2 sc = 60 sc)
This round brings the count back to 60, matching Rnd 3, so the rim lines up with the base.
Rnds 8–9 (Color A): Ch 1, sc in each st around, join. (60 sc)
Fasten off and leave a 24 in (61.0 cm) tail for sewing.
Checkpoint: wall height 3 1/3 in (8.5 cm); front wall 4.5 in (11.4 cm) across. The front wall shows 3 full tulips, each side wall shows 2, and the back wall has 3.
Make All Pieces
- Backing: 1 piece in Color A
- Pockets: 3 pieces, each using Colors B, C, and A
Layout (backing rows counted from the bottom):
        [ ring ]
          | tab |          Rows 69-80
         / taper \         Rows 55-68
        |  open  |         Rows 45-54
        |POCKET 3|         Rows 34-44
        |  gap   |         Rows 29-33
        |POCKET 2|         Rows 18-28
        |  gap   |         Rows 13-17
        |POCKET 1|         Rows 2-12
        |________|         Row 1
Joining
Use whipstitch with the Color A tail, sewing through both loops of the pocket and the backing.
Each pocket gets two horizontal seams, and each seam is 18 stitches to 18 stitches.
- Bottom seam: Hold the pocket’s 18 marked back-wall sts from Rnd 1 against the backing. Sew them to backing sts 2–19 of the lower row, leaving 1 backing st free at each side.
- Top seam: Sew the 18 back-wall sts from Rnd 9 to backing sts 2–19 of the upper row.
| Bottom seam row | Top seam row | |
|---|---|---|
| 1 | Row 2 | Row 12 |
| 2 | Row 18 | Row 28 |
| 3 | Row 34 | Row 44 |
Each pair of seams is 10 rows apart, or 3 1/3 in (8.5 cm). That matches the pocket wall height, so the back wall lies flat with no pulling or puckering. There are 6 rows, or 2 in (5.1 cm), between one pocket’s rim and the next pocket’s base. That leaves room for the top of a roll.
Keep the tension firm but not tight. Pin both corners of each seam before you start sewing. The 1 free st on each side keeps the seams clear of the border.
Checkpoint: the three pockets sit centered and level. Each top seam is 4.5 in (11.4 cm) wide.
Border
Work the border on the backing only, with Color A, after the pockets are sewn on. The pockets are not part of the stitch count.
Border gauge: 4 sc per 1 in (2.5 cm). Along the hdc row ends, this works out to 4 sc for every 3 rows.
Rnd 1: Join Color A in the first st of Row 1 (bottom right corner). Work all sides as follows, then join with sl st to first sc.
- Bottom edge: 3 sc in first st, sc in next 18 sts, 3 sc in last st = 24 sc
- Left body edge: 72 sc across 54 row ends
- Left taper edge: 20 sc across 14 row ends
- Left tab edge: 16 sc across 12 row ends
- Tab top: 3 sc in first st, sc in next 4 sts, 3 sc in last st = 10 sc
- Right tab edge: 16 sc
- Right taper edge: 20 sc
- Right body edge: 72 sc
Total: 24 + 72 + 20 + 16 + 10 + 16 + 20 + 72 = 250 sc
Rnd 2: Ch 1, rev sc in each st around, join. (250 rev sc) Fasten off.
Why the math works: Hdc rows are 1/3 in (0.8 cm) tall and sc are 1/4 in (0.6 cm) wide, so 3 rows take 4 sc. That gives 54 rows → 72 sc and 12 rows → 16 sc. The taper edge runs on a slant about 5 in (12.7 cm) long, so it takes 20 sc. On the bottom edge, the 20 hdc each get one sc, and the 2 corner sts get 2 extra each: 18 + 3 + 3 = 24. The border adds 0.25 in (0.6 cm) to each side, so the width goes from 5 in to 5.5 in (12.7 cm to 14.0 cm).
Ring: Fold the tab over the wooden ring toward the back. Sew the top edge of the tab across the base of the tab (Row 69), stitch to stitch over the 6 sts. This leaves a 2 in (5.1 cm) loop around the ring.
Final Blocking
- Spray the holder evenly with water until it is damp but not dripping.
- Lay the backing face up on a foam mat. Pin it to 5.5 in (14.0 cm) wide and 18.25 in (46.4 cm) from the bottom edge to the start of the taper.
- Stuff each pocket loosely with a hand towel so the walls stand up and the tulips open.
- Pin each arch gently upward, and point each center petal up.
- Leave it to dry completely, usually 12 to 24 hours.
- Take out the pins, slide in the rolls, and hang.
Final Quality-Control Checklist
- Backing is 20 hdc wide and 54 rows long before the taper
- Taper ends at 6 sts and the tab is 12 rows
- Each pocket has 60 sts in Rnds 1–3, 7, 8, and 9
- Each pocket has 10 stems, 10 Tulips, and 30 arches
- Seams are 18 sts to 18 sts, placed 10 rows apart
- Border has 250 sts, with a 3-sc group at each of the 4 corners
- The ring tab is sewn securely and all ends are woven in
Troubleshooting
- Pocket is too tight for a roll: Your sc gauge is too firm. Remake it with a larger hook. The front needs to be 4.5 in (11.4 cm) wide.
- Tulip band ruffles: Your Fans are too loose. Check that you skip exactly 2 sts on each side of every Fan and sc.
- Count is off in Rnd 7: Make sure you have exactly 30 arches. Recount Rnd 6 in groups of 3 arches per tulip.
- Backing curls: Block it flat, and keep the border tension even.
- Pocket sags forward: Re-sew the top seam with smaller stitches, and add a few anchoring stitches at each side corner.
- Taper edges are uneven: Work each hdc2tog on the first 2 and last 2 sts of the row, never 1 st in from the edge.
Care
Hand wash in cool water with mild soap. Press out the water in a towel and dry the holder flat, then reshape the pockets while damp.

Final Notes
Every measurement leads to the next. The 16-st gauge gives a 4.5 in (11.4 cm) front wall and a 15 in (38.1 cm) pocket. The pocket’s 3 1/3 in (8.5 cm) wall matches 10 backing rows. The 54-row backing holds all three pockets with 2 in (5.1 cm) gaps between them. The 250-st border brings the width to 5.5 in (14.0 cm), and the ring tab brings the hanging length to about 25 in (63.5 cm). Check each measurement as you go, and the pieces will fit together.
Happy crocheting!