

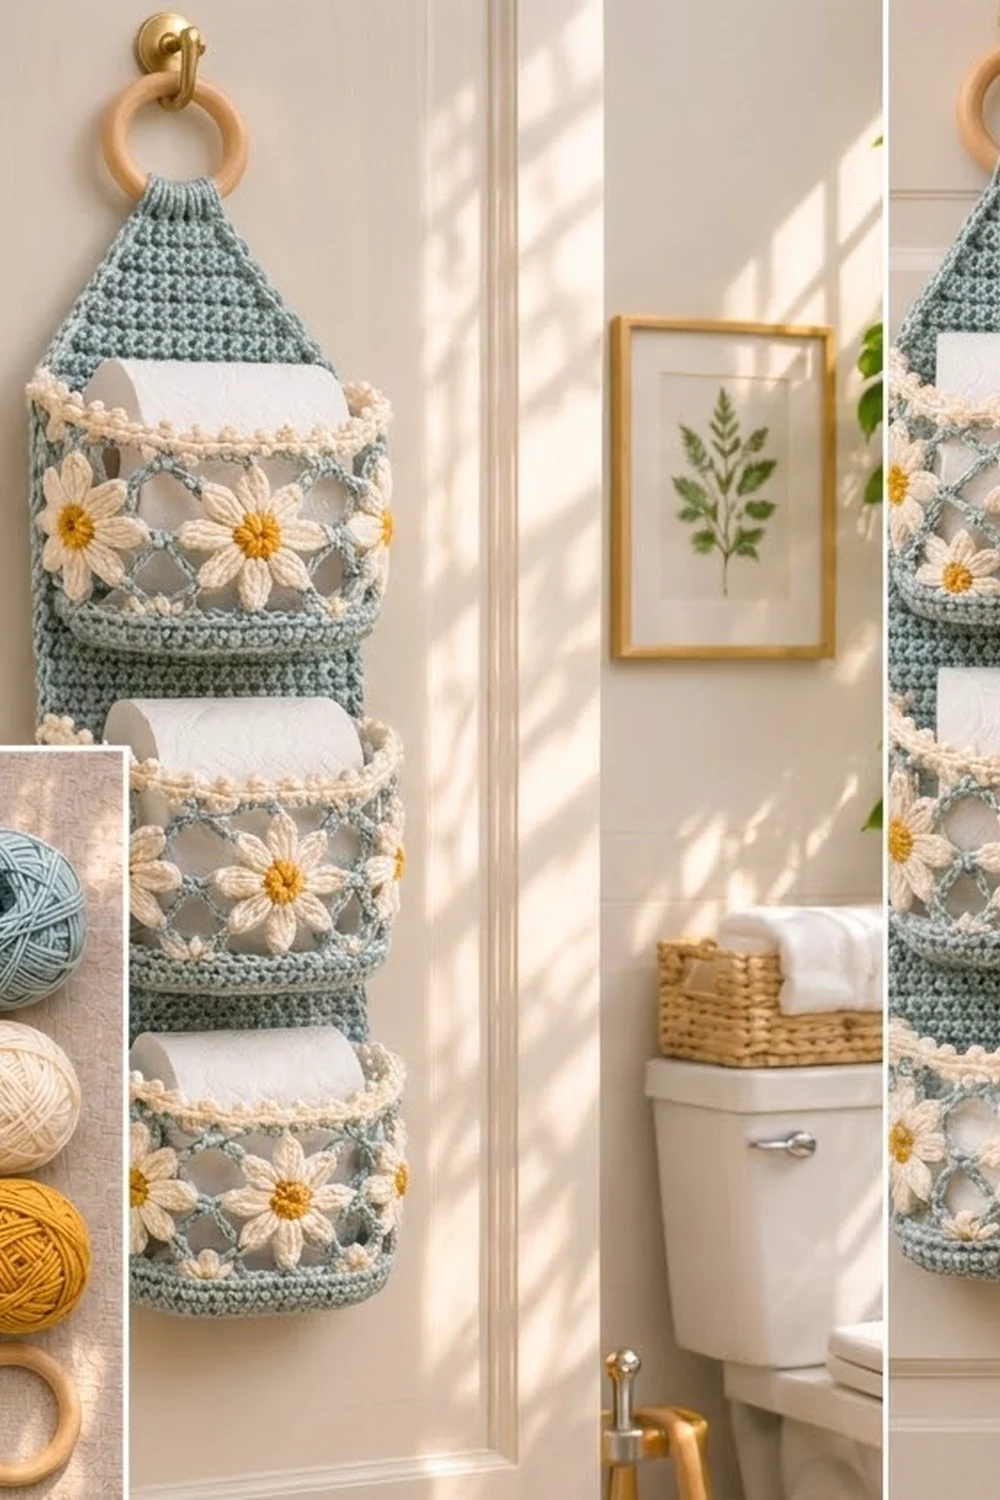
This hanging holder stores three spare toilet rolls in a narrow vertical stack. You can hang it on a door hook, a towel hook or a wall peg. It has a solid powder-blue backing strip, three open-top pockets with an airy diamond lattice, and cream-and-mustard daisies across the front of each pocket.
The look is soft cottage style. Dusty blue is the main color, cream is used for the petals and the bumpy picot rims, and mustard yellow fills each daisy center. A natural wooden ring at the top completes the piece.
The pattern uses US crochet terms. The finished holder measures about 6.8 in (17.3 cm) wide and 18.8 in (47.8 cm) long from the bottom of the ring to the bottom edge. Each pocket is 6 in (15.2 cm) wide, 2.7 in (6.9 cm) deep and 3.75 in (9.5 cm) tall.
Here is how it comes together. You work the backing strip in rows of half double crochet and taper the top into a triangle with a tab. Next you add a two-row border. Each pocket starts with a flat single-crochet base, then you work the walls in the round: solid rounds first, then the lattice, then the rim. Finally you make the daisies, sew them on and stitch the pockets to the strip.
Finished Size and Construction
- Finished size: 6.8 in × 18.8 in (17.3 cm × 47.8 cm), not counting the ring
- Skill level: Intermediate
- Terminology: US
- Yarn weight: worsted (#4) cotton
- Hook: 5 mm (H-8)
- Number of pieces: 1 backing strip, 3 pockets and 15 daisy appliqués
- Layout: 3 pockets stacked vertically, 1 column × 3 rows
- Pocket size: 6 in × 2.7 in × 3.75 in tall (15.2 × 6.9 × 9.5 cm)
- Strip before border: 6 in (15.2 cm) wide; 14 in (35.6 cm) straight body plus a 3.6 in (9.1 cm) taper
- Border depth: 0.4 in (1.0 cm)
Materials
Use a smooth worsted-weight cotton or cotton blend. Cotton holds its shape and handles bathroom humidity well. Avoid fuzzy yarns, because they blur the lattice.
- Color A, dusty blue: 130 g / 220 m
- Color B, cream: 50 g / 85 m
- Color C, mustard: 10 g / 17 m
These quantities include roughly a 15% margin.
Tools:
– 5 mm (H-8) crochet hook
– Wooden ring, 2.75 in (7.0 cm) outer diameter
– Tapestry needle
– Stitch markers
– Locking pins
– Measuring tape
– Scissors
– Spray bottle and blocking mat
Abbreviations (US Terms)
- ch – chain
- sl st – slip stitch
- sc – single crochet
- hdc – half double crochet
- dc – double crochet
- hdc2tog – half double crochet 2 together
- BLO – back loop only
- MR – magic ring
- st(s) – stitch(es)
- sk – skip
- RS / WS – right side / wrong side
Special stitches:
- Picot: ch 3, then sl st in the first of those 3 ch.
- Reverse sc (crab stitch): working from left to right, insert the hook in the next st to the right, pull up a loop, yarn over and pull through both loops.
Gauge and Checkpoints
- Single crochet: 16 sts × 18 rows/rnds = 4 in (10.2 cm)
- Half double crochet: 14 sts × 10 rows = 4 in (10.2 cm)
- Lattice: one ch-5 mesh round ≈ 0.75 in (1.9 cm) tall
Make one pocket first. It shows you both your sc gauge and your lattice tension.
Checkpoints:
– Pocket base: 6 in × 2.7 in (15.2 × 6.9 cm).
– Pocket after Rnd 4: walls 0.9 in (2.3 cm) tall.
– Pocket after Rnd 7: walls 3.15 in (8.0 cm) tall, of which the lattice is 2.25 in (5.7 cm).
– Finished pocket: 3.75 in (9.5 cm) tall.
– Strip after Row 35: 6 in × 14 in (15.2 × 35.6 cm).
If your piece is too big: go down half a hook size. If only the lattice is too tall, change the ch-5 loops to ch-4.
If your piece is too small: go up half a hook size.
A toilet roll is about 4.5 in (11.4 cm) across and 4.1 in (10.4 cm) tall. It should slip into a finished pocket easily and stick out a little above the rim.
Pocket (Make 3)
Base
Use Color A. You work the base flat, in rows.
- Row 1: Ch 25. Sc in 2nd ch from hook and in each ch across, turn. (24 sc)
- Rows 2–12: Ch 1, sc in each st across, turn. (24 sc)
Checkpoint: the base is 6 in × 2.7 in (15.2 × 6.9 cm).
Walls
From here you work in joined rounds. Do not turn.
Rnd 1: Ch 1. Work:
– 24 sc across the last row,
– 12 sc down the row ends (1 per row),
– 24 sc across the underside of the foundation chain,
– 12 sc up the row ends.
Sl st in the first sc to join. (72 sc)
Rnd 2: Ch 1. Sc in BLO of each st around, join. (72 sc)
Working in back loops makes a crisp fold, so the walls stand up and the corners turn softly round.
Rnds 3–4: Ch 1, sc in each st around, join. (72 sc)
Checkpoint: the walls are 0.9 in (2.3 cm) tall.
Diamond Lattice
Rnd 5: Ch 1, sc in the first st, ch 5, sk 3 sts, sc in next st. Repeat from * 16 more times. Ch 5, sk 3 sts, sl st in the first sc. (18 ch-5 loops)
Check the math: 18 repeats × 4 sts = 72 sts.
Rnd 6: Sl st into each of the first 3 ch of the first loop. Ch 1, sc in the same loop, ch 5, sc in next loop. Repeat from * 16 more times. Ch 5, sl st in the first sc. (18 loops)
Each sc sits in the center of a loop from the round below, which forms the diamonds.
Rnd 7: Repeat Rnd 6. (18 loops)
Checkpoint: the lattice is 2.25 in (5.7 cm) tall.
Rim
Rnd 8 (conversion round): Sl st into the first loop. Ch 1, work 4 sc in each loop around, join. (18 loops × 4 sc = 72 sc)
This round brings the count back to exactly the base count, so the rim stays the same width as the base. Fasten off Color A.
Rnd 9: Join Color B in any st. Ch 1, sc in each st around, join. (72 sc)
Rnd 10 (trim round): Ch 1, sc in each of next 2 sts, picot. Repeat from * around, join. (72 sc worked 1 per existing st, plus 36 picots added)
Fasten off and weave in the ends.
Checkpoint: the finished pocket is 3.75 in (9.5 cm) tall and 6 in (15.2 cm) across the front.
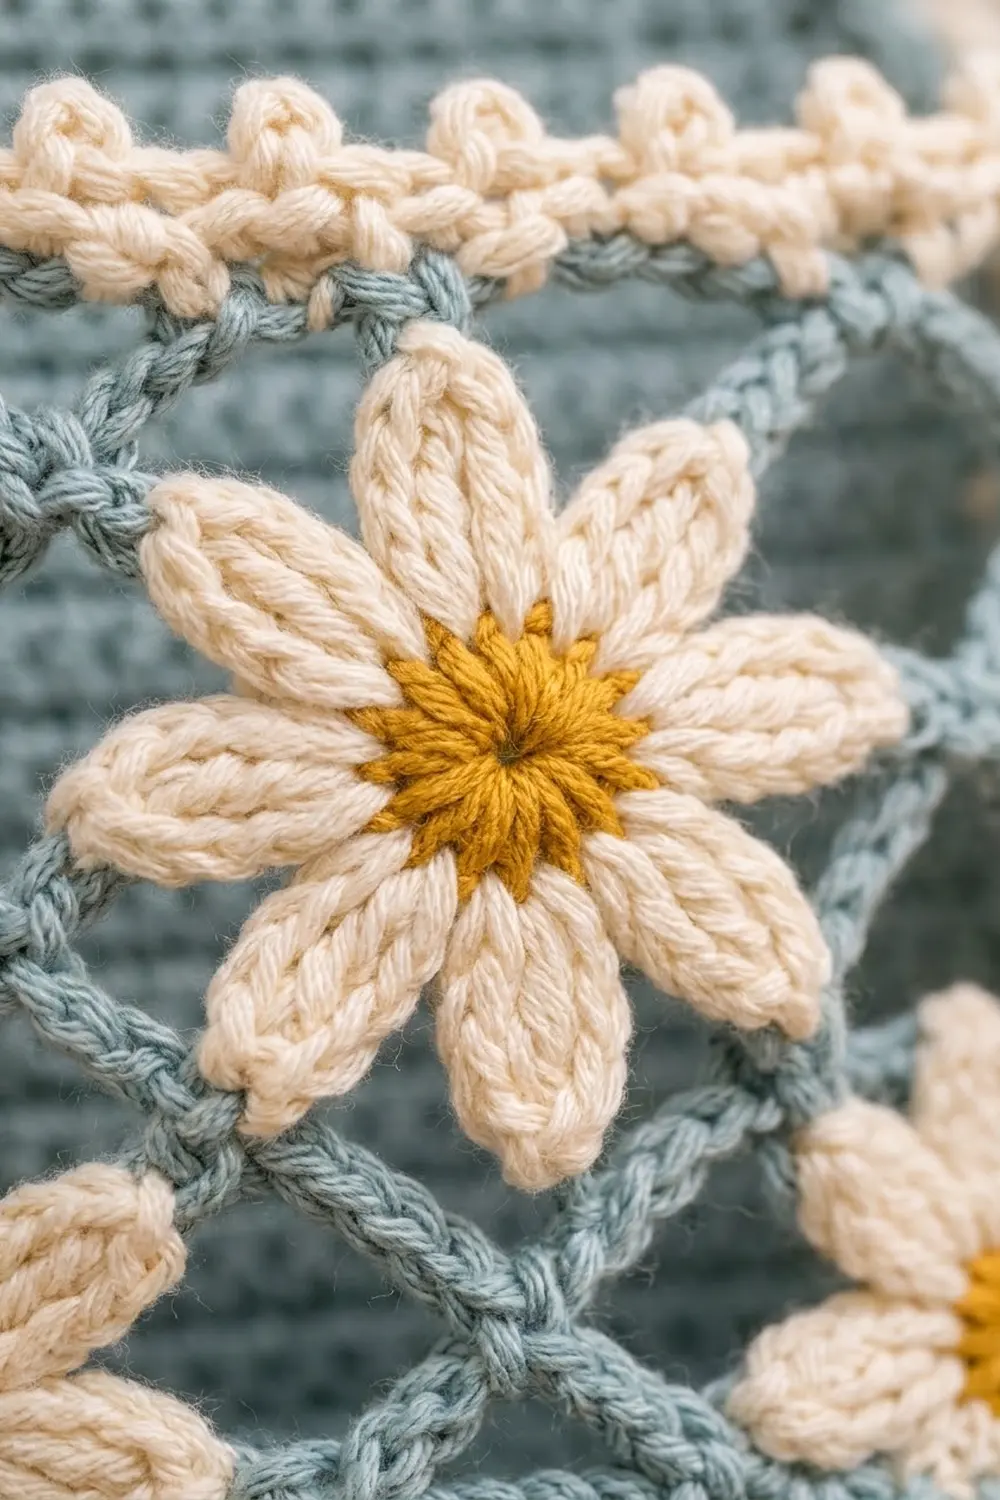
Daisy (Make 15)
- Rnd 1: With Color C, MR, 10 sc in ring, sl st to join. (10 sc) Fasten off.
- Rnd 2: Join Color B in any sc. Ch 4, sc in 2nd ch from hook, hdc in next ch, dc in next ch, sl st in next center sc. Repeat from * 9 more times; the last sl st goes in the joining st. (10 petals)
Fasten off and leave a 10 in (25.4 cm) tail for sewing.
Checkpoint: the center is 0.45 in (1.1 cm) across, and the whole daisy is 1.5 in (3.8 cm) across.
Placing the Daisies
The front of each pocket is one long side: 24 sts, or 6 lattice loops.
- Upper row: 3 daisies centered over Rnd 7, about 2 in (5.1 cm) apart center to center.
- Lower row: 2 daisies over Rnd 5, set halfway between the upper ones.
Pin all 5 in place. Using the center tail, tack each daisy to the lattice through its center and the tip of every second petal.
Backing Strip
Use Color A. The ch 2 at the start of each row does not count as a stitch.
Row 1: Ch 23. Hdc in 3rd ch from hook and in each ch across, turn. (21 hdc)
Rows 2–35: Ch 2, hdc in each st across, turn. (21 hdc)
Checkpoint: 6 in × 14 in (15.2 × 35.6 cm).
Taper
Rows 36–44: Ch 2, hdc2tog, hdc in each st to the last 2 sts, hdc2tog, turn.
Each of these rows is 2 sts shorter than the row before:
| Row | Sts |
|---|---|
| 36 | 19 |
| 37 | 17 |
| 38 | 15 |
| 39 | 13 |
| 40 | 11 |
| 41 | 9 |
| 42 | 7 |
| 43 | 5 |
| 44 | 3 |
Checkpoint: the taper is 3.6 in (9.1 cm) tall.
Tab
Rows 45–48: Ch 2, hdc in each st, turn. (3 hdc)
Fasten off and leave a 12 in (30.5 cm) tail. The tab is 1.6 in (4.1 cm) long.
Make All Pieces
Totals:
– Color A: 1 strip and the base, walls and Rnds 1–8 of all 3 pockets
– Color B: Rnds 9–10 of all 3 pockets and the petals of all 15 daisies
– Color C: the centers of all 15 daisies
Layout (front view, ring at top):
        ( O )         wooden ring
         /\           tab + taper
        |  |
        |P3|          top pocket
        |  |
        |P2|          middle pocket
        |  |
        |P1|          bottom pocket
        |__|
Border
You work the border on the strip before you join the pockets. It is worked as two rows that run from one side of the tab base, around the strip, to the other side. The tab is left free.
Border gauge: 4 sc per 1 in (2.5 cm), which matches the sc gauge.
On this border, the counts for each edge do not include the corners. The corner stitches are listed separately.
Border Row 1: With RS facing, join Color A at the left edge of Row 44. Ch 1 and work:
- Left taper edge: 2 sc in each row end of Rows 44–36. (18 sc)
- Left side: 8 sc over every 5 rows, 7 times, for Rows 35–1. (56 sc)
- Bottom-left corner: 3 sc in the first foundation st. (3 sc)
- Bottom edge: sc in each of next 5 sts, 2 sc in next st, 3 times, then sc in next st. This covers the 19 middle sts with 22 sc.
- Bottom-right corner: 3 sc in the last foundation st. (3 sc)
- Right side: 8 sc over every 5 rows, 7 times. (56 sc)
- Right taper edge: 2 sc in each row end of Rows 36–44. (18 sc)
Total: 18 + 56 + 3 + 22 + 3 + 56 + 18 = 176 sc.
Border Row 2: Ch 1, do not turn. Work reverse sc in each st back across. (176 sts)
Fasten off.
Why the math works:
- Sides: 35 rows × 0.4 in = 14 in (35.6 cm). At 4 sc per inch, 14 in needs 56 sc, which is exactly 7 groups of 8.
- Bottom: 6 in (15.2 cm) needs 24 sc. You have 22 edge sc plus the center sc of each corner group, which makes 24.
- Taper edges: each slanted edge is about 4.4 in (11.2 cm) long, and 18 sc covers it without ruffling.
- Width: the two border rows add 0.4 in (1.0 cm) on each side, so the bordered strip is 6.8 in (17.3 cm) wide.
Joining
Attaching the Ring
- Fold the tab through the wooden ring toward the WS.
- Using the tail, whipstitch Row 48 to the back of Row 44, going stitch to stitch: 3 sts to 3 sts.
- Pull snugly so the ring can’t slide.
Attaching the Pockets
Each pocket’s back long side (24 sts) lies against the strip. Measure the positions from the foundation edge of the strip (Row 1), not from the border:
| Base at | Rim at | |
|---|---|---|
| P1 (bottom) | 0.75 in (1.9 cm) | 4.5 in (11.4 cm) |
| P2 (middle) | 5.25 in (13.3 cm) | 9 in (22.9 cm) |
| P3 (top) | 9.75 in (24.8 cm) | 13.5 in (34.3 cm) |
This leaves 0.75 in (1.9 cm) between pockets and 0.5 in (1.3 cm) above P3, below the taper.
Stitch-to-stitch logic: the pocket back is 24 sc wide and the strip is 21 hdc wide, and both measure 6 in (15.2 cm). Sew 8 pocket sts to every 7 strip sts, 3 times.
For each pocket:
1. Pin it in place.
2. Using Color A, whipstitch the back edge of Rnd 1 to the strip.
3. Sew up both back corners through the solid rounds and the lattice joins.
4. Sew across the back of Rnd 9.
Tension: keep the seams firm but flat. If you pull too tight, the strip puckers. If you sew too loosely, the pockets sag forward when they’re loaded.
Size checkpoint: the strip should still lie at 6.8 in (17.3 cm) wide, and the three rims should be level.
Final Blocking
- Weave in all the ends before you block.
- Lay the strip flat, RS up, with the pockets folded flat.
- Spray until damp, not soaked.
- Pin the strip to 6.8 in × 18 in (17.3 × 45.7 cm), measuring up to the top of the taper. Keep the side borders straight.
- Open each pocket and stuff it with a toilet roll wrapped in a plastic bag, so it dries in its finished shape.
- Gently open up the lattice diamonds and flatten the daisy petals with your fingertips.
- Let everything dry completely before hanging.
Final Quality-Control Checklist
- Each pocket shows 18 even lattice loops, and Rnd 8 has 72 sc.
- Each pocket has 36 picots, spaced evenly.
- Each daisy has 10 petals and is tacked at its center and on alternate petals.
- The strip is 21 hdc wide, and the taper ends at 3 sts.
- The border has 56 sts on each side and 18 on each taper edge.
- The pockets are centered, level and spaced 0.75 in (1.9 cm) apart.
- The ring is sewn on securely, and the holder hangs straight.
- A roll fits in each pocket and sticks out a little above the rim.
Troubleshooting
- Pocket walls splay outward: you skipped the BLO in Rnd 2, or your sc is loose. Redo Rnd 2, or go down a hook size.
- Lattice looks stretched or saggy: use ch 4 instead of ch 5, and make sure each sc goes into the center of its loop.
- Rim ruffles: check Rnd 8. It must have exactly 4 sc per loop, for 72 sc.
- Daisies cup: loosen the sl sts between petals, or block them flat before sewing.
- Strip edges wave: your border is too dense. Keep to 8 sc per 5 rows.
- Holder tilts: your pocket seams are uneven. Re-pin and re-sew so each back edge is level.
Care
Hand wash in cool water with mild soap. Lay flat to dry, then reshape the pockets around a roll.
Final Notes
Each stage of the holder checks the size of the next one:
- Gauge sets the pocket base at 6 in (15.2 cm).
- The 72-st walls carry 18 lattice loops, and Rnd 8 converts them back to 72 sc.
- The 21-hdc strip matches each pocket back at 6 in (15.2 cm).
- The 176-st border brings the strip to 6.8 in (17.3 cm) wide.
- Three pockets with even spacing fill the 14 in (35.6 cm) body.
If each checkpoint matches, the finished holder will hang straight and hold three rolls.
Happy crocheting!