

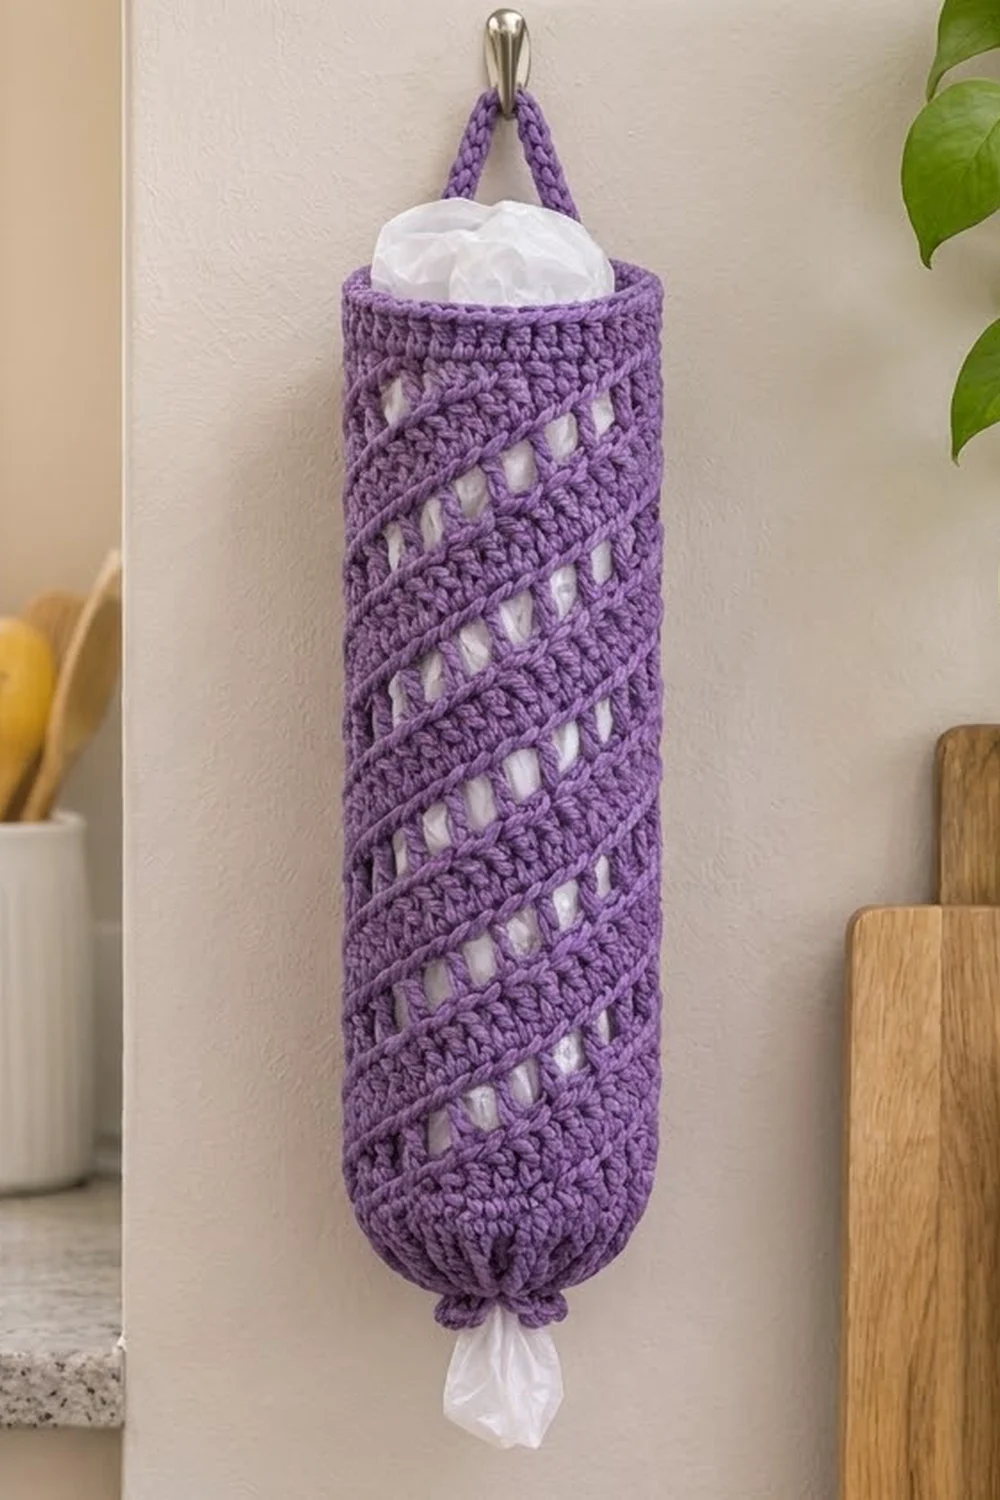
This bag holder keeps the plastic bag pile under the sink under control. It is one long tube. Bands of solid double crochet and diagonal windows spiral around the body. The top has a firm single crochet rim, and the bottom gathers into a small scalloped opening so you can pull bags out one at a time.
The sample is worked in a soft lavender purple. The same pattern works just as well in bright lime green or any other kitchen color. Cotton is the best choice because it holds its shape, wipes clean, and can go in the washing machine.
The pattern uses US crochet terms. The finished holder is about 17 in (43.2 cm) long, 6.9 in (17.5 cm) wide when flat, and 13.7 in (34.8 cm) around, plus a 3 in (7.6 cm) hanging loop.
Construction is simple. You start at the bottom with a small chain ring and build a short sc cone. Then you switch to double crochet and work the spiral pattern around and around without joining. A leveling round, an sc band, a hanging loop, and a scalloped bottom edge finish the piece.
Finished Size and Construction
- Finished size: 17 in (43.2 cm) long, not counting the loop; 6.9 in (17.5 cm) flat width; 13.7 in (34.8 cm) around
- Skill level: Easy / advanced beginner
- Terminology: US crochet terms
- Yarn weight: Worsted (#4) cotton
- Hook: 5.0 mm (US H-8)
- Number of pieces: 1 (the loop and bottom edge are worked directly onto the tube)
- Layout: One vertical tube that hangs from one loop
- Piece size: 48 stitches around; 24 stitches on each side when flattened
- Size before border: 16 in (40.6 cm) long after Rnd 35
- Border depth: Top band 1 in (2.5 cm); hanging loop 3 in (7.6 cm)
Materials
Choose a smooth worsted-weight cotton or cotton blend with about 190 m per 100 g. Avoid acrylic if you want a crisp spiral, because it stretches more under the weight of the bags.
- Lavender purple (main color): about 115 g / 220 m (240 yd)
- Optional lime green: another 115 g / 220 m (240 yd) for a second holder
Tools:
- 5.0 mm (US H-8) crochet hook
- 1 locking stitch marker
- Tapestry needle
- Scissors
- Tape measure
- A 2-liter bottle or rolled towel for blocking
The quantities include a margin of about 15% for gauge checks and weaving in ends.
Abbreviations (US Terms)
- ch – chain
- sl st – slip stitch
- sc – single crochet
- hdc – half double crochet
- dc – double crochet
- sk – skip
- sp – space
- st(s) – stitch(es)
- rnd(s) – round(s)
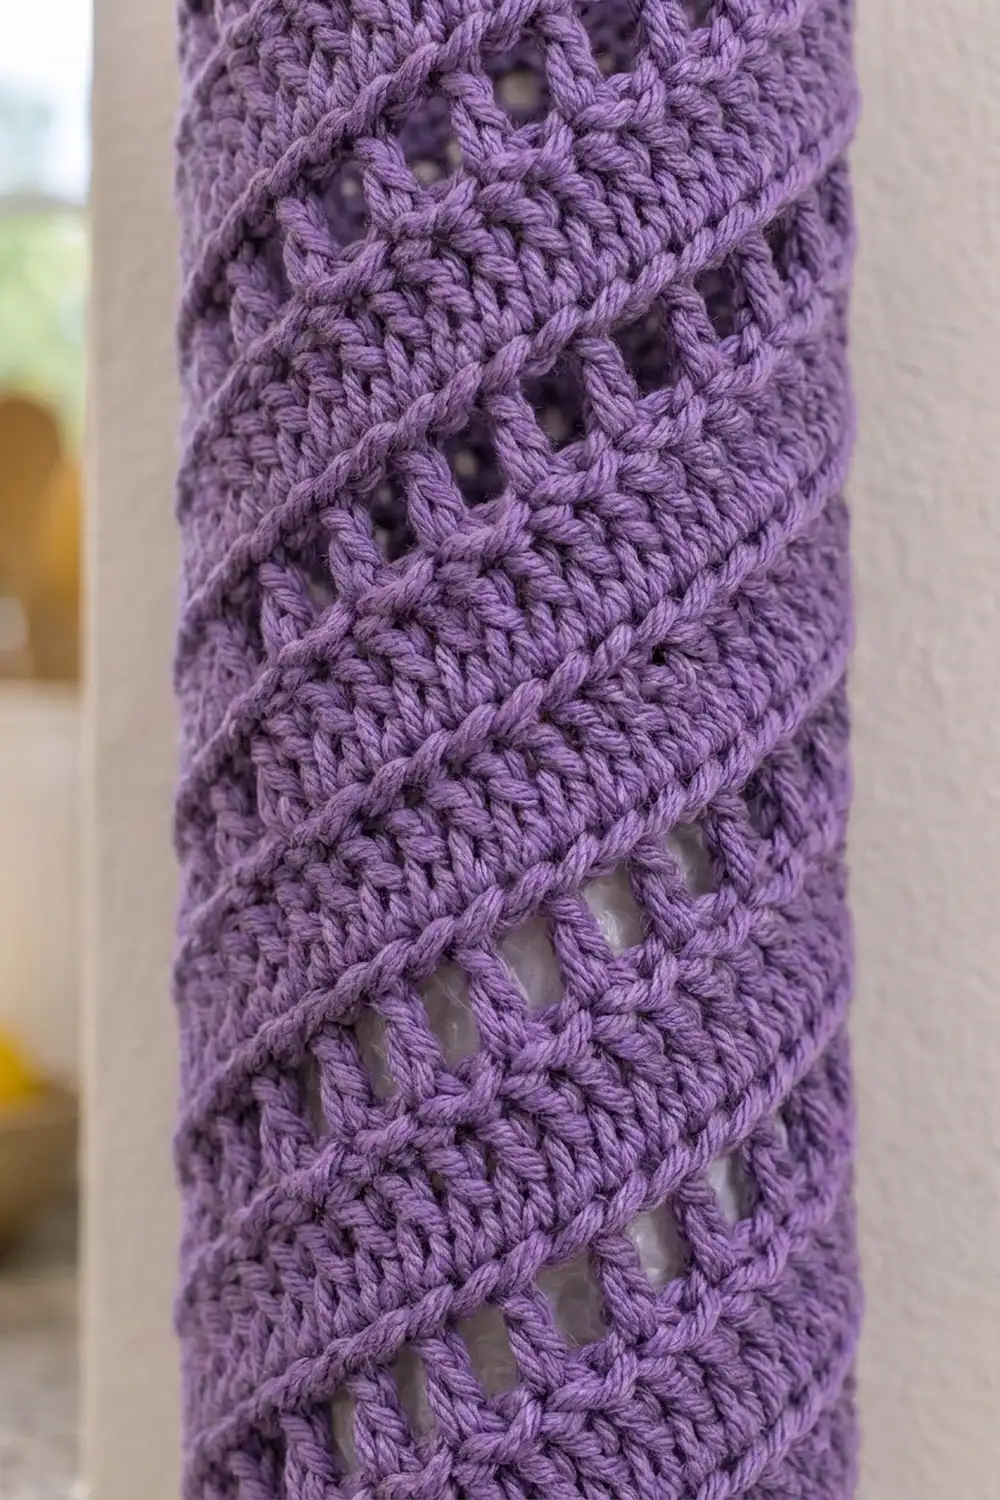
Special stitch – Spiral Pattern (SP): Dc in each dc until 2 dc remain before the next ch-2 sp. Ch 2 and skip those 2 dc. Then work 2 dc in the ch-2 sp. Repeat.
The skipped pair is always the 2 dc just before a window. That places each new window 2 stitches over from the one below it, and this steady shift creates the diagonal. Each window you make replaces one you used up, so every round always has 6 windows.
Gauge and Checkpoints
Gauge: 14 dc and 8 rnds = 4 in (10.2 cm) in dc worked in the round. 16 sc and 16 rnds = 4 in (10.2 cm).
Because this is a single piece, the first 8 rounds are your swatch. Work them, then measure before you go on.
- After Rnd 1: The ring is about 3 in (7.6 cm) around, with an opening about 1 in (2.5 cm) across.
- After Rnd 6: The cone is about 1.5 in (3.8 cm) tall and slightly cupped.
- After Rnd 7: The flat width is 6.9 in (17.5 cm), and the length is 2 in (5.1 cm).
- After Rnd 8: The length is 2.5 in (6.4 cm).
- After Rnd 18: The length is 7.5 in (19.1 cm).
Too big? Switch to a 4.5 mm (US 7) hook. Too small? Switch to a 5.5 mm (US I-9) hook. Round height matters as much as width. Taller rounds make the spiral steeper and the holder longer, so measure your length instead of only counting rounds.
Pattern
Bottom Cone
Work in joined rounds and do not turn.
Rnd 1: Ch 12 and sl st in the first ch to form a ring, making sure the chain isn’t twisted. Ch 1, sc in each ch around, sl st in first sc. (12 sc)
Rnd 2: Ch 1, 2 sc in each st around, sl st in first sc. (24 sc)
Rnd 3: Ch 1, sc in each st around, sl st in first sc. (24 sc)
Rnd 4: Ch 1, sc in next st, 2 sc in next st; rep from * 11 more times, sl st in first sc. (36 sc)*
Rnd 5: Ch 1, sc in each st around, sl st in first sc. (36 sc)
Rnd 6: Ch 1, sc in next 2 sts, 2 sc in next st; rep from * 11 more times, sl st in first sc. (48 sc)*
The plain rounds between the increase rounds stop the bottom from lying flat. Instead, it narrows into a soft gathered cone.
Body Base
Rnd 7: Ch 3 (counts as dc here and throughout), dc in each st around, sl st in top of beginning ch-3. (48 dc)
Rnd 8 (set-up): Ch 3, dc in next 5 sts, ch 2, sk 2 sts, dc in next 6 sts, ch 2, sk 2 sts; rep from * 4 more times. Do not join. (36 dc + 6 ch-2 sps = 48 sts)*
From here on, the body is worked in a continuous spiral with no joins and no turning chains.
Spiral Body
Rnd 9: Dc in next 4 dc. The first of these goes into the top of the beginning ch-3 of Rnd 8; place the marker in it. Ch 2 and sk next 2 dc. Then 2 dc in next ch-2 sp, dc in next 4 dc, ch 2, sk next 2 dc; rep from * 4 more times. Finish with 2 dc in the last ch-2 sp of Rnd 8. (36 dc + 6 ch-2 sps = 48 sts)*
Rnds 10–34: Keep working SP around without stopping. Each time you reach the marker, move it up into the dc you just worked above it. The marker only tracks rounds; the stitch pattern simply continues past it. Count 6 windows between moves of the marker. (36 dc + 6 ch-2 sps = 48 sts per rnd)
That makes 26 spiral rounds in total (Rnds 9–34). Each round shifts the windows 2 sts, so over 26 rounds each diagonal line travels 52 sts, a little more than once around the tube.
Checkpoint: After Rnd 34, the length is 15.5 in (39.4 cm). If your rounds run tall, stop the spiral as soon as you reach this length.
Leveling Round
Rnd 35 (conversion): Dc in each dc and 2 dc in each ch-2 sp until you reach the marker. (36 dc worked one-per-stitch + 12 dc worked into spaces = 48 dc)
This round fills in the last windows and gives a solid base for the top band.
Checkpoint: The length is 16 in (40.6 cm), and the flat width is 6.9 in (17.5 cm).
Border: Top Band, Hanging Loop, and Bottom Edge
Border gauge: 16 sc = 4 in (10.2 cm); 4 sc rounds = 1 in (2.5 cm).
Top Band
Rnd 36: Hdc in next st, sc in each of next 47 sts. (48 sts: 1 hdc + 47 sc; 24 sts on each flattened side)
The hdc steps down from dc height to sc height, so the jog where the spiral ends stays smooth.
Rnds 37–39: Sc in each st around. (48 sc per rnd; 24 sc on each flattened side)
To finish the band: Sl st in next 2 sts. Do not fasten off.
Why the math works: The band keeps the same 48 sts as the body, so no fullness is added or lost. At 16 sc per 4 in (10.2 cm), 48 sts measure 12 in (30.5 cm) around. That pulls the rim in slightly to about 6 in (15.2 cm) wide when flat. The slight pull gives the top its firm, rounded edge and keeps the bags inside.
Hanging Loop
Loop: Ch 24, then sl st in the same st as the last sl st to form a loop.
Loop covering: Ch 1, then work 30 sc into the ch-24 loop. Work them over the chain, not into each ch, and pack them tightly so no chain shows. Sl st in next st of the band. Fasten off and weave in the end.
The 24 ch measure about 6 in (15.2 cm), so the loop rises about 3 in (7.6 cm) above the rim. Packing 30 sc over 24 ch makes a firm cord that won’t stretch.
Bottom Scallop Edge
Turn the holder upside down. Join yarn with a sl st in any free loop of the foundation ch-12 ring.
Edge rnd: Sl st in next ch, 3 dc in next ch; rep from * 5 more times, sl st in first sl st. (6 scallops: 6 sl st + 18 dc = 24 sts)*
Fasten off and weave in the end. The 6 small scallops form the knobby ring around the opening. They also firm up the edge so it holds each bag lightly as you pull it out.
Final Blocking
- Weave in all ends on the inside of the tube, following the dc posts.
- Soak the holder in cool water for 10 minutes, then gently press out the water in a towel. Do not wring it.
- Slide the tube over a 2-liter bottle or a tightly rolled towel about 4.4 in (11.2 cm) across.
- Gently straighten the diagonal lines so the windows open evenly.
- Measure: 17 in (43.2 cm) long and 13.7 in (34.8 cm) around the body.
- Pinch the bottom cone into shape and fluff up the scallops.
- Lay the loop flat and let everything dry completely before hanging.
Final Quality-Control Checklist
- Rnd 6 has 48 sc, and the cone narrows smoothly.
- Every spiral round has 6 ch-2 windows and 36 dc.
- The windows climb diagonally, with none stacked or missing.
- Rnd 35 has 48 dc and no open windows.
- Each of the 4 top band rounds has 48 sts.
- The loop is fully covered and firmly attached.
- The bottom has 6 even scallops.
- The holder is 17 in (43.2 cm) long and 6.9 in (17.5 cm) wide when flat.
Troubleshooting
The windows stack straight up instead of slanting. You are skipping the 2 dc after the window instead of before it. The skipped pair must always sit right before the next ch-2 sp.
A window disappeared or doubled. Count the windows between moves of the marker; there must be 6. Rip back to the marker and rework that round.
The bottom is ruffled. Your sc gauge is loose. Rework the cone with a hook 0.5 mm smaller.
The tube twists a lot. Some twist is normal in spirals. Wet blocking over a bottle straightens most of it.
The top rim flares. Work Rnds 37–39 with a hook 0.5 mm smaller.
Bags fall out of the bottom. Work a second scallop round, or add 1 sc round into the ring before the scallops.
Care
Machine wash cold on a gentle cycle, then lay flat or hang to dry. Reshape it while damp so the spiral stays even.
Final Notes
The whole holder depends on one measurement chain. A gauge of 14 dc to 4 in (10.2 cm) gives 48 sts and 13.7 in (34.8 cm) around. The cone adds 1.5 in (3.8 cm), Rnds 7–8 add 1 in (2.5 cm), and the 26 spiral rounds add 13 in (33.0 cm). The leveling round adds 0.5 in (1.3 cm) and the sc band adds 1 in (2.5 cm), for a total of 17 in (43.2 cm). Check your gauge early and count your 6 windows every round, and the spiral will form on its own.
Happy crocheting!