

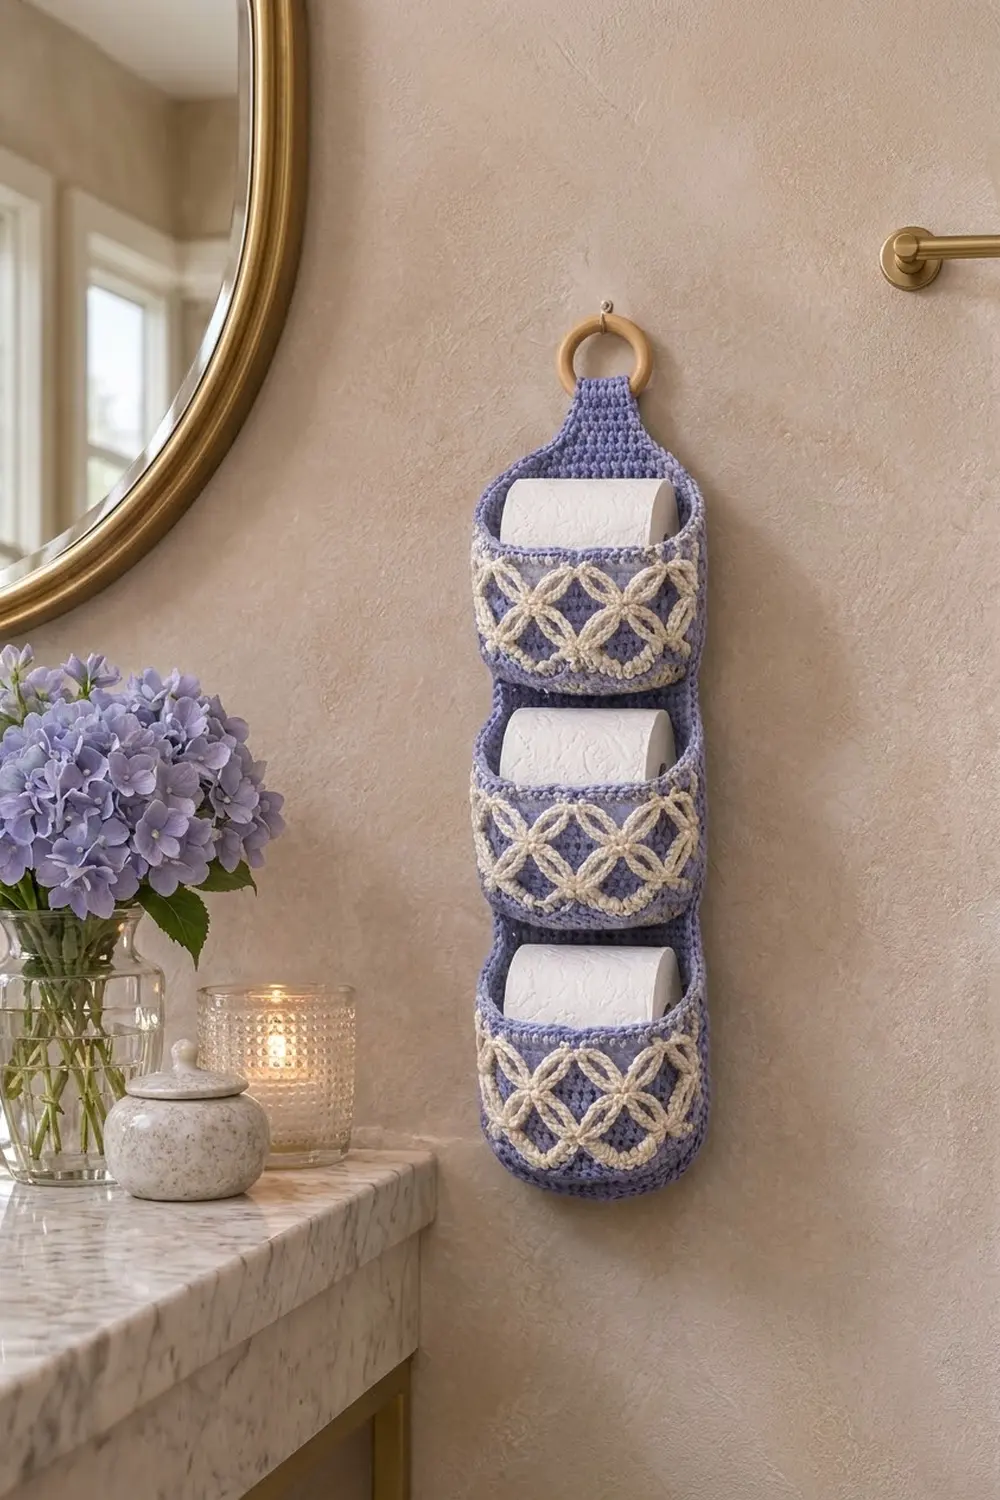
This hanging holder keeps three spare rolls in sight and within reach. A long periwinkle back panel hangs from a wooden ring, and three pockets are sewn down its front. Each pocket has a cream band of rings around its front.
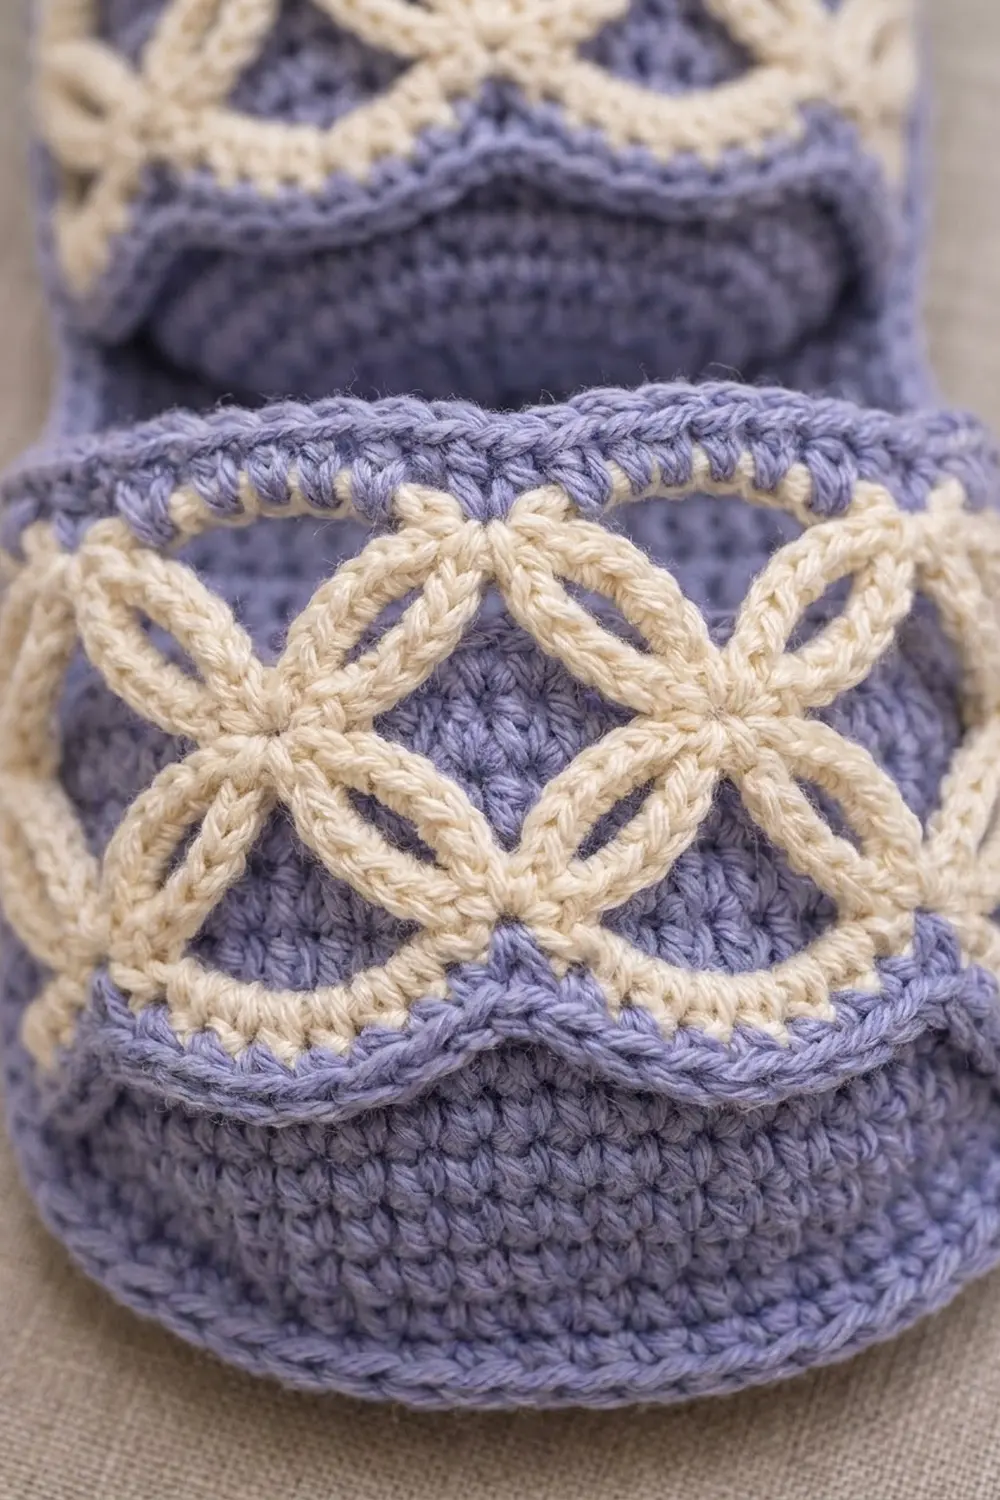
The palette is soft and calm: periwinkle blue for the structure, with cream for the rings. The rings are shells and clusters worked in an open band, so the periwinkle pocket wall shows through each ring’s center.
The pattern uses US crochet terms. The finished holder measures about 6.5 in (16.5 cm) wide and 19.75 in (50.2 cm) tall from the bottom edge to the top of the folded tab, not counting the ring.
Construction is simple. You crochet the back panel in rows, then add a border. You work each pocket in the round from an oval base, crochet a flat ring band for it, and sew the band onto the pocket. Finally, you sew the pockets to the panel and fold the tab around the ring.
Finished Size and Construction
- Finished size: 6.5 in (16.5 cm) wide × 19.75 in (50.2 cm) tall, ring not included
- Skill level: Intermediate
- Terminology: US crochet terms
- Yarn weight: Worsted (#4), cotton
- Hook: 4.5 mm (US 7)
- Number of pieces: 7 (1 back panel, 3 pockets, 3 ring bands)
- Layout: 3 pockets stacked vertically on one panel
- Pocket size: 5.6 in (14.2 cm) wide × 2.9 in (7.4 cm) deep × 3.75 in (9.5 cm) tall
- Panel size before border: 5.5 in (14.0 cm) × 20.75 in (52.7 cm), tab unfolded
- Border depth: 0.5 in (1.3 cm), 2 rounds
Materials
Use a smooth worsted-weight cotton or cotton blend. Cotton holds the pocket shape well and can handle a damp bathroom. Avoid fuzzy yarn, because it hides the shape of the rings.
- Periwinkle (MC): 150 g / about 255 m
- Cream (CC): 50 g / about 85 m
These quantities include a safety margin of about 30%.
Tools:
– 4.5 mm (US 7) crochet hook
– Wooden ring, 3 in (7.6 cm) diameter
– Tapestry needle
– Locking stitch markers
– Scissors
– Pins and a tape measure
Abbreviations (US Terms)
- ch – chain
- sc – single crochet
- dc – double crochet
- sl st – slip stitch
- st(s) – stitch(es)
- sk – skip
- sp – space
- BLO – back loop only
- sc2tog – single crochet 2 together
- rev sc – reverse single crochet (crab stitch): sc worked from left to right without turning
- RS / WS – right side / wrong side
Special stitch: dcXtog (cluster). Yarn over, insert the hook in the next st, pull up a loop, yarn over and pull through 2 loops. Repeat from * to * across X stitches, then yarn over and pull through all loops on the hook. For example, dc7tog joins 7 stitches into one.
Gauge and Checkpoints
Gauge: 16 sc and 16 rows = 4 in (10.2 cm) in sc worked in rows.
This square gauge matters, because every border and sewing step relies on 1 stitch = 1 row = 0.25 in (0.6 cm).
Make one pocket base first, as a test piece.
- Pocket base checkpoint (after Rnd 6): 5.6 in (14.2 cm) long × 2.9 in (7.4 cm) wide
- Pocket wall checkpoint (after Rnd 21): 3.75 in (9.5 cm) tall
- Ring band checkpoint: 12.25 in (31.1 cm) long × 2 in (5.1 cm) tall
- Panel checkpoint (after Row 56): 5.5 in (14.0 cm) × 14 in (35.6 cm)
If your piece comes out too big, go down 0.5 mm in hook size. If it comes out too small, go up 0.5 mm. If your stitch width matches but your rows run tall, tighten each pull-through slightly rather than changing hooks.
Back Panel
With MC, ch 23.
Row 1 (RS): Sc in 2nd ch from hook and in each ch across, turn. (22 sc)
Rows 2–56: Ch 1, sc in each st across, turn. (22 sc)
Checkpoint: 5.5 in (14.0 cm) × 14 in (35.6 cm).
Taper:
- Row 57: Ch 1, sc2tog, sc 18, sc2tog, turn. (20 sc)
- Row 58 and every even row through Row 68: Ch 1, sc in each st across, turn.
- Row 59: Ch 1, sc2tog, sc 16, sc2tog, turn. (18 sc)
- Row 61: Ch 1, sc2tog, sc 14, sc2tog, turn. (16 sc)
- Row 63: Ch 1, sc2tog, sc 12, sc2tog, turn. (14 sc)
- Row 65: Ch 1, sc2tog, sc 10, sc2tog, turn. (12 sc)
- Row 67: Ch 1, sc2tog, sc 8, sc2tog, turn. (10 sc)
- Row 69: Ch 1, sc2tog, sc 6, sc2tog, turn. (8 sc)
The taper is 13 rows, or 3.25 in (8.3 cm).
Tab:
Rows 70–83: Ch 1, sc 8, turn. (8 sc)
The tab is 14 rows, or 3.5 in (8.9 cm), and 2 in (5.1 cm) wide. Do not fasten off. You’ll work the border next (see Border).
Pocket (Make 3)
Work the pocket in joined rounds with MC. Join each round with a sl st to the first sc, then ch 1 (the ch 1 does not count as a stitch). Do not turn.
Oval base
Ch 14.
Rnd 1: Sc in 2nd ch from hook, sc 11, 3 sc in last ch. Rotate and work along the underside of the chain: sc 11, then 2 sc in the first ch (the one already holding the first sc). Join. (28 sc)
This gives two straight sides of 11 sts, with 3 sts at each end.
Rnd 2: 2 sc in first st, sc 11, 2 sc in each of next 3 sts, sc 11, 2 sc in each of last 2 sts. Join. (34 sc)
Rnd 3: Sc 1, 2 sc in next st, sc 11, [sc 1, 2 sc in next st] 3 times, sc 11, [sc 1, 2 sc in next st] twice. Join. (40 sc)
Rnd 4: Sc 2, 2 sc in next st, sc 11, [sc 2, 2 sc in next st] 3 times, sc 11, [sc 2, 2 sc in next st] twice. Join. (46 sc)
Rnd 5: Sc 3, 2 sc in next st, sc 11, [sc 3, 2 sc in next st] 3 times, sc 11, [sc 3, 2 sc in next st] twice. Join. (52 sc)
Rnd 6: Sc 4, 2 sc in next st, sc 11, [sc 4, 2 sc in next st] 3 times, sc 11, [sc 4, 2 sc in next st] twice. Join. (58 sc)
You now have two straight sides of 11 sts each and two rounded ends of 18 sts each.
Checkpoint: 5.6 in (14.2 cm) × 2.9 in (7.4 cm).
Mark the 11 sts of the second straight side (the one worked right after Rnd 6’s first rounded end). This is the back of the pocket, which you’ll sew to the panel.
Walls
Rnd 7: Sc in BLO of each st around. Join. (58 sc) This makes a crisp fold line where the base meets the wall.
Rnds 8–20: Sc in each st around. Join. (58 sc)
Rnd 21: Ch 1, rev sc in each st around. Join and fasten off. (58 rev sc)
Checkpoint: the wall is 3.75 in (9.5 cm) tall, and the opening measures 14.5 in (36.8 cm) around.
Ring Band (Make 3)
Work the ring band flat. To change color, finish the last yarn-over of the row’s last stitch with the new color.
With MC, ch 50.
Row 1 (WS): Sc in 2nd ch from hook and in each ch across. Change to CC, turn. (49 sc)
Row 2 (RS, lower ring halves): Ch 1, sc in first st, sk 1, 7 dc in next st, sk 1, sc in next st. Repeat from * to * 12 times, turn. (12 shells, 13 sc)
Row 3 (upper ring halves):
1. Ch 3, then dc3tog over the first 3 dc of the first shell. The ch 3 and dc3tog together count as the first cluster.
2. Ch 3, sc in the 4th (center) dc of the same shell, ch 3, dc7tog over the next 3 dc, the next sc, and the first 3 dc of the following shell. Repeat from * to * 11 times.
3. Ch 3, sc in the center dc of the last shell, ch 3, dc4tog over the last 3 dc and the last sc.
4. Change to MC, turn.
Count: 13 clusters, 12 sc, 24 ch-3 sps.
Each shell from Row 2 and the cluster arms on either side of it close into a ring. Neighboring rings share the cluster between them, which gives the linked-ring lattice.
Row 4: Ch 1, sc in top of first cluster, sc in ch-3 sp, sc in sc, sc in ch-3 sp, sc in top of next cluster. Repeat from * to * 12 times. (49 sc: 1 + 4 per repeat × 12)
Row 5: Ch 1, do not turn, rev sc in each st across. (49 rev sc) Fasten off.
Checkpoint: 12.25 in (31.1 cm) × 2 in (5.1 cm).
The base row and the top row both hold 49 sts, so the band stays straight and does not fan or cup.
Attach the band: Pin the band around the outside of a pocket, with its bottom edge on Rnd 10 and its top edge on Rnd 17. Center it on the front. The 49-st band covers 49 of the 58 wall sts, which leaves a 9-st gap, 2.25 in (5.7 cm) wide, centered on the back. Whipstitch the top and bottom edges to the wall, 1 band st to 1 wall st. Then tack the ends down.
Make All Pieces
- MC: 1 back panel, 3 pockets, plus Rows 1, 4, and 5 of each ring band
- CC: Rows 2–3 of each ring band (3 bands)
Layout (front view, panel rows counted from the bottom):
        ( wooden ring )
           [ tab ]          rows 70–83, folded
         /  taper  \        rows 57–69
        |  margin   |       rows 54–56
        | POCKET 3  |       rows 39–53
        |   gap     |       rows 36–38
        | POCKET 2  |       rows 21–35
        |   gap     |       rows 18–20
        | POCKET 1  |       rows 3–17
        |  margin   |       rows 1–2
Joining
Finish the panel border (next section) before you sew on the pockets.
Method: Whipstitch with MC and a tapestry needle.
Placement: Center each pocket’s 11 marked back sts across panel sts 6–16. That leaves 5 panel sts free on each side, and the pocket’s rounded ends curve forward past the panel edges.
Stitch-to-stitch logic:
- Bottom line: Sew the 11 back sts of Rnd 7 (the BLO fold line) to 11 panel sts along the pocket’s base row: row 3 for Pocket 1, row 21 for Pocket 2, row 39 for Pocket 3.
- Sides: Sew straight up from each end of the back section. Each of the 15 wall rounds (Rnds 7–21) matches 1 panel row, because 1 round = 1 row = 0.25 in (0.6 cm).
- Top: Sew the 11 back sts of Rnd 21 to the panel’s top row for that pocket: row 17, 35, or 53.
Tension: Keep your stitches snug but not puckered. The pocket back should lie as flat as the panel. If the pocket ripples, you’ve skipped a row or doubled one.
Size checkpoint: the 3-row gaps measure 0.75 in (1.9 cm), and the top pocket ends 0.75 in (1.9 cm) below the start of the taper.
Border
Border gauge: Same as the panel. Each round adds 0.25 in (0.6 cm) on every edge.
At the end of Row 83, do not turn. Work around the whole panel, tab included.
Rnd 1:
- Top (tab, Row 83): 3 sc in first st, sc 6, 3 sc in last st. (12 sts)
- Left side: Sc in the end of each row, Rows 82–2. (81 sts)
- Bottom (foundation): 3 sc in first st, sc 20, 3 sc in last st. (26 sts)
- Right side: Sc in the end of each row, Rows 2–82. (81 sts)
- Join to the first sc. (200 sc)
The corner groups belong to the top and bottom counts. The side counts contain no corner stitches, so nothing is counted twice: 12 + 81 + 26 + 81 = 200.
Rnd 2: Ch 1. Sc in each st, working 3 sc in the center st of each corner group. Join and fasten off.
Count: 200 sts worked 1-per-stitch + 8 added (2 at each of 4 corners) = 208 sc. Per side, that’s top 16, sides 81 each, bottom 30.
Why the math works: With a square gauge, 1 sc per row end exactly matches the row height. The tapered edges are about 12% longer on the slant, but sc stretches enough to absorb that. Each round adds 0.25 in (0.6 cm) per edge, so 2 rounds add 0.5 in (1.3 cm):
- Width: 5.5 + 1.0 = 6.5 in (16.5 cm)
- Unfolded height: 20.75 + 1.0 = 21.75 in (55.2 cm)
Tab: The bordered tab is 4 in (10.2 cm) long. Fold it in half over the wooden ring so its tip meets the taper at row 69. Whipstitch it down across all 16 border sts. The folded loop stands 2 in (5.1 cm) tall.
Final Blocking
- Before sewing, lightly mist the panel and bands with water.
- Pin the panel flat to 6.5 in (16.5 cm) × 21.75 in (55.2 cm). Keep the edges straight.
- Pin each band to 12.25 in (31.1 cm) × 2 in (5.1 cm). Open each ring with a pin through its center.
- Stuff each pocket with a toilet roll wrapped in a towel, and mist the outside.
- Let everything dry completely, then assemble.
Final Quality-Control Checklist
- The panel has 22 sts and 56 rows before the taper, with 8 sts across the tab.
- Each pocket ends with 58 sts and sits on a crisp BLO fold line.
- Each band has 12 complete rings and 49 sts on Rows 1 and 4.
- The border has 208 sts after Rnd 2.
- The pockets are centered on panel sts 6–16 with even 0.75 in (1.9 cm) gaps.
- The tab is firmly sewn and the ring does not slip.
- All yarn ends are woven in through solid sc.
Troubleshooting
- Pocket base cups upward: Your tension is too tight on the increase rounds. Loosen up, or go up 0.5 mm for Rnds 1–6 only.
- Rings look squashed: Pull each dc to its full height, and don’t tighten the dc7tog.
- Band is shorter than 12.25 in (31.1 cm): Your Row 1 is tight. Rework it with a larger hook.
- Panel edges wave: Recheck the border count of 81 sts per side. Extra stitches cause ripples.
- Pockets droop forward: Add a second line of whipstitch across the back sts of Rnd 14.
Care
Hand wash in cool water and reshape while damp. Dry flat, then rehang once it’s completely dry.
Final Notes
Everything is built on one measurement chain:
- Gauge: 16 sc × 16 rows = 4 in (10.2 cm)
- Panel: 5.5 in (14.0 cm) before border, 6.5 in (16.5 cm) after
- Pocket: 58 sts = 14.5 in (36.8 cm) around, 3.75 in (9.5 cm) tall
- Band: 49 sts = 12.25 in (31.1 cm)
- Finished holder: 19.75 in (50.2 cm) tall from the bottom edge to the top of the folded tab
Check each link as you go, and the pieces will fit together without any guesswork.
Happy crocheting!