

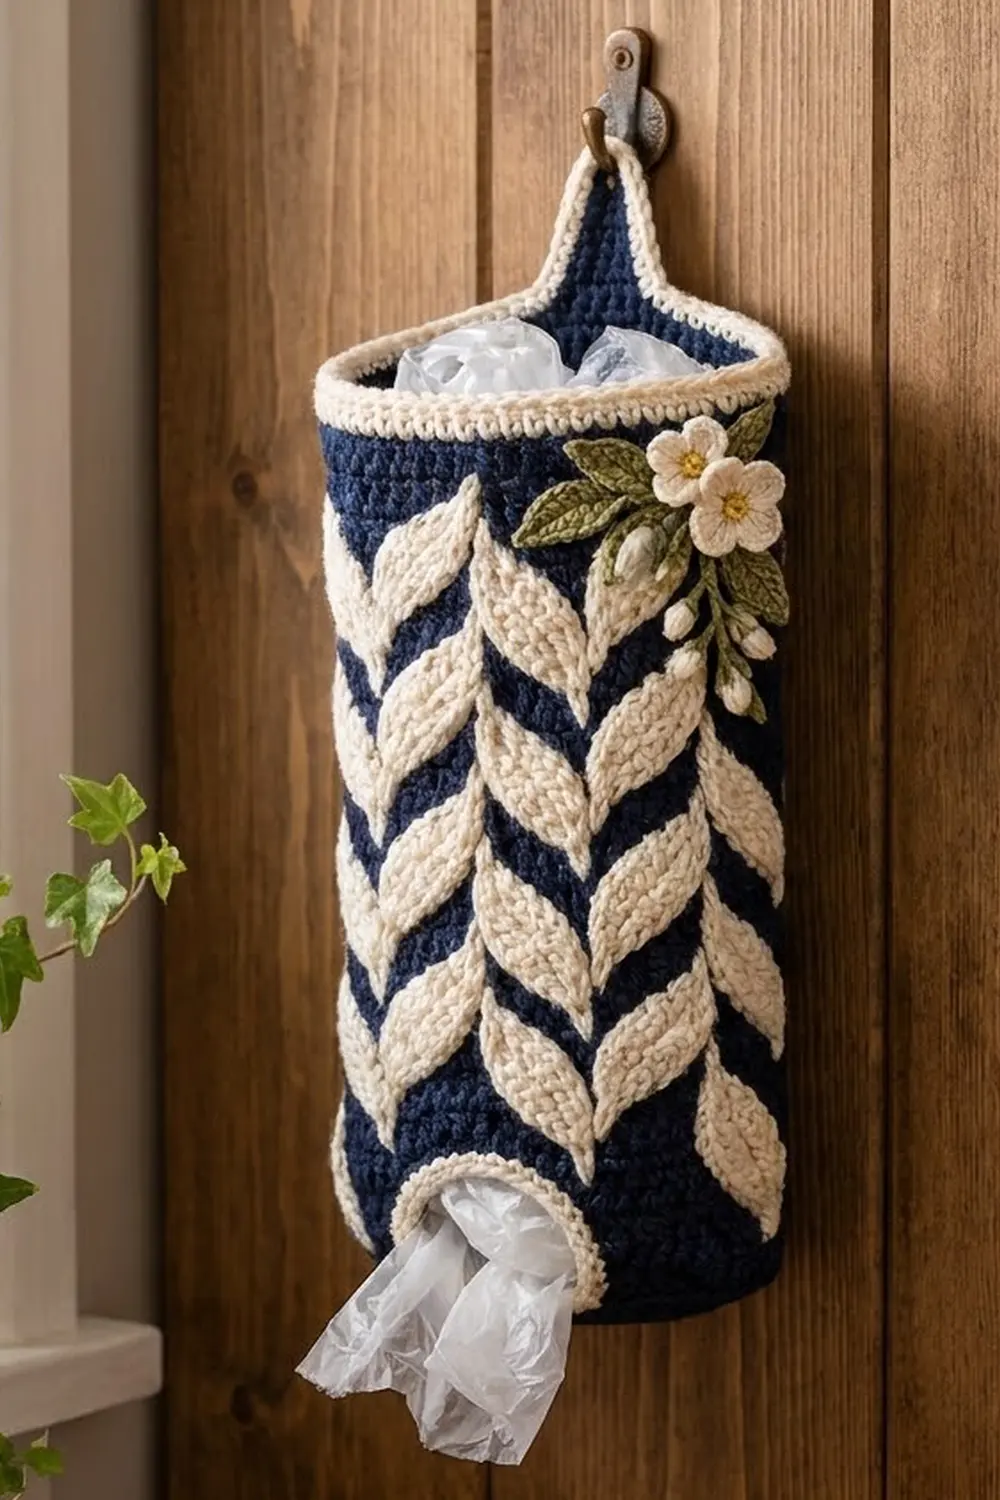
This hanging bag holder has a deep navy tube covered in plump cream leaves. The leaves run in vertical herringbone columns, and each pair opens upward into a V, so the surface looks like stacked laurel sprigs. A cream rim finishes the top. A navy tab outlined in cream rises from the back to a sturdy hanging loop.
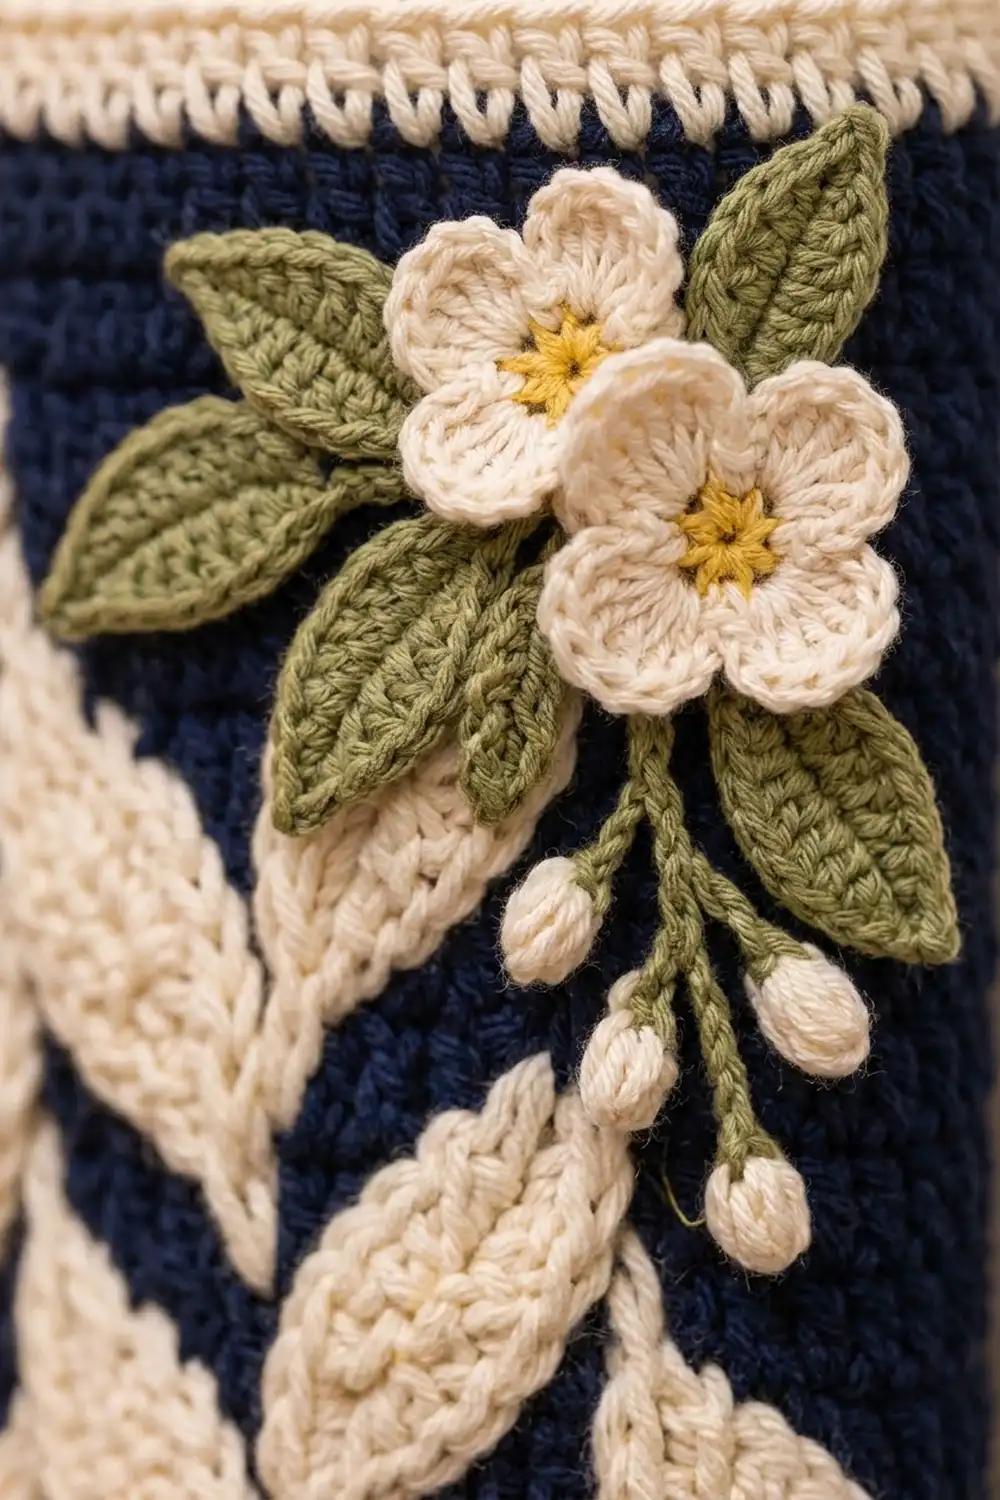
You push bags in through the top and pull them out through a rounded, cream-edged opening low on the front. A small appliqué spray sits at the upper right front. It has two cream five-petal flowers with yellow centers, four sage-green leaves and a sprig of cream buds.
The pattern uses US crochet terms. The holder measures 6 in (15.2 cm) wide when flat and 14 in (35.6 cm) tall from base to rim. The tab and loop add 4.5 in (11.4 cm), for a full hanging length of about 18.5 in (47.0 cm).
You start with an oval base. Then you work the body upward in joined rounds of single crochet, with a few turned rows that leave the front opening. The raised cream leaves are front-post treble clusters. The tab, edgings and appliqués come last.
Finished Size and Construction
- Finished size: 6 in (15.2 cm) wide flat x 14 in (35.6 cm) tall; 18.5 in (47.0 cm) including tab and loop
- Skill level: Intermediate
- Terminology: US
- Yarn weight: Worsted (#4)
- Hook: 4.5 mm (US 7) for the body; 3.5 mm (US E-4) for the appliqués
- Number of pieces: 1 body with tab, plus small sewn-on appliqués (2 flowers, 4 leaves, 1 bud sprig)
- Layout: single tube with an oval base; opening on the lower front, tab on the upper back
- Piece size: 48 sts around = 12 in (30.5 cm) circumference
- Size before border: 13.5 in (34.3 cm) tall after Rnd 65
- Border depth: cream rim of 2 rounds, about 0.5 in (1.3 cm)
Materials
Choose a smooth worsted yarn with good stitch definition. Cotton or a cotton-acrylic blend works best because it holds its shape when the holder is full of bags. The amounts below assume about 190 m per 100 g.
- Navy (MC): 110 g / 210 m
- Cream (CC): 80 g / 150 m
- Sage green: 8 g / 15 m
- Yellow: 2 g / 4 m
All quantities include a margin of about 15%. For a warmer look, swap the navy for rust or terracotta and keep everything else the same.
Tools:
– 4.5 mm (US 7) and 3.5 mm (US E-4) hooks
– 6 stitch markers
– Tapestry needle
– Scissors
– Measuring tape
– Rust-proof pins and a spray bottle for blocking
Abbreviations (US Terms)
- ch – chain
- sl st – slip stitch
- sc – single crochet
- hdc – half double crochet
- dc – double crochet
- tr – treble crochet
- sc2tog – single crochet 2 together
- BLO – back loop only
- MR – magic ring
- st(s) – stitch(es)
- rep – repeat
Special stitch – Leaf (FPtr3cl): With cream, *yo twice, insert the hook from front to back to front around the post of the indicated st 2 rounds below, yo and pull up a loop, [yo, pull through 2 loops] twice. Rep from * 2 more times around the same post. Yo and pull through all 4 loops on the hook. Skip the st behind the Leaf in the current round. Each Leaf counts as 1 st.
Color changes: Change color on the last yo of the stitch before the new color. During leaf rounds, carry the unused yarn inside your sc so it stays hidden.
Gauge and Checkpoints
Gauge: 16 sc and 18 rounds = 4 in (10.2 cm) with the 4.5 mm hook.
Make the oval base first and use it as your swatch. It uses the same stitch and tension as the body, so if the base measures correctly, the tube will too. Measure at each checkpoint:
- After Rnd 4 (base): about 4.75 x 2 in (12.1 x 5.1 cm), 48 sts
- After Rnd 19 (lower band): about 3.3 in (8.4 cm) tall from the base edge
- After Rnd 61 (leaf section): about 12.6 in (32.0 cm) tall, still 6 in (15.2 cm) wide flat
- After Rnd 67 (rim): 14 in (35.6 cm) tall
If your base is too big, go down 0.5 mm. If it is too small, go up 0.5 mm. Never change the stitch count, because the 8-st leaf repeat needs exactly 48 sts. A difference of up to 0.25 in (0.6 cm) in width is fine.
Oval Base
With navy and the 4.5 mm hook, ch 15.
Rnd 1: Sc in 2nd ch from hook and next 12 ch, 3 sc in last ch. Working along the opposite side, sc in next 12 ch, 2 sc in last ch (same ch as first sc). Join with sl st to first sc. (30 sts)
Rnd 2: Ch 1, 2 sc in first st, sc in next 12, [2 sc in next] 3 times, sc in next 12, [2 sc in next] 2 times. Join. (36 sts)
Rnd 3: Ch 1, 2 sc in first st, sc in next st, sc in next 12, [2 sc in next, sc in next] 3 times, sc in next 12, [2 sc in next, sc in next] 2 times. Join. (42 sts)
Rnd 4: Ch 1, 2 sc in first st, sc in next 2, sc in next 12, [2 sc in next, sc in next 2] 3 times, sc in next 12, [2 sc in next, sc in next 2] 2 times. Join. (48 sts)
From here on, the starting ch 1 never counts as a stitch. Sts 5 to 16 of Rnd 4 form the straight front edge.
Lower Band and Opening
Rnd 5: Ch 1, sc in BLO of each st around. Join. (48 sts) This round turns the edge upward.
Rnds 6–7: Ch 1, sc in each st around. Join. (48 sts)
Place markers in sts 5 and 16 of Rnd 7. The 12 sts from marker to marker will become the front opening. Fasten off.
Row 8 (RS): Join navy with a standing sc in st 17, the first st after the opening. Sc in each st around through st 4, stopping at the opening. (36 sts) Turn.
Rows 9–16: Ch 1, sc in each st across. Turn. (36 sts) Row 16 is a RS row and ends at the opening edge.
Rnd 17 (closing round): Ch 12, then sl st to the first sc of Row 16 to bridge the gap. Ch 1, sc in the same st and next 35 sts, then sc in each of the 12 ch. Join. (48 sts)
The raw opening is 12 sts wide and 9 rows tall, about 3 x 2 in (7.6 x 5.1 cm).
Rnds 18–19: Ch 1, sc in each st around. Join. (48 sts)
Checkpoint: the lower band is about 3.3 in (8.4 cm) tall.
Herringbone Leaf Section
Join cream at the start of Rnd 20 and leave it hanging inside the tube. You only carry it during leaf rounds.
Rnds 20–21: With navy, ch 1, sc in each st around. Join. (48 sts)
Rnd 22 (leaf round): Ch 1. *With navy, sc in next 2 sts. With cream, work a Leaf around the post of the 4th st of this repeat in Rnd 20. With navy, sc in next st (the stem st). With cream, work a Leaf around the same post as the last Leaf. With navy, sc in next 3 sts. Rep from * 5 more times. Join. (48 sts: 36 navy sc + 12 Leaves)
The first Leaf replaces the 3rd st of the repeat and leans left. The second Leaf replaces the 5th st and leans right. Both share the post below the stem st, so together they form a V that opens upward.
Rnds 23–24: With navy, ch 1, sc in each st around. Join. (48 sts)
Rnd 25: Rep Rnd 22, working each Leaf around the stem st of Rnd 23. (48 sts)
Keep repeating this 3-round sequence (2 navy rounds, then 1 leaf round) through Rnd 61. The leaf rounds are Rnds 22, 25, 28 and so on up to Rnd 61, for 14 leaf rounds in total. That makes 14 Leaf pairs in each of the 6 columns. Each Leaf reaches up past the 2 navy rounds, so the chevrons nest snugly.
Checkpoint: the body is about 12.6 in (32.0 cm) tall. Each column is 8 sts, or 2 in (5.1 cm) wide, and 3 columns show across the front. Cut cream, leaving a tail to weave in.
Top Band
Rnds 62–65: With navy, ch 1, sc in each st around. Join. (48 sts)
The body now measures 13.5 in (34.3 cm). Change to cream on the last yo of Rnd 65.
Border: Rim, Opening Edge and Tab
Border gauge: the cream border uses the same gauge of 16 sc = 4 in (10.2 cm), with 1 sc worked on top of each body st.
Top Rim
Flatten the tube with the opening centered on the front. You’ll have 24 sts on the front and 24 on the back.
Rnd 66: With cream, ch 1, sc in each st around. Join. (48 sts: 24 front + 24 back)
Rnd 67: Ch 1, sc in each st around. Join. (48 sts: 24 front + 24 back) Fasten off.
Why the math works: the rim keeps the body’s exact 48-st count, so it can’t flare out or pull in, and the flat width stays 6 in (15.2 cm). Together the two rounds add about 0.5 in (1.3 cm), bringing the height to 14 in (35.6 cm).
Opening Edge
Rnd 1: Join cream at the lower right corner of the opening. Work 12 sc along the bottom (1 in each free st), 9 sc up the side (1 per row end), 12 sc across the underside of the ch-12 and 9 sc down the other side. Join. (42 sts: 12 + 9 + 12 + 9)
Rnd 2: Ch 1, loosely sl st in each st around. Join. (42 sts) Fasten off.
One sc per row end matches the 9 rows exactly, so the sides lie flat. The sl st round firms up the edge without narrowing the hole. The finished opening is about 2.5 x 1.5 in (6.4 x 3.8 cm).
Tab
Mark the 16 sts centered on the back of Rnd 67, directly opposite the opening.
Row 1: Join navy in the first marked st. Sc in each of the 16 marked sts. Turn. (16 sts)
Rows 2–7: Ch 1, sc2tog, sc across to last 2 sts, sc2tog. Turn. (Row 2: 14 sts; Row 3: 12; Row 4: 10; Row 5: 8; Row 6: 6; Row 7: 4)
Rows 8–11: Ch 1, sc in each st across. Turn. (4 sts) Fasten off.
The tab is 4 in (10.2 cm) wide at the base, 1 in (2.5 cm) wide at the top and about 2.5 in (6.4 cm) tall.
Tab edging and loop: Join cream at the lower right of the tab, where it meets the rim.
1. Work 11 sc up the side, 1 per row.
2. Sc in the first 2 top sts.
3. Ch 18, then sl st in the last sc made to form a ring.
4. Work 26 sc over the ch-18 ring, then sl st in the same sc.
5. Sc in the last 2 top sts, then work 11 sc down the other side.
6. Sl st into the rim and fasten off.
This gives 26 edging sc plus 26 loop sc. The loop rises about 2 in (5.1 cm) above the tab.
Appliqué Spray
Use the 3.5 mm hook for all the appliqués.
Flower (make 2):
– Rnd 1: With yellow, 10 sc in MR. Join, changing to cream. (10 sts)
– Rnd 2: With cream, [sl st in next st, (hdc, 2 dc, hdc) in next st] 5 times. Join. (5 petals)
Each flower is about 1.75 in (4.4 cm) across.
Leaf (make 4): With sage green, ch 9. Sc in 2nd ch from hook, hdc in next, dc in next 3, hdc in next, sc in next, 3 sc in last ch. Working along the other side, sc in next, hdc in next, dc in next 3, hdc in next, sc in next. Sl st to first sc. (17 sts) Each leaf is about 2 in (5.1 cm) long. If you like, add a surface sl st vein down the center.
Bud sprig: With sage green, ch 13. Sl st in 2nd ch from hook and in each ch back. (12 sl sts)
For each of the 5 buds, use cream: MR, ch 2, 4 dc in ring, pull the ring closed, then sl st in the top of the ch-2. Each bud is about 0.4 in (1.0 cm). Sew the buds along the stem in pairs, with one bud at the tip.
Placement: Arrange the spray at the upper right front, just below the rim, overlapping the navy top band and the highest leaves. Pin the two flowers side by side and tuck the four leaves around them. Let the bud sprig hang down and slightly outward. Sew through the front layer only, then check from the inside that the tube is still open.
Final Blocking
- Weave in all ends on the inside, running cream tails through navy sts so they don’t show.
- Mist the holder until it is damp but not soaked.
- Stuff it with a rolled towel until it measures 6 in (15.2 cm) wide flat.
- Measure 14 in (35.6 cm) from base to rim and ease the length to match.
- Shape the opening into a smooth oval of 2.5 x 1.5 in (6.4 x 3.8 cm).
- Pin the tab flat with the loop upright, then fluff the flower petals with your fingers.
- Let it dry completely before removing the towel.
Final Quality-Control Checklist
- Every round from Rnd 5 to Rnd 67 has 48 sts.
- There are 6 leaf columns with 14 Leaf pairs each, and every V opens upward.
- No carried cream strands show between the leaves.
- The opening is centered on the front and its edge lies flat.
- The tab is centered on the back, opposite the opening.
- The hanging loop is firm, with no gaps.
- The appliqués are secure and the tube is not stitched shut.
- The holder measures 6 x 14 in (15.2 x 35.6 cm), plus 4.5 in (11.4 cm) of tab and loop.
Troubleshooting
Leaves look flat or short: Pull up each tr loop to full height. A Leaf has to stretch past 2 rounds.
Columns drift sideways: Your join is creeping. Always work the first sc of a round into the same st as the join.
Cream shows through: Carry the strand more loosely, and leave it inside the tube during the plain rounds.
Fabric puckers around the leaves: You may be forgetting to skip the st behind each Leaf. Recount to 48.
Opening gapes or ruffles: Work exactly 9 sc on each side. Fewer sts pull the edge in, and more make it ruffle.
Holder is too short: Your rounds are too tight in height. Measure at Rnd 19 and add a navy round to the top band if needed.
Tab curls forward: Block it flat under pins. If it still curls, work a sl st edge along the back.
Care
Hand wash in cool water with mild soap, roll it in a towel to remove the water, and dry it flat over a rolled towel. Keep it out of the dryer, because heat can flatten the raised leaves.
Final Notes
Each measurement builds on the one before it. The base sets 48 sts = 12 in (30.5 cm) around, which gives a flat width of 6 in (15.2 cm). The lower band reaches 3.3 in (8.4 cm). The leaf section brings the body to 12.6 in (32.0 cm), and the top band takes it to 13.5 in (34.3 cm). The rim finishes the body at 14 in (35.6 cm), and the tab and loop add 4.5 in (11.4 cm). If your base matches gauge, every later checkpoint should match too.
Happy crocheting!