

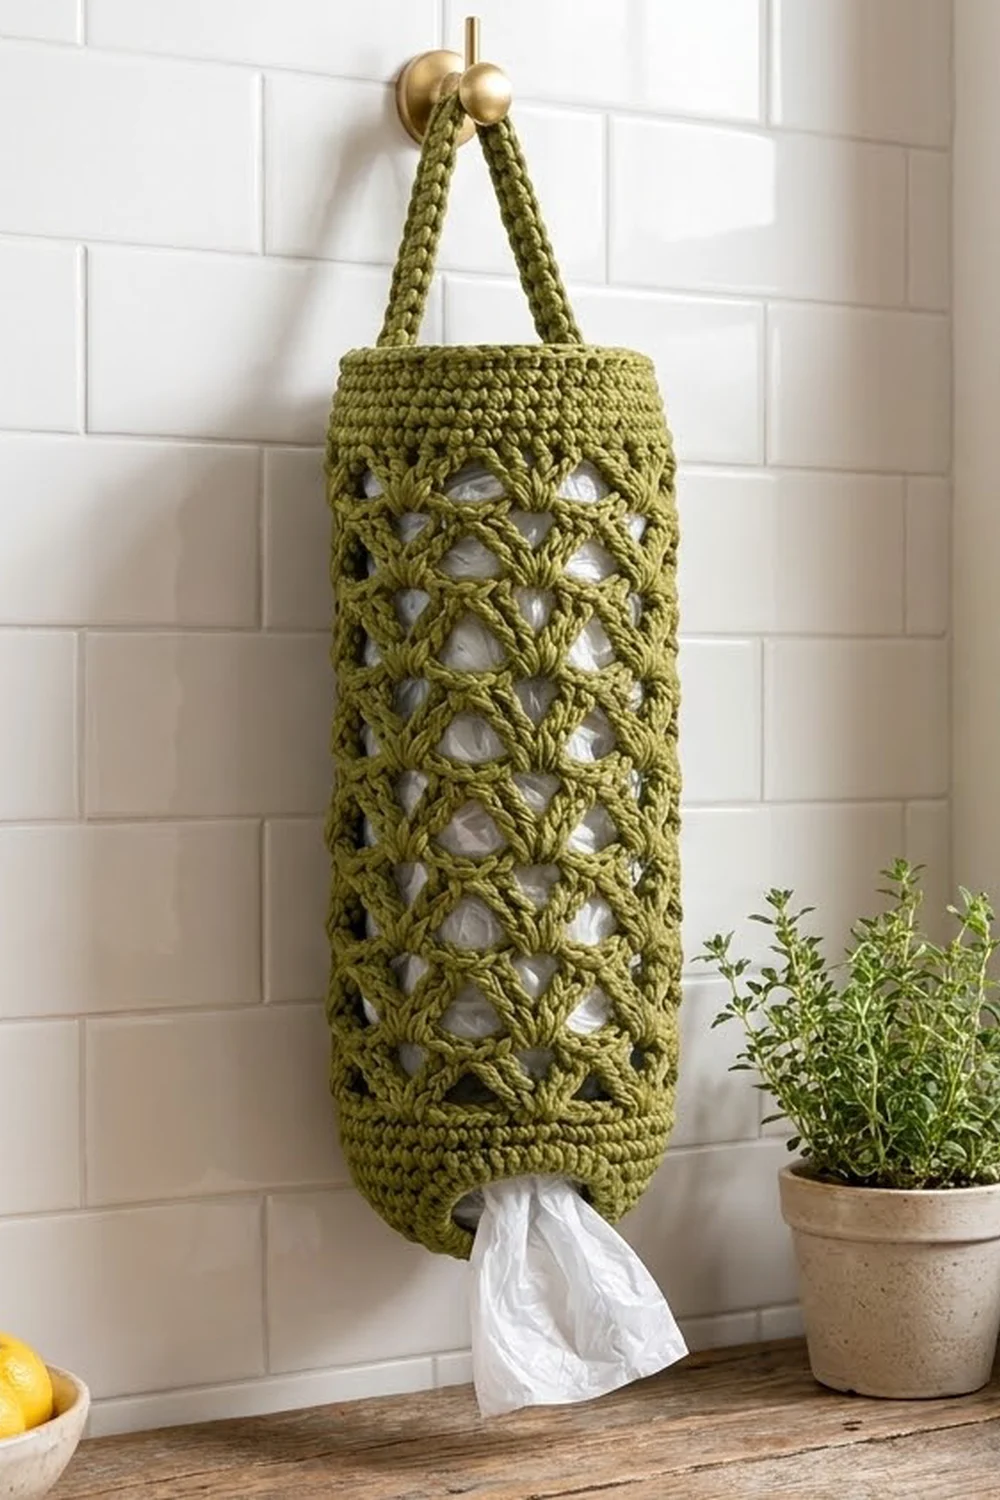
This holder turns a messy pile of grocery bags into something you’ll be glad to see on the kitchen wall. It’s a tall, slim tube with an open diamond lattice. You stuff bags in at the top and pull them out one at a time through a small opening at the bottom.
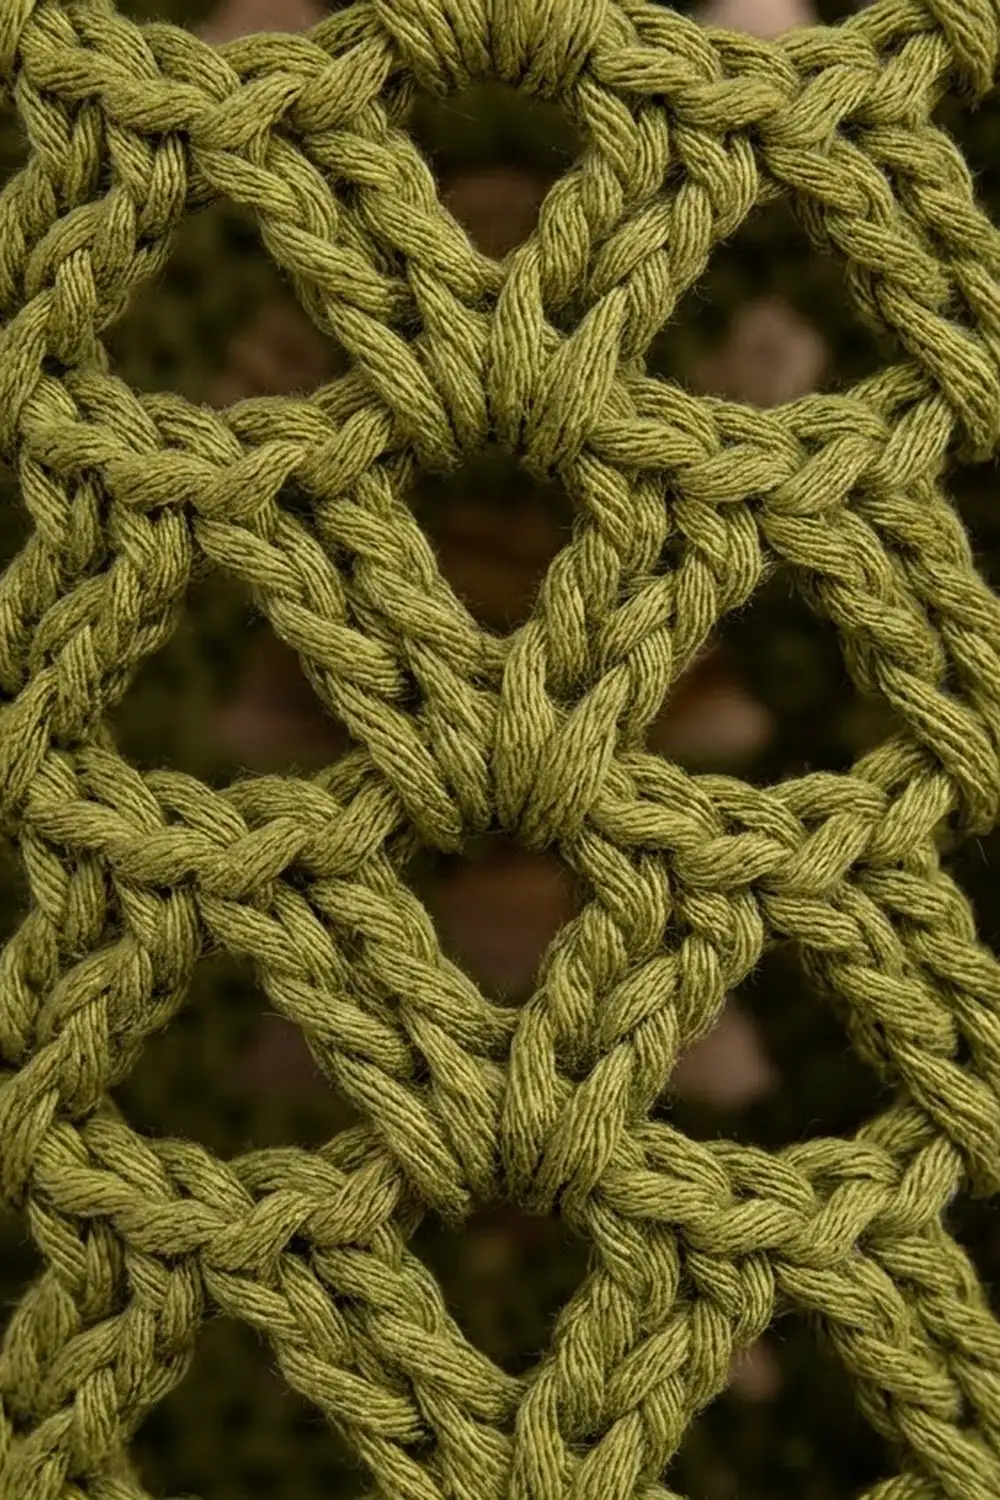
The sample is worked in a warm olive green, and the same pattern looks just as good in mustard yellow. The lattice is made from small fans of double crochet that open upward, linked by chain arcs. Each round of fans sits halfway between the fans below it, so the fabric forms neat diamonds that let you see how many bags are left.
The pattern uses US crochet terms. The finished holder measures 6 in (15.2 cm) wide laid flat and 18 in (45.7 cm) tall. The hanging loop adds about 4 in (10.2 cm), so the total hanging height is about 22 in (55.9 cm).
The holder is made in one piece. You start at the bottom opening and work a solid single crochet band upward, increasing to full width. Then you work the fan lattice, a solid top band, and the strap, which you attach to the opposite side of the rim. A quick slip stitch edging firms up the strap and the opening.
Finished Size and Construction
- Finished size: 6 in (15.2 cm) wide laid flat × 18 in (45.7 cm) tall, plus a loop about 4 in (10.2 cm) high
- Circumference: 12 in (30.5 cm)
- Bottom opening: 8 in (20.3 cm) around, about 2.5 in (6.4 cm) across
- Skill level: Easy-intermediate
- Terminology: US
- Yarn weight: Worsted (#4)
- Hook: 5.0 mm (H-8)
- Number of pieces: 1 (body and strap are worked as one continuous piece)
- Layout: Vertical tube, worked in joined rounds from the bottom up
- Body size before edging: 6 in × 18 in (15.2 × 45.7 cm)
- Edging depth: 1 slip stitch row, which adds less than 0.125 in (0.3 cm)
Materials
Yarn: Use a worsted-weight cotton or cotton blend. Cotton holds the lattice open and won’t stretch out of shape as the holder fills with bags. Avoid very soft acrylic, because the tube will sag lengthwise.
- Olive green: 140 g / about 240 m (262 yd)
- Optional mustard colorway: use the same amount in place of the green
These quantities include a margin of about 15%.
Tools:
– 5.0 mm (H-8) crochet hook
– Yarn needle
– 2 stitch markers
– Scissors
– Measuring tape
– Rust-proof pins and a cardboard tube or rolled towel for blocking
Abbreviations (US Terms)
- ch – chain
- sl st – slip stitch
- sc – single crochet
- 2 sc – 2 single crochet in the same stitch (increase)
- dc – double crochet
- sk – skip
- sp – space
- st(s) – stitch(es)
- rnd(s) – round(s)
- rep – repeat
Special stitch – Fan: Work 5 dc into the same stitch. The fan is narrow at its base and spreads upward into a fan shape.
Gauge and Checkpoints
Gauge: 16 sc and 18 sc rnds = 4 in (10.2 cm). One lattice repeat (1 fan rnd + 1 arc rnd) = about 1 in (2.5 cm) tall.
Test the first part of the piece: Instead of a separate swatch, work Rnds 1–8 and measure them. This bottom band is your gauge piece.
Checkpoints:
1. After Rnd 1: The foundation ring measures 8 in (20.3 cm) around.
2. After Rnd 8: The band measures 6 in (15.2 cm) laid flat (12 in / 30.5 cm around) and 1.75 in (4.4 cm) tall.
3. After Rnd 17 (4 lattice repeats): The piece measures about 6 in (15.2 cm) tall from the start.
4. After Rnd 37: The lattice section measures about 14.5 in (36.8 cm) tall.
5. After Rnd 45: The body measures 18 in (45.7 cm) tall.
If your piece is too big: Go down one hook size (to 4.5 mm) and start again. Don’t drop stitches, because the lattice needs exactly 48 stitches.
If your piece is too small: Go up one hook size (to 5.5 mm).
If your height is off but your width is right: Add or remove one lattice repeat. Each repeat changes the height by about 1 in (2.5 cm).
Body
Work in joined rounds with the right side always facing you. Don’t turn. The ch 1 at the start of a round never counts as a stitch.
Bottom Band
Rnd 1: Ch 32 and join with a sl st to the first ch to form a ring, taking care not to twist the chain. Ch 1, then sc in each ch around. Join with a sl st to the first sc. (32 sts)
Rnd 2: Ch 1, sc in each st around, join. (32 sts)
Rnd 3: Ch 1, sc in next 3 sts, 2 sc in next st; rep from * 7 more times, join. (40 sts)*
Rnd 4: Ch 1, sc in each st around, join. (40 sts)
Rnd 5: Ch 1, sc in next 4 sts, 2 sc in next st; rep from * 7 more times, join. (48 sts)*
Rnds 6–8: Ch 1, sc in each st around, join. (48 sts in each round)
The two increase rounds create the gentle taper at the bottom. Place a marker in the first stitch of Rnd 8 to mark where each round starts.
Lattice
The lattice repeat is 6 stitches wide, so 48 ÷ 6 = 8 repeats around the tube.
Rnd 9 (first arc rnd): Ch 1, sc in the same st as the join. Ch 5, sk 5 sts, sc in next st; rep from * 6 more times. Ch 5, sk the last 5 sts, then join to the first sc. (8 sc + 8 ch-5 arcs = 48 sts)*
Rnd 10 (fan rnd): Sl st in the next 3 ch to reach the center of the first arc. Ch 1, sc in the arc. Work a Fan (5 dc) in the next sc. Sc in the next arc, Fan in the next sc; rep from * 6 more times. Join to the first sc. (8 sc + 40 dc = 48 sts)*
Rnd 11 (arc rnd): Ch 1, sc in the same sc as the join. Ch 5, sk the 5 dc of the next fan, sc in the next sc; rep from * 6 more times. Ch 5, sk the last fan, then join to the first sc. (8 sc + 8 ch-5 arcs = 48 sts)*
The stitch positions shift naturally from round to round:
– In Rnd 10, the fans grow from the sc of Rnd 9, and the new sc sit in the centers of the arcs.
– In Rnd 11, the sc land on those arc-center stitches.
– So the fans in the next fan round sit halfway between the fans below them.
This half-repeat offset is what forms the diamond lattice.
Rnds 12–37: Repeat Rnds 10–11 thirteen more times, for 14 lattice repeats in total. Rnd 37 is an arc rnd. (48 sts at the end of every round)
Checkpoint: The lattice measures about 14.5 in (36.8 cm) from the top of Rnd 8, and the body is about 16.25 in (41.3 cm) tall in total.
Top Band
Rnd 38 (conversion rnd): Ch 1. Sc in the same sc as the join, then work 5 sc into the next ch-5 arc. Sc in the next sc, 5 sc in the next arc; rep from * 6 more times. Join.
Count: 8 sc worked one into each existing sc + 40 sc added into the arcs (5 × 8) = 48 sts*.
Rnds 39–45: Ch 1, sc in each st around, join. (48 sts in each round)
The top band is 8 rounds deep, which is 1.75 in (4.4 cm). It matches the bottom band, and the body now measures 18 in (45.7 cm). Don’t fasten off.
Hanging Strap
The strap is worked in rows straight off the rim. You’ll attach its far end to the opposite side of the rim.
Row 1: Ch 1, sc in the first 5 sts of Rnd 45. Turn. (5 sts)
Rows 2–45: Ch 1, sc in each st across, turn. (5 sts in each row)
The strap measures 10 in (25.4 cm) long and 1.25 in (3.2 cm) wide (5 sts at 4 sts per inch).
Attach the strap: The strap started on stitches 1–5 of Rnd 45. The stitches directly opposite are 1 + 24 = stitches 25–29 (48 ÷ 2 = 24). Count to them and mark them.
Make sure the strap isn’t twisted. Hold the last row of the strap against stitches 25–29 with the inside of the strap facing the inside of the tube. Then sl st through both layers, matching one strap stitch to one rim stitch, for 5 sl sts.
Once attached, the strap arches to about 4 in (10.2 cm) above the rim. Don’t fasten off.
Edging
Work the edging with the same hook and keep your tension relaxed.
Edging gauge: Work 1 sl st per stitch or row end, which is about 18 sl sts per 4 in (10.2 cm) along the strap edges.
Strap edging: Sl st into the end of each row along the first long edge of the strap, back to the rim. Then work along the rim to the other edge of the strap and sl st in each row end of the second edge. Join and fasten off.
– First long edge: 45 sl sts (1 per row)
– Second long edge: 45 sl sts (1 per row)
Why the math works: The strap has 45 rows, so each long edge has exactly 45 row ends. Working 1 sl st per row end adds no extra length or fullness, so the edge stays straight, just firmer and smoother. That gives the strap its rope-like edge.
Opening edging: Attach the yarn to the foundation chain at the bottom opening. Sl st in each foundation ch around (32 sl sts), join and fasten off.
This round matches the 32 sc of Rnd 1 one to one. It firms up the opening so it holds its round shape and dispenses one bag at a time.
Final Blocking
- Weave in all the ends along the inside of the solid bands.
- Soak the holder in cool water for 10 minutes, then gently press out the water. Don’t wring it.
- Roll it in a towel to remove the excess water.
- Slide a cardboard tube or a tightly rolled towel inside so that it measures 12 in (30.5 cm) around.
- Ease the body to 18 in (45.7 cm) tall. Line up the fans in straight columns and open each diamond evenly.
- Pin the strap flat at 10 in (25.4 cm) long.
- Let it dry completely before hanging.
Final Quality-Control Checklist
- [ ] The body measures 6 in (15.2 cm) laid flat and 18 in (45.7 cm) tall.
- [ ] Every lattice round has 48 sts (8 fans or 8 arcs).
- [ ] The fans are offset half a repeat from round to round, forming even diamonds.
- [ ] Both solid bands are 8 rounds deep, 1.75 in (4.4 cm).
- [ ] The strap is 5 sts wide and 45 rows long, attached to sts 25–29 without a twist.
- [ ] The opening is 8 in (20.3 cm) around and edged with 32 sl sts.
- [ ] All ends are woven in securely on the inside.
Troubleshooting
The fans stack straight up instead of forming diamonds: You probably worked the fans into the arcs. Work the fans into the sc and the sc into the arcs.
A lattice round has the wrong count: Count the fans or arcs. There should always be 8. Missing one usually means you skipped 4 or 6 stitches instead of 5.
The tube twists in a spiral: Join every round exactly in the first stitch, and don’t count the ch 1 as a stitch.
The bottom ruffles or puckers: Check that Rnds 3 and 5 have exactly 8 increases each.
The strap leans to one side: Re-count to stitches 25–29 and reattach the strap there.
The holder stretches too long when full: Switch to 100% cotton, or remove one lattice repeat.
Care
Hand wash in cool water and lay flat or over a tube to dry. Cotton can also go through a gentle machine wash inside a laundry bag. Reshape it while it’s damp.
Final Notes
Here’s how the measurements build on each other:
– The 32-chain ring gives an 8 in (20.3 cm) opening.
– Two increase rounds bring the tube to 48 stitches, which is 12 in (30.5 cm) around and 6 in (15.2 cm) laid flat.
– The 48 stitches divide into 8 lattice repeats of 6 stitches.
– 14 lattice repeats add 14.5 in (36.8 cm) of height.
– Two 1.75 in (4.4 cm) bands bring the body to 18 in (45.7 cm).
– A 45-row strap attached exactly opposite its starting point finishes the holder.
If your measurements match at each checkpoint, the finished holder will too. Happy crocheting!